manuals.online logo
Brands
  1. Home
  2. •
  3. Brands
  4. •
  5. ANZ
  6. •
  7. Payment Terminal
  8. •
  9. ANZ POS MOVE User manual

ANZ POS MOVE User manual

QUICK REFERENCE GUIDE
ANZ Merchant Services Support 1800 039 025
Credit Card Authorisation Centre 1800 999 205
Debit Card Authorisation Centre 1800 039 025
Stationery www.anz.com/merchantconnect or 1800 039 025
Linkly Support (Integrated) www.linkly.com.au or 02 9998 9800
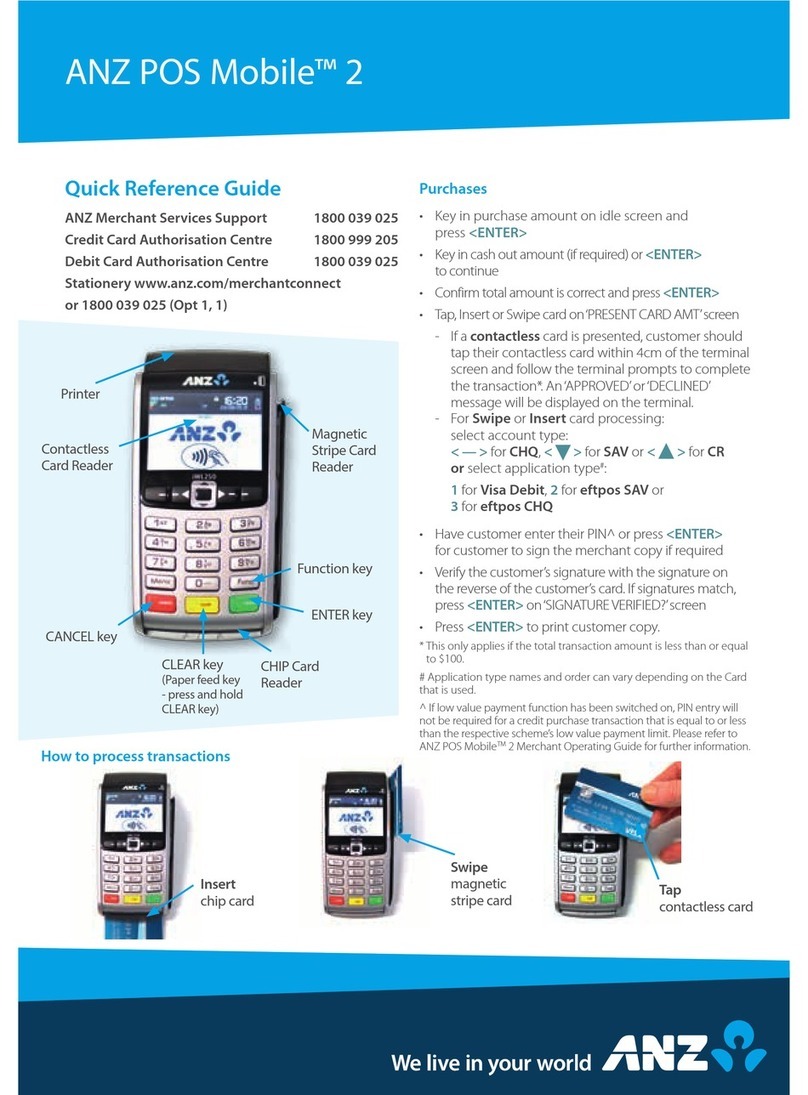
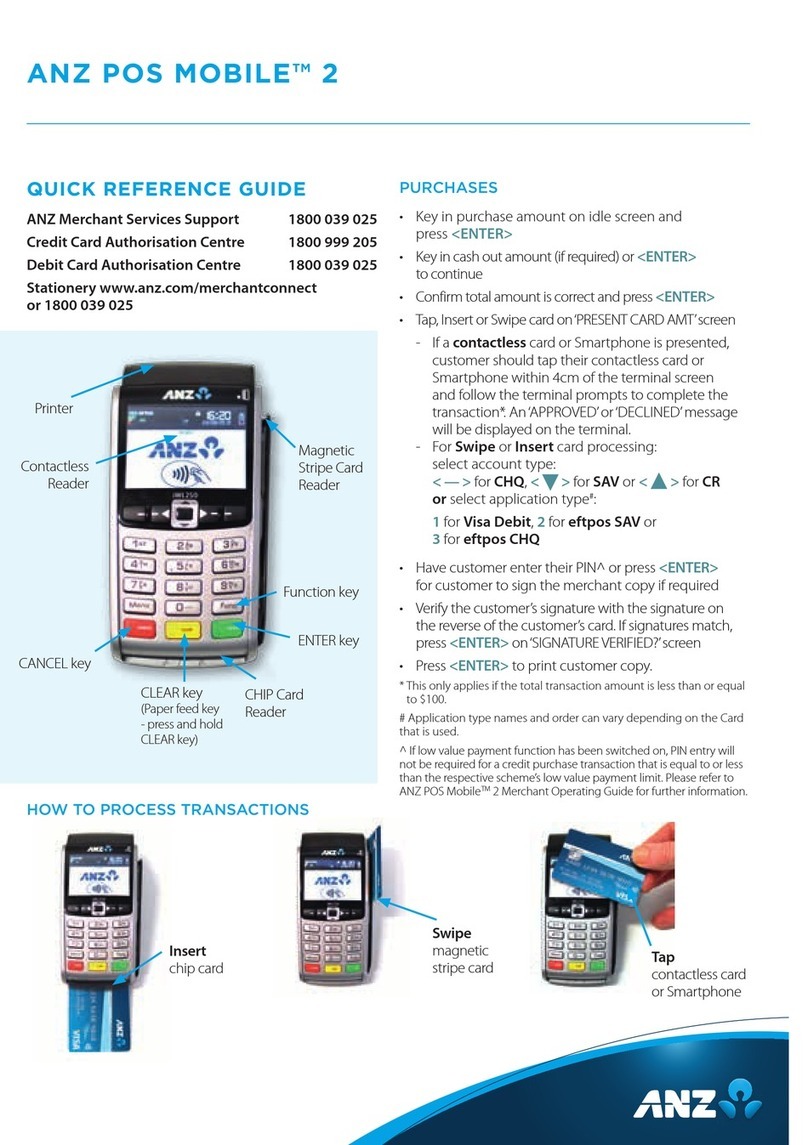
ANZ POS MOVE
Contactless
Reader
Printer
Magnetic
Stripe Reader
MENU
CANCEL
CLEAR
ENTER
Paper
Feed
Chip Card
Reader
Function
Key
NAVIGATING THE TERMINAL
• MENU: Press to enter the application menus
•F2: Scroll down through menu items
• F3: Scroll up through menu items
• CLEAR: Deletes entered numbers or letters
• CANCEL: Cancels transactions and returns
to idle screen
• ENTER: Confirm information that has been
typed into the terminal
BASIC FUNCTIONS
• POWER ON: Hold <ENTER> button for 3 seconds
• POWER OFF: Remove terminal from powered
base or direct power and hold down the
<FUNC> and <CLEAR> buttons together for
3seconds
• To wake up press <ENTER>
HOW TO PROCESS TRANSACTIONS
Insert
chip card
Swipe
magnetic
stripe card
Tap contactless card,
smartphone or
wearables
SALES
Standalone Integrated
Press <ENTER> if the
terminal is in ‘sleep mode’ to
bring up the idle screen
Initiate the
transaction via
Point of Sale
(POS) system
until the EFTPOS
screen displays
‘PRESENT CARD’
Key in sale amount
To process cash out, press
CASH on the terminal
touchscreen and key in the
cash out amount, otherwise
press <ENTER>.
Tap, Insert or Swipe card on ‘PRESENT CARD’
screen − For Swipe or Insert card processing
select account type
Have customer enter their PIN or press
<ENTER> for customer to sign the merchant
copy where required
Where required, verify the customer’s signature
with the signature on the reverse of the
customer’s card. If signatures match, press
<ENTER>
Press <ENTER> to print customer copy
REFUNDS
Standalone Integrated
Press & then select
TRANSACTION
Initiate the
transaction via
Point of Sale
(POS) system
until the EFTPOS
screen displays
‘PRESENT CARD’
Select REFUND
Enter refund amount then
press <ENTER>
Type Merchant Password
then press <ENTER>
Tap, Insert or Swipe card on ‘PRESENT CARD’
screen − For Swipe or Insert card processing
select account type
Have customer enter their PIN or press
<ENTER> for customer to sign the merchant
copy where required
Where required, verify the customer’s signature
with the signature on the reverse of the
customer’s card. If signatures match, press
<ENTER>
Press <ENTER> to print customer copy
MERCHANT PASSWORD
The Merchant Password is used to process Refunds,
Mail Order Telephone Order (MOTO) and Handkey
transactions on ANZ POS Move Standalone devices
and can be changed by following the below steps.
Changing a Merchant Password
• Press <FUNC> 90 and then press <ENTER>
• Terminal displays a list of options to set the
password. Selecting REFUND will allow you to
set the password for refunds and selecting KEY
ENTRY will allow you to set the password for
Hand Key/MOTO. For further information about
passwords, please refer to your Merchant
Operating Guide.
• Press the F2 and F3 touchscreen buttons to scroll
to REFUND or KEY ENTRY and press ENTER to
change the password
• Type in existing 4-digit password and press
<ENTER>
• Type in new 4-digit password and press <ENTER>
• Verify password by re-entering and press <ENTER>
SETTLEMENT
ANZ offers same day settlement, every day. For
ANZ business account holders, funds are available
on the same day for transactions settled before
9.00pm (Melbourne time). For non-ANZ business
account holders, ANZ transfers the funds to the
merchant’s bank on the following business day
and the availability of the funds will be
determined by the merchant’s bank.
• Press & then select BATCH
• Select SETTLE
- Select SUMMARY TOTALS for a settlement
report which shows the Sales, Cashout,
Refund and Totals (excluding AMEX & Diners)
- Select SUB TOTALS to print a settlement
report which shows a breakdown of all cards
accepted (including AMEX & Diners)
Note: The above steps only apply to standalone. To process
settlement on an integrated device you will need to initiate it
via your Point of Sale (POS) system.
PRINT LAST SETTLEMENT
• Press & then BATCH
• Select LAST SETTLEMENT to print last
settlement report
Note: The above steps only apply to standalone. To print
settlement reports on an integrated device you will need to
initiate it via your Point of Sale (POS) system.
PRINT PRE-SETTLEMENT REPORT
• Press & then BATCH
• Select TOTALS
- Select SUMMARY TOTALS for a settlement
report which shows the Sales, Cashout,
Refund and Totals (excluding AMEX & Diners)
- Select SUB TOTALS to print a settlement
report which shows a breakdown of all cards
accepted (including AMEX & Diners)
Note: The above steps only apply to standalone. To print
settlement reports on an integrated device you will need to
initiate it via your Point of Sale (POS) system.
PRINT LAST TRANSACTION –
COPY
• Press & then PRINT
• Select TRANSACTIONS
• Select LAST
Note: The above steps only apply to standalone. To print a last
transaction receipt on an integrated device you will need to
initiate it via your Point of Sale (POS) system.
CHARGING THE TERMINAL
B AT T E RY
• Place the terminal on the base by securely
connecting the terminal to the docking
connector on the base
• The terminal should display in the upper
right corner of the terminal screen
• Connect the other end of base power supply to
the main power outlet on the wall
• Check that the charging symbol has been
added to the power icon displayed on the
upper right corner of the terminal screen. This
will indicate that the terminal is connected into
the power outlet and amount of charge held in
the battery.
HOW TO LOAD PRINTER PAPER
A red line will appear on the paper, indicating that
the paper roll must be replaced. To re-load a
newroll:
• Open the paper compartment by lifting the
catch located at the rear of the terminal below
the contactless symbol and pull the cover
towards the rear of the terminal
• Insert the paper roll (diameter 40mm) in the
compartment
• Pull the paper up to the top of the terminal and
hold in position
• Maintain the paper roll position and press the
lid closed until it clips into position
Note: Ensure paper roll is always loaded in the terminal for the
terminal to function.
HOW TO CONNECT TO A WIFI
NETWORK
To connect to a WiFi network please follow the
steps below:
• Press <FUNC> 6 and <ENTER>
• Press <F2> (scroll down) or <F3> (scroll up) to
select WiFi and then press <ENTER>
• The terminal will return to idle screen
• Press & select TERMINAL
• Select OTHERS
• Select SETTINGS
• Select WiFi
• Using the touchscreen press the Enable icon
• Press the Scan Networks icon
• The terminal will display ‘Scanning’ before
displaying a list of the available WiFi networks
• Select the WiFi network you wish to connect to
by using the touchscreen
• Type in the WiFi password using the
touchscreen and then press <ENTER>
• The terminal will briefly display ‘New Profile OK’
• Press <CANCEL> to return to the main screen
• The WiFi symbol at the top of the terminal
should turn from white to green indicating that it
has successfully connected to the WiFi network
Australia and New Zealand Banking Group Limited (ANZ) ABN 11 005 357 522.
Item No. 97390 03.2021 WZ103048
anz.com
TERMINAL FAULTS – SELF-HELP
If your terminal isexperiencing technical issues:
Blank Screen / Stuck Screen
1. Place terminal on charging base and hold down
<FUNC> + <CLEAR>. The terminal will power
down and reboot
2. Press <FUNC> 110 then <ENTER> ‘Logon
Approved’ should display on the terminal.
If unsuccessful please contact ANZ Merchant
Services on 1800 039 025 for further assistance.
No/Weak Signal Strength
1. Place terminal on charging base and hold down
<FUNC> + <CLEAR>. The terminal will power
down and reboot.
2. Press <FUNC> 110 and <ENTER> ’Logon
Approved’ should display on the terminal.
If unsuccessful, please contact ANZ Merchant
Services on 1800 039 025 for further assistance.
Note: When terminal is not connected to the base, it can
be switched o by pressing and holding the <FUNC> and
<CLEAR> keys together. To turn on press the <ENTER> key.
TERMINAL SECURITY
Please ensure that the terminal is placed in a
secure location enabling the cardholder to use
the keypad without being observed by security
cameras, CCTV devices or by any other person.
Only authorised ANZ employees are permitted to
install or perform maintenance of your terminal.
ANZ CONTACTLESS
PAY M E N TS
A GREAT PAYMENT EXPERIENCE
FOR YOUR CUSTOMERS
Contactless payments are becoming more and
more popular. With the phone at the center of
everyday life, tap to pay mobile payments are fast
becoming another convenient way for customers
to pay.
Mobile payments work the same way as
contactless cards for customer payments across
all contactless terminals. Customers simply add
their eligible cards to their compatible devices
and then use it to tap and pay.
THINGS YOU AND YOUR STAFF
NEED TO KNOW
Below are some steps you can follow to ensure
your staff and customers have a seamless
payment experience:
• Ensure your terminal is easily accessible to
customers.
• Always let the customer present their card or
smart device as they may need to hold the
device to authenticate transactions.
• Initially, customers may take a little longer with
their payment transactions as they find the
‘sweet spot’ with their device.
• For transactions over $100, customers may be
prompted to enter their PIN into the terminal.
Always follow the terminal prompts when
processing transactions.
If you’re not already accepting contactless
payments, contact us on 1800 086 325 to find out
more on how we can upgrade your device today.
SCENARIOS YOU MIGHT
ENCOUNTER
Contactless payments can be made using a range
of products in market:
• Plastic Cards
• Smart Phones
• Wearables
Mobile payments give you and your customers
the processing speed of contactless transactions.

Other manuals for POS MOVE

2

Other ANZ Payment Terminal manuals

ANZ Worldline Move 5000 User manual

ANZ

ANZ Worldline Move 5000 User manual

ANZ Worldline Move 5000 User manual

ANZ

ANZ Worldline Move 5000 User manual

ANZ POS Turbo Plus User manual

ANZ

ANZ POS Turbo Plus User manual

ANZ POS MOVE User manual

ANZ

ANZ POS MOVE User manual

ANZ TURBO User manual

ANZ

ANZ TURBO User manual

ANZ POS Turbo 2 User manual

ANZ

ANZ POS Turbo 2 User manual

ANZ POS PLUS User manual

ANZ

ANZ POS PLUS User manual

ANZ POS Mobile 2 User manual

ANZ

ANZ POS Mobile 2 User manual

ANZ HealthPay User manual

ANZ

ANZ HealthPay User manual

ANZ pos turbo plus User manual

ANZ

ANZ pos turbo plus User manual

ANZ POS Plus 2 User manual

ANZ

ANZ POS Plus 2 User manual

ANZ POS MOBILE2 User manual

ANZ

ANZ POS MOBILE2 User manual

ANZ multiPOS Turbo User manual

ANZ

ANZ multiPOS Turbo User manual

ANZ POS PLUS Instruction sheet

ANZ

ANZ POS PLUS Instruction sheet

ANZ Medicare Easyclaim User manual

ANZ

ANZ Medicare Easyclaim User manual

Popular Payment Terminal manuals by other brands

VeriFone HICAPS VX820 user guide

VeriFone

VeriFone HICAPS VX820 user guide

NBS Technologies NORE 710 user guide

NBS Technologies

NBS Technologies NORE 710 user guide

EHRLE CarWash-Key quick start guide

EHRLE

EHRLE CarWash-Key quick start guide

Sagem Monetel EFTsmart installation manual

Sagem Monetel

Sagem Monetel EFTsmart installation manual

Ingenico PAYZONE iCT250 Quick reference guide

Ingenico

Ingenico PAYZONE iCT250 Quick reference guide

PAX S920 reference guide

PAX

PAX S920 reference guide

Ingenico iWL2 Series user guide

Ingenico

Ingenico iWL2 Series user guide

IDTECH ViVOpay VP6800 user manual

IDTECH

IDTECH ViVOpay VP6800 user manual

VeriFone DUET Vx810 reference guide

VeriFone

VeriFone DUET Vx810 reference guide

Ingenico AXIUM EX6000 user guide

Ingenico

Ingenico AXIUM EX6000 user guide

VeriFone HICAPS VX680 quick guide

VeriFone

VeriFone HICAPS VX680 quick guide

Gilbarco Veeder-Root Encore S Enhanced FlexPay EMV... Start-up/Service Manual

Gilbarco

Gilbarco Veeder-Root Encore S Enhanced FlexPay EMV... Start-up/Service Manual

Ingenico IngePay Quick setup

Ingenico

Ingenico IngePay Quick setup

WESTPAY Carbon Series quick start guide

WESTPAY

WESTPAY Carbon Series quick start guide

VeriFone V660p installation guide

VeriFone

VeriFone V660p installation guide

LAKS Key2Pay MINI user manual

LAKS

LAKS Key2Pay MINI user manual

Hypercom epic T7 Plus installation guide

Hypercom

Hypercom epic T7 Plus installation guide

New Pos Technology NEW 8210 product manual

New Pos Technology

New Pos Technology NEW 8210 product manual

manuals.online logo
manuals.online logoBrands
  • About & Mission
  • Contact us
  • Privacy Policy
  • Terms and Conditions

Copyright 2025 Manuals.Online. All Rights Reserved.