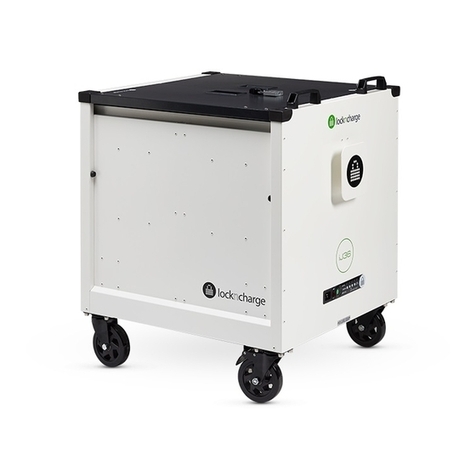
PC Locs LocknCharge EVO 40 Series User manual

EVO 40 Cart™
USER INSTRUCTIONS
ENG
TRK
ESP
PRT
FRA
DEU
ITA
www.pclocs.com.au www.lockncharge.com

EVO 40 Cart™
Congratulaons on your purchase.
Follow these instrucons for easy and fast set-up of your EVO 40 Cart.
PC Locs, LocknCharge and the Padlock device are Trademarks of IWS Global Pty Ltd.
Copyright IWS Global Pty Ltd, May 2014.
Disclaimer.
This informaon is the intellectual property of IWS Global Pty Ltd and may not be distributed, duplicated
or copied in part or full without the wrien permission. Since the use of this informaon, the equipment
connected and the condions by which any IWS Global product is used is beyond the control of IWS Global,
it is the obligaon of the owner and/or user to determine the correct and safe use of any equipment and
product. To the extent that the law permits, any liability which may be incurred as a result of the use or
future use of a product manufactured or sold by IWS Global is limited to the cost of repairing or replacing the
failed product or component at the discreon of IWS Global either within, or outside of warranty periods,
and does not extend to any loss or damage which may be caused as a consequence of misuse or failure of
the equipment or product or the informaon contained herein. IWS Global shall not in any event be liable for
economic loss of prots, indirect, special, bodily injuries or consequenal damages.

INSTRUCTION MANUAL
STEP 1 - Opening the EVO 40 Cart top lid.
Unlock the top lid via the cam lock. Remove the lockable top lid.
STEP 2 - Opening the EVO 40 Cart side storage compartments.
Unlock the locks on the side compartments.

EVO 40 Cart™
STEP 1 - Installing the Charge Tray.
Insert the charging tray into the top compartment
of the Cart. Ensure the tray ts under the ‘lip’.
STEP 2 - Securing the tray.
Secure the tray with the quarter-turn fasteners.
Secon A - Seng up the Charge tray
(Note: for set-up of a Sync Charge tray, go to Secon B - Seng up the Sync Charge tray).
STEP 3 - Aaching the device adaptors and cables.
Load all the devices into the baskets.
Insert the baskets into the lng compartments.
Fasten the tray in 6 locaons.
Aach each of the device chargers/ adaptors to
the sockets on the power boards (note: power
board may look dierent).

INSTRUCTION MANUAL
Aach the USB cable to the adaptor
(if applicable)
. Insert the cables into the grommet holes.
Secure the cables in the ‘S’ clip.
(maximum of 2 cables per clip).Pull through enough cable for your device.
STEP 4 - Connecng the power.
Connect the external cord to the Cart. Plug the other end of the cable into a wall socket.

EVO 40 Cart™
STEP 5 - Using the ECO Safe Charge unit.
(Follow the supplied instrucons for operang the ECO Safe Charge unit).
Use the remote control to operate the
ECO Safe Charge unit. Reset switch. Status indicators.
Wrap the cord around the cable cleat
when it is not in use.
STEP 6 - Gently close and lock the compartments.
Charging can proceed while the devices are connected and locked inside the compartments.
(Please proceed to Secon C - Seng up the Security Chain Kit).

INSTRUCTION MANUAL
STEP 1 - Installing the Sync Charge Tray.
Insert the Sync Charge tray in the
top compartment of the Cart. Ensure the tray ts under the ‘lip’.
STEP 2 - Securing the tray.
Secure the tray with the quarter-turn fasteners.
Secon B - Seng up the Sync Charge tray
(Note: for set-up of a Sync Charge tray, go to Secon B - Seng up the Sync Charge tray).
STEP 3 - Aaching the device cables.
Load all the devices into the baskets.
Insert the baskets into the lng compartments.
Fasten the tray in 6 locaons.
Connect the device cables to the
iQ 16 Sync Charge Boxes.

EVO 40 Cart™
STEP 4 - Roung the cables.
Insert the USB cables through the grommet
holes. Secure the cables in the ‘S’ clip (2 per clip). Pull through enough cable for your devices.
STEP 5 - Connecng the power.
Ensure the iQ 16 Sync Charge Boxes are switched
on. Connect the external power cord to the Cart. Plug the other end of the cable into a wall socket.
STEP 6 - Syncing devices.
(Follow the supplied instrucons with the iQ 16 Sync Charge Box for the operaon of syncing and charging).
Connect the host computer to the sync ports
outside the cart using the 3 host port cables.
Neatly wrap the cord around the cable cleat
when it is not in use.
STEP 7 - Gently close and lock the compartments.
Syncing or charging can proceed while the devices are connected and locked inside the compartments.

INSTRUCTION MANUAL
Tools required:
• Masonry hammer-drill
• 10mm masonry drill bit
• Pencil and ruler/tape
• Hammer
• 13mm and 17mm spanners
The Security Chain Kit contains the following:
• 1 x 3 holed Anchor Plate and security chain
• 3 x 55mm long, 8mm Anchor Bolts
• 3 x Shear Nuts and washers
• 1 x Lock and key set
Secon C - Seng up the Security Chain Kit.
Move the Trolley to where you intend to store and secure it. It is best if the Floor Plate is as close as possible
to a wall to reduce the hazard of tripping and injury.
Aach the end of the chain to the steel loop with the padlock and posion the plate end in the desired
posion on the oor.
(NOTE: If mounng on carpet you will need to cut out the carpet from the area where the oor plate
aaches, otherwise the carpet will wrap around the drill when drilling).
Mark the center of each of the
3 holes, using the oor plate as
a guide.
Drill a 10mm hole through each
of the 3 marked centers to a
depth of 50mm.
Insert the anchor bolts with nut
aached into the holes through
the oor plate. Using the 13 mm
spanner, progressively ghten
down each of these anchor nuts
so that all three bolts are rmly
anchored into the concrete.
Now undo each of the three nuts, and in their
place thread on the three silver shear-nuts.
Ensure that the ‘cone’ is down and the hexagonal
nut is up. Using the 17mm spanner ghten down
the three shear nuts unl the hexagonal ‘head’
shears o, leaving just the cone ‘base’.
Aach the security chain through the steel
loop under the side of the trolley using the
padlock.

EVO 40 Cart™
Troubleshoong
1. If no lights are illuminated with the iQ 16 Sync Charge Box is switched ON, check that the power cable
is fully inserted into the iQ 16 Sync Charge Box socket and the other end is fully inserted into the mains
power socket and the mains power switch is ON.
2. To check the iQ 16 Sync Charge Box is operang correctly, switch the iQ 16 Sync Charge Box OFF. Remove
all connected USB cables and switch back ON again. Both the Charge light and the Sync light should
inially illuminate but the Sync light will exnguish aer a short delay. This is normal operaon.
3. If the iQ 16 Sync Charge Box is operang normally but the devices cannot be charged, check the USB
cables connecng to the devices are of the correct type and quality and not damaged.
4. If the iQ 16 Sync Charge Box is operang normally but the devices cannot be synchronized, check the
USB cables connecng to the devices are of the correct type and quality and not damaged.
5. Any other issues relang to synchronizaon problems should be referred to your IT department or
provider of synchronizaon soware.
Warranty
PC Locs/LocknCharge warrants the product to be free of defects in design, materials, assembly and crasmanship
for a period of twelve months from the date of purchase to the original retail purchaser. Evidence of original
purchase will be required to obtain warranty service.
In the event that a defect, malfuncon or failure occurs or is discovered during the warranty period,
PC Locs/LocknCharge will repair or replace, at its opon, the products which in the reasonable judgment of PC
Locs/LocknCharge are deemed defecve. All transportaon costs shall be borne by the owner and the risk of
loss shall be upon the party iniang the transportaon.
The warranty does not apply to any product that has been subject to misuse, tampering, neglect, or accident or as
a result of unauthorized alteraons or repairs to the product. The warranty is in lieu of all warranes expressed or
implied, including the implied warranes of merchantability and tness for a parcular purpose which are expressly
excluded or disclaimed. In no event will PC Locs/LocknCharge, their directors, ocers, employees, or agents be
liable for any harm, consequenal, incidental, third party, special or indirect damages whatsoever arising out of the
use or inability to use the products even if PC Locs/LocknCharge has been advised of the possibility of such damages.
PC Locs/LocknCharge obligaon is strictly and exclusively limited to the replacement or repair of any defecve
products. Some states do not allow the exclusion or limitaon of incidental or consequenal damages, so the
above limitaon or exclusion may not apply to you.

INSTRUCTION MANUAL
Compliances and Approvals
USA | CANADA:
Conforms to UL60950-1

www.pclocs.com.au www.lockncharge.com

EVO 40 Cart™
BEDIENUNGSANLEITUNG
ENG
TRK
ESP
PRT
FRA
DEU
ITA
www.pclocs.com.au www.lockncharge.com

EVO 40 Cart™
Herzlichen Glückwunsch zu Ihrem Kauf.
Folgen Sie diesen Anweisungen für eine einfache und zügige Inbetriebnahme.
PC Locs, LocknCharge und die Padlock-Vorrichtung sind Marken der IWS Global Pty Ltd. Copyright
IWS Global Pty Ltd, Mai 2014.
Haungsausschluss
Diese Informaonen sind geisges Eigentum von IWS Global Pty Ltd. Sie dürfen ohne vorherige schriliche
Genehmigung weder teilweise noch vollständig verteilt, reproduziert oder kopiert werden. Da die Nutzung
dieser Informaonen, die angeschlossenen Geräte und die Einsatzbedingungen für IWS Global-Produkte
sich außerhalb der Kontrolle von IWS Global benden, obliegt die richge und sichere Nutzung aller Geräte
und Produkte der Verantwortung der jeweiligen Eigentümer bzw. Anwender. Innerhalb der gesetzlichen
Vorschrien ist jede Haung als Folge des Gebrauchs oder des späteren Gebrauchs eines Produkts, das durch
IWS Global hergestellt oder verkau wurde, begrenzt auf die Kosten der Reparatur oder des Austausches
des fehlerhaen Produkts oder einer fehlerhaen Komponente im Ermessen von IWS Global innerhalb
oder außerhalb der Garanezeit. Eine Haung für eventuelle Verluste oder Schäden infolge unsachgemäßer
Handhabung oder eventueller Fehler von Geräten, Produkten oder hier gegebenen Informaonen ist
ausgeschlossen. IWS Global haet in keinem Fall für wirtschaliche Verluste durch entgangene Gewinne,
indirekte oder spezielle Körperverletzungen oder Folgeschäden.

BEDIENUNGSANLEITUNG
SCHRITT 1: EVO 40 Cart-Gehäusedeckel önen
Schließen Sie das Hebelschloss des
Gehäusedeckels auf. Enernen Sie den abschließbaren Gehäusedeckel.
SCHRITT 2: EVO 40 Cart-Seitenfächer önen
Schließen Sie die Schlösser der Seitenfächer auf.

EVO 40 Cart™
SCHRITT 1: Ladeeinsatz installieren
Legen Sie den Ladeeinsatz in das oberste Fach des
Carts.
Vergewissern Sie sich, dass der Einsatz unter die
„Lippe“ passt.
SCHRITT 2: Einsatz sichern
Sichern Sie den Einsatz mit den
Bajoneverschlüssen.
Abschni A - Ladeeinsatz einrichten
(Hinweis: Für die Einrichtung eines Sync-Ladeeinsatzes lesen Sie Abschni B: Sync-Ladeeinsatz einrichten)
SCHRITT 3: Geräteadapter und Kabel anbringen
Setzen Sie alle Geräte in die Körbe.
Setzen Sie alle Körbe in die Kippfächer.
Befesgen Sie den Einsatz an 6 Posionen.
Verbinden Sie alle Geräte-Ladeadapter mit den
Buchsen der Netzbaugruppen. (Hinweis: Die
Form kann von der Abbildung abweichen.)

BEDIENUNGSANLEITUNG
Verbinden Sie das USB-Kabel mit dem Adapter
(falls vorhanden)
.Verlegen Sie die Kabel durch die Durchführungen.
Sichern Sie die Kabel in den „S“-Klammern.
(maximal 2 Kabel pro Klammer)
Ziehen Sie eine ausreichende Kabellänge für Ihr
Gerät durch.
SCHRITT 4: Stromversorgung anschließen
Stecken Sie das externe Netzkabel in den Cart.
Stecken Sie das andere Kabelende in eine
Wandsteckdose.

EVO 40 Cart™
SCHRITT 5: ECO Safe Charge-Einheit einsetzen
(Lesen Sie die mitgelieferten Anweisungen zum Betrieb der ECO Safe Charge-Einheit.)
Verwenden Sie die Fernbedienung zur Steuerung
der ECO Safe Charge-Einheit. Reset-Schalter Statusanzeigen
Bei Nichtbenutzung wickeln Sie das Kabel um die
Kabelklemme.
SCHRITT 6: Fächer san schließen und abschließen
Das Auaden der angeschlossenen Geräte kann bei verschlossenen Fächern erfolgen.
(Bie bei Abschni C fortsetzen: Sicherheitskeensatz installieren)

BEDIENUNGSANLEITUNG
SCHRITT 1: Sync-Ladeeinsatz installieren
Setzen Sie den Sync-Ladeeinsatz in das oberste
Fach des Carts.
Vergewissern Sie sich, dass der Einsatz unter die
„Lippe“ passt.
SCHRITT 2: Einsatz sichern
Sichern Sie den Einsatz mit den
Bajoneverschlüssen.
Abschni B - Sync-Landeeinsatz einrichten
(Hinweis: Für die Einrichtung eines einfachen Ladeeinsatzes lesen Sie Abschni A: Ladeeinsatz einrichten)
SCHRITT 3: Gerätekabel anbringen
Setzen Sie alle Geräte in die Körbe.
Setzen Sie alle Körbe in die Kippfächer.
Befesgen Sie den Einsatz an 6 Posionen.
Verbinden Sie die Gerätekabel mit den
iQ 16 Sync Charge Boxen.

EVO 40 Cart™
SCHRITT 4: Kabel verlegen
Verlegen Sie die Kabel durch die Durchführungen.
Sichern Sie die Kabel in den „S“-Klammern (2 pro
Klammer).
Ziehen Sie eine ausreichende Kabellänge für Ihre
Geräte durch.
SCHRITT 5: Stromversorgung anschließen
Stellen Sie sicher, dass die iQ 16 Sync Charge
Boxen eingeschaltet sind. Stecken Sie das externe
Netzkabel in den Cart.
Stecken Sie das andere Kabelende in eine
Wandsteckdose.
SCHRITT 6: Geräte synchronisieren
(Folgen Sie der beiliegenden iQ 16 Sync Charge Box-Bedienungsanleitung für das Synchronisieren und Auaden.)
Verbinden Sie den Hostcomputer über die drei
Hostkabel mit den äußeren Synchronisaons-
Ports des Carts.
Bei Nichtbenutzung wickeln Sie das Kabel um die
Kabelklemme.
Table of contents
Languages:
Other PC Locs Outdoor Cart manuals