PCB Piezotronics 027250-07201 User manual

Model 027250-07201
PCB L&T Hand Torque Angle Wrench, w/Angle Encoder & Auto-ID, 200 ft-lb (271 Nm), 21-inch
Handle, 1/2-inch Square Drive, 10-pin PT Receptacle
Installation and Operating Manual
For assistance with the operation of this product,
contact the PCB Piezotronics, Inc.
Toll-free: 716-684-0001
24-hour SensorLine: 716-684-0001
Fax: 716-684-0987
E-mail: [email protected]
Web: www.pcb.com

Manual 21354 Rev E
ECN 50523
Repair and Maintenance
PCB guarantees Total Customer Satisfaction through its
“Lifetime Warranty Plus” on all Platinum Stock Products
sold by PCB and through its limited warranties on all other
PCB Stock, Standard and Special products. Due to the
sophisticated nature of our sensors and associated
instrumentation, field servicing and repair is not
recommended and, if attempted, will void the factory
warranty.
Beyond routine calibration and battery replacements
where applicable, our products require no user
maintenance. Clean electrical connectors, housings, and
mounting surfaces with solutions and techniques that will
not harm the material of construction. Observe caution
when using liquids near devices that are not hermetically
sealed. Such devices should only be wiped with a
dampened cloth—never saturated or submerged.
In the event that equipment becomes damaged or ceases
to operate, our Application Engineers are here to support
your troubleshooting efforts 24 hours a day, 7 days a
week. Call or email with model and serial number as well
as a brief description of the problem.
Calibration
Routine calibration of sensors and associated
instrumentation is necessary to maintain measurement
accuracy. We recommend calibrating on an annual basis,
after exposure to any extreme environmental influence,
or prior to any critical test.
PCB Piezotronics is an ISO-9001 certified company whose
calibration services are accredited by A2LA to ISO/IEC
17025, with full traceability to SI through N.I.S.T. In
addition to our standard calibration services, we also offer
specialized tests, including: sensitivity at elevated or
cryogenic temperatures, phase response, extended high
or low frequency response, extended range, leak testing,
hydrostatic pressure testing, and others. For more
information, contact your local PCB Piezotronics
distributor, sales representative, or factory customer
service representative.
Returning Equipment
If factory repair is required, our representatives will
provide you with a Return Material Authorization (RMA)
number, which we use to reference any information you
have already provided and expedite the repair process.
This number should be clearly marked on the outside of
all returned package(s) and on any packing list(s)
accompanying the shipment.
Contact Information
PCB Piezotronics, Inc.
3425 Walden Ave.
Depew, NY14043 USA
Toll-free: (800) 828-8840
24-hour SensorLine: (716) 684-0001
Repair inquiries: rma@pcb.com
For a complete list of distributors, global offices and sales
representatives, visit our website, www.pcb.com.
Safety Considerations
This product is intended for use by qualified personnel
who recognize shock hazards and are familiar with the
precautions required to avoid injury. While our equipment
is designed with user safety in mind, the protection
provided by the equipment may be impaired if equipment
is used in a manner not specified by this manual.
Discontinue use and contact our 24-Hour Sensorline if:
Assistance is needed to safely operate equipment
Damage is visible or suspected
Equipment fails or malfunctions
For complete equipment ratings, refer to the enclosed
specification sheet for your product.
Definition of Terms and Symbols
The following symbols may be used in this manual:
DANGER
Indicates an immediate hazardous
situation, which, if not avoided, may
result in death or serious injury.

Manual 21354 Rev E
ECN 50523
CAUTION
Refers to hazards that could damage
the instrument.
NOTE
Indicates tips, recommendations and
important information. The notes
simplify processes and contain
additional information on particular
operating steps.
The following symbols may be found on the equipment
described in this manual:
This symbol on the unit indicates that
high voltage may be present. Use
standard safety precautions to avoid
personal contact with this voltage.
This symbol on the unit indicates that
the user should refer to the operating
instructions located in the manual.
This symbol indicates safety, earth
ground.

Manual 21354 Rev E
ECN 50523
PCB工业监视和测量设备 - 中国RoHS2公布表
PCB Industrial Monitoring and Measuring Equipment - China RoHS 2 Disclosure Table
部件名称
有害物质
铅(Pb)
汞
(Hg)
镉
(Cd)
六价铬(Cr(VI))
多溴联苯 (PBB)
多溴二苯醚(PBDE)
住房
O
O
O
O
O
O
PCB板
X
O
O
O
O
O
电气连接器
O
O
O
O
O
O
压电晶体
X
O
O
O
O
O
环氧
O
O
O
O
O
O
铁氟龙
O
O
O
O
O
O
电子
O
O
O
O
O
O
厚膜基板
O
O
X
O
O
O
电线
O
O
O
O
O
O
电缆
X
O
O
O
O
O
塑料
O
O
O
O
O
O
焊接
X
O
O
O
O
O
铜合金/黄铜
X
O
O
O
O
O
本表格依据 SJ/T 11364 的规定编制。
O:表示该有害物质在该部件所有均质材料中的含量均在 GB/T 26572 规定的限量要求以下。
X:表示该有害物质至少在该部件的某一均质材料中的含量超出 GB/T 26572 规定的限量要求。
铅是欧洲RoHS指令2011/65/ EU附件三和附件四目前由于允许的豁免。
CHINA RoHS COMPLIANCE

Manual 21354 Rev E
ECN 50523
Component Name
Hazardous Substances
Lead (Pb)
Mercury (Hg)
Cadmium (Cd)
Chromium VI
Compounds
(Cr(VI))
Polybrominated
Biphenyls (PBB)
Polybrominated
Diphenyl Ethers
(PBDE)
Housing
O
O
O
O
O
O
PCB Board
X
O
O
O
O
O
Electrical Connectors
O
O
O
O
O
O
Piezoelectric Crystals
X
O
O
O
O
O
Epoxy
O
O
O
O
O
O
Teflon
O
O
O
O
O
O
Electronics
O
O
O
O
O
O
Thick Film Substrate
O
O
X
O
O
O
Wires
O
O
O
O
O
O
Cables
X
O
O
O
O
O
Plastic
O
O
O
O
O
O
Solder
X
O
O
O
O
O
Copper Alloy/Brass
X
O
O
O
O
O
This table is prepared in accordance with the provisions of SJ/T 11364.
O: Indicates that said hazardous substance contained in all of the homogeneous materials for this part is below the limit
requirement of GB/T 26572.
X: Indicates that said hazardous substance contained in at least one of the homogeneous materials for this part is above the limit
requirement of GB/T 26572.
Lead is present due to allowed exemption in Annex III or Annex IV of the European RoHS Directive 2011/65/EU.

10/21/2016
Hand Torque-Angle Wrench
Installation and Operating Manual
For assistance with the operation of this product, contact:
RS Technologies
Division of PCB Load & Torque, Inc.
Toll-Free in USA: 888-684-2894
24-hour SensorLine
SM
: 716-684-0001
Fax: 248-888-8266

RS Technologies Division of PCB Load & Torque, Inc. Toll-Free in USA 888-684-28947 716-684-0001 www.pcbloadtorque.com
HAND TORQUE-ANGLE WRENCH OPERATION MANUAL
2
Introduction: Safety Considerations
C
AUTION
1: The
Model 962 should not be opened by anyone other than factory personnel. There are no user
serviceable parts inside of the Model 962 recorder.
C
AUTION
2: Cables can kill your equipment. High voltage electrostatic discharge can damage electrical devices.
Similar to a capacitor, a cable can hold a charge caused by triboelectric transfer, such as that which
occurs in the following:
•Laying on and moving across a rug
•Any movement through air
•The action of rolling out a cable
•Contact with a non-grounded person.
The solution for product safety: 1) Connect the cables only with power switched OFF. 2) Temporarily
“short” the end of the cable before attaching it to any signal input or output.
WARNING
SYMBOLS
AND
TERMS
This symbol on the unit indicates that the user should refer to the operating instructions
located in the manual.
This symbol on the unit indicates that high voltage may be present. Use standard safety
precautions to avoid personal contact with this voltage.
This system indicates safety, earth ground.
The WARNING heading, if used in this manual, explains dangers that might result in personal injury or death. Always
read the associated information very carefully before performing the indicated procedure.
The CAUTION heading, if used in this manual, explains hazards that could cause damage to the instrument.

RS Technologies Division of PCB Load & Torque, Inc. Toll-Free in USA 888-684-28947 716-684-0001 www.pcbloadtorque.com
HAND TORQUE-ANGLE WRENCH OPERATION MANUAL
3
1.0 INTRODUCTION
Hand Torque Wrenches manufactured by RS Technologies
Division of PCB Load & Torque, Inc., are designed to
accurately measure static torsional loads ranging from 2.0 lb-in
up to 600 lb-ft (0.23 to 814 Nm). All models utilize strain
gages configured into a Wheatstone Bridge Circuit to produce
the primary sensing element. The four-arm Wheatstone Bridge
configuration is shown below in Figure 1. Also pictured in
Figure 1 is the wiring code for the standard 10-pin PT
receptacle.
Figure 1–Hand Torque Wrench Wheatstone Bridge
With Angle Wiring Code
The gages are bonded to the wrench’s flexure. Typically, a
regulated DC or AC excitation is applied between A and B of
the bridge. When torque is applied to the wrench, the
Wheatstone Bridge becomes unbalanced, producing an output
signal voltage between C and D, which is proportional to the
applied load. The magnitude of the output signal corresponds
to the deformation of the transducer and therefore the applied
load. This configuration allows for temperature and pressure
compensation, as well as cancellation of signals caused by
forces not directly applied to the axis of the applied load.
Output is typically expressed in units of millivolt per volt of
excitation. Optional data collectors and signal conditioners are
available from RS Technologies and PCB Load & Torque.
Angle is generated by a solid-state gyro mounted in the head
of the torque wrench. With the gyro mounted in the head of the
torque wrench, errors in angle measurement due to flex of the
handle during tightening are eliminated. With the use of the
solid-state gyro, no ‘angle tether’ is required against which
angle values are referenced.
Specifications
Full Scale Output ..................... 2 mV/V (output and shunt calibration are
matched to within ±0.25% to assure
interchangeability; output is matched for
specified English units.
Shunt Calibration .................... 2.00 mV/V ±0.25% with 43.575k Ohm
resistor
Interchangeability ................... Full scale output and shunt calibration are
matched within ±0.3% to assure
interchangeability
Nonlinearity ............................. ±0.25% Full Scale
Hysteresis ................................. ±0.25% Full Scale
Zero Balance ............................ ±2% Full Scale
Overload Capacity ................... 150% of Full Scale
Bridge Resistance .................... 350 Ohms, nominal
Excitation ................................. 10 vdc or vac (RMS)
Compensated Temp Range ..... 70 to 150ºF
Useable Temp Range ............... 0 to 200 ºF
Receptacle ................................ Bendix PT02H-12-10P
Mating Connector .................... Bendix PT06A-12-10S(SR)
Angle Output ............................ TTL (quadrature) 0-5vdc
Angle Resolution ...................... 0.125 degrees
Angle Power ............................. 5vdc
Counts/Revolution ................... 2880 nominal
Angle Accuracy ....................... ±1% of reading ±1 degree @ angular
velocity >10 deg/sec <180 deg/sec
Table 1. Capacities
Part No. Drive Size Handle Capacity
027125-07012 ¼-inch 8-in. 100 lb-in
(11.4 Nm)
027137-07022 3/8-inch 12-in. 200 lb-in
(22.7 Nm)
027137-07051 3/8-inch 12-in. 50 lb-ft
(68 Nm)
027250-07101 ½-inch 21-in. 100 lb-ft
(136 Nm)
027250-07201 ½-inch 21-in. 200 lb-ft
(271 Nm)
027250-07301 ½-inch 28-in. 300 lb-ft
(407 Nm)
027375-07501 ¾-inch 43-in. 500 lb-ft
(678 Nm)

RS Technologies Division of PCB Load & Torque, Inc. Toll-Free in USA 888-684-2894 716-684-0001 www.pcbloadtorque.com
HAND TORQUE-ANGLE WRENCH OPERATION MANUAL
4
2.0 SAFETY INFORMATION
Applied loads must be limited to 100% of the rated capacity.
Application of loads exceeding rated capacity can lead to
damage of the hand torque wrench and potential injury to the
operator. Therefore, always use care in applying torque to
fasteners being audited or tightened failure. Operators should
always observe standard shop safety requirements, such as
wearing steel-toed shoes, safety glasses, etc.
3.0 MECHANICAL INSTALLATION
Mechanical installation consists of attaching the proper sized
socket or drive fitting to the hand torque wrench. This socket
or drive will be lined up with the fastener being tightened.
Typical applications will be for auditing the residual torque in
a previously assembled fastener, or for final tightening of a
critical fastener.
4.0 ELECTRICAL INSTALLATION
The hand torque wrench is connected to a data collector or
signal conditioner via the 10-pin PT receptacle located on the
end of the handle. Cable assemblies for RS Technologies and
other instruments are available through RS Technologies
Division of PCB Load & Torque, Inc.
Connect one end of the cable to the wrench connector and the
other end to the data collector signal conditioner. Make sure to
completely tighten the cable connector to the wrench.
5.0 POLARITY
Clockwise torque on hand torque wrenches produces a
positive-going signal output. Counterclockwise torque
produces a negative-going signal output. Most data collectors
provide a CW/CCW adjustment to ensure accurate readings.
6.0 SHUNT CALIBRATION
Shunt calibration is the known, electrical unbalancing of a
strain gage bridge by means of a fixed resistor that is placed,
or “shunted”, across one leg of the bridge. The Wheatstone
Bridge utilized by RS Technologies hand torque wrenches is
typically calibrated using the shunt calibration technique.
Shunt calibration is a practical method for providing field
calibration of data collectors and strain gage transducers such
as hand torque wrenches. This provides assurance of obtaining
accurate readings without having to apply known, traceable,
physical input loads to the wrench, which may be impractical
in an assembly line or out in the field.
Shunt calibration simulates the mechanical input to a
transducer by unbalancing the bridge with a fixed resistor
placed across, or in parallel with, one leg of the bridge. For
clockwise shunt calibration, or +CAL, the shunt resistor (R
CAL
)
is shunted across the +Excitation (A) and +Signal (C) leg of
the bridge. For counterclockwise shunt calibration, or –CAL,
the shunt resistor (R
CAL
) is shunted across the -Excitation (BD)
and +Signal (C) leg of the bridge. See Figure 1 for shunt
resistor locations in the Wheatstone Bridge circuit.
Shunt calibration is accepted throughout the industry as a
means of periodic calibration of a data collector and a hand
torque wrench between calibrations of known, applied,
traceable, mechanical input values. Consequently, most all
strain gage transducer manufacturers collect and supply shunt
calibration data, along with a shunt calibration resistor, as a
standard feature.
The hand torque wrench provided by RS Technologies
Division of PCB
Load & Torque Inc.
comes with a calibration
certificate. On the first page of this certificate you will find a
calibration value in engineering units that is associated with a
particular resistor. This resistor can be installed on the data
collector and used when matching up the instrument to the
wrench. Follow the instructions provided with the data
collector for complete details on shunt calibration procedures.
6.1 ANGLE CALIBRATION
If the torque-angle wrench will be used with an RS
Technologies Model 920, 960, or 962 meter with auto ID
enabled, the torque wrench parameters will be auto detected. If
not using the torque-angle wrench with auto ID enabled, or if
using a non-RS Technologies meter, manually enter the
‘Counts/Revolution’ value stated on the calibration certificate
into the transducer’s definition before calibrating to meter to
the wrench.

RS Technologies Division of PCB Load & Torque, Inc. Toll-Free in USA 888-684-2894 716-684-0001 www.pcbloadtorque.com
HAND TORQUE-ANGLE WRENCH OPERATION MANUAL
5
6.2 Basic Shunt Calibration Procedure
The following procedure outlines the basic routine of shunt
calibration. The actual calibration procedure performed by
your data collector may be automated and will differ. Consult
the data collector instruction manual for further details.
1. Connect the hand torque wrench to the data collector and
allow adequate time for the system to stabilize. 2 to 5
minutes is recommended.
2. With no load on the wrench, adjust the data collector zero
controls for each bridge to read zero (0).
3. Shunt the calibration resistor between the desired
excitation and signal leads of the Wheatstone Bridge, as
described in Section 6.0.
4. Adjust the data collector’s gain or span controls as
required to obtain an electrical output signal and/or
numeric display that represents the simulated calibration
load as indicated on the calibration certificate.
5. Remove the shunt resistor and adjust the zero if necessary.
6. If a significant zero adjustment is required, repeat Steps 3-
5.
7.0 OPERATION
7.1 Typical Hand Torque Wrench System Configurations
Operation requires the connection of the wrench to a readout
device, data collector, or signal conditioner. Readout
instruments, data collectors, and suitable cable assemblies are
available from RS Technologies Division of PCB Load &
Torque, Inc.
7.2 Operation with a Data Collector or Readout Device
The span and zero of the instrument must be set before the
hand torque wrench system can be used. The span can be set
using the shunt calibration value and resistor supplied by the
manufacturer, or by a deadweight torque calibrator. Refer to
the shunt calibration information in the instruction manual of
the instrument for proper setup information.
7.3 Hand Torque Wrench Operation Guidelines
With the instrument power OFF, connect the torque/angle
wrench to the instrument.
Set the torque/angle wrench on a table top such that the gyro
status light is visible.
Switch the instrument power to ON. Do not move the
torque/angle wrench until the gyro status light turns GREEN.
Calibrate the instrument to the torque-angle wrench. Use the
angle counts per revolution as stated on the
torque-angle
wrench calibration certificate when defining the torque wrench
calibration values.
During use, a GREEN gyro status light indicates gyro
operation is normal.
If the status light flashes RED, angular velocity has exceeded
the 180deg/sec limit and the angle reading may be in question.
The status light will return to GREEN after several seconds
and testing can continue.
Refer to Figures 3-6 for proper use of a hand torque wrench.
NOTE: To ensure best results, the square drive of the socket
must be fully engaged with the drive of the hand torque
wrench. Similarly, the hex drive of the socket must be fully
engaged with the head of the fastener.
7.4 Rundown Status LED
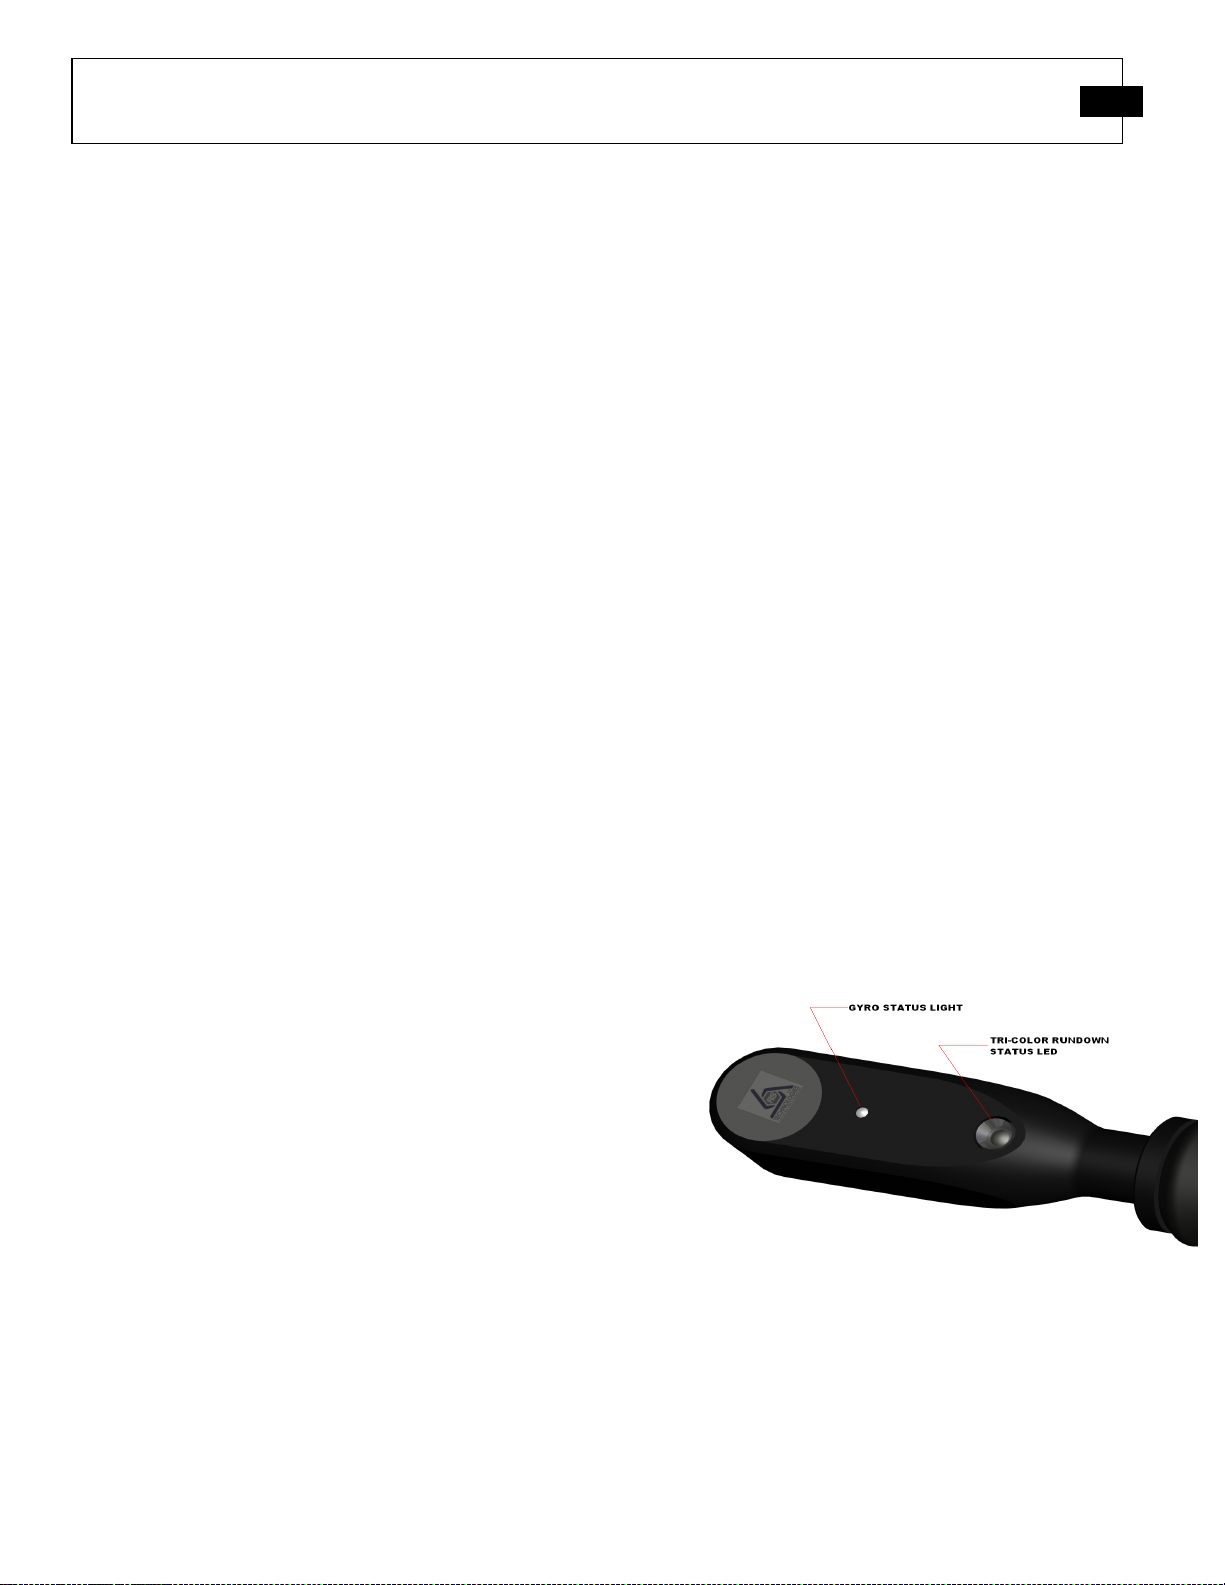
When used with the Model 920 meter, the tri-color rundown
status LED is used to indicate the pass/fail status of the last
recording. Refer to Figure 2. Based upon the test setup
parameters that have been programmed into the Model 920
meter, the LED indications are as follows:
RED: Torque and, or, angle value above the
programmed ‘High Limit’.
GREEN: Torque and angle values fall within the
programmed ‘High and Low Limit’.
YELLOW: Torque and, or, angle value is below
the
programmed ‘Low Limit’
Figure 2–Hand Torque Angle Status Lights

RS Technologies Division of PCB Load & Torque, Inc. Toll-Free in USA 888-684-2894 716-684-0001 www.pcbloadtorque.com
HAND TORQUE-ANGLE WRENCH OPERATION MANUAL
6
8.0 TROUBLESHOOTING
When having difficulty operating the hand torque wrench,
refer to the following checklist.
No output
No power
Loose or dirty connections
Open circuit or short
Faulty or improper wiring
No torque applied
Erratic or Improper Readings
Excitation voltage drift
Electrical noise
Loose fixturing
Open circuit or short
Improper load applied
Cable too long
Blinking Display
Overload condition
Open circuit
Zero Balance
Load applied to wrench
Overloaded or side-loaded wrench
Open circuit
Improper electrical connections
Zero Shift
Fixture preload
Faulty or improper wiring
Improper zero taken
Figure 3—Hold the handle of wrench perpendicular to the centerline
or shank of the fastener.
Figure 4—Support the head of wrench using one hand and prepare
to pull with the other.
Figure 5—For best results, pull on the handle of the wrench with a
smooth steady pull. Stop pulling the wrench handle either when the
desired torque specification is reached or when the fastener breaks
loose and the head of the fastener begins to rotate.
Figure 6—Do not jerk the handle abruptly or you may get
inaccurate and inconsistent readings.

RS Technologies Division of PCB Load & Torque, Inc. Toll-Free in USA 888-684-2894 716-684-0001 www.pcbloadtorque.com
HAND TORQUE-ANGLE WRENCH OPERATION MANUAL
7
Zero Drift
Unconditioned power supply
Open circuit or short
Loose wiring
RFI/EMI interface
Temperature change
Wrench moved on power ON before
green gyro status LED obtained
Flashing red gyro status LED
Angular velocity has exceeded limit
Damaged or Deformed Equipment
Improper use
Error Analysis
PCB Load & Torque, Inc. typically supplies accuracy
information on its products in the form of individual errors
(see specification sheet). For hand torque wrenches they are:
Non-Linearity, Hysteresis, and Non-Repeatability.
The customer can combine these individual errors to establish
the maximum possible error for the measurement or just
examine the applicable individual error. If the wrench is used
for increasing torque measurement only, ignore the Hysteresis
error. If the torque measurement is near the full rated capacity,
the linearity error can be ignored. If the capability exists to
correct the data through linearization-fit or a look-up-table, the
error in the measurement can be minimized. A sophisticated
user can get rid of all the errors except for the non-
repeatability error in the measurement.
If problems persist, contact PCB Load & Torque for technical
assistance.
9.0 MAINTENANCE
The hand torque wrenches provided by RS Technologies
Division of PCB Load & Torque Inc. are made of durable
materials, and are intended for industrial use. However, routine
maintenance, such as cleaning of electrical connectors,
housings, handle, and square drives with solutions and
techniques that will not harm the physical material of
construction is acceptable. The hand torque wrenches should
only be wiped with a damp cloth and never submerged or have
liquids poured on them. # # #

RS Technologies Division of PCB Load & Torque, Inc. Toll-Free in USA 888-684-2894 716-684-0001 www.pcbloadtorque.com
HAND TORQUE-ANGLE WRENCH OPERATION MANUAL
8
MANUAL NUMBER: 51051
MANUAL REVISION: A
ECN NUMBER: 37134

Model Number
027250-07201 HAND TORQUE ANGLE WRENCH Revision: F
ECN #: 53170
Performance EN G LISH SI
Measurement Range(Full Scale Capacity) 200 lbf-ft 271.2 Nm
Sensitivity(output at rated capacity)
(0.25%FS)
2 mV/V 2 mV/V [1]
Non-Linearity ≤ 0.25 % FS ≤ 0.25 % FS [2]
Hysteresis ≤ 0.25 % FS ≤ 0.25 % FS [2]
Interchangeabilty ≤ 0.30 % FS ≤ 0.30 % FS [3]
Overload Capacity 150 % F.S. 150 % F.S.
Drive Size 1/2 inch Square 1/2 inch Square [4]
Quadrature Output 2950 Counts/Rev 2950 Counts/Rev [1]
Quadrature Output Voltage 0 to 5V 0 to 5V
Angle Resolution 0.122 degrees 0.122 degrees
Environmental
Temperature Range(Operating) 0 to +200 °F -18 to +93 °C
Temperature Range(Compensated) +70 to +150 °F +21 to +66 °C
Temperature Effect on Output(Maximum) ± 0.01 %RO/°F ± 0.018 %RO/°C
Temperature Effect on Zero
Balance(Maximum)
± 0.01 %FS/°F ± 0.018 %FS/°C
Electrical
Isolation Resistance ≥ 1G Ohm ≥ 1G Ohm
Bridge Resistance 350 Ohm 350 Ohm
Excitation Voltage(Recommended) 10 VDC or VAC rms 10 VDC or VAC rms
Zero Balance ≤ 2 % FS ≤ 2 % FS
Shunt Calibration 2 mV/V 2 mV/V [5]
Angle Power + 5 VDC + 5 VDC
Output Polarity cw+ cw+
Ph ysical
Size - Length 22.63 in 574.8 mm [4]
Weight 1.8 lb 0.8 kg
Mating Connector PT06A-12-10S PT06A-12-10S
Connector DT02H-12-10P DT02H-12-10P
Color Code Violet Violet
Socket Retaining Type Ball/Spring Ball/Spring
[6]
All specifications are at room temperature unless otherwise specified.
In the interest of constant product improvement, we reserve the right to change specifications without notice.
OPTIONA L VERSION S
Optional versions have identical specifications and accessories as listed for the standard model except
where noted below. More than one option may be used.
NOTES:
[1]Nominal.
[2]FS - Full Scale.
[3]Matched for mV/V and shunt calibration.
[4]See Drawing 50913 for Complete Dimensions
[5]2 mV/V with 43.575 kOhm precision resistor.
[6]See PCB Declaration of Conformance PS117 for details.
Date: 10/05/2022 Date: 10/05/2022 Date: 10/05/2022 Date: 10/05/2022 49884
Entered: ND Engineer: NJN Sales: DM Approved: JM Spec Number:
PCB Load & Torque A Division of PCB
Piezotronics
24350 Indoplex Circle Farmington
Hills, M I 48335
UNITED STATES
Phone: 866-684-7107
E-M ail: LTSales@ pcb.com
Web site: www.pcb.com/LoadAndTorque
SUPPL IED ACCESSORIES:
Model 7122R-04352A PRECISION CAL RESISTOR 43.575 kOhm
OPTIONA L A CCESSORIES:
Model 080922-01000 MODEL 922 DIGITAL PEAK METER
Model 080962-01000 MODEL 962 DATA RECORDER
Model 097000-34445 INTERCONNECT CABLE
Model 4242R-000630 MATING CONNECTOR PT06A-12-10S(SR)

ISO VIEW
SCALE 1 / 2
1
1
2
2
3
3
4
4
A A
B B
C C
D D
DWG. NO.
SCALE: SHEET
DRAWN CHECKED ENGINEER
TITLE
UNLESS OTHERWISE SPECIFIED TOLERANCES ARE:
DIMENSIONS IN MILLIMETERS
[ IN BRACKETS ]
ANGLES
`
.5 DEGREES
24350 Indoplex Cir le, Farmington Hills,MI 48335
(248) 888-8260 E-MAIL: ltinfo@p b. om
DIMENSIONS IN INCHES
ANGLES
`
.5 DEGREES
FILLETS AND RADII
.015 MAX
FILLETS AND RADII
0.38 MAX
OUTLINE DRAWING
50913
1 OF 1
3/4
1/2" SQ DRIVE STD (027250-07XXX)
HAND TORQUE/ANGLE WRENCH
AM 08.03.11
DECIMALS XX ±.01
XXX ±.005
DECIMALS X ± 0.3
XX ± 0.13
50913
PCB Load & Torque (A Division of PCB Piezotroni s, In .)
laims proprietary rights in the information dis losed hereon.
Neither it nor any reprodu tion thereof will be dis losed to
others without the written onsent of PCB Load and Torque.
REVISIONS
REV DESCRIPTION ECO
BCHANGED DIMENSIONING/TOLERANCE - 01.12.22, PTE 52470
PUSH/TURN RECEPTACLE
(PT02H-12-10P OR EQUIV.)
WIRING CODE:
PIN A +EXC.
PIN B +SIG.
PIN C -SIG.
PIN D -EXC.
PIN E ENCODER GND
PIN F +5 VOLTS
PIN G CW LEAD
PIN H CCW TRAIL
PIN J ID GND
PIN K ID DATA
1.94
`
.03 49.1
`
.8
[ ]
o
1/2" DRIVE
BALL DETENT
PTE 11.01.16
.56 [14.2]
2.50 [63.5]4.90
`
.03 124.5
`
.8
[ ]
FOAM RUBBER GRIP CONNECTOR SHROUD
1.86 [47.1]Ø
.75 [19.1]Ø
22.63
`
.38 574.8
`
9.7
[ ]
ID LABEL - COLOR CODED
n
1.00 [25.4]
R.700 [17.8]
1.40 [35.6]
1.25 [31.8]
SD 01.23.17
GYRO STATUS LED
(RED - GRN)
TRI-COLOR RUNDOWN STATUS LED
(RED - YEL - GRN)
10.44 [265.2]
Table of contents
Other PCB Piezotronics Power Tools manuals

PCB Piezotronics
PCB Piezotronics HT356B20/NC User manual

PCB Piezotronics
PCB Piezotronics Y027250-07101 User manual

PCB Piezotronics
PCB Piezotronics J353B34 User manual

PCB Piezotronics
PCB Piezotronics 027137-07051 User manual

PCB Piezotronics
PCB Piezotronics 027125-04051 User manual

PCB Piezotronics
PCB Piezotronics 027025-04021 User manual

PCB Piezotronics
PCB Piezotronics 340A15 User manual

PCB Piezotronics
PCB Piezotronics 027250-07101 User manual

PCB Piezotronics
PCB Piezotronics ICP 351B32 User manual

PCB Piezotronics
PCB Piezotronics 027250-04301 User manual