PDi PD251-037 User manual
PD251-037
Android Module Kit for
SWLED Televisions
Document Number PD196-327R1

PD196-327R1 PD251-037 Smart Module Kit Page 2 of 8
PDi Communication Systems, Inc. 40 Greenwood Lane Springboro, Ohio 45066 USA PH 1-800-628-9870 FX 937-743-5664
Copyright, Trademarks, and Disclaimer
Copyright,Trademarks
© 2014 PDi Communication Systems, Inc. All rights reserved. PDi-TAB® is a registered trademark of PDi Communication
Systems, Inc. Product logos, brands and other trademarks displayed within PDi’s products are the property of their
respective trademark holders, who are not affiliated with, endorsing, or sponsoring PDi Communication Systems, Inc. or
our products.
Disclaimer
The author and publisher have used their best efforts in preparing this manual. PDi Communication Systems, Inc. makes
no representation or warranties with respect to the accuracy or completeness of the contents of this manual and
specifically disclaims any implied warranties or merchantability or fitness for any particular purpose and shall in no event
be liable for any loss of profit or
any other damages. The information contained herein is believed accurate, but is not warranted, and is subject to change
without notice or obligation.
.
SAFETY INSTRUCTIONS
CAUTION: THIS INSTALLATION SHOULD BE MADE BY A QUALIFIED SERVICE PERSON AND SHOULD
CONFORM TO ALL LOCAL CODES. READ AND FOLLOW THE SAFETY INSTRUCTIONS BEFORE ATTEMPTING
THIS INSTALLATION.
1. To avoid the hazards of fire or electrical shock, DO
NOT expose this module to rain or moisture.
2. Do not use in oxygen tent or oxygen chamber.
3. Do not use this apparatus near water.
4. Clean only with dry cloth.
5. Refer all servicing to qualified service personnel.
Servicing is required when the apparatus has been
damaged in any way, such as power-supply cord or plug
is damaged, liquid has been spilled or objects have
fallen into the apparatus, the apparatus has been
exposed to rain or moisture, does not operate normally,
or has been dropped.
Android Module Connections
Front View
Back View
Antenna
Ethernet
HDMI
Service Port
(Will not be used)
USB
Power
Cable
CCI
PD196-327R1 PD251-037 Smart Module Kit Page 3 of 8
PDi Communication Systems, Inc. 40 Greenwood Lane Springboro, Ohio 45066 USA PH 1-800-628-9870 FX 937-743-5664
Installation
Installations of the Android Modules are shown with compatible PDi brackets. Use of any other bracket may
require modification of installation. Contact PDi for compatible PDi bracket information.
Tool List:
1. Safety glasses/goggles
2. P1 or P2 Phillips screwdriver
Safety Steps:
1. Always wear safety glasses/goggles to prevent injury from debris.
2. Follow the installation/removal instructions for your existing products.
Parts List
PART NUMBER
QTY
DESCRIPTION
PD251-036
1
SMART MODULE
PD106-750
1
HDMI MALE TO MALE 17” CABLE
PD106-559
1
CCI CABLE
PDIPPHMSM4X710
2
M4 X .7 X 10MM PHILLIPS HEAD SCREW (FOR 24” TV ONLY)
PDISEMS44025
2
4-40 X 1/4” SEMS SCREW (FOR 42” TV ONLY)
PDIFW6
2
#6 FLAT WASHERS (FOR 42” TV ONLY)
PD239-237
1
PWR SUPPLY UNIV AC INPUT 12VDC, 1.25A
24” LED TV
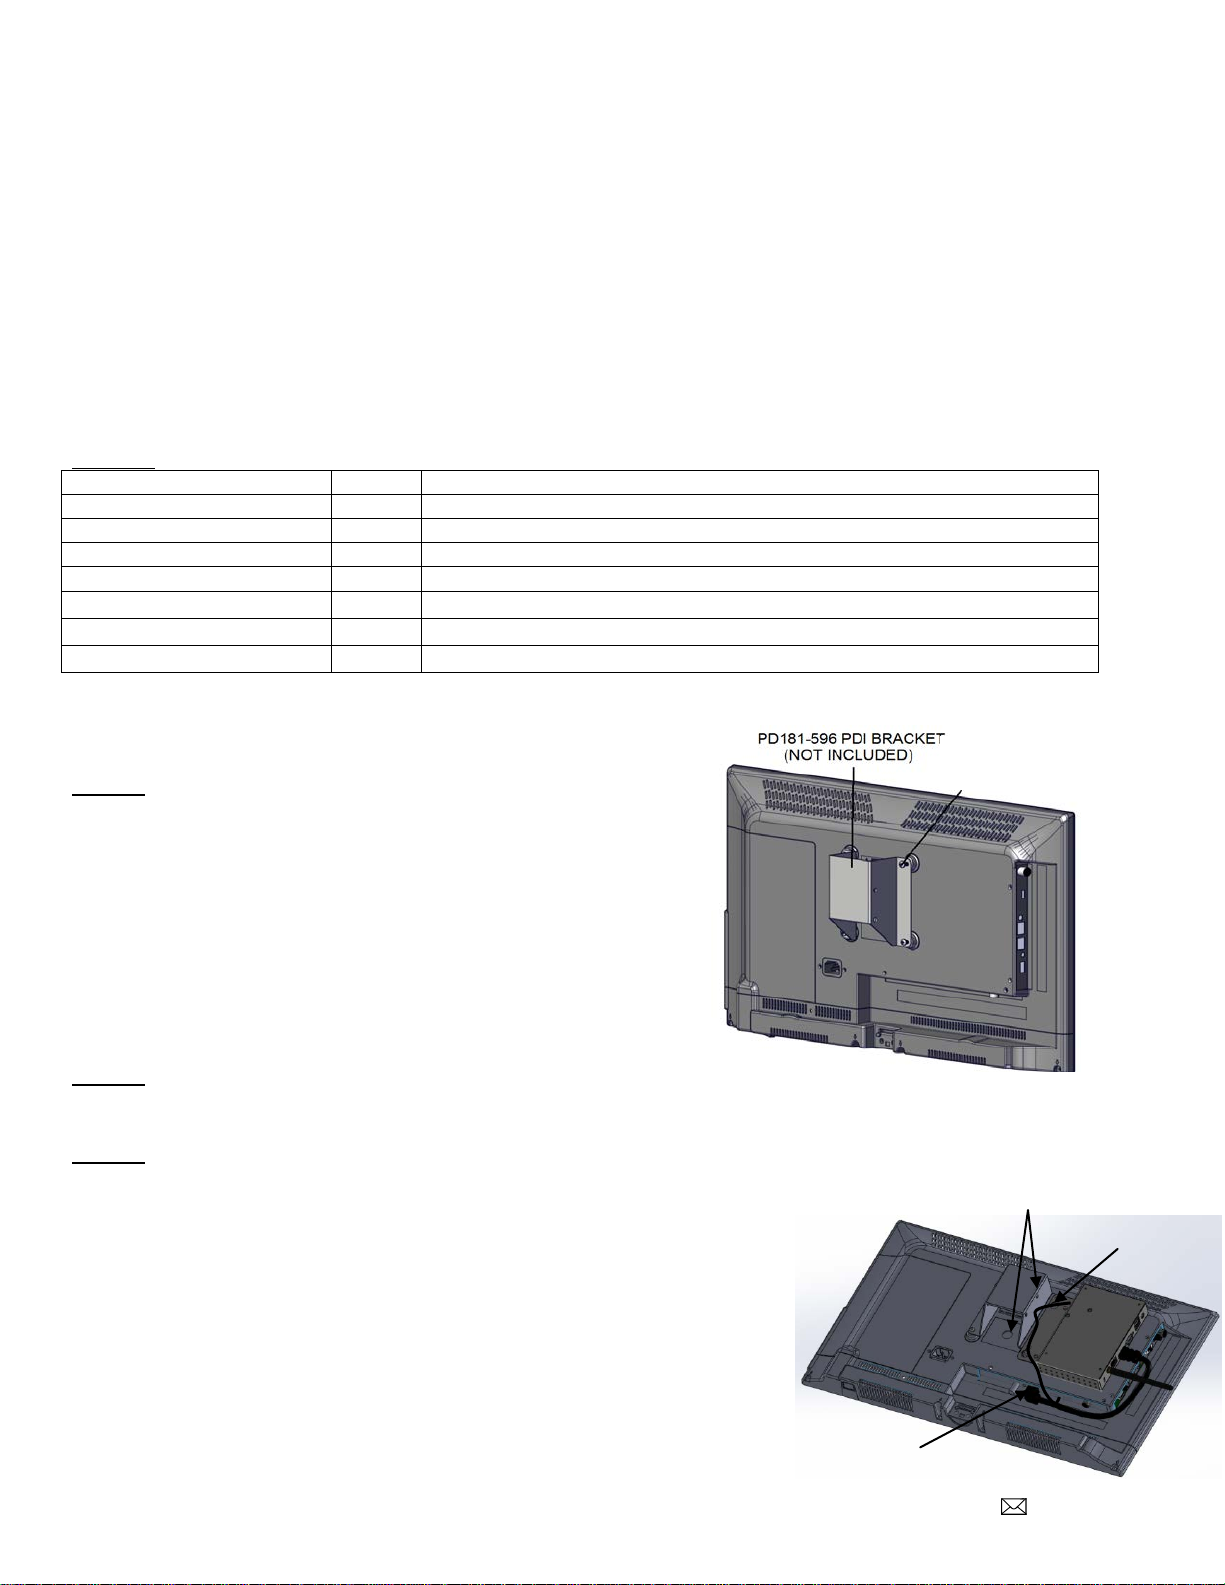
Step 1:
On the back of the TV, remove and discard the (2) M4X76
screws from the back of the PD181-596 bracket. (Bracket
purchased separately as part of PD168-103 kit)
Insert (2) PDIPPHMSM4X710 screws supplied with kit but do
tighten.
Step 2:
Place PD251-029 Android Module over the screws and slide down into place. Tighten screws.
Step 3:
Connect cables PD106-750 HDMI and PD106-559 CCI cable to television as shown.
*The PD106-750 must to be connected to the HDMI 2 port on the television.
PDIPPHMSM4X710
PD106-750
HDMI
PD106-559
CCI
PDIPPHMSM4710
(2)

PD196-327R1 PD251-037 Smart Module Kit Page 4 of 8
PDi Communication Systems, Inc. 40 Greenwood Lane Springboro, Ohio 45066 USA PH 1-800-628-9870 FX 937-743-5664
Step 4:
Mount the television per manufacturer’s installation instructions for your product.
Step 5:
Attach power adapter to the SMART module.
32”LED TV
Shown with PD168-051 mounting kit (Purchased separately)
Step 1:
On the back of the TV, loosen the (2) PDIPPHMSM6X110 screws from the back of the existing plate.
Step 2:
Slide Android module over screws and retighten.
Step 3:
Connect cables PD106-750 HDMI and PD106-559 CCI cable to television as shown.
*The PD106-750 must to be connected to the HDMI 2 port on the television.
Step 4:
Mount the television per manufacturer’s installation instructions for your product.
Step 5:
Attach power adapter to the SMART module.
PD106-750
HDMI
HDMI2
PD106-559
CCI

PD196-327R1 PD251-037 Smart Module Kit Page 5 of 8
PDi Communication Systems, Inc. 40 Greenwood Lane Springboro, Ohio 45066 USA PH 1-800-628-9870 FX 937-743-5664
42” LED TV
Shown with PD168-033 mounting kit (Purchased Separately)
Step 1:
Loosen (2) M6 screws on the PD168-033 kit plate and insert Android module between plate and TV. Tighten
(2) M6 screws.
Step 2:
Place flat washers PDIFW6 and PDISEMS44025 screws to plate and through android module and tighten to
secure
Step 3:
Connect cables PD106-750 HDMI and PD106-559 CCI cable to television as shown.
*The PD106-750 must to be connected to the HDMI 2 port on the television.
Step 4:
Remount the television per manufacturer’s installation instructions for your product.
Step 5:
Attach power adapter to the SMART module.
Screen Format Configuration
The default screen format may be zoomed so that the edges are cropped. A PDI remote control (such as PD108-210 or
PD108-420) is required to change the screen format. The remote must be ordered separately. The following instructions
assume you have correctly installed the Android Module.
Disable HDMI Zoom
1. With the SMART module powered, turn on the TV.
2. Repeatedly press the ARC or ASPECT button on the remote until the on-screen display shows “Full Screen”.
Keyboard
You may have the PD161-004 PDi wireless keyboard (purchased separately) or other compatible keyboard for use with
this module. If you are using the PDi wireless keyboard, it will function as any 83 key QWERTY keyboard with several
“Hot” keys.
Hot Keys
Function
Fn/Pair
Pair Keyboard with Module
Esc
Back one screen
Fn/Home
Home screen
PD168-033 Mounting Kit
(Not Included)
PDISEMS44025 Screws
& #6 Flat Washers
Android Module
PD106-750
HDMI Cable
HDMI 2
PD106-559
CCI

PD196-327R1 PD251-037 Smart Module Kit Page 6 of 8
PDi Communication Systems, Inc. 40 Greenwood Lane Springboro, Ohio 45066 USA PH 1-800-628-9870 FX 937-743-5664
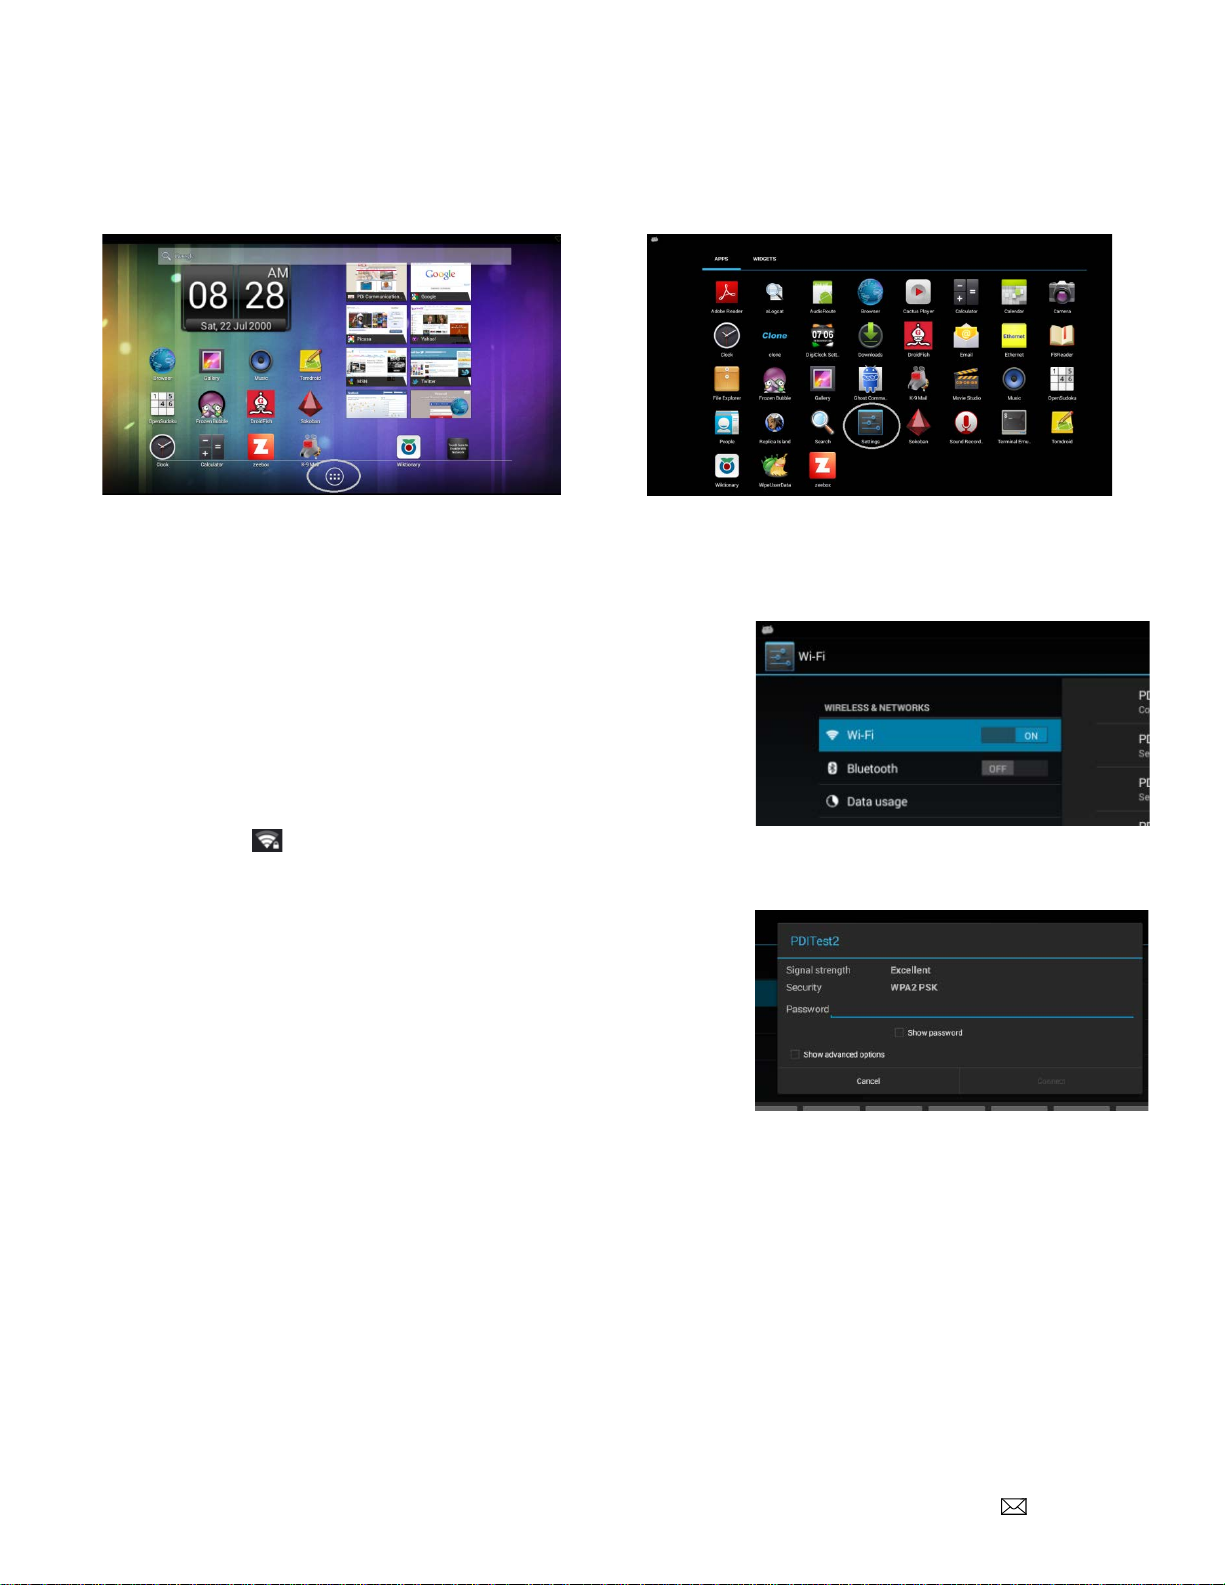
Android Setup
To enter administrative setup, follow the instructions below.
1. Turn on TV.
2. Cycle power to the SMART module to reboot it.
3. When the Language Selection screen appears, press ARROW UP on the keyboard or pillow speaker.
NOTE: This must be done within 2 minutes of a power cycle.
4. The Android home screen will appear.
Pull Down Panels
By pressing the mouse and scrolling down from the top, you can reveal two different information panels.
.
Quick settings panel. This is on the right side of a screen and
gives you direct entry into different areas of the settings app,
depending on which icon you choose.
Notification panel. This is on the left side of a screen
and provides you with system notifications. Selecting
one of these notifications can take you directly to the
app responsible for it.
PD196-327R1 PD251-037 Smart Module Kit Page 7 of 8
PDi Communication Systems, Inc. 40 Greenwood Lane Springboro, Ohio 45066 USA PH 1-800-628-9870 FX 937-743-5664
Settings
From the android home screen select “ALL APPS”, then select “Settings”. You will enter the Setting screen where you
can adjust network, sound, and account settings.
Connect To Wi-Fi Networks
Follow the instructions to connect to a wi-fi network.
1. Open Settings.
2. Slide the Wi-Fi switch to the On position.
(If not already set to “on”)
3. The module scans for available Wi-Fi networks and displays the
names of those it finds. Secured networks are indicated with a
locked icon .
4. If the module finds a network that you connected to previously, it connects to it.
5. Select a network name to see more details or connect to it, and
type a security code if necessary.
Hard Reset Information
If the TV becomes unresponsive, remove power from the Smart module and reconnect power.
Additional Information
Additional information is available in the user manual, document number PD196-328. You can access this information
online at http://www.pdiarm.com.For instructional installation video go to www.youtube.com/pdiuniversity

PD196-327R1 PD251-037 Smart Module Kit Page 8 of 8
PDi Communication Systems, Inc. 40 Greenwood Lane Springboro, Ohio 45066 USA PH 1-800-628-9870 FX 937-743-5664
Limited Warranty
PDi Communication Systems Inc., (“PDi”) warrants, to the original purchaser only, that the product will be free from
defects in materials and workmanship, under normal use, for 2 years from the date of original purchase. This warranty
does not cover any other equipment that may have been included with PDi’s shipment of this product.
After receipt of written notice of a defect or malfunction occurring during the warranty period, PDi will repair or replace
goods returned to its Springboro, Ohio location, at its discretion, the whole or any component part of any product
manufactured by PDi and found by PDi to be defective. If the decision is made to replace the product, PDi will exchange
the model for the same model or a model similar in form and function.
As a condition to obtaining warranty service, written notification of the defective product must be received by PDi within
ten (10) days of noticing the defect. Repair of said product requires it to be shipped to the PDi factory in Springboro,
Ohio. All shipments shall be F.O.B. Springboro, Ohio, and all shipping and freight charges to PDi’s factory shall be paid
by the customer.
For information regarding authorized servicing and all other information pertaining to this warranty, please contact PDi
COMMUNICATION SYSTEMS at 40 Greenwood Lane, Springboro, Ohio 45066 or phone 800-628-9870 and ask for
Service.
This warranty gives specific legal rights and you may also have other rights which vary from state to state.
Exclusions from Warranty
•Products damaged by any catastrophe, accident, or from neglect, misuse, fault, improper assembly, improper
maintenance, inadequate return packaging, or negligence by the customer or any third party. They will be treated
as out of warranty for external cause to the Products, such as, but not limited to, failure of or faulty electric power,
air conditioning, operator error, failure or malfunction of any data communications system. Such conditions will be
determined by PDi at its sole unfettered discretion.
•Service and repair of accessories, apparatus, attachments or any other devices which are not PDi products or
options.
•Defacing of product, revision control and PDi labeling (label alterations, serial number missing, serial number no
longer discernible and serial number invalid). All serial numbers are recorded and tracked for warranty purposes.
•Unauthorized changes, modifications or alterations in or to the Products not installed by PDi.
•Damage to or loss of any programs, data, or removable storage media.
•Damage incurred during installation, relocation or removal of the Products or any accessories, apparatus,
attachments or other devices.
•Normal wear.
•The furnishing of accessories or supplies.
•Damage by shipping carrier.
•Incompatibility issues.
•Damages of any kind including, but not limited to, direct or indirect damages, lost profits, lost saving, or other
special incidental, exemplary or consequential damages whether for breach of contract, tort or otherwise, or
whether arising out of the use of or inability to use the product, even if PDi or any distributor, dealer, or authorized
service provider has been advised of the possibility of such damages, or any claim by any other party
•Damage caused by any software or application not installed at the factory.
PDi’s liability under this warranty is limited to repair or replacement of defective products and parts as provided above.
PDi shall not be liable for incidental or consequential damages.*
The warranty contained herein is in lieu of all other expressed or implied warranties, including any implied warranty of
merchantability or fitness for any particular purpose. PDi neither assumes nor authorizes any person to assume, on its
behalf, any other obligation or liability.
*Some states do not allow the exclusion of limitation of incidental or consequential damages or a disclaimer of warranties
implied by law, so the above limitation or exclusion may not apply.
The information and technical data in this manual is believed accurate, but is not warranted and is subject to change
without notice or obligation. PDi reserves the right to change this policy without advance notice.
Table of contents
Other PDi Control Unit manuals


