PEACOCK THRUSH User manual
Before you begin, read these instructions completely and carefully.
• Be certain electrical power is OFF before and during installation, maintenance and removal.
• Fan wiring must be properly grounded in accordance with the NEC and any applicable local code requirements.
• Use only UL or IEC approved wire for input/output connections.
• Verify that supply voltage matches voltage on fan label. Installation to any other connection may void the warranty.
• Wear gloves during installation to prevent injury and do not expose wiring to metal or sharp edges.
IMPORTANT SAFETY PRECAUTIONS
WARNING: To reduce the risk of fire, electrical shock, or personal injury, mount this fan to an outlet box marked "Acceptable for Fan Support of
22.7kg (50lbs)" or less and use Mounting Screws provided with the outlet box. CAUTION: Install the primary mounting means and use only the
hardware provided with the fan.
To reduce the risk of personal injury, do not bend the blade brackets when installing the brackets, balancing the blades or clearing the fan. Be
careful not to insert foreign objects in between rotating fan blades.
To reduce the risk of fire or electrical shock, do not use this fan with any solid-state speed control device.
The important safeguards and instructions appearing in this manual are not meant to cover all possible conditions and situations that may occur.
It must be understood that common sense, caution and careful attention to detail are factors which cannot be built into this product. These
factors must be supplied by the person or persons installing, caring for, and operating the unit.
This product should be installed, inspected and maintained by a qualified and licensed electrician. Installation of luminaire must be in accordance
with NEC and local code requirements.
ELECTRIC SHOCK FALLING PARTS
ABRASIONS BURNS
THRUSH CEILING FAN E26 LED
Installation Manual
REV 2022 0919
SPECIFICATIONS AND DETAILS ARE SUBJECT TO CHANGE WITHOUT NOTIFICATION. CONTACT PEACOCK FAN COMPANY FOR UP TO DATE DETAILS.
PEACOCK FAN COMPANY • PEACOCKFAN.COM
SAVE THESE INSTRUCTIONS 1
THRUSH CEILING FAN E26 LED
Installation Manual
REV 2022 0919
SPECIFICATIONS AND DETAILS ARE SUBJECT TO CHANGE WITHOUT NOTIFICATION. CONTACT PEACOCK FAN COMPANY FOR UP TO DATE DETAILS.
PEACOCK FAN COMPANY • PEACOCKFAN.COM
SAVE THESE INSTRUCTIONS 2
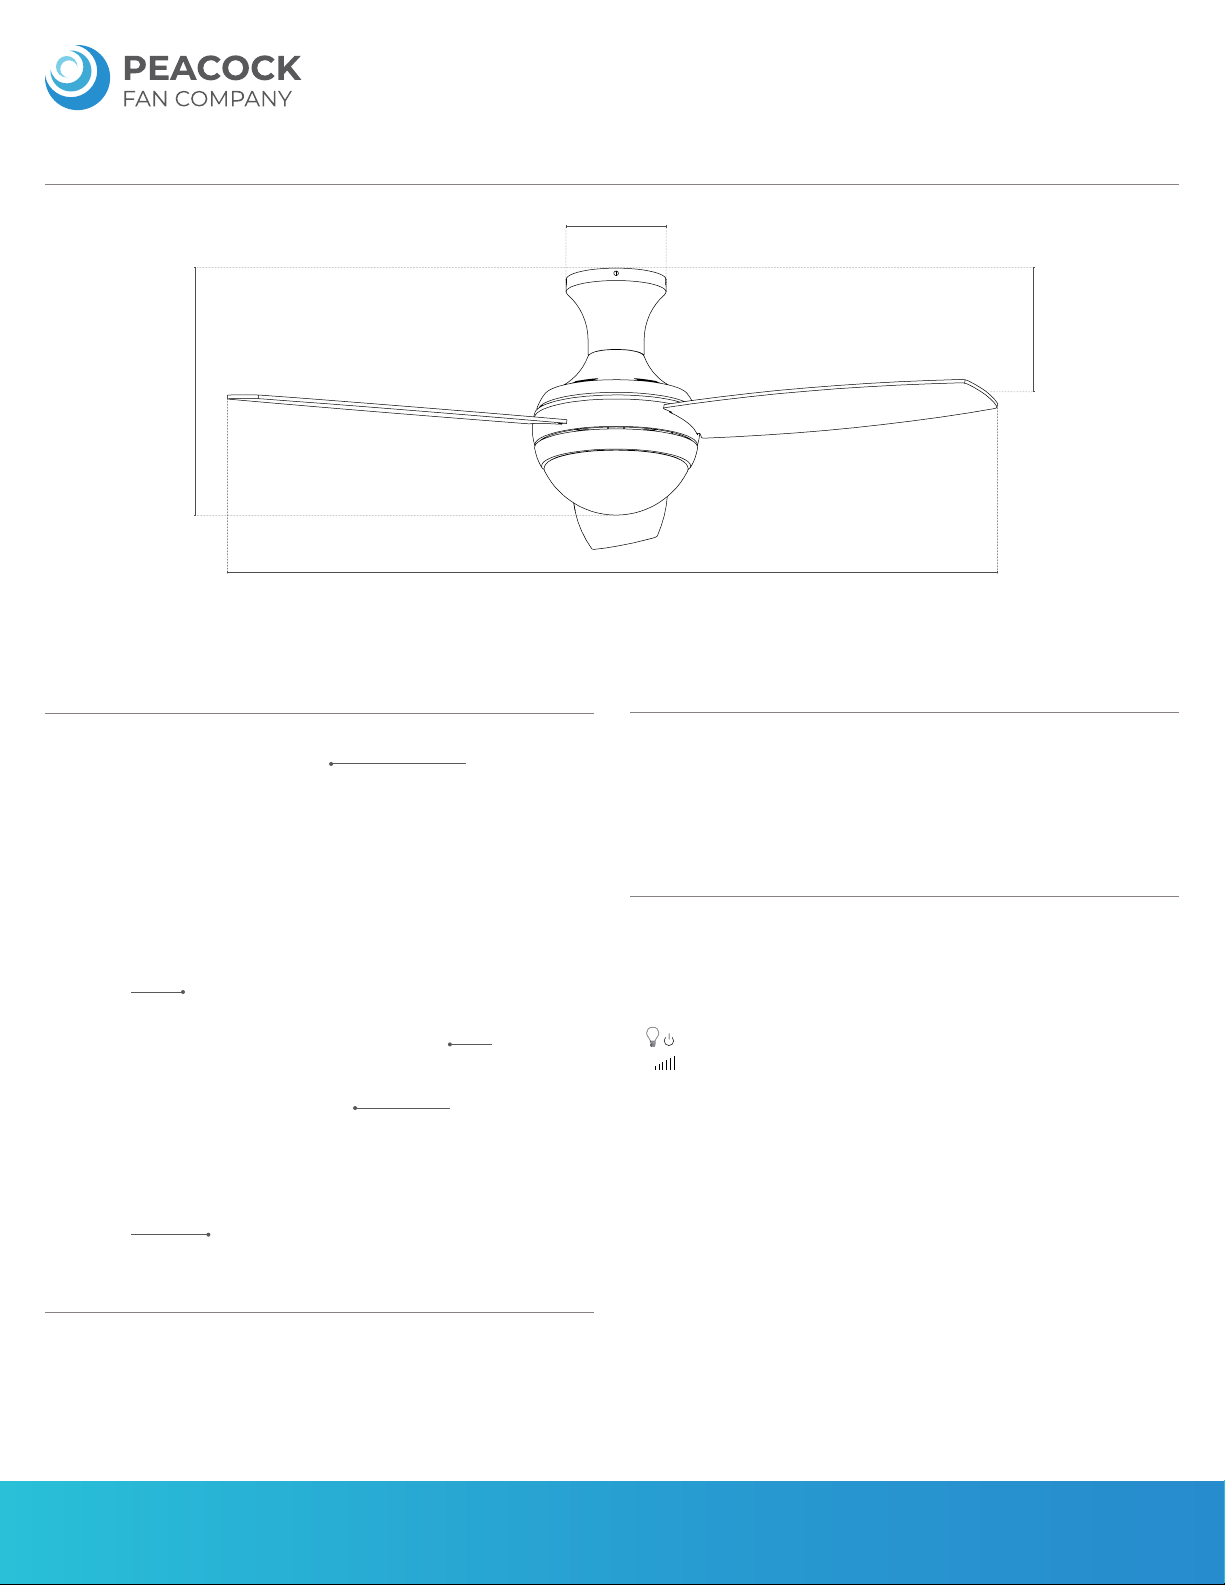
DIMENSIONS
PRODUCT PARTS
Mounting Bracket
Light Kit
Blade Screws
& Washers
Center Band
9.4”
52”
14.5”
6”
Glass
INSTRUCTIONS
TOOLS NEEDED
• Philips Screw Driver
• Flathead Screw Driver
• Wiring supplies as required by electrical code
• Step Ladder
• Wire Cutters
The slide switch is for forward/reverse rotation.
In cold weather: Set to reverse rotation (clockwise). Airflow will be directed upward,
circulating warm air.
In warm weather: Set to forward rotation (counter-clockwise). Airflow will be directed
downward, circulating cold air.
REMOTE CONTROL
Install 9V battery (not included).
Operation Buttons:
1 - Fan Speed - High
2 - Fan Speed - Medium
3 - Fan Speed - Low
- Light On/Off
- Light Dimmer
NOTE: Hold down to increase or decrease the light. The light has a memory function
so the light will stay at the same brightness as the last time it was turned off.
THRUSH CEILING FAN E26 LED
Installation Manual
REV 2022 0919
SPECIFICATIONS AND DETAILS ARE SUBJECT TO CHANGE WITHOUT NOTIFICATION. CONTACT PEACOCK FAN COMPANY FOR UP TO DATE DETAILS.
PEACOCK FAN COMPANY • PEACOCKFAN.COM
SAVE THESE INSTRUCTIONS 3
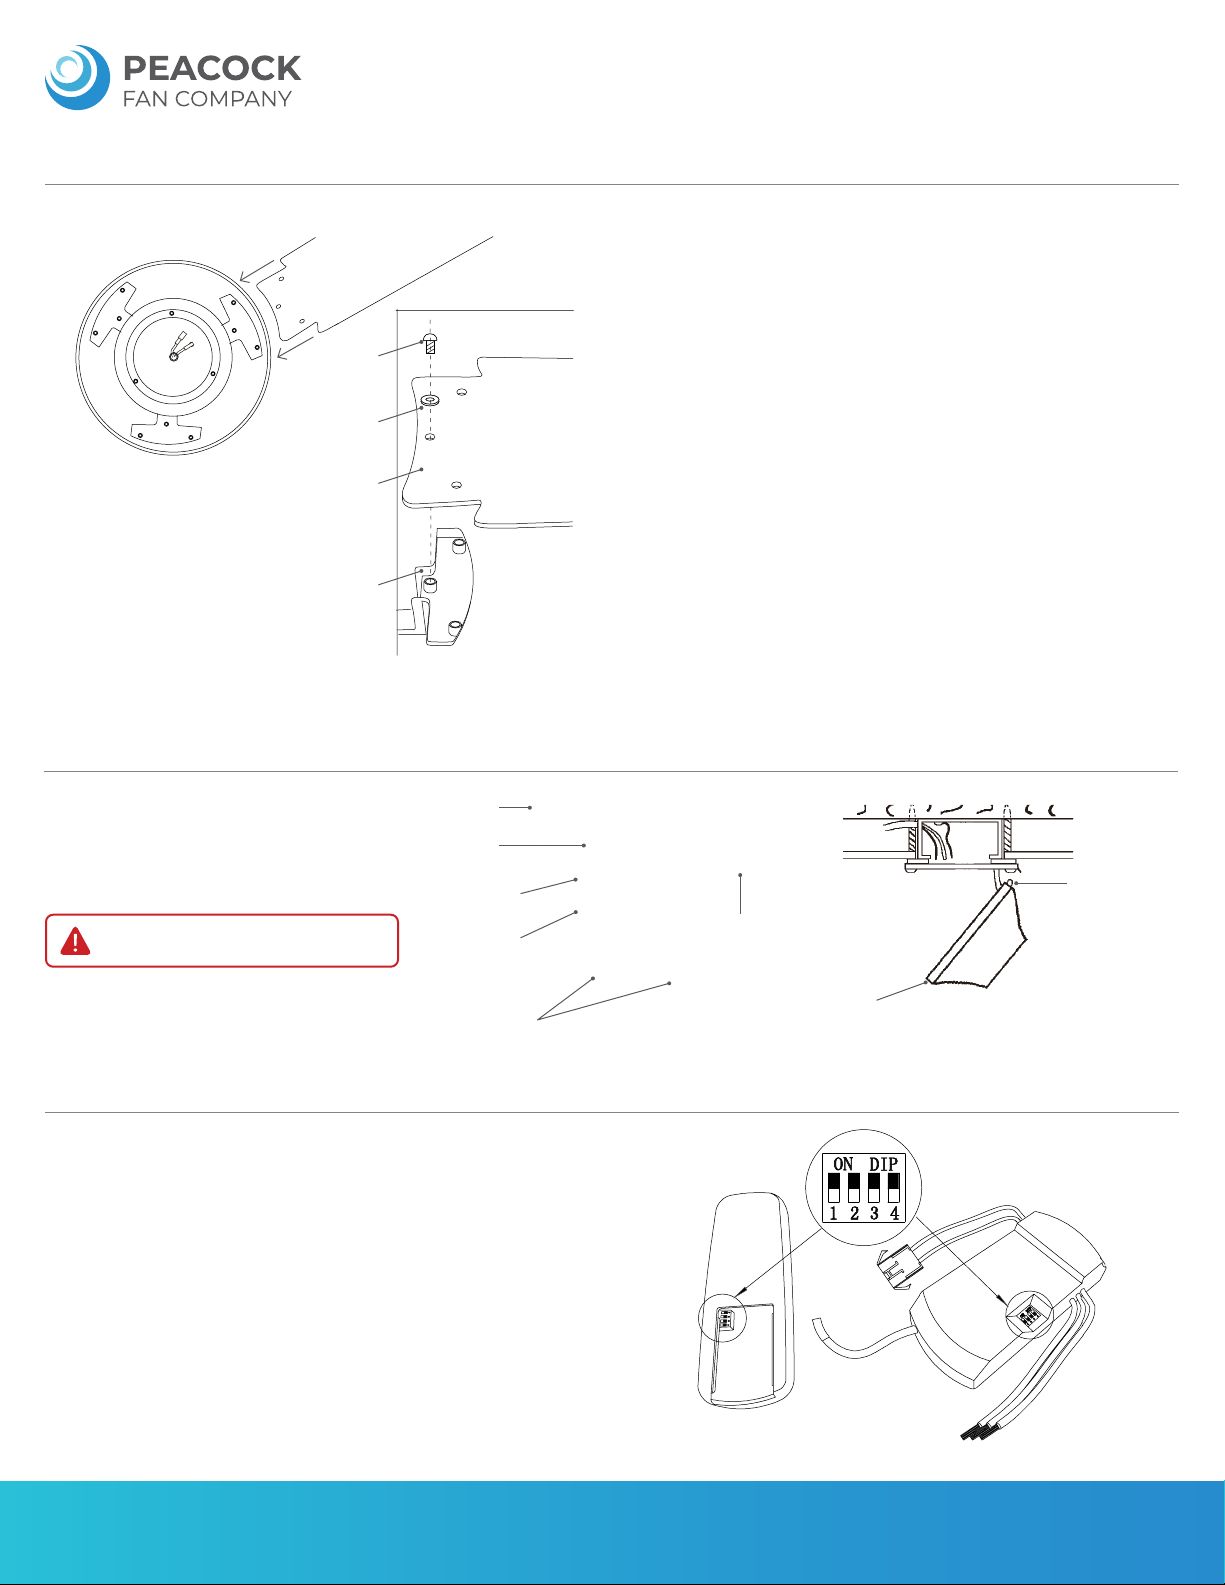
FAN BODY INSTALLATION
MOUNTING BRACKET INSTALLATION
ELECTRICAL CONNECTIONS
A) Set the code on the hand-held remote and receiver so they are the same.
B) Remove the battery cover on the hand-held remote (press firmly below the arrow
and slide the battery cover off.)
C) Set code switches to desired position.
D) Set the code switches to the same positions on the receiver as set on the remote.
A) Secure mounting bracket and rubber gaskets to
outlets.
B) Hang fan on the temporary hook.
Wood
Joist
Outlet
Box
Rubber
Gasket
Mounting
Bracket
Outlet Screws
Ceiling
Temporary Hook
Canopy
WARNING: To reduce the risk of re, electric shock, or personal
injury, mount to UL/CSA Listed outlet box marked acceptable for
fan support and use mounting screws provided with the outlet box.
A) Attach the blades to the fan motor assembly using the screws and flat washers. B) Connect polarized connectors of light kit to the corresponding connectors found in
motor assembly.
C) Install the light kit to the fan motor assembly by tightening three screws.
Blade
Bracket Screw
Fibre Washer
Blade
Blade Bracket
THRUSH CEILING FAN E26 LED
Installation Manual
REV 2022 0919
SPECIFICATIONS AND DETAILS ARE SUBJECT TO CHANGE WITHOUT NOTIFICATION. CONTACT PEACOCK FAN COMPANY FOR UP TO DATE DETAILS.
PEACOCK FAN COMPANY • PEACOCKFAN.COM
SAVE THESE INSTRUCTIONS 4
FAN MOUNTING ASSEMBLY
A) Place two screws and washers on mounting plate (marked B on diagram) which correspond with slots in canopy. Screw in two turns.
B) Position canopy to mounting plate aligning slots to screws (marked B on diagram) then turn to lock.
C) Position and tighten the two screws and washers (marked A on diagram) then tighten the two screws (marked B on diagram).
ELECTRICAL CONNECTIONS (CONTINUED)
E) Connect GREEN fan wire to BARE (ground) wire.
F) Connect BLACK receiver unit wire to BLACK supply wire.
G) Connect WHITE receiver unit wire to WHITE supply wire.
H) Connect WHITE receiver unit wire (MOTOR N) to WHITE fan wire.
I) Connect BLACK receiver unit wire (MOTOR L) to BLACK fan wire.
J) Connect BLUE receiver unit wire (FOR LIGHT) to BLUE light wire.
K) After making the wire connections, ensure the wires are spread apart with the
grounded conductor and the equipment grounding conductor on one side of the
outlet box and the ungrounded conductor on the other side of the outlet box.
L) Ensure the splices are turned upward and pushed carefully up into the outlet box.
M) Ensure the 3 connectors on supply wires are turned upward and pushed carefully
up into the outlet box.
N) Position the receiver into the mounting bracket as shown.
RECEIVER OUTLET BOX
Black
White
Ground
Black
White
White
Black
Blue
FAN
White
Black
Blue
Green
SUPPLY
CIRCUIT
120V
DOWN ROD MOUNT INSTALLATION
A) Carefully rotate fan assembly until groove in hemisphere locks over tab of canopy
assembly.
NOTE: When installing fan on sloped ceiling, make sure tab on hanger bracket faces
towards the top of the slope. Depending on the slope, a longer down rod may be
required to prevent fan blades from hitting the ceiling.
WARNING: Failure to seat tab in groove could cause damage to electrical wires and possible shock or re hazard.
Washers
Black
White
A
B
B
A

THRUSH CEILING FAN E26 LED
Installation Manual
REV 2022 0919
SPECIFICATIONS AND DETAILS ARE SUBJECT TO CHANGE WITHOUT NOTIFICATION. CONTACT PEACOCK FAN COMPANY FOR UP TO DATE DETAILS.
PEACOCK FAN COMPANY • PEACOCKFAN.COM
SAVE THESE INSTRUCTIONS 5
LIGHT INSTALLATION
A) Screw in (2) lamps to E26 sockets.
B) Place glass onto the fan and turn to secure.
C) To clean the fixture, turn off the power, wait for it to cool, and wipe the fixture
with a clean, soft cloth.
WARNING: Be sure to turn off power before installing. Ensure that all connections, set screws and screws are
securely tightened before the next step.
OPERATION
A) Turn fan completely off before moving the reverse switch.
B) Set reverse switch to recirculate air depending on season:
• LEFT position in summer (Figure 2).
• RIGHT position in winter (Figure 3).
C) A ceiling fan will allow you to raise your thermostat setting in summer and lower your thermostat setting in winter without feeling a difference in your comfort.
• NOTE: If the reverse switch is set in the middle position (Figure 4), fan will not operate.
D) Attach supplied pull chain extensions or custom pull chain extensions (sold separately) to ends of the pull chains.
Reverse Switch
FIGURE 1 FIGURE 2 FIGURE 3 FIGURE 4
Fan will not operate if switch
is set in middle position.

THRUSH CEILING FAN E26 LED
Installation Manual
REV 2022 0919
SPECIFICATIONS AND DETAILS ARE SUBJECT TO CHANGE WITHOUT NOTIFICATION. CONTACT PEACOCK FAN COMPANY FOR UP TO DATE DETAILS.
PEACOCK FAN COMPANY • PEACOCKFAN.COM
SAVE THESE INSTRUCTIONS 6
TROUBLESHOOTING
A) Fan will not start.
• Check fuses and circuit breakers.
• Check wiring connections to fan.
• Check wiring connections in switch housing.
• CAUTION: Turn power off for last two items.
B) Fan is noisy.
• Check to make sure that all screws in motor housing are snug.
• Check to make sure that blade bracket screws are tight.
• If fan has a light kit make sure switch housing screws and set screws are tight.
• Some fan motors are sensitive to signals from solid state variable controls. If solid state controller is used, change to an alternative control. (Contact factory for a list of
available controls.)
C) Fan wobbles or shakes excessively.
• Check that all blades are screwed firmly into blade brackets.
• Check that blade brackets are secured firmly to motor.
• Check distance from tip of blades to ceiling.
• Check distance between blade tip to blade tip. All measurements should be equal. Loosen blade screws and position blade until even then re-tighten.
• Check that the down rod hemisphere notch is engaged in canopy.
• Check to make sure that jam screws in down rod are tightened.
• Make sure canopy and mounting bracket are tightened securely to wooden joist.
• Make sure warpage has not occurred in wooden blades. If so, contact the customer service department for replacement parts.
Table of contents
Other PEACOCK Fan manuals


Popular Fan manuals by other brands

ELTA FANS
ELTA FANS H03VV-F installation guide

Hunter
Hunter 20714 Owner's guide and installation manual

Emerson
Emerson CARRERA VERANDA CF542ORB00 owner's manual

Hunter
Hunter Caraway Owner's guide and installation manual

Panasonic
Panasonic FV-15NLFS1 Service manual

Kompernass
Kompernass KH 1150 operating instructions


