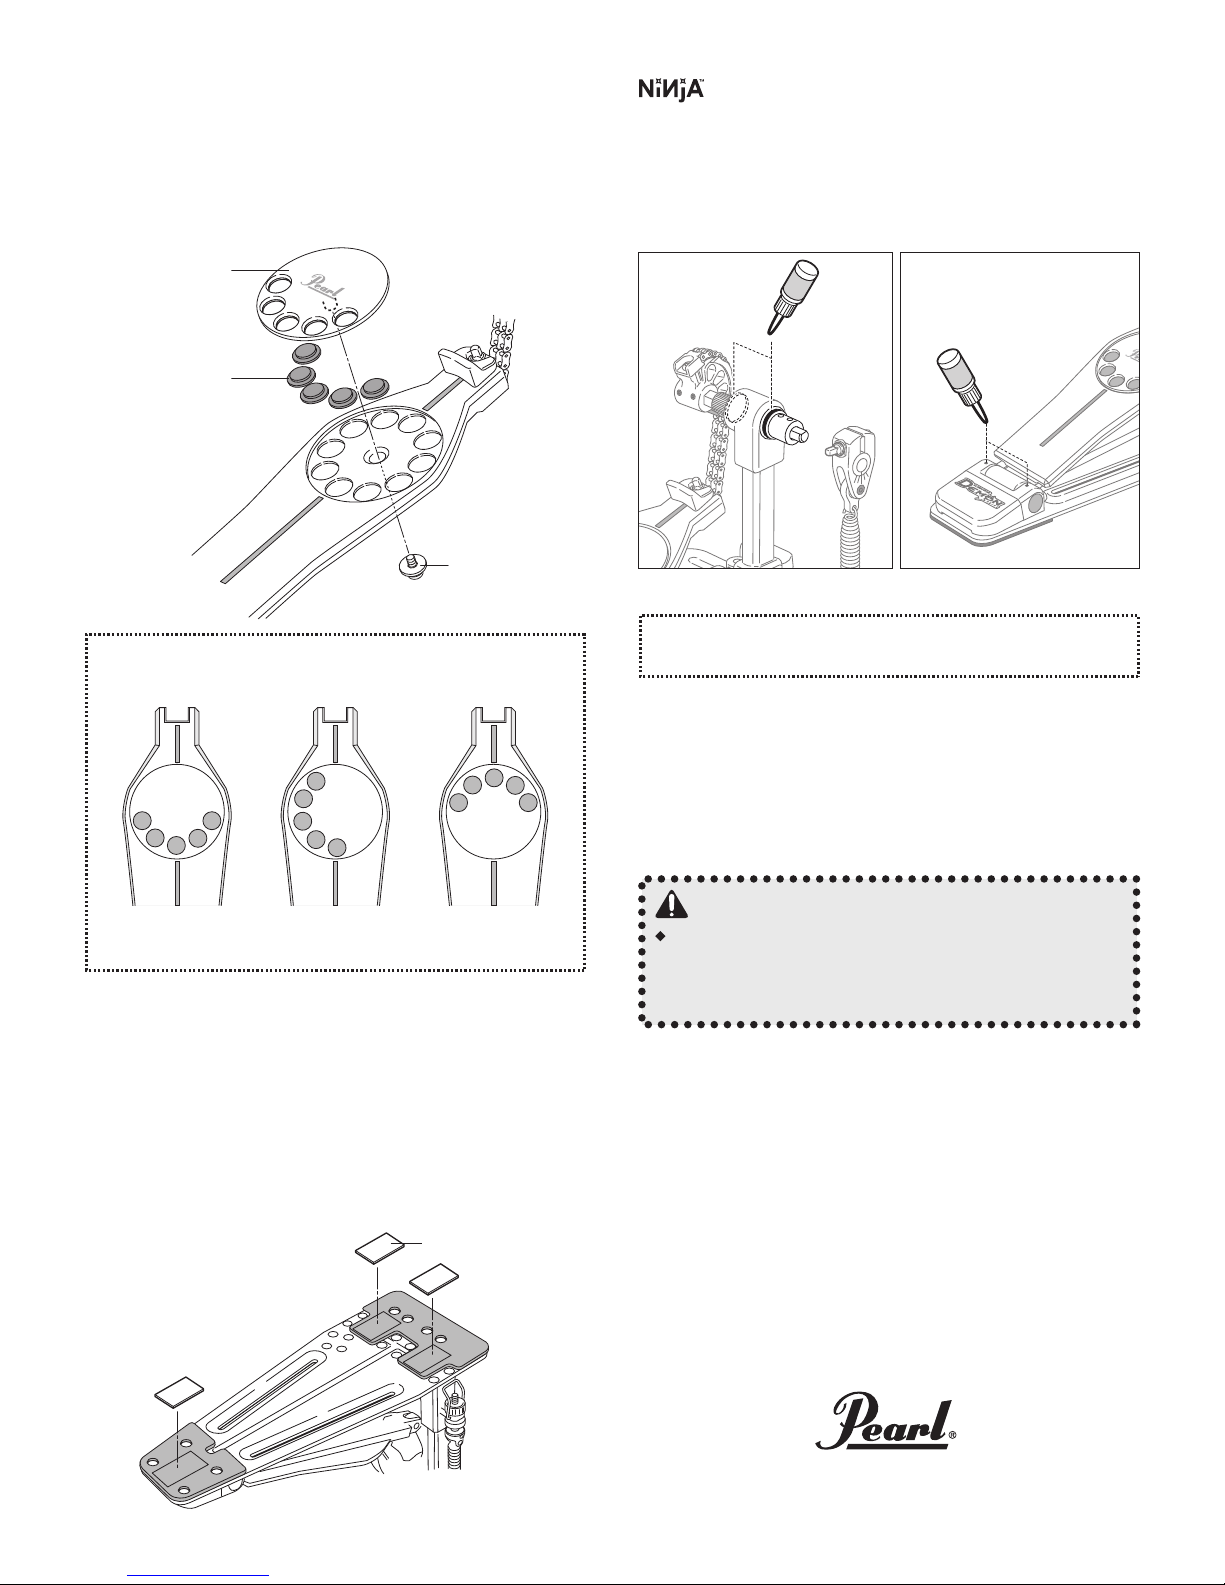
Pearl P-3000C User manual

Instruction Manual
Congratulations on your purchase!
To get optimum performance of your "P-3000C" Drum Pedal,
please read this Instruction Manual before playing.
PEARL DRUM PEDAL
P-3000C
Beater Holder Link
Key Bolt (for Beater
Position Adjustment)
Beater Setting Stopper
Control Core Beater
Uni-Lock Footboard
Angle Cam
Upper Nut
Lower Nut
Click Lock
Wing Bolt
Adjustment Knob
Key Bolt
(for Footboard Angle
Adjustment)
Traction Dot
Traction Plate Key Bolt
(for Beater Stroke
Adjustment)
Multi Function
Drum Key
Long Footboard
Short Footboard
Included Items
Oil, Velcro Tape (x3), Allen Wrench (3mm, 2.5mm)
Footboard
Duo-Deck
Hinge
Heel Plate Hoop Clamp
Bottom Plate

In the initial factory setting, the
Index Mark is centered in the
Window as shown (Fig. 2).
Index Mark
Index Mark
Initial
Setting
Beater Holder Link
Key Bolt
Beater Setting Stopper
Control Core Beater
Key Bolt
Drum Key
Beater Setting Stopper
Allen Screw
Beater Holder Link
Fig. 2
Fig. 1-B
Fig. 1-A
Fig. 3
Fig. 4-A
Fig. 6
Control Core Beater Setting
Insert the Control Core Beater into the Beater Holder Link
until it stops against the Beater Setting Stopper, and tighten
the Key Bolt with the provided Multi Function Drum Key
(Fig.1-A). Make sure that the Beater Setting Stopper is flush
against the Beater Holder Link with the flat face square
against the Notch (Fig.1-B).
To change to a higher or shorter beater height, loosen the
Allen Screw on the Beater Setting Stopper with the provided
Multi-Function Drum Key or Allen wench (3mm) then loosen
the Key Bolt on the Beater Holder Link (Fig.3). Set the beater
to the desired height and re-tighten the Key Bolt. Reset the
Beater Setting Stopper flush against the Beater Holder Link
per the instructions above.
Beater Stroke Adjustment
The P-3000C Demon Chain Pedal features Pearl's patented
two-position Beater Holder that can be positioned closer or
farther from the drum head for Finesse "A" Position setting or
Power "B" Position setting respectively.
It also rotates infinitely for perfect beater angle without
changing the footboard angle.
Changing the Beater Holder Position
To change to the Power setting, loosen the Key Bolt to open
the clamp and slide the Beater Holder to the Power setting
position (Fig.4-A, 4-B). There is no need to remove the Key
Bolt from the clamp.
Beater Angle Adjustment
To change the angle of the Beater, loosen the Key Bolt and
set the angle to your preference and re-tighten the Key Bolt
(Fig.5).
Fig. 4-B
"B" Position (Power)"A" Position (Finesse)
The Beater Setting Stopper preserves the height setting if the
beater is removed when transporting the pedal.
Indicator marks are provided for referencing Beater angle settings
(Fig.6).
Tip
Tip
Tip
Tip
The Beater Holder is set at the factory in the Finesse "A" Position.
Fig. 5
A B
Beater Holder Link

Initial
Setting
Uni-Lock Footboard Angle Cam
Key Bolt
Drum Key
Heel Plate
Hinge
Hinge
Flat Head Screw
3-Piece Screw
Bottom Plate
Footboard
Fig. 9
Fig. 10
Fig. 8-A
Duo-Deck Footboard
The P-3000C features Pearl's patented Duo-Deck
Footboard, the world's first convertible Short / Long
Footboard.
To convert the Duo-Deck to a Long Footboard, turn the
pedal over and remove the four Flat Head Screws with the
provided Multi-Function Drum Key or Allen wrench (3mm)
as shown and remove the Heel Plate and the Hinge from the
Bottom Plate (Fig.9).
Lift the Footboard and remove the four 3-Piece Screws with
the provided Multi-Function Drum Key or Allen wrench
(3mm) as shown, and remove the Hinge from the Footboard
(Fig.10).
Footboard Angle Adjustment
The Footboard Angle can be adjusted by loosening the Key
Bolt on the Uni-Lock Footboard Angle Cam and adjusting it
to the desired angle (Fig.8-A). Re-tighten the Key Bolt to
secure the angle. A gauge on the side of the Angle Cam is
provided to reference Footboard Angle settings (Fig.8-B).
Long FootboardShort Footboard
Fig. 8-B
Tip
Note
If the Beater is too far from the Bass
Drum Head, the Footboard can
touch the Hoop Clamp and cause
damage to the Footboard and/or the
Hoop Clamp. To prevent damage,
please refer to (Fig.7), and adjust the
Beater angle as shown.
The Duo-Deck is set at the factory in the Short Footboard setting.
Fig. 7

Heel Plate
Hinge
Hinge
3-Piece Screw
Flat Head Screw
Flat Head
Screw
3-Piece
Screw
3-Piece Screw
Bottom Plate
Footboard
Upper Nut
Spring
Allen Screw
Allen wrench
Adjustment Knob
Wing Bolt
Lower Nut
Click Lock
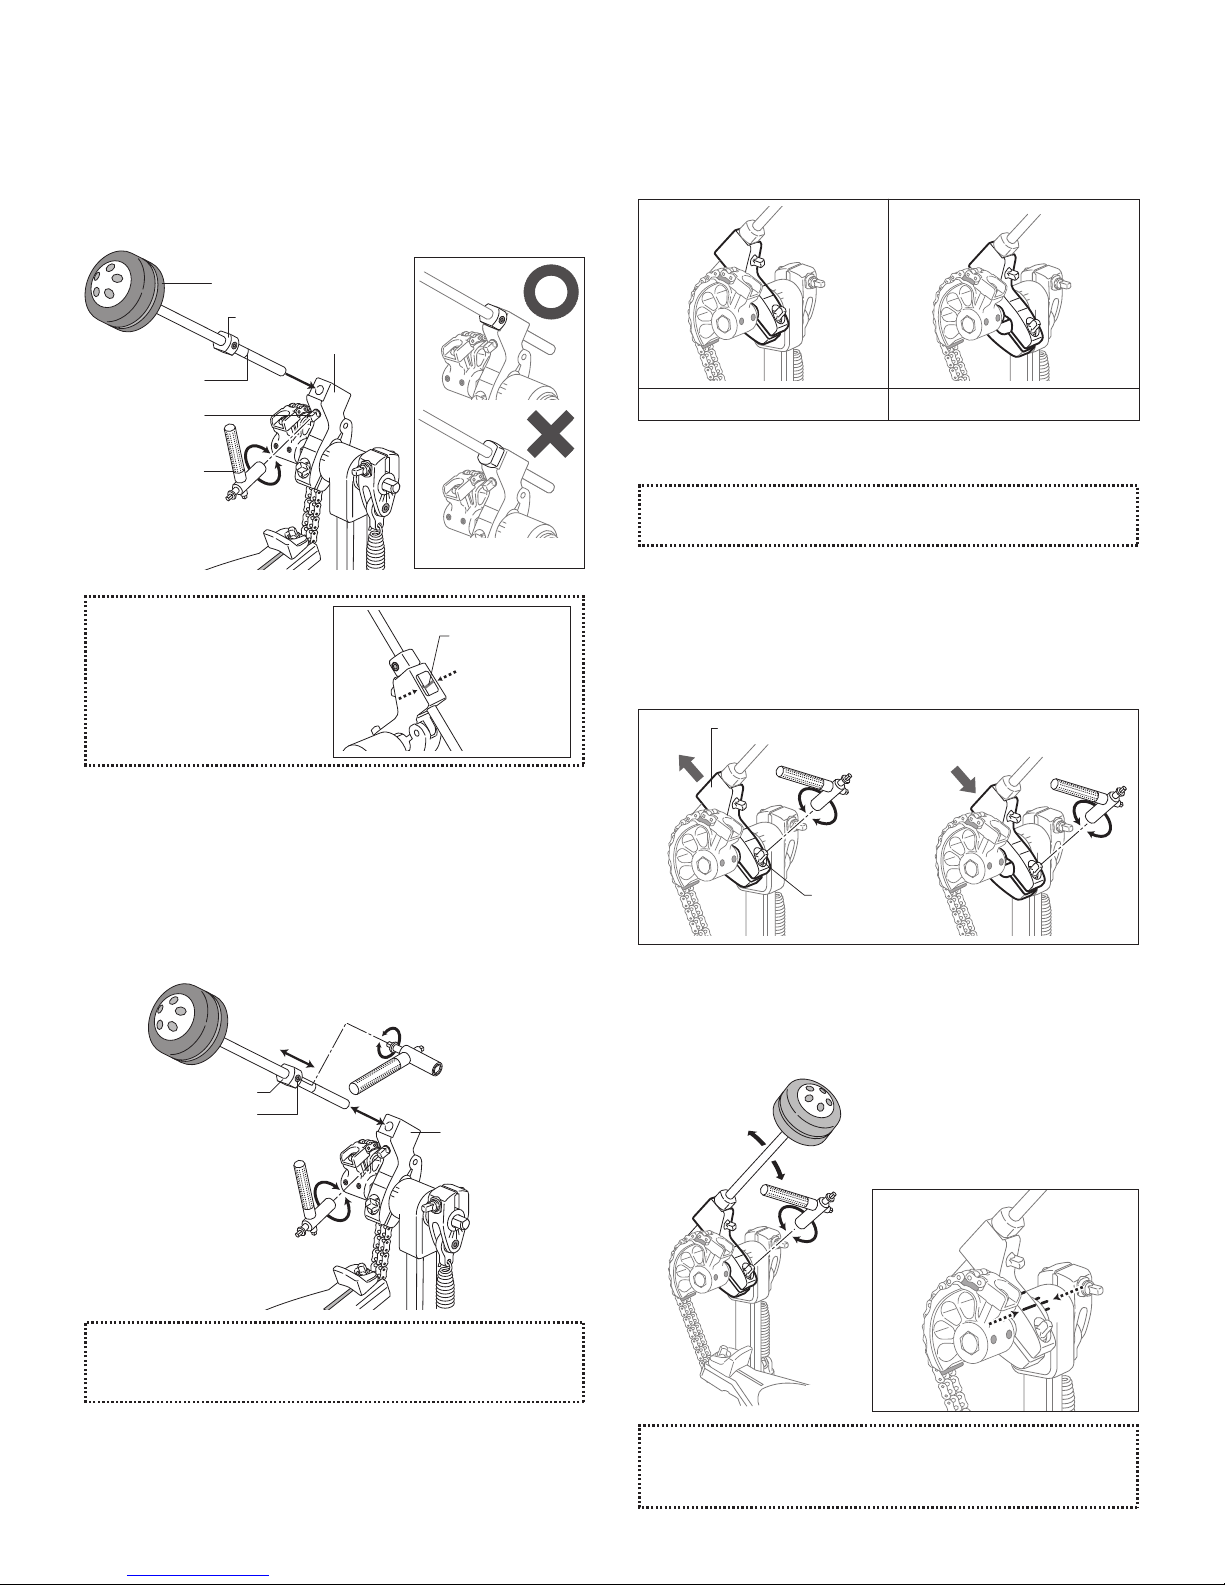
Spring Tension Adjustment
The P-3000C Demon Chain Pedal features Pearl's patented
Click Lock spring tension retention system. To increase the
spring tension, disable the Click Lock by lifting the lever
upward, loosen the Upper Nut and tighten the Lower Nut
until the desired tension is achieved (Fig.13-A). To decrease
spring tension, disable the Click Lock by lifting the lever
upward, loosen the Upper Nut and loosen the Lower Nut
until the desired tension is achieved. When the desired
spring tension is achieved, tighten the Upper Nut to keep
the spring tension from loosening then press the Click Lock
lever down to engage the grooves around the Lower Nut
until you feel the lever "Click" (Fig.13-B). Before playing,
make sure that both Upper and Lower Nuts are tight and the
Click Lock lever is in a vertical position with both sides of
the lever engaged in the grooves around the Lower Nut.
Hoop Clamp System
The P-3000C Hoop Clamp System is designed with
Spherical Rubber Grips allowing the front of the bass drum
to be raised while keeping the pedal flush on the floor.
Insert the bass drum hoop into the clamp, and turn the Wing
Bolt to secure.
The clamp comes preset from the factory to accommodate
most bass drum hoops but if necessary it can be adjusted
to fit thicker or thinner hoops. Loosen the Allen Screw on the
Adjustment Knob with the provided Allen wrench (2.5mm)
as shown and tighten or loosen the Adjustment Knob until
proper fit is achieved then re-tighten the Allen Screw
(Fig.14). If the heel plate of the pedal lifts while playing, try
loosening the Adjustment Knob to change the angle of the
Hoop Clamp until the pedal remains flat.
Reattach the Hinge to the Footboard in the position shown
with two 3-Piece Screws using the provided Multi-Function
Drum Key or Allen wrench (3mm) (Fig.11).
Place the Heel Plate between the Footboard and the Hinge
(Fig.12) and attach the Heel Plate with the remaining two
3-Piece Screws using the Mutli-Function Drum Key or Allen
wrench (3mm). Attach the Hinge to the Bottom Plate with
two Flat Head Screws using the Multi-Function Drum Key or
Allen wrench (3mm) (Fig.12). The Hinge is now located at
the back of the Footboard to achieve a Long Footboard.
Fig. 13-B
Fig. 14
Fig. 13-A
Fig. 11
Fig. 12
The Duo-Deck Footboard uses two
different types of screws. Make sure
to use the correct screws.
Note

http://www.pearldrum.com
Products and specifications are subject to change without notice.
Printed in China
-1504-
Traction Dot
3-Piece Screw
Traction Plate
Velcro Strips
Traction Plate / Traction Dots
The Traction Plate adjusts to a variety of grip/slide
configurations. To change the position of the Traction Dots,
use the Multi-Function Drum Key or Allen wrench (3mm) to
remove the 3-Piece Screw beneath the footboard and
remove the Traction Plate (Fig.15). Rearrange the Traction
Dots to your preference and replace the Traction Plate.
Velcro Strips for Slip Prevention
Velcro Strips are provided with the P-3000C pedal to help
prevent slipping when used on carpeted floors. To apply,
peel off the backing on the Velcro Strips and apply them in
the locations shown. Clean the surfaces thoroughly with
alcohol and dry completely for best adhesion (Fig.16).
Fig. 15
Fig. 16
Tip
Setting Examples
The Aluminum Traction Dots can be replaced with optional
NP-283N/7 Rubber Dots for more traction.
Check all Key Bolts and Allen Screws for tightness
before performances, and tighten them with the
provided Multi-Function Drum Key or Allen wrenches
as needed.
Optional Items (sold separately)
. Control Core Wood Beater (B-300W)
. Traction Rubber Grip (NP-283N/7)
. NiNjA Oil (OL-300)
CAUTION
For best results, always use genuine NiNjA Oil.
Note
Oil
The P-3002C features precision NiNjA bearings for
incredible speed and smoothness. To keep them functioning
at their maximum speed and performance it's recommended
that you apply genuine NiNjA Oil at regular intervals
(Fig.17). NiNjA Oil is also ideal for use on the footboard
hinges to maintain "like-new" performance (Fig.18).
Fig. 17 Fig. 18
Table of contents
Other Pearl Music Pedal manuals

Pearl
Pearl Eliminator Demon Drive Specification sheet

Pearl
Pearl Eliminator Demon Drive Specification sheet

Pearl
Pearl Eliminator Demon Drive P-3002D Installation guide

Pearl
Pearl Demon Drive 3000C Series User manual

Pearl
Pearl P-3002D User manual

Pearl
Pearl Eliminator Demon Chain User manual

Pearl
Pearl P-2050C User manual

Pearl
Pearl P-1000 User manual

Pearl
Pearl P-120 User manual

Pearl
Pearl P-2052C User manual