PECPEC
PECPEC
PECOO
OO
O
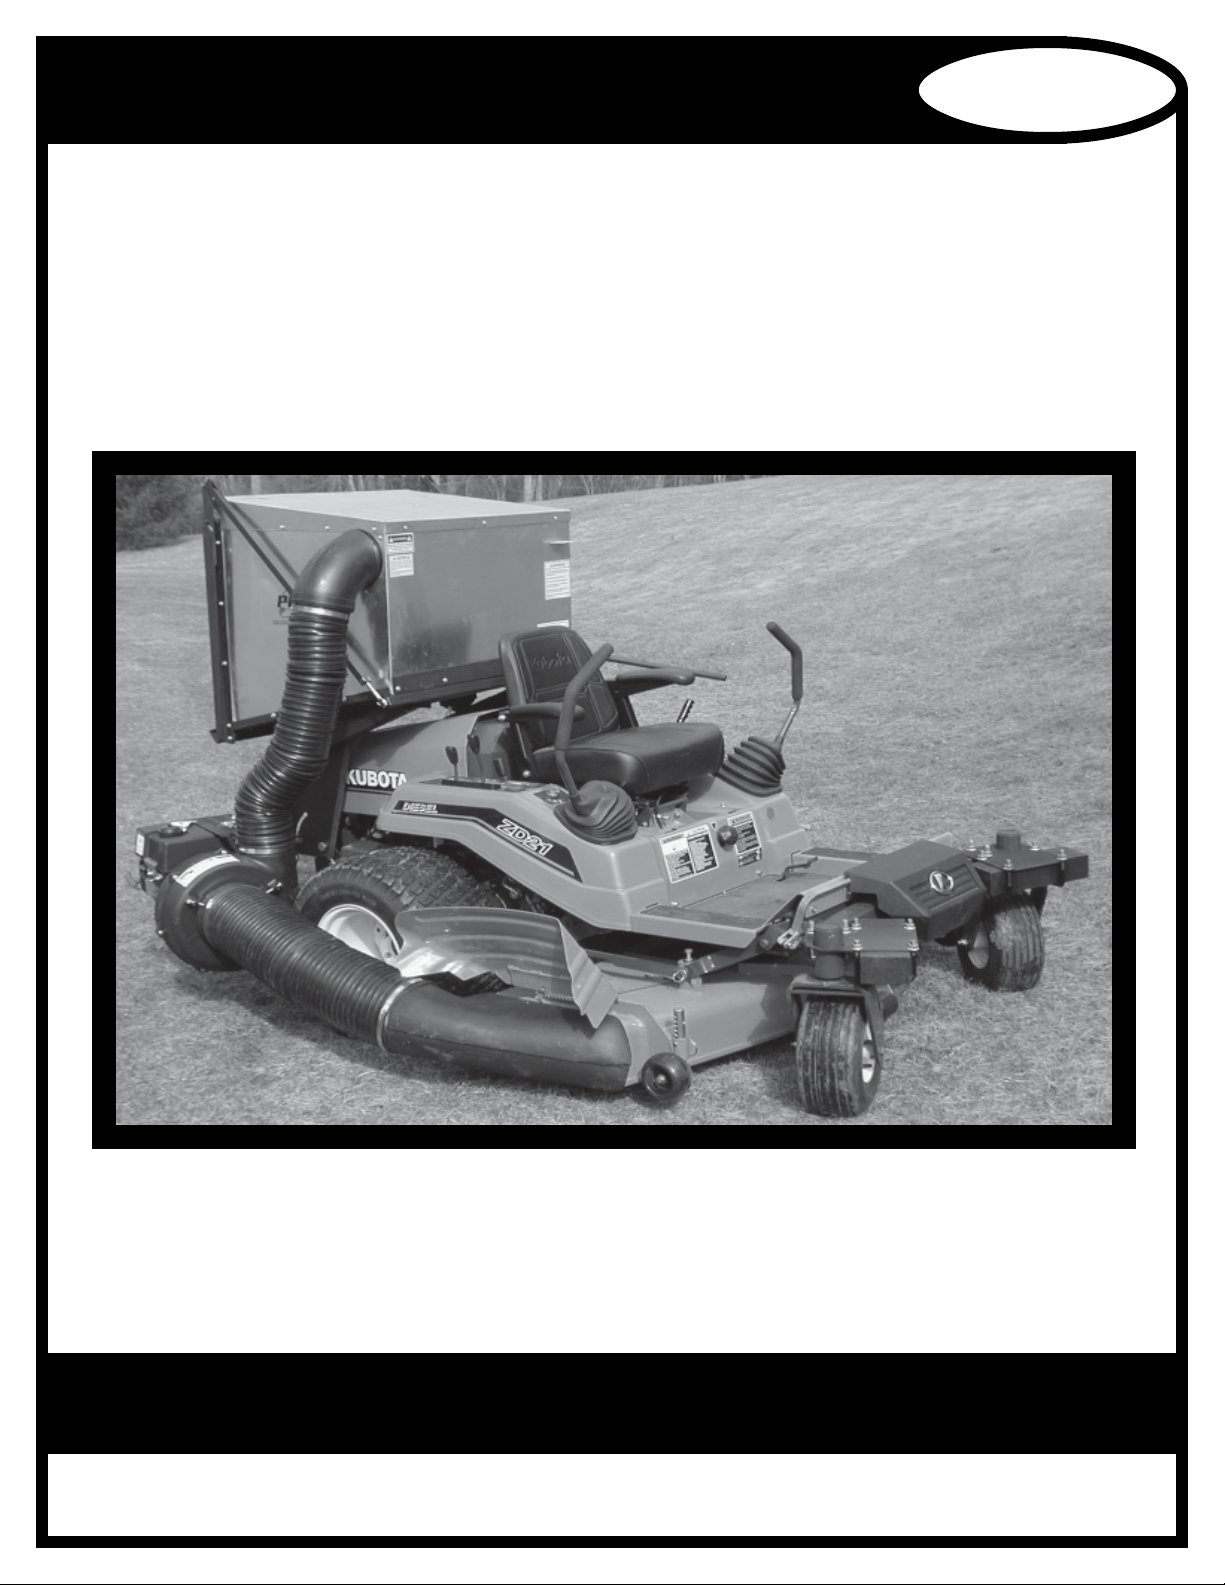
MODEL 2862MODEL 2862
MODEL 2862MODEL 2862
MODEL 2862
11
11
1
2020
2020
20
1 - 01 - 0
1 - 01 - 0
1 - 044
44
4KUBKUB
KUBKUB
KUB
OO
OO
OTT
TT
TA ZD1A ZD1
A ZD1A ZD1
A ZD1
8 & ZD28 & ZD2
8 & ZD28 & ZD2
8 & ZD2
11
11
1PECOPECO
PECOPECO
PECO
WW
WW
WARRANTARRANT
ARRANTARRANT
ARRANTYY
YY
Y
22
22
2
PP
PP
PeCo LimitedeCo Limited
eCo LimitedeCo Limited
eCo Limited WW
WW
Warar
arar
arrr
rr
ranty fanty f
anty fanty f
anty for Neor Ne
or Neor Ne
or New Prw Pr
w Prw Pr
w Productsoducts
oductsoducts
oducts
A. WHAT IS WARRANTED?
PeCo extends the following
warranties to the original
purchaser of each new PeCo
consumer product subject to the
following limitations.
1. PRODUCT WARRANTY.
Any part of any consumer
product,which is defective in
material or workmanship as
delivered to the purchaser
will be repaired or replaced,
as PeCo elects, without
charge for parts or labor, if
the defect appears within 12
months from the date of
delivery of the product to the
original purchaser. ALL
DEFECTIVE PARTS MUST BE
RETURNED TO PeCo FOR
INSPECTIONTO DETERMINE
VALIDITY OF WARRANTY
CLAIMS. Freight and mailing
charges will be borne by the
customer.
2. PARTS REPLACED
DURING WARRANTY.
Any new PeCo part which is
furnished in performance of
this warranty and is defective
in material or workmanship
as delivered to the purchaser
will be repaired or replaced,
as PeCo elects, without
charge if the defect appears
within 90 days from the date
of installation of such part or
before the expiration of the
original warranty period,
whichever is later.
F. NO REPRESENTATIONS
ADDITIONALWARRANTIES,
DISCLAIMER.
Neither PeCo, Inc.nor any company
affiliated with it makes any
warranties, representations or
promises as to the quality of
performance of its products other
than those set forth herein. Except
as described above, PeCo, Inc.
makes no other warranties AND
SPECIFICALLY DISCLAIMS ANY
AND ALL IMPLIED WARRANTIES
OF FITNESS AND
MERCHANTABILITY.
G. ANY MACHINE USED FOR
RENTAL OR COMMERCIAL
PURPOSES ARE GUARANTEED
FOR 45 DAYS FROM DATE OF
ORIGINAL SALE ONLY.
H. REMEDIED EXCLUSIVE.
The only remedies the purchaser
has in connection with the breach
or performance of any warranty on
PeCo, Inc. consumer products are
set forth above. In no event will
PeCo be liable for special incidental
or consequential damages.
I. NO SERVICE CENTER
WARRANTY.
The selling Service Center makes
no warranty on his own on any item
warranted by PeCo, Inc. unless he
delivers to purchaser a separate
written warranty certificate
specifically warranting the item.
The dealer has no authority to make
any representation or promise on
behalf of PeCo or to modify the
terms of limitations of this warranty
in any way.
B. SECURING WARRANTY
ADJUSTMENTS
Damaged or broken parts other
than engines or batteries, must be
returned to PeCo, Inc., P.O. Box
1197, Arden, NC 28704 before any
warranty adjustment can be
authorized. At the time of
requesting warranty adjustment,
the purchaser must present
evidence of the date of delivery of
the product. The purchaser shall
pay any charge for transporting
the product to and from Arden,NC.
C. ITEMS NOT COVERED BY
PeCo WARRANTY.
Engines and batteries attached to
PeCo products are covered under
a separate warranty by the
respective manufacturer.
D. UNAPPROVED ALTERATION
OR MODIFICATION.
All obligations of PeCo, Inc.under
this warranty shall be terminated
if products are altered or modified
in ways not approved by PeCo, Inc.
E. ACCIDENTS AND NORMAL
MAINTENANCE.
The warranty covers only
defective material and
workmanship. It does not cover
depreciation or damage caused by
normal wear, accident, improper
use or abuse of products. The cost
of normal maintenance and
normal replacement of service
items such as belts, cutting
blades, hoses, etc., which are not
defective shall be paid for by the
purchaser.