Pedibal Navigata Cite User manual

User Manual
Important Recommendations:
• Please retain the shipping carton (as helps with any returns for servicing or returns should they be required)
• 2 keys are included we recommend separating these and perhaps getting 3rd cut as replacing these is not possible)
• Keep the battery charged especially if not used for long periods to help extend the battery life (see instructions)
• Please take time to read over the instruction manual for usage safety tips.
pedibal.com
Pedibal Navigata Cite
@pedibal
@pedibal
@pedibalbikes

1
R
Introduction
Thank you for purchasing your e-bike from Pedibal. We take pride in bringing you a quality
product that will offer you years of enjoyment.
We take pride in our bikes and are sure it will offer you years of stable performance and
longevity - we take safety very seriously and are always available for support should your bike
develop any mishaps.
This manual contains details of the product and its features, and information on its operation and
maintenance. Please read it carefully and familiarise yourself with the e-bike before using it in
order to ensure safe use. Be sure to retain this manual as future reference.
Due to the nature of the product, this manual includes many warnings and cautions concerning
the safe operation and consequences if safe operation is not performed in respect to operation
and maintenance of this product. All information in the manual should be carefully studied and if
you have any questions you should contact Pedibal prior to further use.
We cannot anticipate every situation or condition which may occur whilst riding, and therefore
we make no representation about the safe use of the bicycle under all conditions. There are risk
associated with the use of bicycles which are beyond our control, and are the sole responsibility
of the rider. Please note that all content within this manual is subject to change or withdrawal
without notice. Pedibal makes every effort to ensure the accuracy of its documentation and
assumes no responsibility or liability for any errors or inaccuracies that may appear herein.
The product(s) has been verified on a voluntary basis. The product(s) satisfy the requirements of
the Certification Mark of ECM, in reference to the above listed standard(s). The above
Certification Mark can be affixed on the product(s) according to the ECM regulation about its
release and its use. Whereas the manufacturer is responsible for the certification of the
product(s) they are not expected to perform all the necessary activities before placing the
product(s) on the market. The Manufacturer is also responsible to maintain efficient internal
production control to ensure the product(s) are in compliance with the Certification.

2
Important Safety Maintenance
Congratulations on becoming a Pedibal Navigata Owner. Now you have invested in the new E-bike,
we just wanted to remind you of a few important points you should consider every time before you
take your new e-bike out for a ride.
It has become apparent many of our customers are new to Electric Bicycles. Like any moving vehicle
with moving parts fixing points parts subject to moving/vibration. If it is not checked regularly, it can
become loose or detached. So we try to impress that it should become second nature to introduce
regular checks on a regular basis or prior to every use as a precautionary measure.
Check all fixing points are tight and secure and we
have highlighted those in the graphic on this page.
Pre Checks
Tighten All Screws Before Riding
• Always wear a helmet when riding
• Check brakes are secured and work sufficiently
• Check tires are inflated correctly
• Check pedals are tight
• Make sure light and reflectors are present/working

To ensure the safety, make the following functional checks before riding:
Normal operation of the light, brake and power cut system.
Tire pressure (low pressure will effect range and speed).
Wheel axle tightness. Battery charging level.
Braking system adjustment and free operation (wheel should spin freely,
and brake levers should have minimal travel before engaging the brake).
2
Daily Checks
Rear Disc Brake Calliper
Motor (inside wheel)
Front Fork
Integrated LED Light
Seat Post
Saddle
LCD Control Centre
Rear Brake Lever
Front Brake Lever
USB Charging Port
Battery Charging Port
Power Switch
Gear Control
Twist Go Power Cut Button
Seat Post Quick Release
Pedal
Front Disc Brake
Part Description
Magnetic Folding Locking Nut

Folding
1
2
3
4
5
4

Throttle Control
Twist n Go Throttle, to engage the throttle press the red button located
below the gear lever this will enable the Navigata to move independent
of any peddling up to 15.5mph and press again to disengage (if not used
before we suggest to familiarise yourself with this function on open
ground before use on main carriage way)
RR 008 is the indicator that the "Throttle Control" is OFF. Under this
mode the "Cruise control" and "Walking model" will be turned off as well.
To turn on the "Throttle Control", please press the red button.
Control & Display
5
ON/OFF
Display Operation
Please read this manual before you use your Pedibal e-bike. This manual
will guide you to use the product correctly to get the most from your
ride.
Hold button for a few seconds to turn on the power, and hold
button for a few seconds again to turn off the power. When the motor is
not in use for a consecutive 5 minutes, it will automatically shut down
and turn off the power supply.
Assist ratio gear
Light
Walking mode
Cruise control
When riding above 4.5mph, press and hold to
enter cruise mode which will maintain your speed.
Brake, or hold any button to cancel. (Throttle Control
must be engaged)
Hold button for a few seconds to turn on the
integrated headlight (the controller should have
headlight drive output function); hold button for a
few seconds again to turn off the headlight.
Press or to switch between 5 assist levels (1
being the least assist/power consumption, 5 being
the highest assist). The unit defaults to assist 1 when
powered on. Assist 0 will not engage the motor.
Hold button until flashes - the bike maintains a
maximum speed of 3.7mph. Press and hold
button again to cancel this mode. The speed will
fluncturate between 2.8mph to 4.6mph according to
different road conditions. (Throttle Control must be
engaged)
Speed ModeSpeed
Riding Duration Error Code Distance Mode
Battery Level
Assist Level
Light Walk Mode

Control & Display
Press button in Display mode 1 to enter Display
mode 2, 3 and 4.
• Display mode 1 [ODO] - Main display
• Display mode 2 [TRIP] - Trip distance
• Display mode 3 [TM] - Travel time
• Display mode 4 [REE] - Error code
Whilst riding for more than 5 seconds, the unit will
automatically switch back to Display 1
Hold button to turn off both the display and the
power supply.
Speed display
Hold and simultaneously for few seconds to
to switch between different speed display mode.
• [SPEED] - Current speed
• [AVG] - Average speed
• [MAX] - Max speed
Display mode
Code Definition
0 Normal
6 Battery level low
7 Check Motor
8 Check Throttle
9 Check Control
10 UART Error
11 UART Error
Electronic control system failure will display fault code. Once the fault is
no longer detected, the fault code display interface will automatically
exit.
rror Code Display
6

7
When the battery is removed, do not touch the “+” and “-” contacts,
especially with wet hands or metallic objects.
Do not recharge the battery in the inverted position. Doing so would
drastically reduce its lifespan.
Place the charger in a flat, secure place, and connect the output plug to
the socket on the battery pack.
Connect the mains plug (110V/220V terminal) to a power outlet and the
charging will start.
After charging has finished, unplug from the mains (terminal 110V/220V),
and then the battery pack.
Recharge the battery after each use (this will not degrade the lifespan of
the battery).
The battery does not need to be removed from the bike in order to
charge.
Bike needs to be in folded position to remove battery. To remove the
battery - turn the key and then pull the battery forwards (towards the
folding join of the frame) and upwards carefully until the pack lifts out.
The charger will automatically stop once the battery pack is full.
Always charge in dry conditions and indoors away from direct sunlight.
Check charger cables, charger, and battery for damage before
beginning each charge.
Charging tips
With the battery removed
Switch off the power via the switch on the battery pack.
Plug the output lead of the charger into the socket of the battery pack.
Plug the mains adapter into a 110/220V power socket to start charging.
After charging, first unplug from the mains outlet and then from the
battery pack. NOTE: Always charge your battery at temperatures
between 10 and 26 Celsius and ensure the battery is not damaged
before charging.
When the battery is charging on the bike
When properly connected, the indicator light on the charger adapter will
turn red.
For the first charge, you should allow 8-10 hours. If the indicator light
turns yellow, it means the battery is doing a trickle-charge to ensure the
battery is not over-charged. Normal charging takes between 2-8 hours.
The charger is designed to prevent the battery over-charging, but as a
precaution you should not leave the battery charging for more than 24
hours.
Duration of charging
Battery

Battery & Range
Keep the charger in a safe place, away from children.
Do not use the battery when not fully charged as it will decrease its lifespan.
Always use the original charger. Third-party chargers may damage, or shorten the
life of the battery.
The charger works with both 110/220V mains.
The charger does not have any serviceable parts. Please do not open it without
permission.
Avoid charger contact with liquids and/or metal objects. Always be sure it is safely
stored/placed so that it can not suffer damage from a fall/impact.
When in use, the charger should not be covered, to prevent overheating, damage,
or fire.
The charger is only for indoor use. Please keep it in dry and ventilated place.
If you notice a strange smell from the charger or it is too hot, stop charging and
contact Pedibal support. Due to risk of damage or injury, do not attempt to use the
charger.
If charging with the battery removed
In order to reduce consumption, increase autonomy, and extend the motor's
lifespan, use the pedals during the startups and climbs.
Do not twist the throttle too fast. The vehicle should accelerate slowly, reducing
consumption and risk of damage to the electrical system. It’s recommended to use
the pedals to avoid sudden stops and starts.
The vehicle controller has a charge overload protection. If overloaded, energy
supply will be cut automatically and restored when it returns to normal.
While riding, avoid using the throttle as you brake as it may damage the motor.
The maximum load is 120KGs. Exceeding this will cause excess wear and tear.
Important tips while riding
When pushing the e-bike manually, turn off the power to avoid accidental
acceleration.
It is recommended to park indoors.
In a public place, the e-bike must be parked in accordance with local traffic rules.
When parking in any situation, do not forget to switch off the power and remove
the key.
Important tips when parking
Press the battery ON/OFF button and the battery's power LED will display to indicate
power capacity.
Hold down the centre button on the head unit until LCD screen turns on.
For options, please check the LCD display manual for details.
Normal temperature: 25°C. Normal Load. Max speed (15-25mph) miles of journey.
Power consumption of one time charge: ≤0.5kw.h. Economical speed: 11mps.
Economy speed(6mls) miles of journey. Rated load: 90kg. Dead-load: ≤30kg.
The battery range depends on road conditions, riding style, wind direction,
atmospheric temperature, air pressure in the tire and correct use of charging. Please
note this during riding.
8
Flat
Wind 2-3
10mile 20mile 30mile
Flat
Against Wind 2-3
≤2 Degree
Wind 2-3
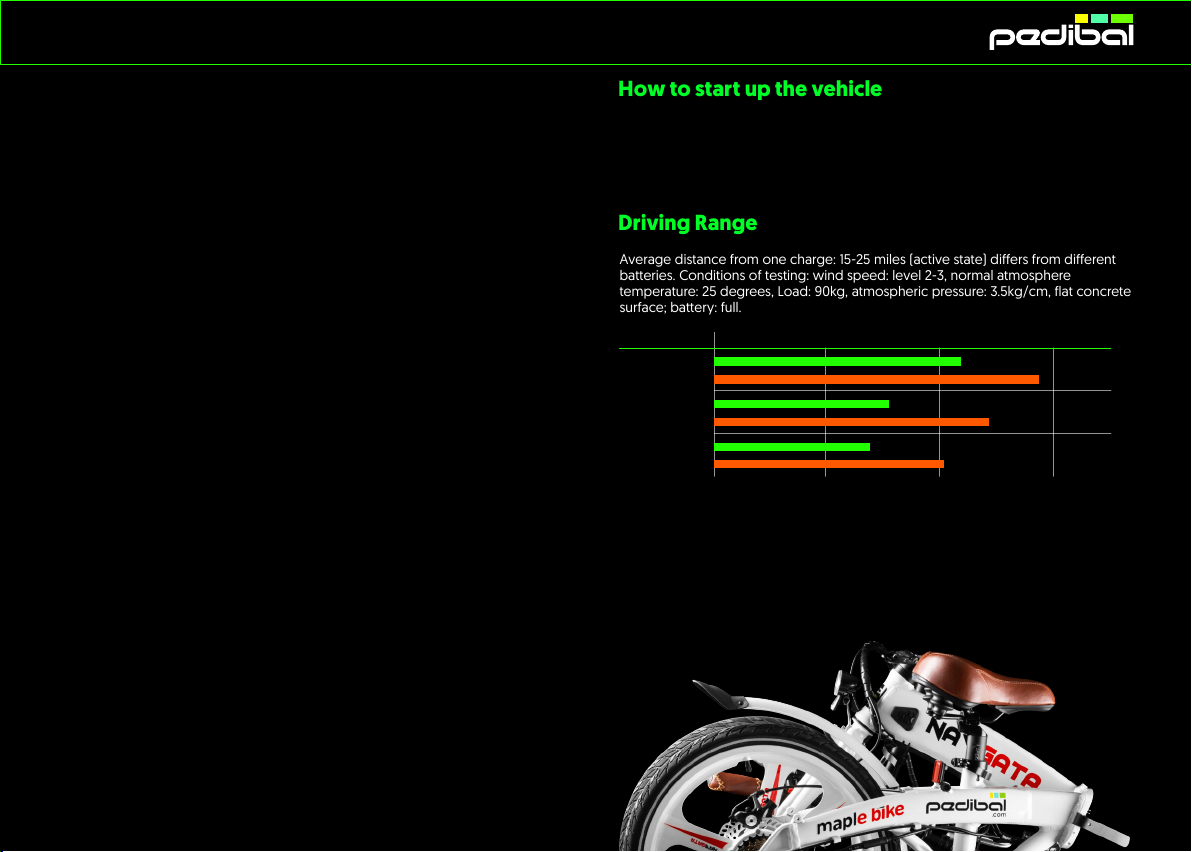
How to start up the vehicle
Average distance from one charge: 15-25 miles (active state) differs from different
batteries. Conditions of testing: wind speed: level 2-3, normal atmosphere
temperature: 25 degrees, Load: 90kg, atmospheric pressure: 3.5kg/cm, flat concrete
surface; battery: full.
Driving Range

Seat post height adjust
Minimum insertion
Maintenance
Tightening and correct operation of both wheels, frame and front fork.
Tire pressure and conditions.
Gearshift correct operation.
Bell and reflectors conditions and correct operation.
Braking system correct operation.
If you do not use the vehicle for long periods of time, charge the battery
at least once a month,To avoid reducing its lifespan.
To ensure safe riding conditions you must properly maintain your bike.
You should follow the basic guidelines below and see your certified
local bike shop seasonally to ensure your bike is safe for using.
Regular self-checks
Do not wash with high pressure jets to prevent water infiltration into the
electrical system and bearings.
Dirt on painted surfaces should be removed with a neutral product and
wiped off with a dry cloth.
Lubricate any exposed pivot points, hinges etc with suitable bicycle
lubricant after washing.
Do not apply lubricant on the brakes, brake levers, rims, tires, battery and
controller.
Avoid touching the brake discs as this can cause contamination of the
brake pads.
Avoid using aerosol-based oils as these can easily contaminate the discs.
Periodically de-grease the chain, and re-apply chain lubrication to the
inside rollers of each link. Wipe off any excess oil from the outside of the
chain to help prevent it attracting contaminants.
To adjust seat height, use quick release lever to free the seat post and
pull upwards or push downwards to reach desired height.
Minimum saddle height
9
1Handlebar 18 - 20
Parts Torque required N.M)
2Handlebar-stem 18 - 20
3Saddle 18 - 20
4Seat-pillar 18 - 20
5Front wheel 16 - 25
6Rear Wheel 25 - 35
7B.B Parts 35 - 55
Maintenance and cleaning tips
Recommended torque values for threaded fasteners

General
Saving battery power and extending your range
Like any sport, bicycling involves risk of injury and damage. By choosing to ride a
bicycle, you assume the responsibility for that risk, so you need to know - and to
practice - the rules of safe and responsible riding and of proper use and
maintenance. Proper use and maintenance of your bicycle reduces risk of injury.
Your bicycle is designed for use by persons 16 years old and above. Riders must
have the physical coordination, reaction time and mental capability to ride and
manage traffic, road conditions, sudden situations and also respect the laws
governing bicycle use where they ride, regardless of age.
If you have an impairment or disability such as a visual impairment, hearing
impairment, physical impairment, cognitive/language impairment, or a seizure
disorder, consult your physician before riding any bicycle.
10
Frequent braking and starting, riding uphill against a strong wind, starting from a
standstill and riding on rough or muddy roads, and carrying more than one person,
or heavy loads will consume extra battery power and shorten the range. A few tips
to prolong the battery life during these condition is as frequently.
Frequent Braking-try to look ahead and coast rather than stop and go frequently.
Riding uphill or against a stiff wind-pedal to supplement the battery power.
When starting from a standstill-use the pedals to help bring you up to speed.
When the battery meter indicators the voltage is low, switch to manual power and
avoid using the battery so you don’t shorten the battery life.
If the battery is being stored, remove the battery from the bicycle and recharge it
every month.
This user manual should be used only to reference use and functions but should
not be used as a reference for inspection.
The images shown may differ from the actual model to technical improvements.
We reserve the right to change the model without prior notice due to technical
improvements.
The vehicle has a top speed limiter. For safety purposes, its removal is strictly
prohibited.
Ensure pre-ride checks are performed before each and every ride.
Only allow others to ride who have already been adequacy trained on the use and
operation of this product
Useful tips
1It doesn’t
work Insufficient battery power
Faulty connections
Key in wrong position
Charge the battery
Clean the connections
Turn the key into the
correct position
Symptoms Possible causes Most common solutions
2Irregular
acceleration
and/or
reduced top
speed
Insufficient battery power
Loose throttle magneto
Damaged throttle spring
Charge the battery
Weld and adjust
Contact an Authorised
Service Center
3When
powered on,
the motor
doesn’t
respond
Loose wiring
Loose throttle magneto
Loose or damaged motor
wiring plugs
Repair and/or reconnect
Weld and adjust
Contact an Authorised
Service Center
4Reduced
range Low tire pressure
Low or faulty battery
charge
Driving with too many hills,
braking, departures, and/or
excessive load
Battery discharged for long
period of time, without
regular charges, aged or
damaged
Adjust the tire pressure
Check the connections
and/or fully charge the
battery
Help with the pedals
Replace the battery
Make a prolonged
battery charge
5The battery
won’t charge Charger not well connected
Battery cases fuse blown
Battery wiring disconnected
or with a bad contact
Adjust the connections
Replace the fuse
Reconnect/repair the
wiring
6Driving wheel
makes strange
noises
Charger not well connected
Battery cases fuse blown
Replace the bearing
Adjust/replace the rim
Important tips while riding
General Warning

Safety
Your bicycle comes with additional documents and manuals the
manufacturers of the system components. These documents must
also be read before using this product.
All users must read this manual before first use.
Ensure that you comprehend with all instruction and safety notes.
Ensure the bikes fits you properly before first use. You may loose
control or fall if your bike is too big or too small.
Always wear an approved bicycle helmet while using this product
and ensure that the helmet manufacturers instructions for fit and
care followed.
Ensure correct tightening and setup is performed on your bicycle
before first use and checked regularly.
It is your responsibility to familiarise yourself with laws and
requirements for the operation of this product in the ares(s) where
you ride.
Ensure handle bar grips are not damaged and improperly installed. Loose or damaged grips can cause
you to lose control and fall.
Failure to wear a helmet when riding many result in serious injury or death.
If you are using standard bicycle trailers, stands, or vehicle bicycle racks. Contact Pedibal E-bike to check if
your equipment will work with the bicycle.
Off-road riding requires close attention and specific skills and present variable conditions and hazards
which accompany the conditions. Wear appropriate safety gear and do not ride alone in remote areas.
Take extra care while riding in wet conditions. Feet or hands can slip in wet conditions and lead to death
or serious injury from a fall.
Do not remove front or rear reflectors or the handlebar bell.
Lights should and must be used in addition to reflectors in most locations.
Engaging in extreme riding is extremely dangerous and should be avoided. Although many articles/
advertisements/catalogue depict riders in extreme terrain this not recommended nor permitted and you
can be seriously injured or killed if you perform extreme riding.
Bicycles and bicycle parts have strength and integrity limitations and extreme riding should not be
performed or you risk damaging the components or becoming seriously injured or killed. -Failure to
confirm proper installation, comparability, proper operation, or maintenance of any component or
accessory can result in serious injury or death.
After any incident you must consider your bike unsafe to ride until you consult with a certified bicycle
service provider for a comprehensive inspection.
Failure to properly charge, store, or use your battery will void the warranty and may cause a hazardous
situation.
Extreme care should be taken when using the pedal assistance sensor on this product. Ensure you
understand and are prepared for the power assistance to prepare you as soon as peddling is underway.
You should check the operation of the brake inhibitor switches before each side. The brake system is
equipped with an inhibitor which shuts down power to the electric motor whenever the brakes are
engaged. Check proper operation slowly while in a controlled environment by riding slowly with the
motor engaged and applying the brake levers are engaged.
User must understand the operation of the twist throttle and pedal assist sensors before using, and take
care in their usage in respect to traveling at speeds appropriate for usage area and user experience level.
Always use the lowest assist level until you are comfortable with the bike and feel confident in controlling
the power.
Any changes to the product not expressly approve by Pedibal E-bike Company could void warranty and
care while riding.
Because electric bikes are heavier and faster than normal bicycles, they require extra caution and care
while riding.
To avoid shock never submerge the electrical components in water or subject to salt water environments.
11
Safety notes before first use
Additional Safety Notes
Helmet to meet EN1078 standard. Make sure that you always wears
an approved bicycle helmet when riding; but also make sure that
you understands that a bicycle helmet is for bicycling only, and must
be removed when not riding. A helmet must not be worn while
playing, in play areas, on playground equipment, while climbing
trees or at any time while not riding a bicycle. Failure to follow this
warning could result in serious injury or death.Do not let a child
younger than 16 years old ride the bicycle.
Note on Helmets
The rider must be 16 Years or over.As a parent or guardian, you are
responsible for the activities and safety of your child, and that
included making sure that the bicycle is properly fitted to the child;
that it is in good repair and safe operating condition; that you and
your child have learned and understand the safe operation of the
bicycle; and that you and you child have learned, understand and
obey not only the applicable local motor vehicle, bicycle and traffic
laws, but also the common sense rules of safe and responsible
bicycling. As a parent, you should read this manual, as well as
review its warnings and the bicycle’s functions and operating
procedures
Additional Noted for parents

Table of contents
Other Pedibal Bicycle manuals