Pegler Yorkshire REMS Mini-Press ACC User manual

FOR A FASTER CONNECTION
PUSH OR PRESS
WITH PEGLER YORKSHIRE
For a comprehensive range of
quality, innovative plumbing
and heating products backed
by a superb technical support
service, make sure you connect
with Pegler Yorkshire.
FREE Phone: 0800 156 0010
email: [email protected]
www.pegleryorkshire.co.uk

2
COMBINED EXPERTISE,
HELPING YOU
CONNECT + CONTROL
GLOBAL EXPERIENCE, COMBINED EXPERTISE
With over 100 years of manufacturing and innovation combined
with extensive industry knowledge and worldwide market
experience, Pegler Yorkshire offers the most advanced and
complete Connect + Control systems on a global scale.
As one of Britain’s largest and most respected manufacturers and
suppliers of products for the plumbing and heating industries,
Pegler Yorkshire is condent we can provide you with all the
connections, controls and support your project requires.

3
PUTTING YOU IN CONTROL
Diverse industry expertise combined with cutting- edge technological innovation
mean Pegler Yorkshire’s Control solutions help you overcome unique challenges
and meet the highest standards in both performance and system aesthetics.
PERFORMANCE WITH PRECISION
Pegler Yorkshire’s Control products enable you to balance precision ow control, energy
efciency and comfort through innovative products and systems that ensure building
performance criteria are met and the resulting installation is easy, efcient and economical to
operate.
CONNECT WITH CONFIDENCE
With a wealth of expertise and the broadest range of solutions and systems on the
market, Pegler Yorkshire’s Connect products mean you’ll complete your installation
as seamlessly, efciently and effectively as possible.
TOTAL FUNCTIONALITY, COMPLETE EFFICIENCY
Pegler Yorkshire’s range of Connect solutions offer innovatively designed, efcient and reliable
products and systems that reduce installation time and cost without compromising quality,
aesthetics or reliability.

4
Fig. 1
Fig. 2 Fig. 3 Fig. 4
1234
5
6
10
9
8
7
REMS Mini-Press ACC

5
Translation of the Original Instruction Manual
The respective latest sales literature applies for the use of REMS pressing tongs,
REMS Mini pressing tongs, REMS pressing rings with adapter tongs, REMS pressing heads and
REMS expanding heads for the different pipe connection systems, see also
www.rems.de > Downloads > Product Catalogues, Brochures. If the system manufacturer alters
components of pipe connection systems or markets new ones, their current application status
change and error.
Fig. 1-4
1 Tongs retaining bolt 2 Pressure plate/button
3 Locking pin/bolt 4 Press rollers
5 Housing grip 6 Safety inching switch
7 Reset button 8 Battery charge indicator
9 Pistol grip 10 Battery
General Safety Instructions for power tools
Read all the safety notes, instructions, illustrations and technical data which come with
this power tool. Failure to heed the following instructions can lead to electric shock, re and/or
severe injuries.
Save all warnings and instructions for future reference.
The term “power tool” in the warnings refers to your mains-operated (corded) power
tool or battery-operated (cordless) power tool.
1) Work area safety
a) Keep work area clean and well lit. Cluttered or dark areas invite accidents.
b) Do not operate power tools in explosive atmospheres, such as in the presence of
ammable liquids, gases or dust. Power tools create sparks which may ignite the dust or
fumes.
c) Keep children and bystanders away while operating a power tool. Distractions can cause
you to lose control.
2) Electrical safety
a) Power tool plugs must match the outlet. Never modify the plug in any way. Do not use
any adapter plugs with earthed (grounded) power tools. Unmodied plugs and
matching outlets will reduce risk of electric shock.
b) Avoid body contact with earthed or grounded surfaces, such as pipes, radiators, ranges
and refrigerators. There is an increased risk of electric shock if your body is earthed or
grounded.
c) Do not expose power tools to rain or wet conditions. Water entering a power tool will
increase the risk of electric shock.

6
d) Do not misuse the connecting cable to carry or hang up the power tool or to pull the
plug out of the socket. Keep the connecting cable away from heat, oil, sharp edges or
moving tool parts. Damaged or knotted cables increase the risk of electric shock.
e) When operating a power tool outdoors, use an extension cord suitable for outdoor use.
Use of a cord suitable for outdoor use reduces the risk of electric shock.
f) If operating a power tool in a damp location is unavoidable, use a residual current
device (RCD) protected supply. Use of an RCD reduces the risk of electric shock.
3) Personal safety
a) Stay alert, watch what you are doing and use common sense when operating a power
tool. Do not use a power tool while you are tired or under the inuence of drugs,
alcohol or medication. A moment of inattention while operating power tools may result in
serious personal injury.
b) Use personal protective equipment. Always wear eye protection. Protective equipment
such as dust mask, non-skid safety shoes, hard hat, or hearing protection used for appropriate
conditions will reduce personal injuries.
c) Prevent unintentional starting. Ensure the switch is in the off-position before connecting
to power source and/or battery pack, picking up or carrying the tool. Carrying power
tools with your nger on the switch or energising power tools that have the switch on invites
accidents.
d) Remove any adjusting key or wrench before turning the power tool on. A wrench or a key
left attached to a rotating part of the power tool may result in personal injury.
e) Do not overreach. Keep proper footing and balance at all times. This enables better
control of the power tool in unexpected situations.
f) Dress properly. Do not wear loose clothing or jewellery. Keep your hair, clothing and
gloves away from moving parts. Loose clothes, jewellery or long hair can be caught in
moving parts.
g) If devices are provided for the connection of dust extraction and collection facilities,
ensure these are connected and properly used. Use of dust collection can reduce
dust-related hazards.
h) Do not take your safety for granted and ignore the safety rules for power tools even if
you are very familiar with the power tool after frequent use. Careless handling can lead to
severe injury within split seconds.
4) Power tool use and care
a) Do not force the power tool. Use the correct power tool for your application. The correct
power tool will do the job better and safer at the rate for which it was designed.
b) Do not use the power tool if the switch does not turn it on and off. Any power tool that
cannot be controlled with the switch is dangerous and must be repaired.
c) Disconnect the plug from the power source and/or the battery pack from the power
tool before making any adjustments, changing accessories, or storing power tools. Such
preventive safety measures reduce the risk of starting the power tool accidentally.
d) Store idle power tools out of the reach of children and do not allow persons unfamiliar
with the power tool or these instructions to operate the power tool. Power tools are
dangerous in the hands of untrained users.

7
e) Maintain power tools. Check for misalignment or binding of moving parts, breakage of
parts and any other condition that may affect the power tool’s operation. If damaged,
have the power tool repaired before use. Many accidents are caused by poorly maintained
power tools.
f) Keep cutting tools sharp and clean. Properly maintained cutting tools with sharp cutting
edges are less likely to bind and are easier to control.
g) Use the power tool, accessories and tool bits etc. in accordance with these instructions,
taking into account the working conditions and the work to be performed. Use of the
power tool for operations different from those intended could result in a hazardous situation.
h) Keep handles and gripping surfaces dry, clean and free from oil and grease. Slippery
handles and gripping surfaces prevent safe handling and control of the power tool in
unforeseeable situations.
5) Battery tool use and care
a) Recharge only with the charger specied by the manufacturer. A charger that is suitable
for one type of battery pack may create a risk of re when used with another battery pack.
b) Use power tools only with specically designated battery packs. Use of any other battery
packs may create a risk of injury and re.
c) When battery pack is not in use, keep it away from other metal objects, like paper clips,
coins, keys, nails, screws or other small metal objects, that can make a connection from
one terminal to another. Shorting the battery terminals together may cause burns or a re.
d) Under abusive conditions, liquid may be ejected from the battery; avoid contact. If
contact accidentally occurs, ush with water. If liquid contacts eyes, additionally seek
medical help. Liquid ejected from the battery may cause irritation or burns.
e) Do not use a damaged or modied battery. Damaged or modied batteries can behave
unexpectedly and lead to res, explosions or injuries.
f) Do not expose a battery for re or high temperatures. Fire or temperatures above 130 °C
(265 °F) can cause an explosion.
g) Follow all the instructions for charging and never charge the battery or the cordless tool
outside the temperature range specied in the operating instructions. Incorrect charging
or charging outside the permitted temperature range can destroy the battery and increase
the re risk.
6) Service
a) Have your power tool serviced by a qualied repair person using only identical
replacement parts. This will ensure that the safety of the power tool is maintained.
b) Never service damaged batteries. All maintenance of batteries should only be carried out
by the manufacturer or authorised customer service points.

8
General Safety Instructions for power tools
Read all the safety notes, instructions, illustrations and technical data which come with
this power tool. Failure to heed the following instructions can lead to electric shock, re and/or
severe injuries.
Save all warnings and instructions for future reference.
The term “power tool” in the warnings refers to your mains-operated (corded) power tool or
battery-operated (cordless) power tool.
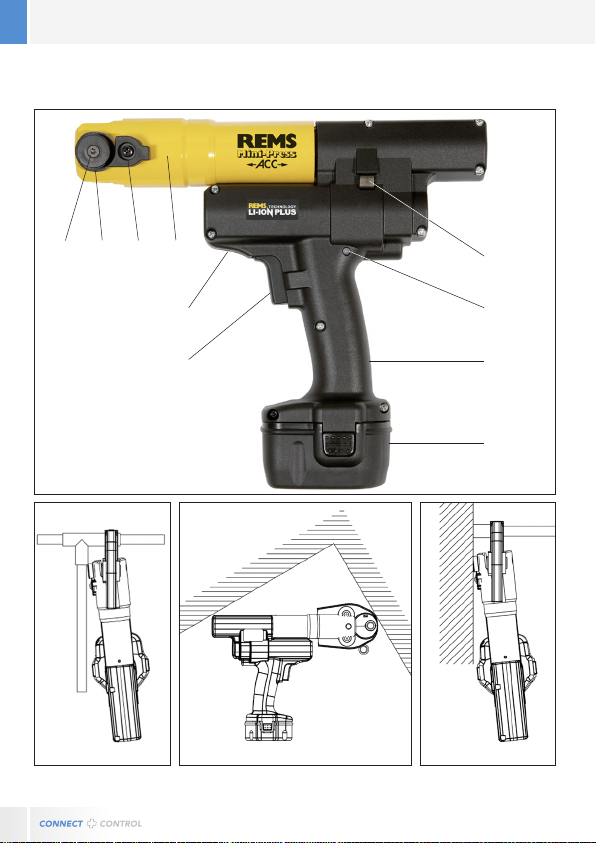
• Hold the power tool rmly by the housing grip (5) and pistol grip (9) and make sure you
are standing rmly when working. The power tool produces a very high pressing force. It is
safer to hold the tool with both hands. Therefore be very careful. Keep children and
bystanders away while operating the power tool.
• Do not reach into moving parts in the pressing area/expanding area. There is a risk of
injury by crushing ngers or hands.
• Never operate radial presses with the tongs retaining bolt unlocked (1). There is a risk of
fracture and ying parts can cause serious injuries.
• Always position the radial press with pressing tongs, Mini pressing tongs, pressing ring
with adapter tongs on the press tting at a right angle to the pipe axis. If the radial press
is positioned askew to the pipe axis, its high drive force will pull it to a right angle to the pipe
axis. This could crush hands or other parts of the body and/or there is a risk of fracture
whereby ying parts can cause serious injuries.
• Do not start radial presses without pressing tongs, Mini pressing tongs or pressing ring
with adapter tongs. Do not start the pressing process except to make a press joint. Unless
counter pressure is applied by the press tting, the drive unit, pressing tongs, Mini pressing
tongs, pressing ring and adapter tongs will be needlessly stressed.
• Before using pressing tongs, pressing rings with adapter tongs (pressing jaws, pressing
slings with adapter jaws) from other manufacturers, check whether these are suitable for
the REMS radial presses. Pressing tongs, pressing rings with adapter tongs of other makes
can be used in REMS Power-Press SE, REMS Power-Press, REMS Power-Press ACC, REMS
Akku-Press and REMS Akku-Press ACC if they are designed for the necessary thrust force
of 32 kN, t mechanically in the REMS drive unit, can be properly locked and break without
danger, e.g. without the risk of aying parts of the press jaws, at the end of their life or when
overloaded. It is recommended to only use pressing tongs and pressing rings with adapter
tongs which are designed with a safety factor ≥ 1.4 against permanent fracture, i.e. withstand
a necessary thrust force of 32 kN up to a thrust force of 45 kN. Also read and observe the
instruction manuals and safety instructions of the respective manufacturer/supplier of the
pressing tongs, pressing rings with adapter tongs and the installation and assembly
instructions of the manufacturer supplier of the press tting system to be pressed and
observe any restrictions for use that are specied there. Failure to do so could lead to fracture
and ying parts can cause serious injuries.

9
• Only operate the axial press with pressing heads fully inserted. Failure to do so could lead
to fracture and ying parts can cause serious injuries.
• Always screw expanding heads as far as they will go onto the expander. Failure to do so
could lead to fracture and ying parts can cause serious injuries.
• Use only undamaged pressing tongs, Mini pressing tongs, pressing rings, adapter tongs,
pressing heads and expanding heads. Damaged pressing tongs, Mini pressing tongs,
pressing rings, adapter tongs, pressing heads and expanding heads can jam or fracture and/
or the press tting will be faulty. Do not attempt to repair damaged pressing tongs, Mini
pressing tongs, pressing rings, adapter tongs, pressing heads and expanding heads. Failure
to do so could lead to fracture and ying parts can cause serious injuries.
• Pull out the plug or remove the battery before assembly/disassembly of pressing tongs,
Mini pressing tongs, pressing rings, adapter tongs, pressing heads and expanding
heads. There is a risk of injury.
• Comply with the maintenance regulations for the power tool and follow the
maintenance instructions for pressing tongs, Mini pressing tongs, pressing rings,
adapter tongs, pressing heads and expanding heads. Following the maintenance
instructions has a positive effect on the life of the power tool, the pressing tongs, Mini
pressing tongs, pressing rings, adapter tongs, pressing heads and widening heads.
• Check the connecting cable and extension leads of the power tool regularly for damage.
Have these renewed by qualied experts or an authorised REMS customer service workshop
in case of damage.
• Only allow trained persons to use the power tool. Apprentices may only use the power
tool when they are over 16, when this is necessary for their training and when they are
supervised by a trained operative.
• Children and persons who, due to their physical, sensory or mental abilities or lack of
experience and knowledge are unable to operate the power tool safely may not use this
power tool without supervision or instruction by a responsible person. Otherwise there is
a risk of injury due to false operation.
• Only use approved and appropriately marked extension leads with a sufcient cable
cross-section. Use extension leads up to a length of 10 m with cable cross-section 1.5 mm²,
from 10 – 30 m with cable cross-section 2.5 mm².
Safety Instructions for batteries
Read all the safety notes, instructions, illustrations and technical data which come with
this power tool. Failure to heed the following instructions can lead to electric shock, re and/or
severe injuries.
Save all warnings and instructions for future reference.
• Only use the battery in REMS power tools. Only then is the battery safe from dangerous
overloading.

10
• Only use original REMS batteries with the voltage specied on the rating plate. Using
other batteries can lead to injuries and risk of re due to exploding batteries.
• Use the battery and the rapid charger only in the specied operating temperature
range.
• Only recharge REMS batteries in the REMS rapid charger. There is a risk of re if an
unsuitable battery charger is used.
• Charge the battery to full capacity in the REMS rapid charger before using for the rst
time. Batteries are delivered partly charged.
• Insert the battery into the battery compartment straight and without force. There is a risk
of bending the battery contacts and damaging the battery.
• Protect the batteries against heat, sunlight, re, moisture and wet. There is a risk of
explosion and re.
• Do not use the batteries in areas where there is a risk of explosion and in the vicinity of
inammable gases, solvents, dust, fumes, liquids for example. There is a risk of explosion
and re.
• Do not open the battery or modify its construction. There is a risk of explosion and re
due to short-circuiting.
• Do not use batteries with damaged housings or damaged contacts. Damage
to or improper use of the battery can cause fumes to escape. The fumes can irritate the
respiratory tracts. Let in fresh air and consult a doctor in case of symptoms.
• Fluid can leak from the battery when used improperly. Do not touch the uid. Leaking
battery uid can cause skin irritation and burns. Rinse off immediately with water in case of
contact. Also consult a doctor if the uid gets into the eyes.
• Observe the safety instructions on the battery and the rapid charger.
• Keep unused batteries away from paper clips, coins, keys, nails, screws or other small
metal objects which could cause bridging of the contacts. There is a risk of explosion and
re due to short-circuiting.
• Remove the battery before stowing/storing the power tool for long periods of time.
Protect the battery contacts against short-circuiting, e.g. with a cap. This reduces the risk of
uids escaping from the batteries.
• Do not throw defective batteries in the normal household waste. Hand the defective
batteries over to an authorised REMS contract service workshop or a recognised disposal
company. Observe the national regulations.
• Keep batteries out of reach of children. Batteries can be life threatening if swallowed, seek
medical assistance immediately.
• Avoid contact with leaking batteries. Leaking uid can cause skin irritation and burns. Rinse
off immediately with water in case of contact. Also consult a doctor if the uid gets into the
eyes.
• Take the batteries out of the power tool when they are empty. This reduces the risk of
uids escaping from the batteries.
• Never recharge the non-rechargeable batteries, open them, throw them on res or
create a short-circuit. The batteries can cause res and burst. There is a risk of injury.

11
Explanation of symbols
Danger with a medium degree of risk which could result in death or
severe injury (irreversible) if not heeded.
Danger with a low degree of risk which could result in minor injury
(reversible) if not heeded.
Material damage, no safety note! No danger of injury.
Read the operating manual before starting
Use eye protection
Use ear protection
Electrical device complies with protection class II
Environmental friendly disposal
1. Capacity
REMS Mini-Press ACC / Mini-Press 22 V ACC Radial press for
making press joints in all standard press tting systems on
steel pipes, stainless steel pipes, copper pipes, plastic pipes, Ø 10 – 40 mm
composite pipes. Ø 3/8” – 1 1/4”
1.1. Thrust
Thrust REMS Mini-Press ACC / Mini Press 22 V ACC 22 kN
The specied forces are nominal forces.
1.2. Electrical Data
REMS Mini-Press ACC 14.4 V =; 1.5 Ah
14.4 V =; 3.0 Ah
Rapid charger Li-Ion/Ni-Cd Input 230 V~; 50 – 60 Hz; 65 W
Output 10.8 – 18 V –---
Input 110 V~; 50 – 60 Hz; 65 W
Output 10.8 – 18 V –---

12
1.3. Weights
REMS Mini-Press ACC drive unit without battery 2.1 kg (4.5 lb)
REMS battery Li-Ion 14.4 V, 1.5 Ah 0.3 kg (0.6 lb)
Pressing tongs Mini (average) 1.2 kg (2.6 lb)
1.4. Noise Information
Emission at workplace
REMS Mini-Press ACC / 22 V ACC LpA = 73 dB LWA = 84 dB K = 3 dB
1.5. Vibrations
Weighted effective value of acceleration < 2,5 m/s² K = 1,5 m/s²
The specied vibration emission value was measured according to a standard test method and
can be used for comparison with another power tool. The specied vibration emission value can
also be used for an initial estimation of the cut-out.
The vibration emission value may differ from the specied value during actual use of the power
tool depending on the manner in which the power tool is used. Dependent upon the actual
conditions of use (periodic duty) it may be necessary to establish safety precautions for the
protection of the operator.
2. Safety Instructions for batteries
After the drive unit has been in storage for a long period of time, the overpressure valve must be
actuated rst by pressing the reset button (7) before putting back into operation. If it is stuck or
stiff, it may not be pressed. The drive unit must be handed over to an authorized REMS customer
service workshop for inspection.
The respective latest sales literature applies for the use of REMS pressing tongs, REMS Mini press-
ing tongs, REMS pressing rings with adapter tongs, REMS pressing heads and REMS expanding
heads for the different pipe connection systems, see also www.rems.de > Downloads > Product
Catalogues, Brochures. If the system manufacturer alters components of pipe connection systems
or markets new ones, their current application status must be enquired about at REMS (Fax +49
2.1. Electrical connection
Note the mains voltage! Before connecting the drive unit or the rapid charger, check whether
the voltage given on the rating plate corresponds to the mains voltage. On building sites, in a wet
environment, indoors and outdoors or under similar installation conditions, only operate the pow-
er tool on the mains with a fault current protection switch (FI switch) which interrupts the power
supply as soon as the leakage current to earth exceeds 30 mA for 200 ms.

13
Rechargeable batteries
Always hold the battery 14.4 V (10) upright when inserting it in the drive unitor the rapid charger.
If inserted at an angle it can cause damage to the contacts and result in a short circuit which
damages the battery.
Total discharging by undervoltage
The Li-Ion batteries may not drop below a minimum voltage because otherwise the battery could
be damaged by “total discharge”. The cells of the REMS Li-Ion battery are delivered pre-charged
to approx. 40 %. Therefore the Li-Ion batteries must be charged before use and recharged
regularly. Failure to observe this regulation of the cell manufacturer can lead to damage to the
Li-Ion battery by total discharging.
Total discharging due to storage
If a relatively low charged Li-Ion battery is stored, self discharging can lead to total discharge
damage of the battery after longer storage. Li-Ion batteries must therefore be charged before
storing and recharged every six months at the latest and charged again before use.
Charge the battery before use. Recharge Li-Ion batteries regularly to avoid their total
discharge. The rechargeable battery will be damaged by total discharge.
Only use a REMS rapid charger for charging. New Li-Ion batteries and Li-Ion batteries which have
not been used for a long time only reach full capacity after several charges. Non-rechargeable
batteries may not be charged.
Battery charging status check for all Li-Ion cordless presses
All REMS cordless presses made as of 2011-01-01 are equipped with an electronic battery
charging status check with battery charge indication by a 2-coloured green/red LED (8). The LED
lights green when the battery is fully or still sufciently charged. The LED lights red when the
battery must be charged. If this condition occurs during pressing and the pressing process is not
nished, the pressing must be completed with a fully charged Li-Ion battery. If the drive unit is not
used, the LED goes out after approx. 2 hours but comes on again when the drive unit is switched
back on.
12
12

14
Graduated charging level indicator of the Li-Ion 21.6 V battery
The graduated charging level indicator shows the charging level of the battery with 4 LEDs. At
least one LED lights for a few seconds after pressing the key with the battery symbol. The more
LEDs that light green, the higher the charging level of the battery. If a LED ashes red, the battery
must be recharged.
Rapid charger Li-Ion/NiCd and rapid charger Li-Ion (Art. No. 571560 and 571575)
The left control lamp lights up and remains green when the mains plug is plugged in. If a battery
is inserted in the rapid charger, the green control lamp ashes to indicate that the battery is
charging. The green light stops ashing and remains on to signal that the battery is fully charged.
If the red control lamp ashes, the battery is defective. If the red control lamp comes on and
remains on, this indicates that the temperature of the rapid charger and / or the battery is outside
the permissible operating range of the rapid charger of 0°C to +40°C.
The rapid chargers are not suitable for outdoor use.
2.2. Installing (changing) the pressing tongs, pressing tongs
Pull out the mains plug or remove the battery. Only use pressing tongs, pressing tongs Mini or
pressing rings with system-specic pressing contour according to the presstting system to be
pressed. Pressing tongs, pressing tongs Mini or pressing rings have letters on the pressing jaws or
pressing segments to identify the pressing contour and a number to identify the size. The adapter
tongs are marked by the letter Z and a number which serves for assignment to the permissible
pressing ring which carries the same identication. The pressing ring 45° (PR-2B) may only be
applied at at angle of 45° to the adapter tongs Z1/adapter tongs Mini Z1. Read and observe the
installation and assembly instructions of the manufacturer/supplier of the press tting system to
be pressed. Never use non-matching pressing tongs, pressing tongs Mini, pressing ring, adapter
tongs and adapter tongs Mini (pressing contour, size). The press joint could be rendered useless
and the machine and pressing tongs, pressing tongs Mini, pressing ring, adapter tongs and
adapter tongs Mini could be damaged.
It is best to place the drive machine on a bench or on the oor. The pressing tongs, pressing
tongs Mini, adapter tongs and adapter tongs Mini can only be installed (changed) when the press
rollers (4) are fully retracted. On REMS Power-Press SE push the rotation direction lever to the left
and actuate the safety inching switch (6) if necessary, on REMS Mini-Press ACC, REMS Mini-Press
22 V ACC, REMS Power-Press / Power-Press ACC and REMS Akku-Press/ Akku-Press ACC, press
the reset button (7), until the press rollers (4) have moved right back.
Open the tongs retaining bolt (1). To do this, press the locking pin/bolt (3) and the tongs retaining
bolt (1) springs out. Insert the chosen pressing tongs, Mini pressing tongs, adapter tongs and
adapter tongs Mini. Push the tongs retaining bolt (1) forward until the locking pin/bolt (3) snaps in.
At the same time, press down the pressure plate/button (2) directly over the tongs retaining bolt
(1). Do not start radial presses without pressing tongs, pressing tongs Mini or pressing ring with
adapter tongs and adapter tongs Mini inserted. Only start the pressing process to make a press

15
joint. Without pressing counterpressure by the press tting the drive machine or pressing tongs,
pressing tongs Mini, pressing ring, adapter tongs and adapter tongs Mini will be exposed to
unnecessarily high stress.
Never press when the tong retainer bolt (1) is unlocked. Risk of fracture, ying parts can
cause serious injuries!
3. Operation
After the drive unit has been in storage for a long period of time, the overpressure valve must
be actuated rst by pressing the reset button before putting back into operation. If it is stuck or
stiff, it may not be pressed. The drive unit must be handed over to an authorized REMS customer
service workshop for inspection.
3.1. Radial presses
The pressing tongs, Mini pressing tongs, pressing ring, adapter tongs and Mini adapter tongs,
especially the pressing contour of the pressing jaws or all 3 pressing segments must be checked
for damage and wear before every use. Damaged or worn pressing tongs, Mini pressing tongs,
pressing rings, adapter tongs and Mini adapter tongs may no longer be used.
There is otherwise a risk of incorrect pressing or accidents.
A trial pressing with inserted press tting must be made with the drive unit and the respectively
used pressing tongs, Mini pressing tongs and the respectively used pressing ring with adapter
tongs or Mini adapter tongs before every use. The pressing tongs, Mini pressing tongs , the
pressing ring with adapter tongs or Mini adapter tongs must t into the drive unit mechanically
and be properly lockable. After completing the pressing check that the pressing jaws, pressing
rings, pressing segments close fully both at their tip. Check the tightness of the connection
(observe national specications, standards, regulations, etc.)
If during closing of the pressing tongs, pressing tongs Mini or pressing rings a marked ridge is
created on the compression sleeve, the pressing may be defective or not tight.
For preventing damages make sure to avoid operating situations like exemplarily shown in
Fig. 12 through 14, that no distortion between pressing tongs, pressing tongs Mini, pressing
rings, adapter tongs, adapter tongs Mini, tting and drive unit occurs. Failure to do so could
lead to fracture and ying parts can cause serious injuries.
3.1.1. Working procedure
In the case of the REMS Mini-Press ACC, REMS Mini-Press 22 V ACC, REMS Akku-Press ACC and
REMS Power-Press ACC, keep the safety inching switch pressed until the pressing is nished and
the pressing tongs or pressing ring is completely closed. After completion of pressing,

16
the drive unit switches automatically to return (forced return). This is indicated by an acoustic
signal (click).
Press the pressing tongs, pressing tongs Mini together with your hand so that they can be
removed from the presstting together with the drive unit. Press the adapter tongs, adapter tongs
Mini together with your hand so that they can be removed from the pressing ring together with
the drive unit. Open the pressing ring by hand so that it can be pulled off the presstting.
3.1.2. Operating safety
On REMS Power-Press SE the pressing process is ended by releasing the safety inching switch.
A torque-dependent safety slip clutch acts additionally in both end positions of the press rollers
for the mechanical safety of the drive units. Do not needlessly stress the safety slip clutch. REMS
Power-Press SE is equipped with an electronic safety circuit which protects the drive unit against
overloading. The drive unit can be used again afterwards as a rule unless the electronic safety
circuit switches the drive unit off repeatedly at the end of the pressing. In this case the drive unit
must be inspected/repaired by an authorised REMS customer service workshop. However, if the
drive unit switches off before pressing is completed, the drive unit must be inspected/repaired
immediately by an authorised REMS customer service workshop.
The REMS Mini-Press ACC,ends the pressing operation automatically, emitting an acoustic signal
(clicking), and returns automatically (forced movement).
A perfect pressing is only produced with full closure of the pressing tongs, pressing tongs
Mini, pressing ring or pressing segment. If a visible burr is created on the pressing sleeve
when closing the pressing tongs, pressing tongs Mini, pressing ring or pressing segment,
the pressing may be faulty or leaking.
3.1.3. Working safety
To ensure safe working, the drive units are equipped with a safety inching switch. This permits
immediate switching off of the drive units at any time, particularly if a potential hazard arises. The
drive units can be switched to the return function in any position.
4. Maintenance
REMS drive units together with all the tools (e.g. pressing tongs, pressing tongs Mini, pressing
rings with adapter tongs, adapter tongs Mini, compression heads, expanding heads) and
accessories (e.g. batteries, rapid chargers) at least once a year to an authorised REMS customer
service station for inspection and repeated inspection of electrical equipment in accordance with
EN 62638:2010-08 (VDE 0702).

17
4.1. Inspection/repair
Before any repair work, pull the mains plug or remove the battery! This work may only be
performed by qualied personnel.
The gearbox of the drive unit in the REMS Power-Press SE is maintenance-free. They operate in a
permanent grease lling and therefore require no lubrication. The motor of the REMS Power-Press
SE, REMS Power-Press, REMS Power-Press ACC and REMS Power-Ex-Press Q & E ACC has carbon
brushes. These are subject to wear and must therefore be inspected or replaced from time to
time. Only use genuine REMS carbon brushes. The REMS Power-Press SE drive unit has a safety
slip clutch. This is subject to wear and must therefore be checked and renewed from time to time.
Use only an original REMS safety slip clutch. In the battery-operated drive units, the carbon
brushes of the motor are subject to wear. These cannot be replaced; the DC motor must be
replaced. The sealing rings (O-rings) wear in all electro-hydraulic drive units. These must therefore
be checked and renewed from time to time. If the pressing power is insufcient or oil is lost, the
drive unit must be inspected and if necessary repaired by an authorised REMS after-sales service
facility.
Damaged or worn pressing tongs, pressing tongs Mini, pressing rings, adapter tongs, pressing
heads or expanding heads cannot be repaired.
4.2. Servicing
Before service work, pull the mains plug or remove the battery!
Keep the pressing tongs, pressing tongs Mini, pressing rings, adapter tongs, adapter tongs Mini
pressing heads and expandin , and particularly their receptacles, clean. Clean heavily soiled metal
parts with the REMS CleanM (Art. No. 140119) cleaner, for example, and then protect against rust.
Clean plastic parts (e.g. housing, batteries) only with the REMS CleanM (Art. No. 140119) or a mild
soap and a damp cloth. Do not use domestic cleaning agents. These frequently contain chemicals
that can attack plastic parts. On no account use petrol, turpentine oil, thinners or similar products
to clean plastic parts.
Make sure that liquids never get inside the power tool. Never immerse the power tool in liquid.
4.2.1. Pressing tongs, pressing tongs Mini, pressing rings, adapter tongs,
adapter tongs Mini
Pressing tongs, pressing tongs Mini, pressing rings, adapter tongs, adapter tongs Mini must be
checked regularly for smooth action. Clean pressing tongs, pressing tongs Mini, pressing rings
and adapter tongs, adapter tongs Mini if necessary and lightly grease the bolts of the
pressing jaws, pressing segments and adapter jaws, adapter tongs Mini with machine oil. Remove
deposits from the pressing contour. Check the proper functioning

18
5.1. Fault: Drive unit does not work
Cause:
• Battery depleted or defective (REMS
cordless drive units)
• Drive unit defective
Remedy:
• Charge the battery with the Li-Ion/Ni-Cd
charger or change the battery
• Have it checked/repaired by an authorised
REMS customer service workshop
of all pressing tongs, pressing tongs Mini, pressing rings, adapter tongs, adapter tongs Mini reg-
ularly with a test pressing with inserted pressing tting. A perfect pressing is only produced with
full closure of the pressing tongs, pressing tongs Mini, pressing ring or pressing segment. This can
be observed after completing the pressing. If a visible burr is created on the pressing sleeve when
closing the pressing tongs, pressing tongs Mini, pressing ring or pressing segment, the pressing
may be faulty or leaking.
Damaged or worn pressing tongs, pressing tongs Mini, pressing rings, adapter tongs, adapter
tongs Mini may no longer be used. In case of doubt, send in the drive machine together with
all pressing tongs, pressing tongs Mini, pressing rings, adapter tongs, adapter tongs Mini to an
authorised REMS service shop for inspection.
5. Trouble
For preventing damages make sure to avoid operating situations like exemplarily shown, that no
distortion between pressing tongs, pressing tongs Mini, pressing rings, adapter tongs, adapter
tongs Mini, tting and drive unit occurs.
After the drive unit has been in storage for a long period of time, the overpressure valve must be
actuated rst by pressing the reset button (7) before putting back into operation. If it is stuck or
stiff, it may not be pressed. The drive unit must be handed over to an authorized REMS customer
service workshop for inspection.

19
5.2. Fault: Radial press does not nish the pressing. Mini pressing tongs, adapter
tongs do not close fully.
Cause:
• Battery depleted or defective (REMS
cordless drive units).
• Drive unit defective.
Remedy:
• Charge the battery with the Li-Ion/Ni-Cd
rapid charger or change the battery.
• Have the drive unit checked/repaired by an
authorised REMS customer service
workshop.
5.3. Fault: REMS Power-Press SE switches of repeatedly at the end of the pressing.
Cause:
• Defective drive unit.
Remedy:
• Have the drive unit checked/repaired by an
authorised REMS customer service
workshop.
5.4. Fault: A prominent burr is produced on the press tting when closing the
pressing tongs, Mini pressing tongs, pressing ring or pressing segments.
Cause:
• Damaged or worn pressing tongs, Mini
pressing tongs, pressing ring, pressing
segments or pressing contour.
• Wrong pressing tongs, Mini pressing tongs,
pressing ring (pressing contour, size) or
adapter tongs, adapter tongs Mini inserted.
• Unsuitable matching of press tting, pipe
and support sleeve.
Remedy:
• Replace the pressing tongs, Mini pressing
tongs, pressing ring with new ones.
• Check the labelling on the pressing tongs,
Mini pressing tongs, pressing ring or
adapter tongs, adapter tongs Mini and
change if necessary.
• Check the compatibility of the press tting,
pipe and support sleeve. Observe the
installation and assembly instructions of the
manufacturer/supplier of the press tting
system to be pressed and contact him if
necessary.
5.5. Fault: Pressing jaws close without load on the pressing tongs.
Cause:
• Pressing tongs, Mini pressing tongs fell to
the oor, compression spring bent.
Remedy:
• Send the pressing tongs, Mini pressing
tongs to an authorised REMS customer
service workshop for inspection.

20
5.6. Fault: The pipe is crushed between the press tting and the tting joint in axial
pressing.
Cause:
• Expansion too long.
• Pipe pushed too wide onto the support
sleeve of the press tting.
• Wrong expanding head (press tting
system, size) inserted.
• Unsuitable matching of press tting, pipe
and support sleeve.
Remedy:
• Check whether the right expanding head
was used. Pipe expanded several times,
observe the installation and assembly
instructions of the manufacturer/supplier of
the press tting system to be pressed.
• Check whether the right expanding head
was used. Pipe expanded several times,
observe the installation and assembly
instructions of the manufacturer/supplier of
the press tting system to be pressed.
• Change expanding head.
• Check the compatibility of the press tting,
pipe and support sleeve and contact the
manufacturer/supplier of the press tting
system to be pressed if necessary.
5.7. Fault: A prominent gap is left between the press tting and the tting joint
after closing the pressing heads in axial pressing.
Cause:
• Pipe crushed between the compression
sleeve and the tting collar, see 5.5.
• Wrong compression head (compression
sleeve system, size) used.
• Battery depleted or defective (REMS
cordless drive units).
• Drive unit defective.
Remedy:
• Check whether the right expanding head
was used. Pipe expanded several times,
observe the installation and assembly
instructions of the manufacturer/ supplier
of the press tting system to be pressed.
• Change pressing head.
• Charge the battery with the Li-Ion/Ni-Cd
rapid charger, change the battery.
• Have the drive unit checked/repaired by an
authorised REMS customer service
workshop.
Table of contents