pela tools 513087 User manual

Induction heater
Induktionsvärmare
Item No:
513087

Allmänna säkerhetsföreskrifter
• Se till att läsa och förstå alla instruktioner. Att inte
följa samtliga instruktioner nedan kan resultera i
elstötar, brand och/eller allvarliga personskador.
• Se till att arbetsområdet är väl ventilerat, torrt och
fritt från hinder.
• Håll alltid arbetsområdet rent och välbelyst.
• Håll åskådare, barn, besökare och djur på avstånd
när induktionsvärmaren används.
• Håll en fulladdad brandsläckare eller brandlt till
hands hela tiden när du använder induktionsvär-
maren.
• Se till att inga brandfarliga produkter är i närheten
av arbetsområdet när du använder induktionsvär-
maren.
• Om du har en pacemaker eller någon annan typ av
elektronisk eller metallkirurgiska implantat skall
du INTE använda verktyget, och alltid vara minst
1 meter (tre fot) från någon som använder värma-
ren.
• Även om de magnetiska fält som avges av verk-
tyget bara färdas några tum, utgör de en allvarlig
risk för alla väl fungerande implanterade medi-
cinska elektroniska enheter, både för användaren
eller för en eventuell åskådare.
• Använd inte induktionsvärmaren inom 15 cm (6
tum) av någon airbagkomponent. Värmen som
skapas av induktionsvärmaren kan antända krock-
kuddens drivmedel och orsaka att den exploderar
utan förvarning. Sök i fordonets servicemanual
efter exakta platser för krockkuddar före använd-
ning av värmaren.
• Spolar, exibla slingor och värmedynor blir varma
efter användning, iakttag stor försiktighet vid mon-
tering/demontering.
• Använd inte induktionsvärmaren under påverkan
av droger, alkohol eller någon medicinering.
• Använd inte induktionsvärmaren iklädd något
metallföremål, t.ex. smycken, (inklusive ringar,
klockor, kedjor, identieringstaggar, piercingar)
eller spännen.
• Ta bort alla lösa mynt, nycklar, kedjor, ckknivar,
miniatyrverktyg eller andra metallföremål i, eller,
på kläderna innan du använder induktionsvärma-
ren.
• Bär inte kläder som innehåller metalliska nitar, lin-
ningsknappar, ckknappar eller dragkedjor när du
använder induktionsvärmaren.
• Värmaren kan värma metallföremål mycket snabbt
och orsaka allvarliga brännskador eller till och
med antända kläder.
• Använd alltid skyddsglasögon när du använder
induktionsvärmaren.
• Rök och rök från varmt/brinnande lim är giftiga.
• Använd alltid skyddsglasögon när du använder
induktionsvärmaren.
• Bär en lämpligt dubbellter mask (damm och
ånga).
• Använd värmebeständigahandskar när du använ-
der induktionsvärmaren eftersom den värmer me-
tall mycket snabbt. Du kan lätt bränna dina händer
och ngrar när du försöker ta bort delar från heta
metallytor.
• Säkerhetsbestämmelser för elektronik
• Montera inte eller ta bort en spole, exibel slinga
eller värmekudde med induktionsvärmaren anslu-
ten till elnätet.
• Innan du kopplar in induktionsvärmaren se till
att nätspänningen är kompatibel med spän-
ningen angiven på typetiketten och inom 10 % av
den angivna spänningen. Anslutning till felaktig
matningsspänning kan leda till allvarliga faror och
skador på induktionsvärmaren.
• Se till att induktionsvärmaren är ansluten till ett
jordat vägguttag.
• Använd inte induktionsvärmaren i regn, fukt eller
där den riskerar att utsättas för vatten. Att utsätta
induktionsvärmaren för vatten eller andra vätskor
kan orsaka en elektrisk stöt.
• Använd inga andra tillbehör förutom de som är av-
sedda och som levereras till värmaren, användning
av icke godkända tillbehör kan skada induktions-
värmaren och därmed orsaka att garantin upphör
att gälla.
• Lämna inte induktionsvärmaren ansluten till elnä-
tet när den inte används.
• Skadade anslutningssladdar skapar elektriska
stötar - Vik inte, böj, krossa eller klippa nätsladden.
Bär aldrig induktionsvärmaren i nätsladden.
• Håll nätsladden borta från värme, olja, skarpa
kanter och / eller rörliga delar.
• Använd inte induktionsvärmaren om nätsladden är
skadad. Använd endast rekommenderade tillbe-
hör och reservdelar. Eventuella reparationer och
kabelbyte ska utföras av behörig elektriker för att
undvika fara.
• Använd inte några tillbehör med skadad isole-
ring, vilket kan leda till gnistor som kan orsaka en
brand. Används skadade tillbehör upphör garantin
att gälla.
• Induktionsvärmaren får EJ ANVÄNDAS kontinuer-
ligt i mer än 3 minuter oavsett material.
Kontaktinformation
Verktygsboden Erlux AB
Källbäcksrydsgatan 1
SE-507 42 Borås
Telefon: 033-202650
Mejl: [email protected]
Miljöskydd/Skrotning
Återvinn oönskat material, släng
det inte bland hushållssoporna. Alla
maskiner, tillbehör och förpackningar
skall sorteras och lämnas till en
återvinningscentral och där kasseras
på ett miljövänligt sätt.

3
Brandrisk, säkerhetsföreskrifter
Det är farligt att värma färg/sprayburkar eller an-
dra trycksatta eller slutna behållare som används
för att lagra bränslen, komprimerade gaser eller
vätskor. Den värme som genereras av induktions-
värmaren kan orsaka att behållarna brister och
deras innehåll att antänds. Försök inte att värma
dessa objekt med hjälp av induktionsvärmaren.
Använd inte ett tillbehör om isoleringen har ska-
dats vilket kan orsaka gnistbildning när du kon-
taktar med ett fordon. Detta kan vara en brand-
risk särskilt när man arbetar på, eller i närheten
av bränsleledningar och / eller bränsletankar.
Vid användning av skadade tillbehör gäller inte
garantin.
Produktsäkerhet
Använd inte induktionsvärmaren utan att ett till-
behör är monterat. Se till att spolen/spiralen sit-
ter fast ordentligt och att skruvarna är ordentligt
åtdragna. Använd inte induktionsvärmaren längre
än den angivna driftcykel : FEM minuter följt av
FEM minuter AV.
• Huvudkretskortet har ett överhettningsskydd,
men tillbehören har inget överhettningsskydd
så de bör inte användas i mer än fem minuter
av kontinuerlig drift.
• Se till att äkten är igång när strömbrytaren
manövreras, om äkten inte fungerar, använd
INTE induktionsvärmaren och kontakta Verk-
tygsboden.
• Försök inte att skapa er än 4 slingor med en
”formbarspole” eller exibel slinga, minst 2
slingor och högst 3 till 4 slingor är det opti-
mala antalet som behövs för bästa funktion.
• Induktionsvärmaren bör inte lämnas utan
uppsikt när den är påslagen.
• För att kyla effektivt, och förlänga livslängden
på din induktionsvärmare se alltid till att det
nns tillräcklig tillgång på ren luft, se till att
ventilerna i induktionsvärmaren är rena och
fria från damm och skräp så att den har ett
obehindrat öde av kylluft.
• Försök inte att på egen hand reparera eller
serva induktionsvärmaren. Det nns inga de-
lar som går att ersätta förutom de utbytbara
tillbehören.
Standardutrustning
• Ø20mm spiral
• Ø32mm spiral
• Ø43mm spiral
• U-formad spole
• formbar spole
• Platt spole
• Instruktionsmanual
• Förvaringslåda
Teknisk specifikation
513087 / MH-1500
Ingångsspänning ~230V / 50 Hz
Ingångsström 10A
Maximal effekt 1500W
Instrumentskyddstem-
peratur 120 °C
Användningsområde
• Omgivningstemperatur: -20 ~ 60 °C
• Relativ fuktighet: <95% RH
• Atmosfäriskt tryck: 0,1 bar ~ 0,86 bar
Dimension och vikt
Nettovikt: 2.4 kgs
Driftinstruktion
Fäst en av värmeslingorna i infästningen på
värmaren (4) och spänn åt knoppar (3) på båda
sidor för att säkerställa att spolen är låst och
xerad. Säkerställa att kontakten (9) är ansluten
till en vanlig 230V, 50Hz eluttag. Fläkten (5) börjar
att arbeta när värmaren kopplas till eluttag. För
spiral/spole till önskad position på arbetsstycket
som skall värmas, tryck på värmebrytaren (1) och
LED indikatorlampan (2) kommer att slås på och
uppvärmningen börjar. Värmebrytaren (1) är ON/
OFF. När det uppvärmda arbetsstycket uppfyller
demonterings krav släpper du värmebrytaren (1),
LED-lampan (2) slocknar och värmaren slutar
värma. Placera värmaren på ett säkert ställe,
låt äkten (5) arbeta5 minuter och sedan dra ur
stickkontakten (9).

4
Varning: Välj och installera spiral/spole i strikt
överensstämmelse med dessa verksamhetsprin-
ciper och förfaranden innan maskinen aktiveras.
Efter värmaren är ansluten till eluttag (9), beröra
aldrig någon del av spiralen/spolen med händer
etc. Efter strömkontakten (9) är urkopplad, för-
säkra dig om att spiralen/spolen inte kan beröras
innan den helt har svalnat.
Större bild, se sida 8
Förberedelser för drift
Innan du använder värmaren, läs noggrant och
väl alla säkerhetsvarningar och försiktighetsåt-
gärder i handboken. Använda en stabil strömför-
sörjning.
Användning av generatorer och växelriktare:
• Generatorer: Vissa portabla generatorer, de
med kraften av 4 kW eller mindre, är oregle-
rade och kan alstra spänningar överstigande
260 V, som kan skada utrustningen och detta
täcks inte av garantin.
• Växelriktare, DC till DC-omvandlare drift: An-
vänd endast 3 kW eller större sinusformade
omformare. Utvärdera den maximala storle-
ken på det uppvärmda föremålet, välja lämp-
lig spole, fäst den i värmaren och säkerställa
att spolen är fast och låst, slå på den och
observera huruvida äkten går igång.
Användning av spiral
Funktion: De rörformade spolen, "spiralen" an-
vänds för att värma muttrar, fästen, diktnings
avlägsnande, frysta gångjärn, avgasrör bultar,
bäddbultar, sensorer (O2) etc.
Obs: Livslängden på spiraler kan förlängas
genom att värma upp arbetsstycket tillräckligt
för att demontera utan överhettning. Under
uppvärmningsprocessen, bör spolarna inte röra
arbetsstycket och det upphettade föremålet. Om
temperaturen hos arbetsstycket är alltför hög,
kan det isolerande skiktet av spolen brännas av.
Lossa frysta, rostiga, korroderade skruvar och
muttrar:
Steg 1: Fäst passande spiral/spole till värmaren.
(3,4,)
Steg 2: Tryck på ON (1) för att starta värmaren.
Steg 3: Placera spiralen runt muttern, först för
några sekunder bara, dra tillbaka och försöka ta
bort muttern med en skiftnyckel etc. Om den fort-
farande sitter fast, applicera spiralen ytterligare
några sekunder och försök sedan skruva igen.
Vanligtvis nns det ingen anledning att värma en
skruv/mutter upp till ett glödande tillstånd för att
avlägsna korrosionen från bulten. Notera: Spira-
len får inte nudda föremålet du värmer. Håll ett
avstånd på 3-4 mm.
Användning av U-formad och platt spole
Funktion: Den U-formade spolen kan utföra
samma arbete som de andra spolarna och kan
även anpassas för att avlägsna och reparera små
bucklor.
Funktion: Den platta uppvärmningsspole används
för att ta bort klistermärken, grak, dekaler, em-
blem, sidolister, små bucklor och striping.
Placera värmeslingan 12 till 25 mm över en
buckla och ytta spolen i små cirkulära rörelser.
Närma dig gradvis och ytta spolen runt utsidan
av kronan. I det fall att buckla krymper ta bort
spolen snabbt och kyl bucklan med en fuktig
trasa. Om bucklan går in mer, är du för nära med
spolen, eller inte tillräckligt långt från utsidan av
kronan. Se sida 8.
Användning av formbar spole
Funktion: formbar spole används för att lossa
frysta O2-sensorer, kulleder och dragstångsän-
dar. Expandera en bit för att ta bort en samman-
kopplad bit:
Steg 1: Sätt i ena änden av den formbara spolen
i en av värarens införingsportar (4) och dra åt
låsknappen (3).
Steg 2: Snurra spolen runt arbetsstycket som
ska expanderas. Tips: Det kommer att värmas
snabbare beroende på hur många varv du snurrar
spolen runt arbetsstycket.
Notera: Snurra spolen max 4 varv runt objektet
du ska värma.

5
Steg 3: Sätt in den andra änden av den form-
bara spolen i den återstående införselöpp-
ning (4) och dra åt låsknappen (3).
Steg 4: Tryck på ON (1) för att aktivera vär-
maren.
Steg 5: Värme tills arbetsstycket expanderats
tillräckligt för att ta isär.
Steg 6. Släpp ON knappen (1) och lossa båda
låsrattarna (3) för att släppa spolen från
maskinen.
Felsökning
• Om LED-ljuset (2) ändras från konstant
lysande till blinkande, betyder det att
värmaren går in i skyddsläge och kommer
avsluta värmningen.
• Om värmaren överhettas eller överbe-
lastas under uppvärmningsprocessen
kommer värmaren automatiskt stoppa
uppvärmningen och gå in i skyddsläge.
I detta ögonblick blinkar LED-ljuset (2).
Släpp värmebrytaren (1). Kyläkten (5)
kommer att fortsätta att arbeta. Lägg
undan värmaren och vänta några minuter
tills LED-ljus lyser konstant. Tillståndet
hos LED-ljuset kan kontrolleras och följas
med ON knappen (1).
• Brist på uteffekt, kan bero på felaktig eller
skadad förlängningssladd. Använd rätt
diameter och längd på förlängningsslad-
den, 7,5 m, 14-AWG eller 15 m, 12-AWG.
Använd endast en förlängningssladd åt
gången.
• Under uppvärmning, kan lite rök uppstå
på huvudet av spiralen/spolen på grund
av den höga temperaturen, vilket är ett
normalt fenomen.
• Spiraler och spolar är förbrukningsvaror.
Om det yttre höljet på spolen faller av
efter användning, rekommenderas att
ersätta spolen med en ny. Använd inte
externa eller självgjorda spolar för att
undvika skador på utrustningen och för
att förhindra olyckor.
• För andra problem, kontakta din lokala
leverantör.
Demontering och förvaring
Efter att ha släppt brytaren (1), kommer äk-
ten att fortsätta arbeta tills alla komponenter
och spolen helt svalnat. Koppla bort värma-
ren från strömuttaget. Det kan demonteras,
rengöras och lagras.
Steg 1: När arbetet är slutfört, släpp brytaren
för att säkerställa kontinuerlig drift av den
interna äkten.
Steg 2: Koppla ur eluttaget och tryck på vär-
mebrytaren för att säkerställa att den interna
äkten stannar.
Steg 3: Koppla ur stickkontakten från förläng-
ningssladden eller vägguttaget.
Steg 4: När värmaren svalnat, släpp låsknap-
parna (3) och avlägsna spolen (Rör inte
spiral/spole direkt med händerna!) Lägg vär-
maren och tillbehören i förvaringsboxen som
ska lagras på ett säkert ställe.
Rengörning
Ordentlig rengöring och vård
Se till att enheten är avstängd och urkopp-
lad. Använda en torr, ren, icke-slipande duk
eller pappershandduk för att avlägsna fett,
olja och annan smuts från höljet, verktyg och
elektriska sladdar innan de läggs tillbaka i
förvaringslådan.
Fett, olja och smuts som är svårare att ta
bort: Använda allmänt tillgängliga ickey-
tande fordonsinteriörrengöringsprodukter.
Låt alla delar torka helt innan användning av
värmaren.
Felaktig rengöring och vård
DOPPA INTE ner några komponenter hos
enheten i vatten eller en rengöringslösning.
SPRUTA INTE enheten med en ström av
vatten från en slang eller tvätta några delar
under en vattenström från en kran, dusch el-
ler liknande.
ANVÄND INTE några ytande organiska
medel såsom bensin, bensen, fotogen, lack-
borttagning, brännolja, metyletylketon (MEK),
lösningsmedel, färgborttagnings och späd-
ningsmedel, etc. Dessa ämnen är brandfar-
liga och kommer att hårdna eller lösa upp
polymermaterial som används i komponen-
terna i värmaren.
ANVÄND INTE rumsvärmare, värmepisto-
ler, gasugnar eller mikrovågsugn, etc. för
att torka komponenterna av värmaren efter
rengöring.

6
Förbrukningsartiklar
Artikelnummer Namn Produkt Inkluderad/tillägg
513833 Ø17mm spiral Tillägg
513834 Ø20mm spiral Inkluderad
513835 Ø26mm spiral Tillägg
513836 Ø32mm spiral Inkluderad
513837 Ø37mm spiral Tillägg
513838 Ø43mm spiral Inkluderad
513839 Ø50mm spiral Tillägg
513840 U-formad spole Inkluderad
513841 formbar spole Inkluderad
513842 Platt spole Inkluderad
Varningsdekal

7
1 ON/Start
2 LED lampa
3 Låsknappar/vred
4 Infästning, spole
5Kyläkt
6 Produkt/varningsdekal
7 kropp/hus
8 Adapter
9 Stickkontakt
Krona Bucklans centrum Krona
Krona
Arbeta i en cirkulär rörelse
runt utsidan av kronan.
Ovanifrån
Från sidan

8
EG FÖRSÄKRAN OM ÖVERENSSTÄMMELSE
2006/42/EC (MD), 2014/35/EU (LVD), 2014/30/EU (EMC)
ORIGINAL DEKLARATION
Vi, tillverkaren
Företag: Verktygsboden Erfilux AB
Adress: Källbäcksrydsgatan 1, SE-507 42 Borås, Sweden
Telefon: +46-33-2026 53
intygar att konstruktion och tillverkning av denna produkt marknadsförd under varumärket PELA
Maskin: Induktionsvärmare MH-1500
Typbeteckning: MH-1500
Artikelnummer: 513087
följer alla relevanta bestämmelser i enlighet med Maskindirektivet 2006/42/EC (MD), 2014/35/EU
(LVD), 2014/30/EU (EMC).
För att tillmötesgå ovan nämnt direktiv har följande harmoniserade standarder använts:
Standard:
EN 60335-1:2012+A11:2014+A13:2017 EN 60335-2-45:2002+A1:2008+A2:2012
EN 62233:2008 EN 61000-6-4:2007+A1:2011 EN 61000-6-2:2005
Notified body: LCIE China
Certifikatsnummer: 1966AS08ACHV32409- 1966AB08ACHV32408
Denna produkt var CE märkt år: 2020
Person som är behörig att ställa samman den tekniska dokumentationen, och är etablerad i
Europeiska gemenskapen:
Namn: Lars Edwardsson
Adress: Källbäcksrydsgatan 1, SE-507 42 Borås, Sweden
Denna deklaration gäller uteslutande för produkten i det utförande den placerades på marknaden
och exkluderar komponenter som tillförs nu och/eller vid senare tillfälle av slutkunden.
Stad och land: Borås, Sverige Datum: 07/01/2020
……………………………………………………………………
Namn:
Befattning: Inköpskoordinator

9
Contact
PELA Tools
Solängsvägen 13
SE-513 70 Borås
Phone: 033-202650
E-mail: [email protected]
Environmental protection /
Scrapping
Recycle any unwanted material,
do not throw it in the household
rubbish. All machines, accessories
and packaging must be sorted and left
at a recycling center and disposed
of in an environmentally friendly
manner.
General safety instructions
• Be sure to read and understand all instructions.
Failure to follow all instructions below may result
in electric shock, re and / or serious injury.
• Make sure that the work area is well ventilated, dry
and free of obstacles.
• Always keep the work area clean and well lit.
• Keep spectators, children, visitors and animals at
a distance when using the induction heater.
• Keep a fully charged re extinguisher or re blan-
ket on hand at all times when using the induction
heater.
• When using the induction heater, make sure that
no ammable products are in the vicinity of the
work area.
• If you have a pacemaker or any other type of elec-
tronic or metal surgical implant, DO NOT use the
tool, and always be at least 1 meter (three feet)
away from someone using the heater.
• Although the magnetic elds emitted by the tool
travel only a few inches, they pose a serious risk to
any well-functioning implanted medical electronic
device, either to the user or to any spectator.
• Do not use the induction heater within 15 cm (6 in-
ches) of any airbag component. The heat created
by the induction heater can ignite the airbag fuel
and cause it to explode without warning. Before
using the heater, search the vehicle service ma-
nual for the exact locations of the airbags.
• Coils, exible loops and heating pads become
hot after use, take great care when assembling /
disassembling.
• Do not use the induction heater under the inu-
ence of drugs, alcohol or any medication.
• Do not use the induction heater wearing any metal
object, e.g. jewelry, (including rings, watches,
chains, identication tags, piercings) or buckles.
• Remove all loose coins, keys, chains, pocket
knives, miniature tools or other metal objects in, or
on, clothing before using the induction heater.
• Do not wear clothing containing metallic rivets,
waistbands, pocket buttons or zippers when using
the induction heater.
• The heater can heat metal objects very quickly and
cause severe burns or even ignited clothing.
• Always wear safety goggles when using the induc-
tion heater.
• Smoke and fumes from hot / burning glue are
toxic.
• Always wear safety goggles when using the induc-
tion heater.
• Wear a suitable double lter mask (dust and
steam).
• Use heat-resistant gloves when using the induc-
tion heater as it heats metal very quickly. You can
easily burn your hands and ngers when trying to
remove parts from hot metal surfaces.
• Safety regulations for electronics
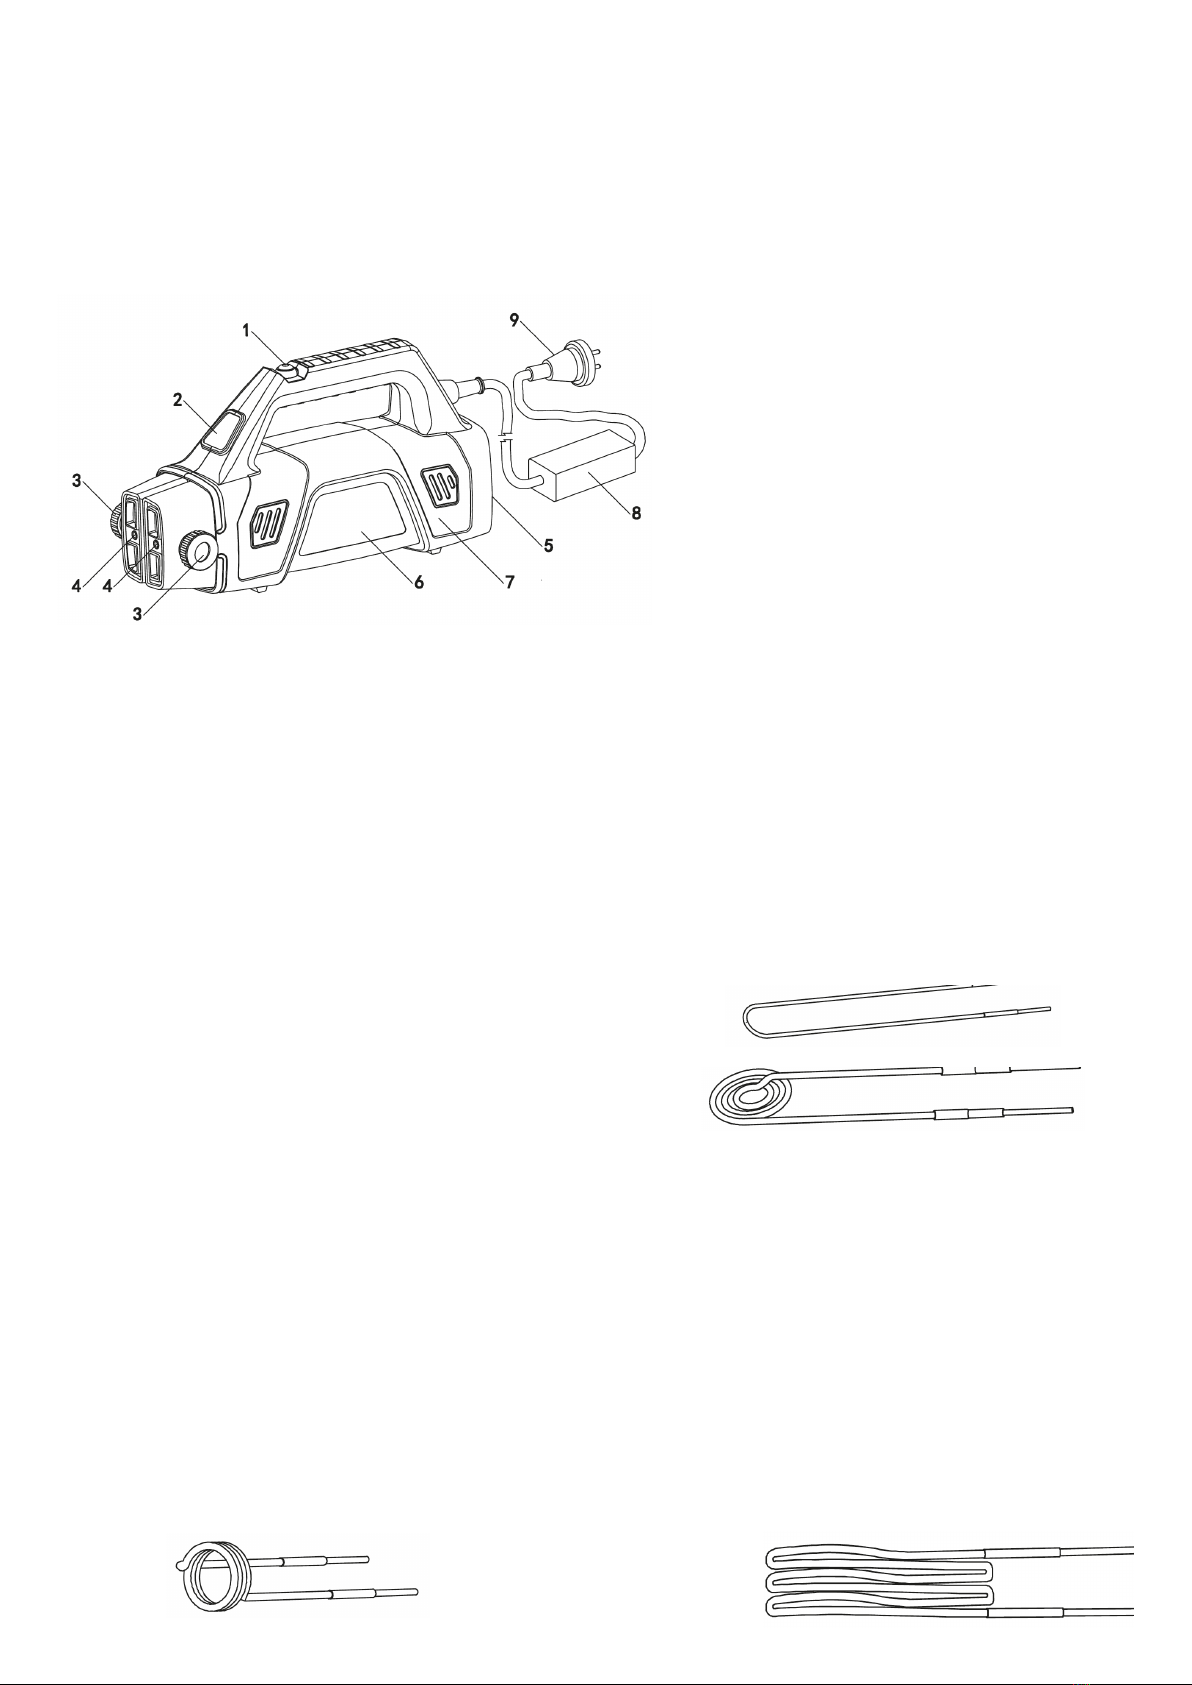
• Do not install or remove a coil, exible loop or
heating pad with the induction heater connected
to the mains.
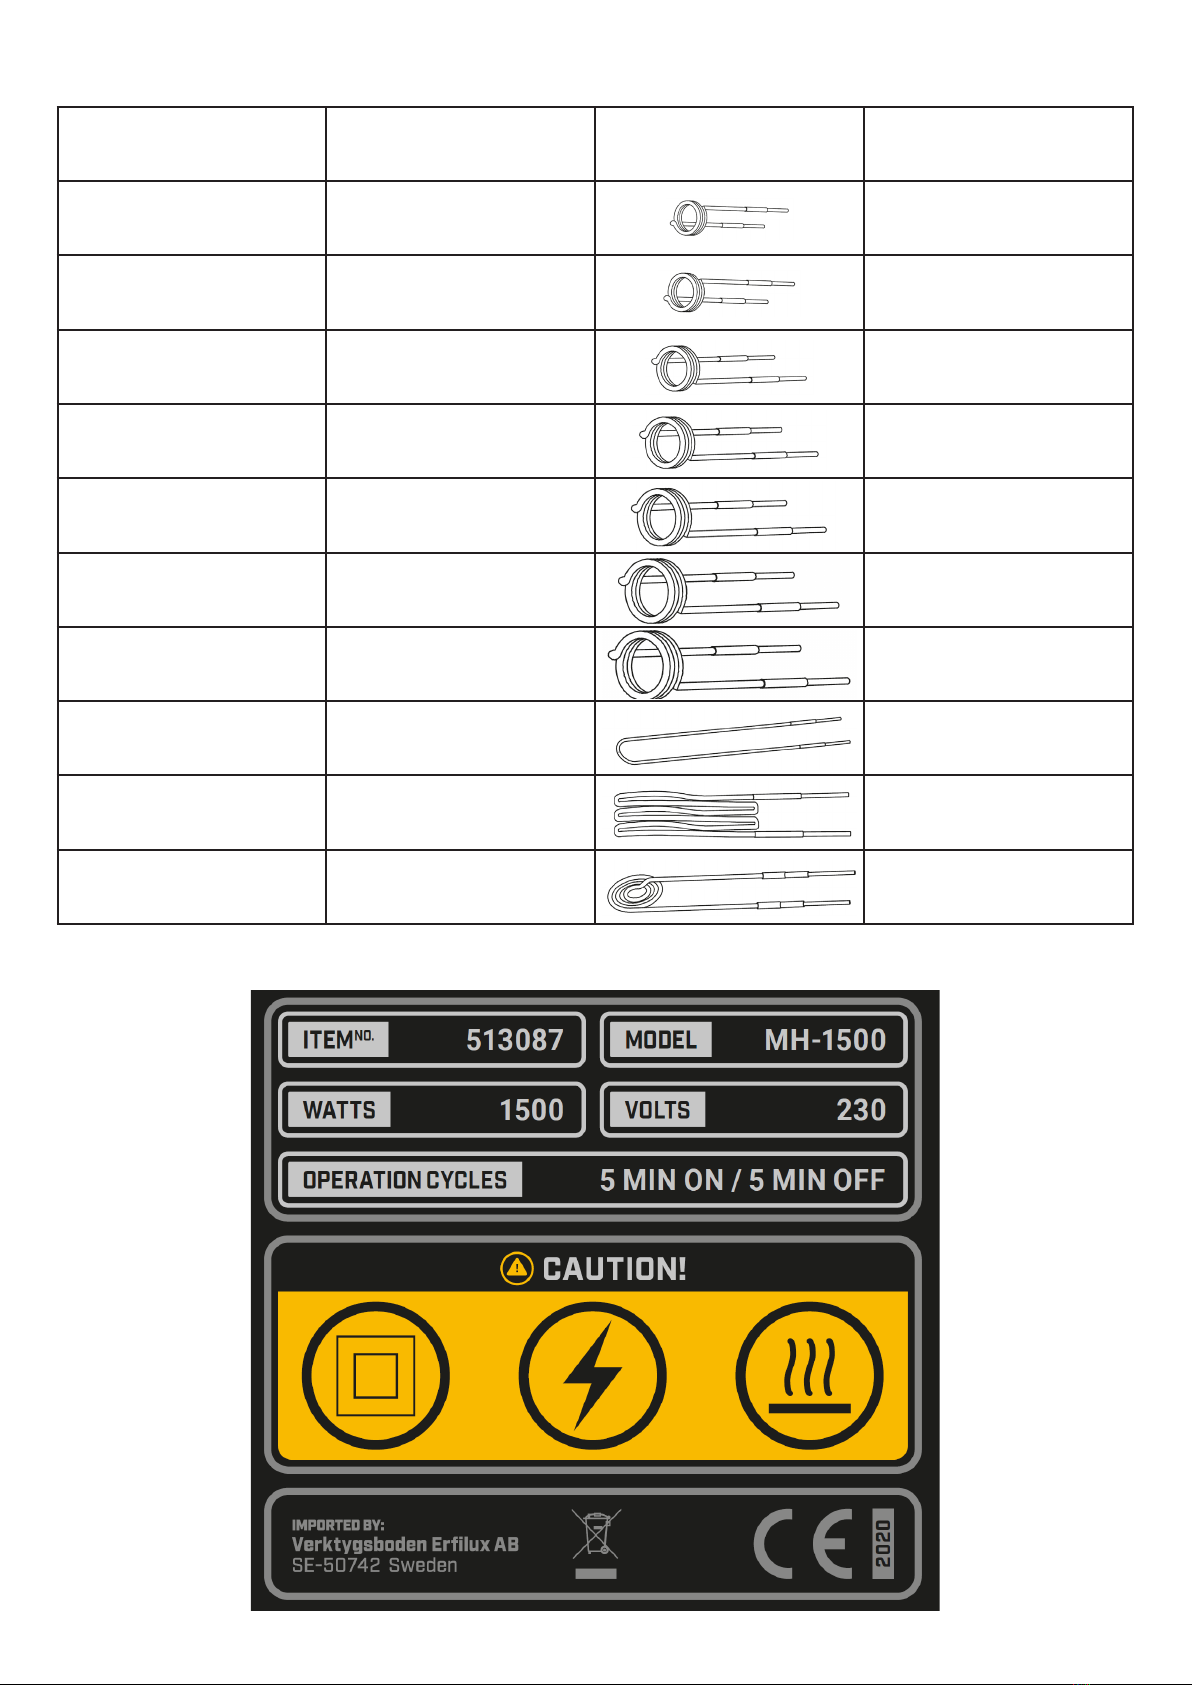
• Before switching on the induction heater, make
sure that the mains voltage is compatible with the
voltage indicated on the type label and within 10%
of the specied voltage. Connection to incorrect
supply voltage can lead to serious dangers and
damage to the induction heater.
• Make sure that the induction heater is connected
to a grounded wall socket.
• Do not use the induction heater in rain, moisture
or where it may be exposed to water. Exposing
the induction heater to water or other liquids can
cause an electric shock.
• Do not use any accessories other than those inten-
ded and supplied to the heater, use of unapproved
accessories may damage the induction heater and
thus cause the warranty to expire.
• Do not leave the induction heater connected to the
mains when not in use.
• Damaged connecting cords create electric shock
- Do not bend, bend, crush or cut the power cord.
Never carry the induction heater in the mains cord.
• Keep the power cord away from heat, oil, sharp
edges and / or moving parts.
• Do not use the induction heater if the power cord
is damaged. Use only recommended accessories
and spare parts. Any repairs and cable replace-
ment must be carried out by a qualied electrician
to avoid danger.
• Do not use any accessories with damaged insula-
tion, which can lead to sparks that can cause a
re. If damaged accessories are used, the war-
ranty expires.
• The induction heater must NOT be USED conti-
nuously for more than 3 minutes regardless of
material.

Fire risk, safety regulations
It is dangerous to heat paint / spray cans or other
pressurized or closed containers used to store
fuels, compressed gases or liquids. The heat
generated by the induction heater can cause the
containers to rupture and their contents to ignite.
Do not attempt to heat these objects using the
induction heater.
Do not use an accessory if the insulation has
been damaged, which can cause sparks when
contacting a vehicle. This can be a re hazard
especially when working on, or in the vicinity of
fuel lines and / or fuel tanks.
When using damaged accessories, the warranty
does not apply.
Product safety
Do not use the induction heater without an ac-
cessory tted. Make sure that the spool / spiral is
securely fastened and that the screws are pro-
perly tightened. Do not use the induction heater
longer than the specied operating cycle: FIVE
minutes followed by FIVE minutes OFF.
• The main circuit board has an overheating
protection, but the accessories have no over-
heating protection so they should not be used
for more than ve minutes of continuous
operation.
• Make sure that the fan is running when the
switch is operated, if the fan does not work,
DO NOT use the induction heater and contact
the Tool Booth.
• Do not try to create more than 4 loops with a
"form bar coil" or exible loop, a minimum of
2 loops and a maximum of 3 to 4 loops is the
optimal number needed for best function.
• The induction heater should not be left unat-
tended when it is switched on.
• To cool eciently, and extend the life of your
induction heater, always make sure that there
is sucient access to clean air, make sure
that the valves in the induction heater are
clean and free of dust and debris so that it
has an unobstructed ow of cooling air.
• Do not attempt to repair or service the in-
duction heater on your own. There are no
replaceable parts other than the replaceable
accessories.
Standard equipment
• Ø20mm spiral
• Ø32mm spiral
• Ø43mm spiral
• U-shaped coil
• adaptive coil
• Flat coil
• Instruction manual
• Storage box
Technical specification
513087 / MH-1500
Input voltage ~230V / 50 Hz
Input current 10A
Maximum power 1500W
Instrument protection
temperature 120 °C
Area of use
• Ambient temperature: -20 ~ 60 ° C
• Relative humidity: <95% RH
• Atmospheric pressure: 0.1 bar ~ 0.86 bar
Dimension and weight
Net weight: 2.4 kgs
Operating instructions
Attach one of the heating coils to the bracket on
the heater (4) and tighten the knobs (3) on both
sides to ensure that the coil is locked and xed.
Make sure that the plug (9) is connected to a
standard 230V, 50Hz electrical outlet. The fan (5)
starts working when the heater is connected to
an electrical outlet. To move the coil / coil to the
desired position on the workpiece to be heated,
press the heat switch (1) and the LED indicator
light (2) will switch on and the heating will start.
The heat switch (1) is ON / OFF. When the heated
workpiece meets the disassembly requirements,
release the heat switch (1), the LED lamp (2)
goes out and the heater stops heating. Place the
heater in a safe place, let the fan (5) work for 5
minutes and then unplug it (9).
10

11
Warning: Select and install spiral / coil in strict
accordance with these operating principles and
procedures before activating the machine. After
the heater is connected to an electrical outlet (9),
never touch any part of the coil / coil with hands,
etc. After the power plug (9) is disconnected,
make sure that the coil / coil cannot be touched
until it has completely cooled down.
Larger image, see page 8
Preparations for operation
Before using the heater, carefully read all safety
warnings and precautions in the manual. Use a
stable power supply.
Use of generators and inverters:
• Generators: Some portable generators, those
with a power of 4 kW or less, are unregulated
and can generate voltages in excess of 260 V,
which can damage the equipment and this is
not covered by the warranty.
• Inverter, DC to DC converter operation: Use
only 3 kW or larger sinusoidal converters.
Evaluate the maximum size of the heated
object, select the appropriate coil, attach it
to the heater and ensure that the coil is xed
and locked, turn it on and observe whether
the fan starts.
Use of spiral
Function: The tubular coil, the "spiral" is used
to heat nuts, brackets, sealing removal, frozen
hinges, exhaust pipe bolts, bed bolts, sensors
(O2) etc.
Note: The service life of spirals can be extended
by heating the workpiece suciently to disas-
semble without overheating. During the heating
process, the coils should not touch the workpiece
and the heated object. If the temperature of the
workpiece is too high, the insulating layer of the
coil may burn off.
Loosen frozen, rusty, corroded screws and nuts:
Step 1: Attach the appropriate coil / coil to the
heater (3.4,)
Step 2: Press ON (1) to turn on the heater.
Step 3: Place the coil around the nut, rst for a
few seconds only, pull back and try to remove
the nut with a wrench etc. If it is still stuck, apply
the coil for a few more seconds and then try
screwing again. Usually there is no need to heat
a screw / nut up to a glowing state to remove the
corrosion from the bolt. Note: The spiral must not
touch the object you are heating. Keep a distance
of 3-4 mm.
Use of U-shaped and flat coil
Function: The U-shaped coil can perform the
same work as the other coils and can also be
adapted to remove and repair small dents.
Function: The at heating coil is used to remove
stickers, graphics, decals, emblems, side mol-
dings, small dents and striping.
Place the heating coil 12 to 25 mm over a dent
and move the coil in small circular motions.
Gradually approach and move the spool around
the outside of the crown. In the event that the
dent shrinks, remove the spool quickly and cool
the dent with a damp cloth. If the dent goes in
more, you are too close with the spool, or not far
enough from the outside of the crown. See page
8.
Use of adaptive coil
Function: formable coil is used to loosen frozen
O2 sensors, ball joints and drawbar ends. Expand
a bit to delete an interconnected bit:
Step 1: Insert one end of the mouldable spool
into one of the inlet ports (4) of the heater and
tighten the lock button (3).
Step 2: Spin the spool around the workpiece to
be expanded. Tip: It will heat up faster depending
on how many turns you spin the spool around the
workpiece.
Note: Spin the coil a maximum of 4 turns around
the object you are to heat.

12
Step 3: Insert the other end of the mouldable
spool into the remaining insertion opening
(4) and tighten the lock button (3).
Step 4: Press ON (1) to activate the heater.
Step 5: Heat until the workpiece is expanded
enough to disassemble.
Step 6. Release the ON button (1) and re-
lease both locking knobs (3) to release the
spool from the machine.
Troubleshooting
• If the LED light (2) changes from con-
stantly lit to ashing, it means that the
heater enters protection mode and will
end the heating.
• If the heater overheats or overloads
during the heating process, the heater
will automatically stop heating and enter
protection mode. At this moment the LED
light (2) ashes. Release the heat switch
(1). The cooling fan (5) will continue to
operate. Put the heater aside and wait a
few minutes until the LED lights are on
constantly. The condition of the LED light
can be checked and monitored with the
ON button (1).
• Lack of output power, may be due to
faulty or damaged extension cord. Use
the correct diameter and length of the
extension cord, 7.5 m, 14-AWG or 15 m,
12-AWG. Use only one extension cord at a
time.
• During heating, some smoke can occur
on the head of the coil / coil due to the
high temperature, which is a normal phe-
nomenon.
• Spirals and coils are consumables. If the
outer casing of the spool falls off after
use, it is recommended to replace the
spool with a new one. Do not use external
or self-made coils to avoid damage to the
equipment and to prevent accidents.
• For other problems, contact your local
supplier.
Disassembly and storage
After releasing the switch (1), the fan will
continue to operate until all components and
the coil have completely cooled down. Dis-
connect the heater from the power outlet. It
can be disassembled, cleaned and stored.
Step 1: When the work is completed, release
the switch to ensure continuous operation of
the internal fan.
Step 2: Disconnect the electrical outlet and
press the heat switch to ensure that the inter-
nal fan stops.
Step 3: Disconnect the plug from the exten-
sion cord or wall outlet.
Step 4: When the heater has cooled down,
release the locking buttons (3) and remove
the coil (Do not touch the coil / coil directly
with your hands!) Place the heater and ac-
cessories in the storage box to be stored in a
safe place.
Cleaning
Proper cleaning and care
Make sure the device is turned off and dis-
connected. Use a dry, clean, non-abrasive
cloth or paper towel to remove grease, oil
and other dirt from the casing, tools and elec-
trical cords before putting them back in the
storage box.
Grease, oil and dirt that are more dicult
to remove: Use widely available non-liquid
vehicle interior cleaning products. Allow all
parts to dry completely before using the
heater.
Improper cleaning and care
DO NOT immerse any components of the
device in water or a cleaning solution.
DO NOT spray the unit with a stream of
water from a hose or wash any parts under
a stream of water from a faucet, shower or
similar.
DO NOT use any liquid organic agents such
as gasoline, benzene, kerosene, paint re-
movers, fuel oil, methyl ethyl ketone (MEK),
solvents, paint removers and diluents, etc.
These substances are ammable and will
harden or dissolve polymeric materials used
in the components of the heater.
DO NOT use room heaters, heat guns, gas
ovens or microwaves, etc. to dry the compo-
nents of the heater after cleaning.

13
Förbrukningsartiklar
Item number Name Product Included / supplement
513833 Ø17mm spiral Supplement
513834 Ø20mm spiral Included
513835 Ø26mm spiral Supplement
513836 Ø32mm spiral Included
513837 Ø37mm spiral Supplement
513838 Ø43mm spiral Included
513839 Ø50mm spiral Supplement
513840 U-shaped coil Included
513841 Adaptive coil Included
513842 Flat coil Included
Warning sticker

14
1 ON/Start
2 LED lamp
3 Lock buttons / knobs
4 Fastening, coil
5 Cooling fan
6 Product / warning
decal
7 body / house
8 Adapter
9 Plug

EU Declaration of Conformity
2006/42/EC (MD), 2014/35/EU (LVD), 2014/30/EU (EMC)
ORIGINAL Declaration of conformity
We, the manufacturer
Company: Verktygsboden Erfilux AB
Address: Källbäcksrydsgatan 1, SE-507 42 Borås, Sweden
Telephone number: +46-33-2026 53
Declare under our sole responsibility that the product
Machine: MH-1500 induction heater
Type designation: MH-1500
Item number: 513087
fulfils all relevant provisions of the 2006/42/EC (MD), 2014/35/EU (LVD), 2014/30/EU (EMC).
To show compliance with the above Directives the following harmonized standards have been
applied:
Standards:
EN 60335-1:2012+A11:2014+A13:2017 EN 60335-2-45:2002+A1:2008+A2:2012
EN 62233:2008 EN 61000-6-4:2007+A1:2011 EN 61000-6-2:2005
Notified body: LCIE China
Certificate number: 1966AS08ACHV32409- 1966AB08ACHV32408
This product was CE marked year: 2020
Person authorized to compile the technical file:
Namn: Lars Edwardsson
Adress: Källbäcksrydsgatan 1, SE-507 42 Borås, Sweden
This declaration relates to the machinery in the state in which it was placed on the market, and
excludes components which are added and/or operations carried out subsequently by the final user.
City and Country: Borås, Sverige Date: 07/01/2020
……………………………………………………………………
Name: Ted Berglund
Position: Purchasing coordinator
15

Verktygsboden Erlux AB Källbäcksrydsgatan 1, SE-507 42 Borås
© Verktygsboden · Borås · Sweden · 0120504-03
Table of contents
Languages: