READ ME!
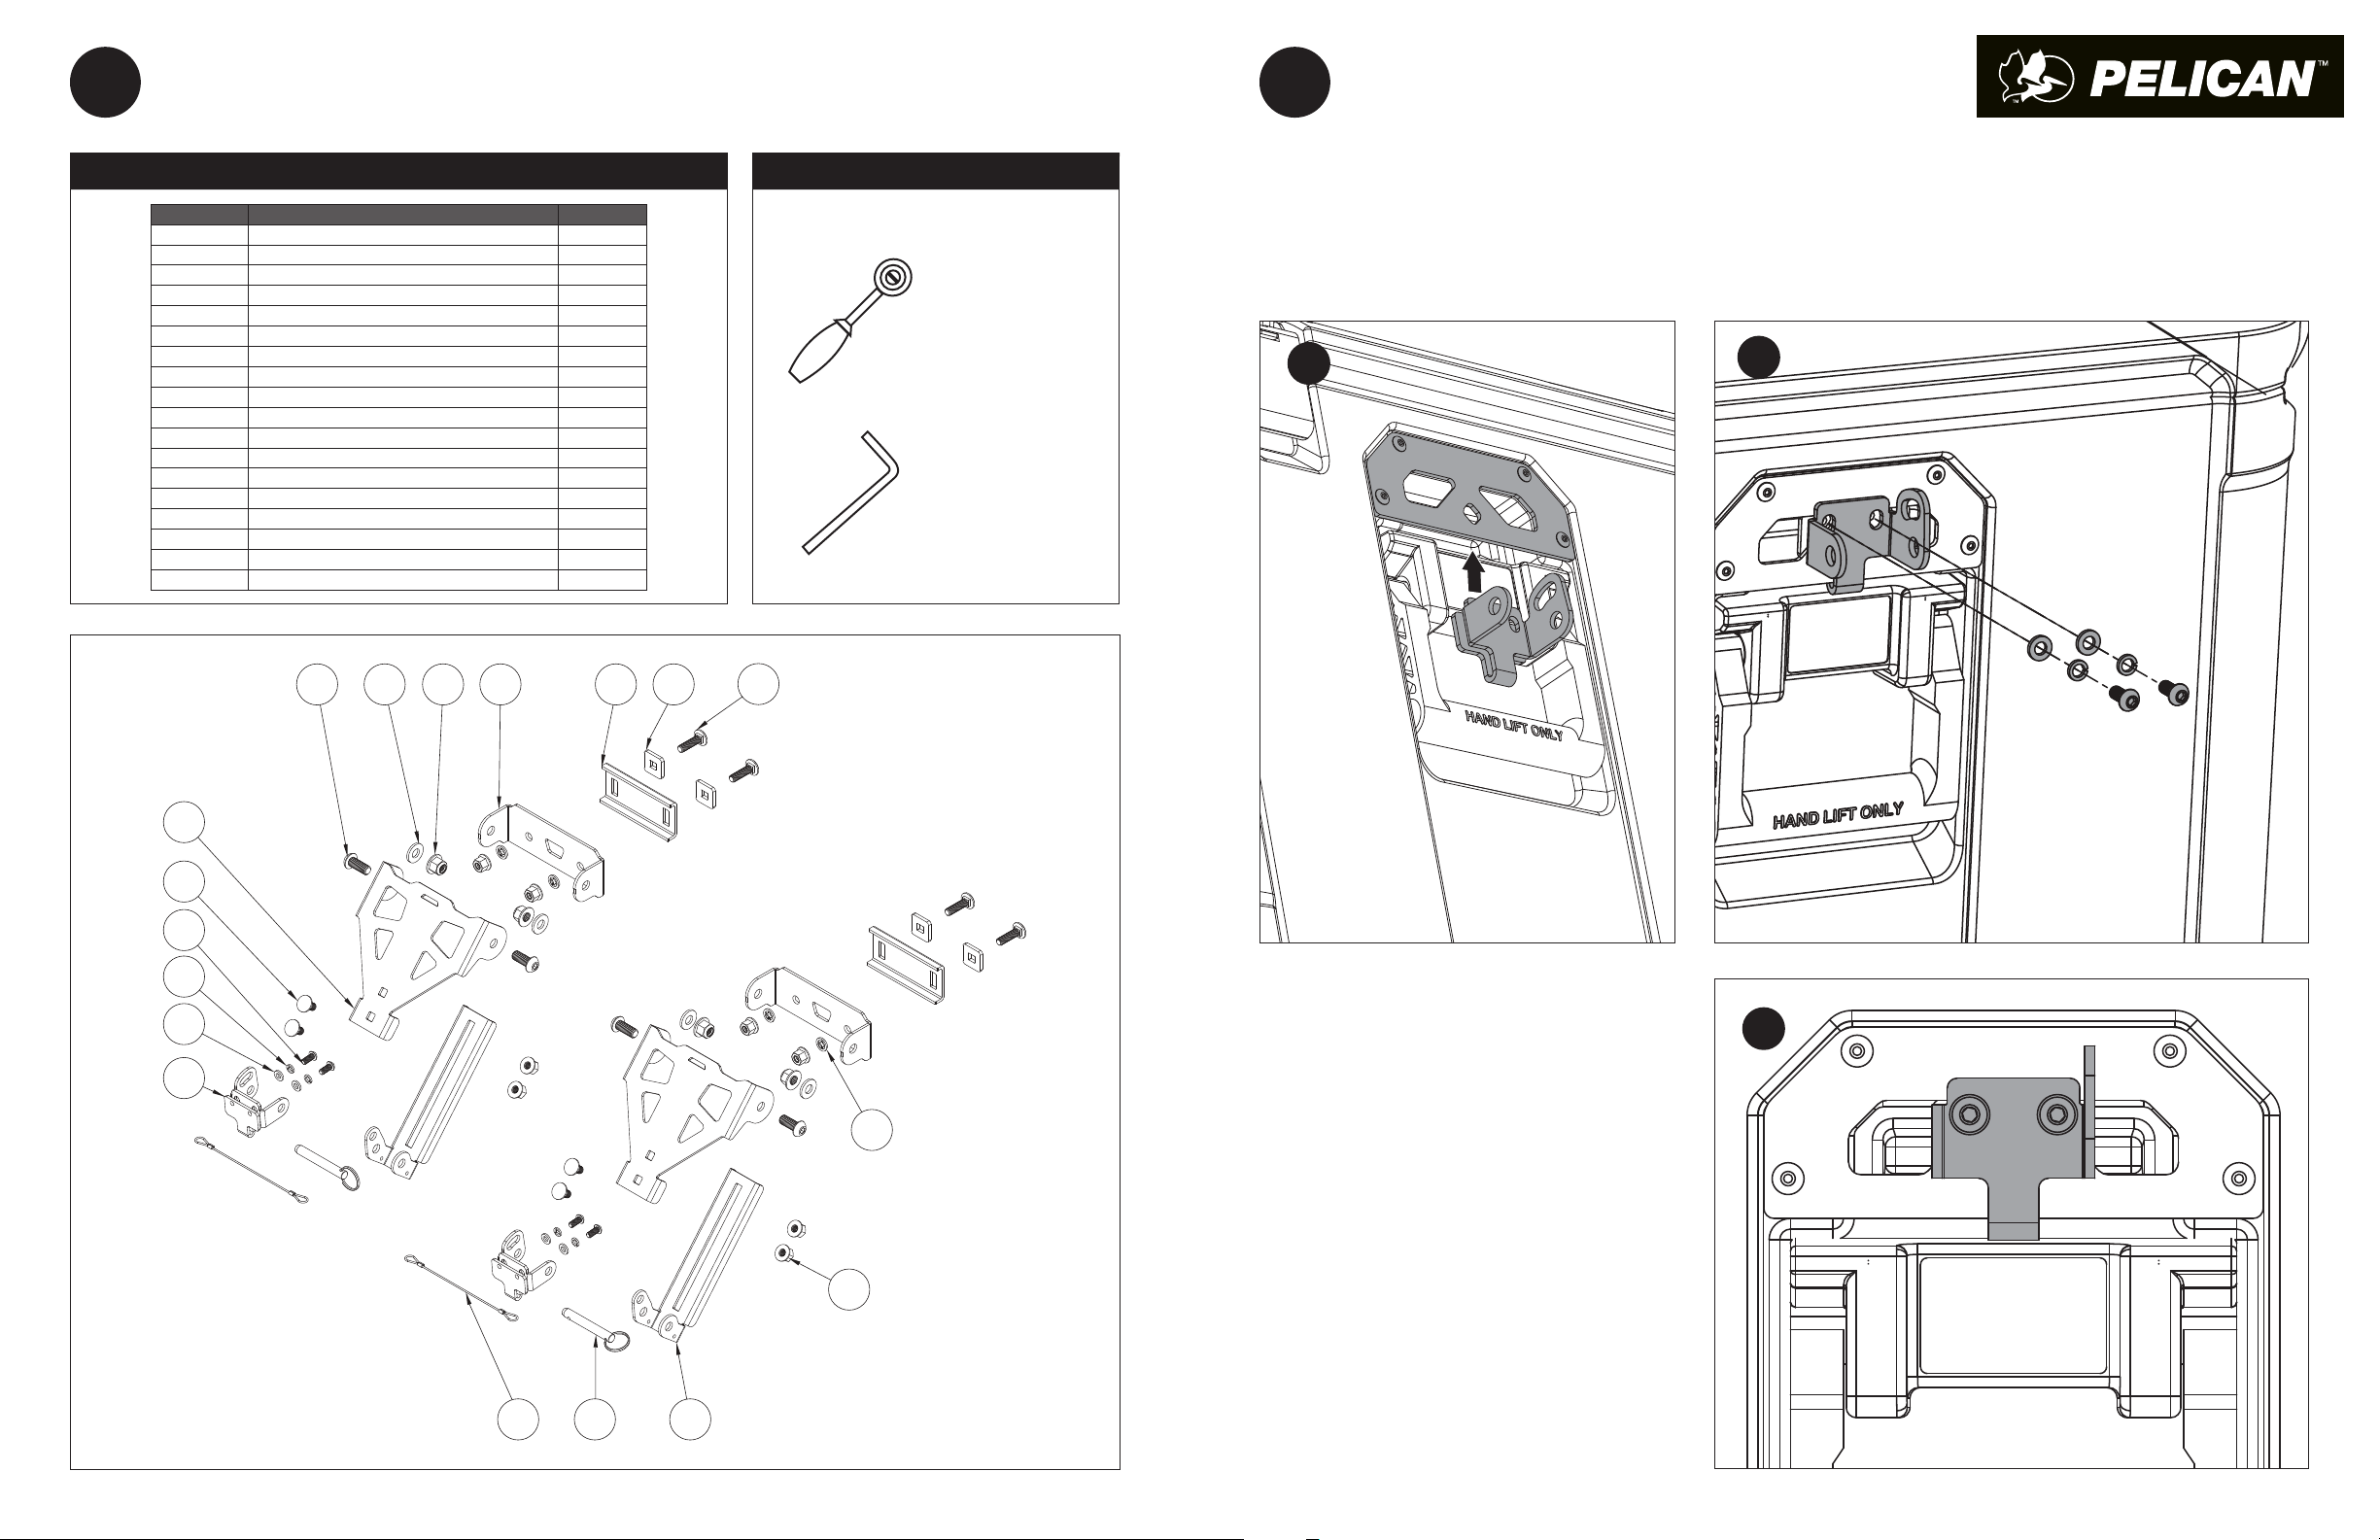
THANK YOU FOR PURCHASING A PELICAN™ CARGO CASE GEN2 CROSS BED MOUNT KIT. BEFORE YOU START, TAKE A MOMENT TO FAMILIARIZE
YOURSELF WITH THE FITTING INSTRUCTIONS AND THE COMPONENTS RECEIVED. REFER TO PAGE 1 FOR A LIST OF ALL THE COMPONENTS,
QUANTITIES AND TOOLS REQUIRED.
SINCE 1976
For Pelican™ BX135, BX255 Cargo Cases in Truck Beds using factory bed-flange mounting or Toyota™ Deck Rails.
IMPORTANT WARNING!
LATCHES AND MOUNTING KIT CARE
It is critical that Pelican™ Cargo Mounts and Cases be properly installed and securely attached to your vehicle. Failure to properly secure
the Mounts and Cargo Case to your vehicle could result in serious injury and even death. You are responsible for the fitment of the Mounts and
Cargo Cases to your vehicle. You must therefore periodically inspect the equipment for wear and damage. Replace if in doubt. If you have
limited mechanical experience you should not attempt to install the equipment. You should have the equipment installed by a professional
installer if you have any doubts about your abilities.
It is imperative that the user check the fit security of the cases to the vehicle after an initial brief period of driving and adjust if required.
Pelican recommends the user do so periodically and if road conditions change (i.e. freeway to dirt "road"), again check the fit security of the
attachment of the Case to the vehicle.
Periodically check the latches and mounting hardware to ensure there are no loose parts. Continual exposure to daylight may cause the black hardware
finish to dull. To maintain the glossy finish, occasionally apply a light coat of UV protectant. After exposure to salty coastal climates or snowy regions,
rinse off the mounts with water to remove salt deposits. To help prevent corrosion, apply a non-reactive silicone-based oil or spray to nuts and bolts.
Take care not to damage painted surfaces during mounting and dismounting. Touch-up paint is recommended as needed to prevent corrosion.
XBEDMT2
PELICAN™CARGO CASE
CARGO CASE CROSSBED MOUNT, GEN 2
PELICAN PRODUCTS, INC.
23215 Early Avenue, Torrance, CA 90505
Pelican.com • 310.326.4700
Pelican Products, Inc. (“Pelican”) guarantees its Pelican™ Cargo cases for a lifetime against
breakage or defects in workmanship. This lifetime warranty does not cover mounting hardware,
which Pelican warrants against defects in materials and workmanship for three years from the date
of purchase. To the extent permitted by law, Pelican’s liability is limited to the case and not its
contents and in no event shall Pelican’s liability to the purchaser for damages exceed the purchase
price of the case in respect of which damages are claimed.
TO THE EXTENT PERMITTED BY LAW: (A) THIS WARRANTY IS IN LIEU OF ALL WARRANTIES, EXPRESS
OR IMPLIED, INCLUDING, BUT NOT LIMITED TO, THE IMPLIED WARRANTIES OF MERCHANTABILITY
AND FITNESS FOR A PARTICULAR PURPOSE; (B) ALL OTHER IMPLIED WARRANTIES AND ANY LIABILITY
NOT BASED UPON CONTRACT ARE HEREBY DISCLAIMED AND EXCLUDED; AND (C) IN NO EVENT SHALL
PELICAN BE LIABLE FOR ANY INDIRECT, PUNITIVE, INCIDENTAL OR CONSEQUENTIAL DAMAGES, OR
SPECIAL DAMAGES, REGARDLESS OF WHETHER A CLAIM FOR SUCH DAMAGES IS BASED ON WARRANTY,
CONTRACT, NEGLIGENCE OR OTHERWISE .
With valid dated proof of purchase, Pelican will either repair or replace any broken or defective
product, at our sole option. Certain products are available for a limited time only. If a claim is made
involving one of these products, Pelican reserves the right to replace a broken or defective product
with a standard Pelican product of comparable size and quality if no comparable limited edition
product is available at the time of a claim. TO THE EXTENT PERMITTED BY LAW, THIS SHALL BE THE
SOLE AND EXCLUSIVE REMEDY OF THE PURCHASER.
To make a warranty claim, the purchaser must complete the warranty claim form at
https://www.pelican.com/us/en/support/warranty/. Any warranty claims shall be made by the
purchaser as soon as practicable and, with respect to the mounts and related hardware, no later
than three years from the date of purchase. The purchaser must provide valid dated proof of purchase
and obtain a return authorization number from Pelican Customer Service prior to returning any
product, and is responsible for paying for all warranty freight costs. If Pelican determines that any
returned product is not defective, within the terms of this warranty, the purchaser shall pay Pelican
all costs of handling, return freight and repairs at Pelican’s prevailing rates.
This warranty does not cover normal wear and tear including but not limited to scratches, dents
or tears, aesthetic surface damage which may be caused by oxidation or by the natural breakdown
of colors caused by exposure to the elements. All warranty claims of any nature are barred if the
product has been altered, damaged or in any way physically changed, or subjected to abuse, misuse,
negligence or accident.
Some states and countries do not allow limitations on how long an implied warranty lasts or the
exclusion or limitation of incidental or consequential damages, so the above limitation or exclusion
may not apply to you. This warranty gives you specific legal rights, and you may have other rights
which vary from state to state and country to country.
In Australia: The benefits provided to you under this warranty are in addition to your rights and
remedies as a consumer under the Australian Consumer Law as contained in the Competition and
Consumer Act 2010 (Cth) (“the Act”). Nothing in this warranty limits the rights or obligations of a
party under the Act in relation to the supply to consumers of goods which cannot be limited, modified
or excluded. If applicable, our goods come with guarantees that cannot be excluded under the Act.
Consumers are entitled to a replacement or refund for a major failure and compensation for any other
reasonably foreseeable loss or damage. Consumers are also entitled to have the goods repaired or
replaced if the goods fail to be of acceptable quality and the failure does not amount to a major
failure. If you are not a consumer under the Act, then your rights may be limited. To make a warranty
claim, the purchaser may contact Pelican Products Australia, Suite 2.33, West Wing, Platinum Bldg.,
Erina
NSW
2250,
T
el:
+612
4367
7022,
or
email:
inf
[email protected].
Any
claims
should
be
made as soon as practicable. To expedite claims, the purchaser should obtain a return authorization
number from Pelican Customer Service prior to returning any product. The purchaser is responsible
for paying for all freight costs. If Pelican determines that any returned product is not defective,
within the terms of this warranty or the Act, the purchaser may pay Pelican all costs of handling,
return freight and repairs at Pelican’s prevailing rates. In the event that Pelican determines that
any returned product is defective, within the terms of this warranty or the Act, Pelican shall pay the
purchaser all reasonable costs of the purchaser in making a claim under this warranty.
PELICAN™ CARGO CASES AND MOUNTS
LIMITED LIFETIME WARRANTY (CASES) AND THREE YEAR WARRANTY (MOUNTS)
©2021 Pelican Products, Inc. Part No. XBEDMT-002-BLK Rev. A DE21 5-36666
Toyota is a registered trademark of Toyota Motor Corporation. All other trademarks are registered
and/or unregistered trademarks of Pelican Products, Inc., its subsidiaries and/or affiliates.
For warranty details go to www.pelican.com/warranty