Pelican PC600 User manual

Installation Guide: Pelican PC600 or PC1000
Premium Whole House Water Filter
Master Distributor Pelican™ www.Waterfilter-USA.com 1-866-767-6401

2
Please Read First
Step 1: Carbon Soak for Tank 1– Brief Description, see instructions
for details on page 5
Connect the bypass valves to the tank head. Attach the threaded 90-degree elbow with
the appropriate o-ring and split ring in place to the up-flow side of each bypass
valve.(hand tight) Now screw the backwash assembly to the 90-degree elbow. Attach
your hose to the assembly and turn the water on slowly until the water begins to flow out
the down-flow inlet side and turn the water off. Let the media soak in the tank for 48
hours before washing the carbon. This process allows the media bed in the tank to de-
aerate. Follow instructions on page 6, 7 & 8
Step 2: Carbon Wash for Tank 1 - Brief Description, see instructions
for details on page 9
This process allows most of the carbon fines (dust) to be removed from the carbon bed
inside the tank before installation. This will remove most of the carbon fines from the
tank although it may still be noticeable for a short time once put into service. Follow
instructions on page 9 & 10
Step 3: Installation
The plumbing will start with the shut off valve then the pre-filter followed by the filter.
Follow the instructions starting with the pre-filter assembly on page 4. Then follow the
directions on page 11 along with the diagrams supplied.
Note: After installation the arrows on the bypass valve may be pointing in different
direction than the diagram shows, if this is the case simply pull up on the red arrows to
take them off and turn them around.
Helpful Hint and Trouble Shooting
Page 15

3
Diagram 1- Parts list for single tank system PC600 or PC1000
Note:Some of the parts included will not be used. We have included all the parts as a
convenience to our customers. You may save the additional parts for the future.
Note: Customer is responsible for all local plumbing codes

4
Pre-Filter Assembly
Includes:
1. 1ea. 10” blue pre-filter housing
2. 1ea. 5 micron pre-filter
3. 1ea. mounting bracket with mounting screws
4. 1ea. shut off valve
5. 1ea. pre-filter wrench for changing the pre-filters
Installation of Pre-Filter
Determine the size of the fittings you will need.
Sequence for plumbing from incoming water supply before connecting to the filter
tank(s):
1. Shut off valve
2. Pre-filter housing with pre-filter inside
Diagram - Shows the order of the shut off valve and pre-filter housing

5
How to change the pre-filter
When it comes time to change the pre-filter, it is an easy operation.
Step 1: Turn the main water supply off by turning the shut-off valve to the off position
Step 2: Push the red button on top of the pre-filter housing to relieve the pressure
Step 3: Use the supplied pre-filter wrench to unscrew the blue housing (turn clockwise)
Step 4: Replace the used pre-filter with a new one and screw the blue housing back onto
black cap
Step 5: Turn the water supply back on and you are done

6
Carbon Soak Instructions
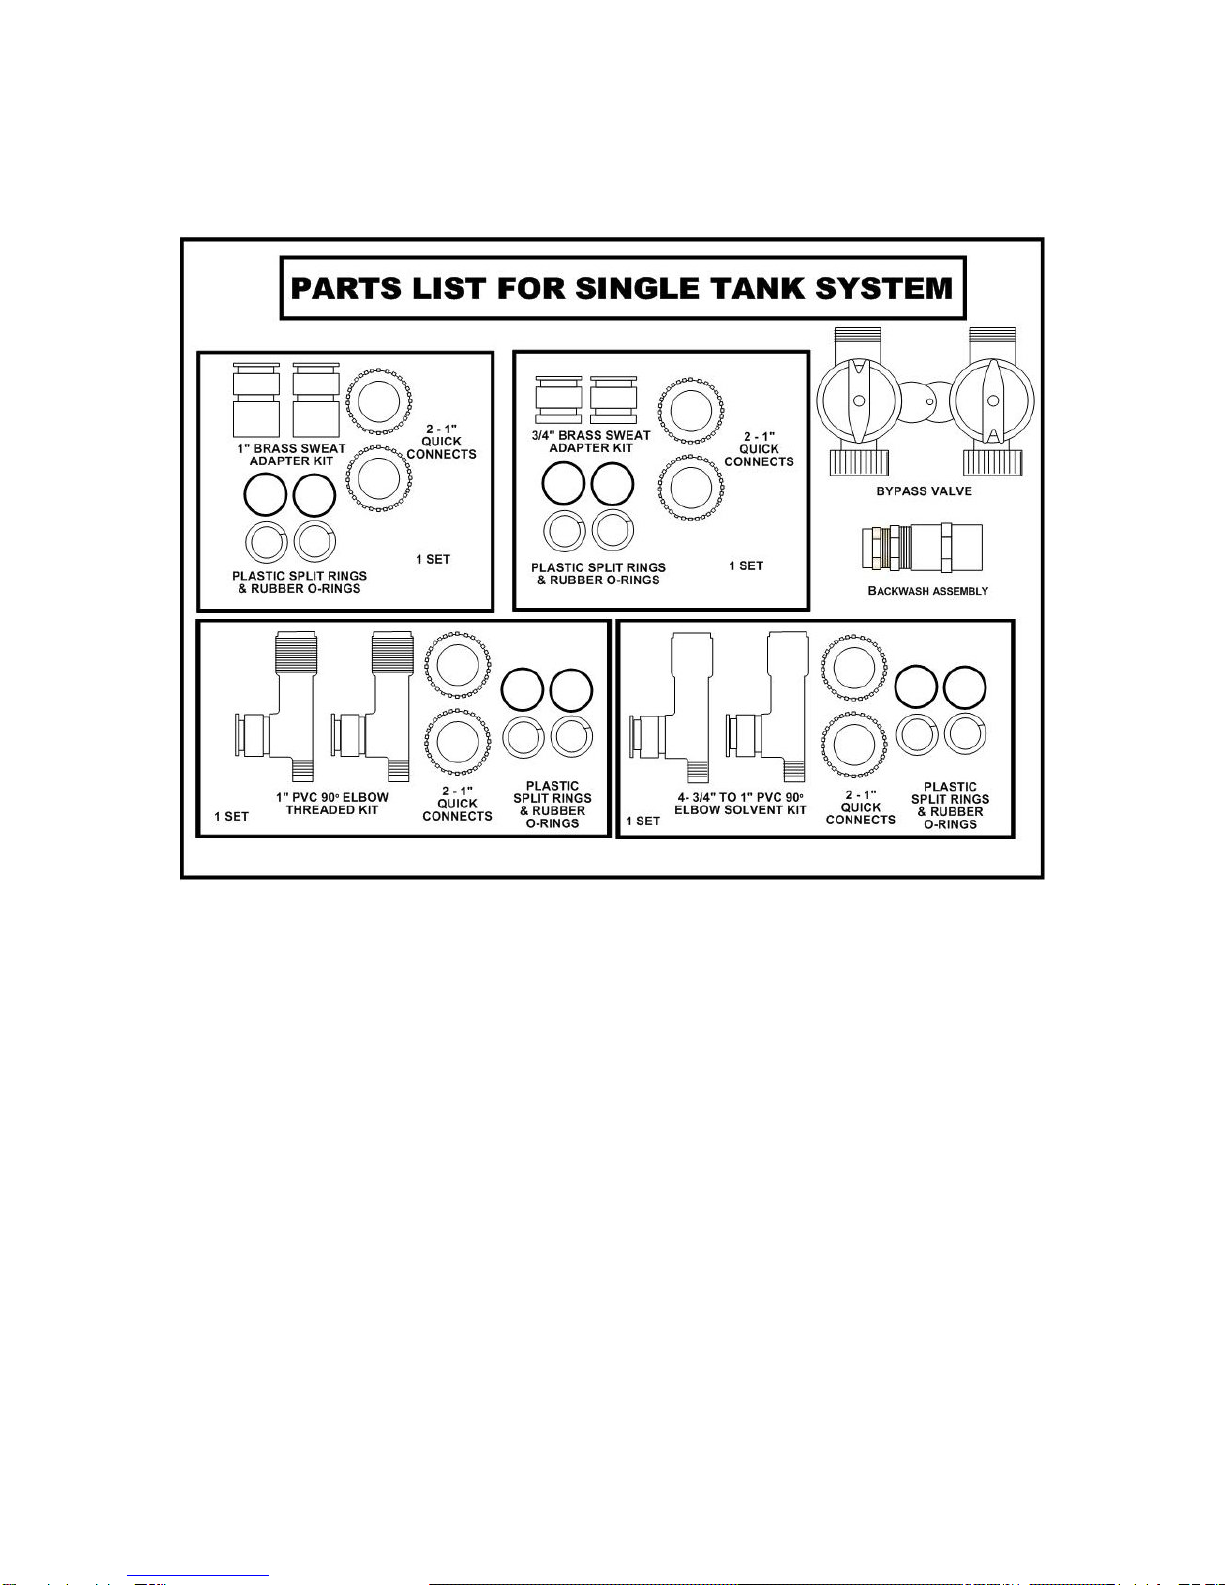
You will need (1) bypass valve (1) threaded gray 90-degree elbow adapter, (1) black
rubber o-ring, (1) white plastic split ring, and (1) black 1” quick connects. Then you will
need (1) white 1” female-to-female threaded pvc adapter, (1) white pvc female-to-male
¾” to 1” adapter, and (1) brass ¾” male-to-female threaded hose adapter.
NOTE: Hand tighten all fittings. Do not use a wrench for these steps.
1. Bypass valve installation – The bypass valve comes complete and ready to
install with o-rings, split rings and black quick connectors. To install simply
press the bypass valve onto the head of the tank and hand tighten both black
quick connectors.
2. Slide the 1” quick connect threaded side out onto the non-threaded side of the
threaded 90-degree elbow.
3. Take the white plastic split ring and slide it on the inner groove on the 90-
degree elbow.
4. Take the black rubber o-ring and slide it onto the outer groove on the 90-degree
elbow.
5. Take the completed 90-degree elbow threaded assembly and attach it to the up-
flow inlet side of the filter. Push the 90-degree elbow until the treads on the
quick connect is able to thread onto the valve. Then tighten the 1” quick
connect by hand until hand tight.
6. Take the 1” female-to-female treaded pvc adapter and attach it to the threaded
end of the 90-degree elbow that is now attached to the tank. (Seen on Diagram
3)
7. Attach the ¾”white male-to-female adapter to the open end of the 1”white
female-to-female adapter. (Seen on Diagram 3)
8. Attach the brass ¾”male-to-female adapter to the open end of the ¾”white
female-to-male adapter. (Seen on Diagram 3)
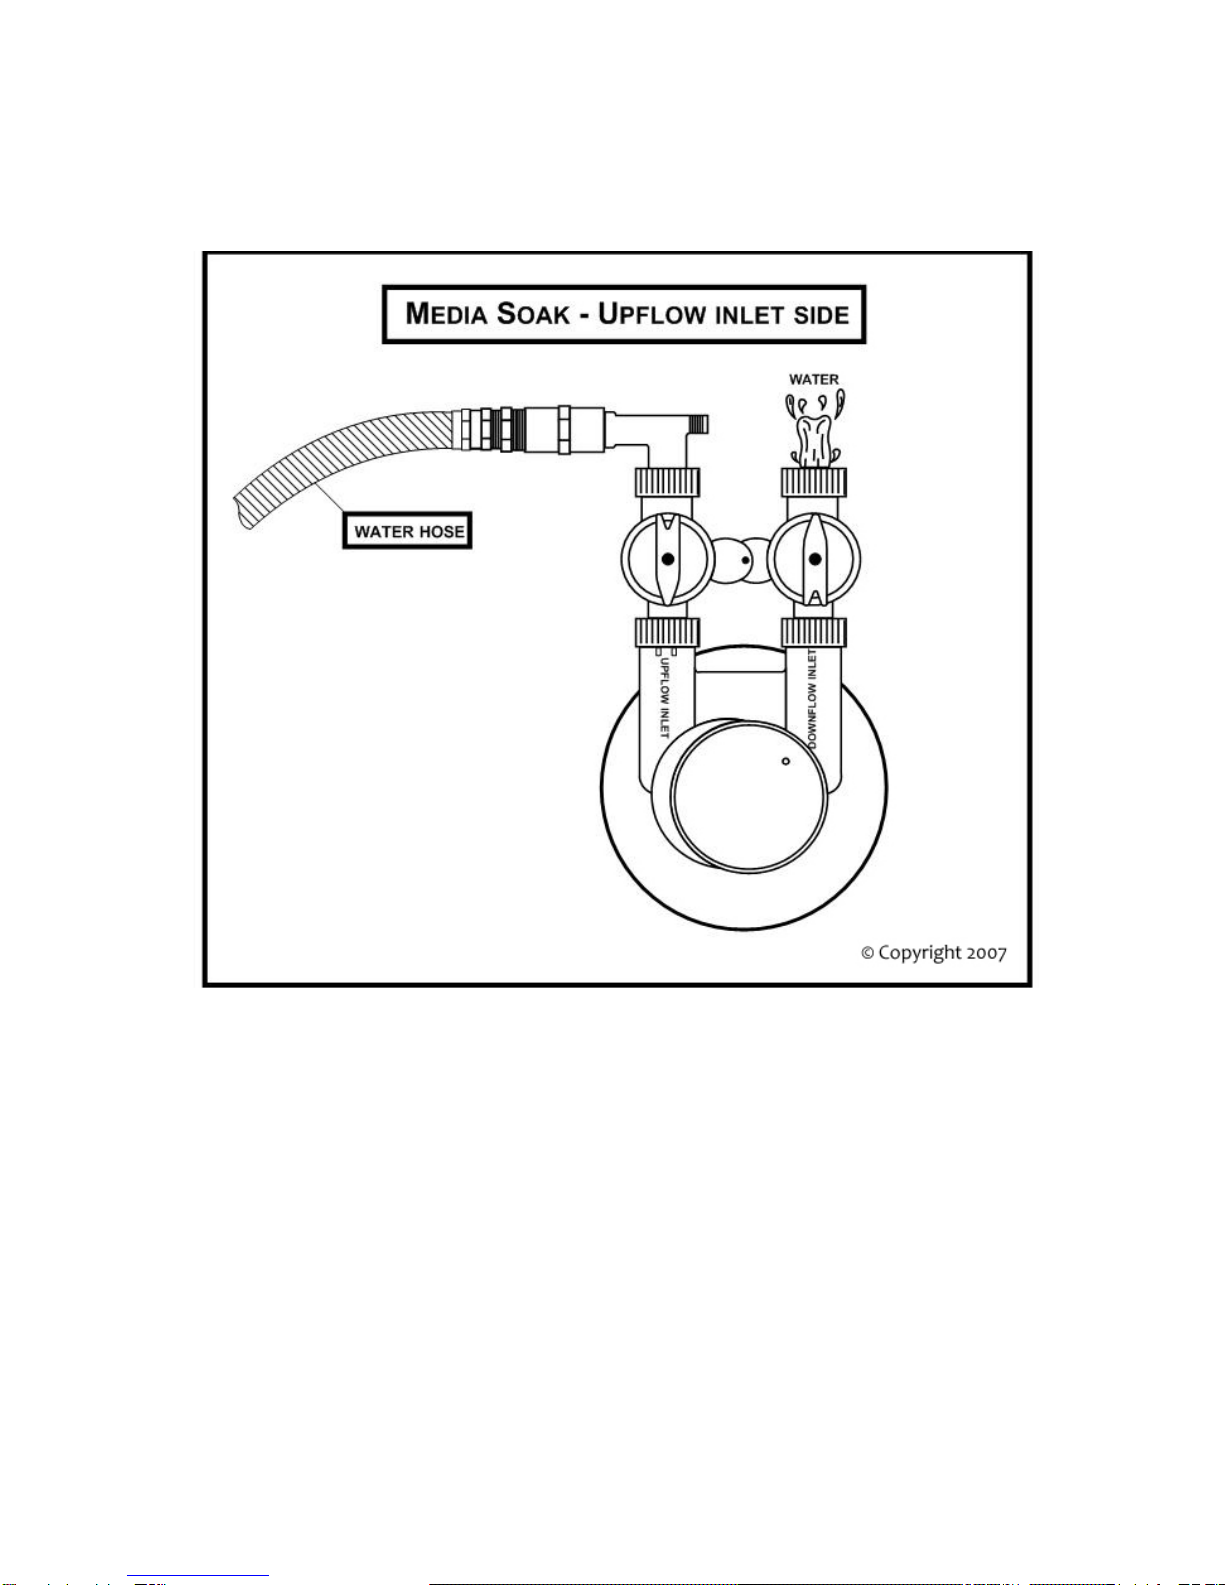
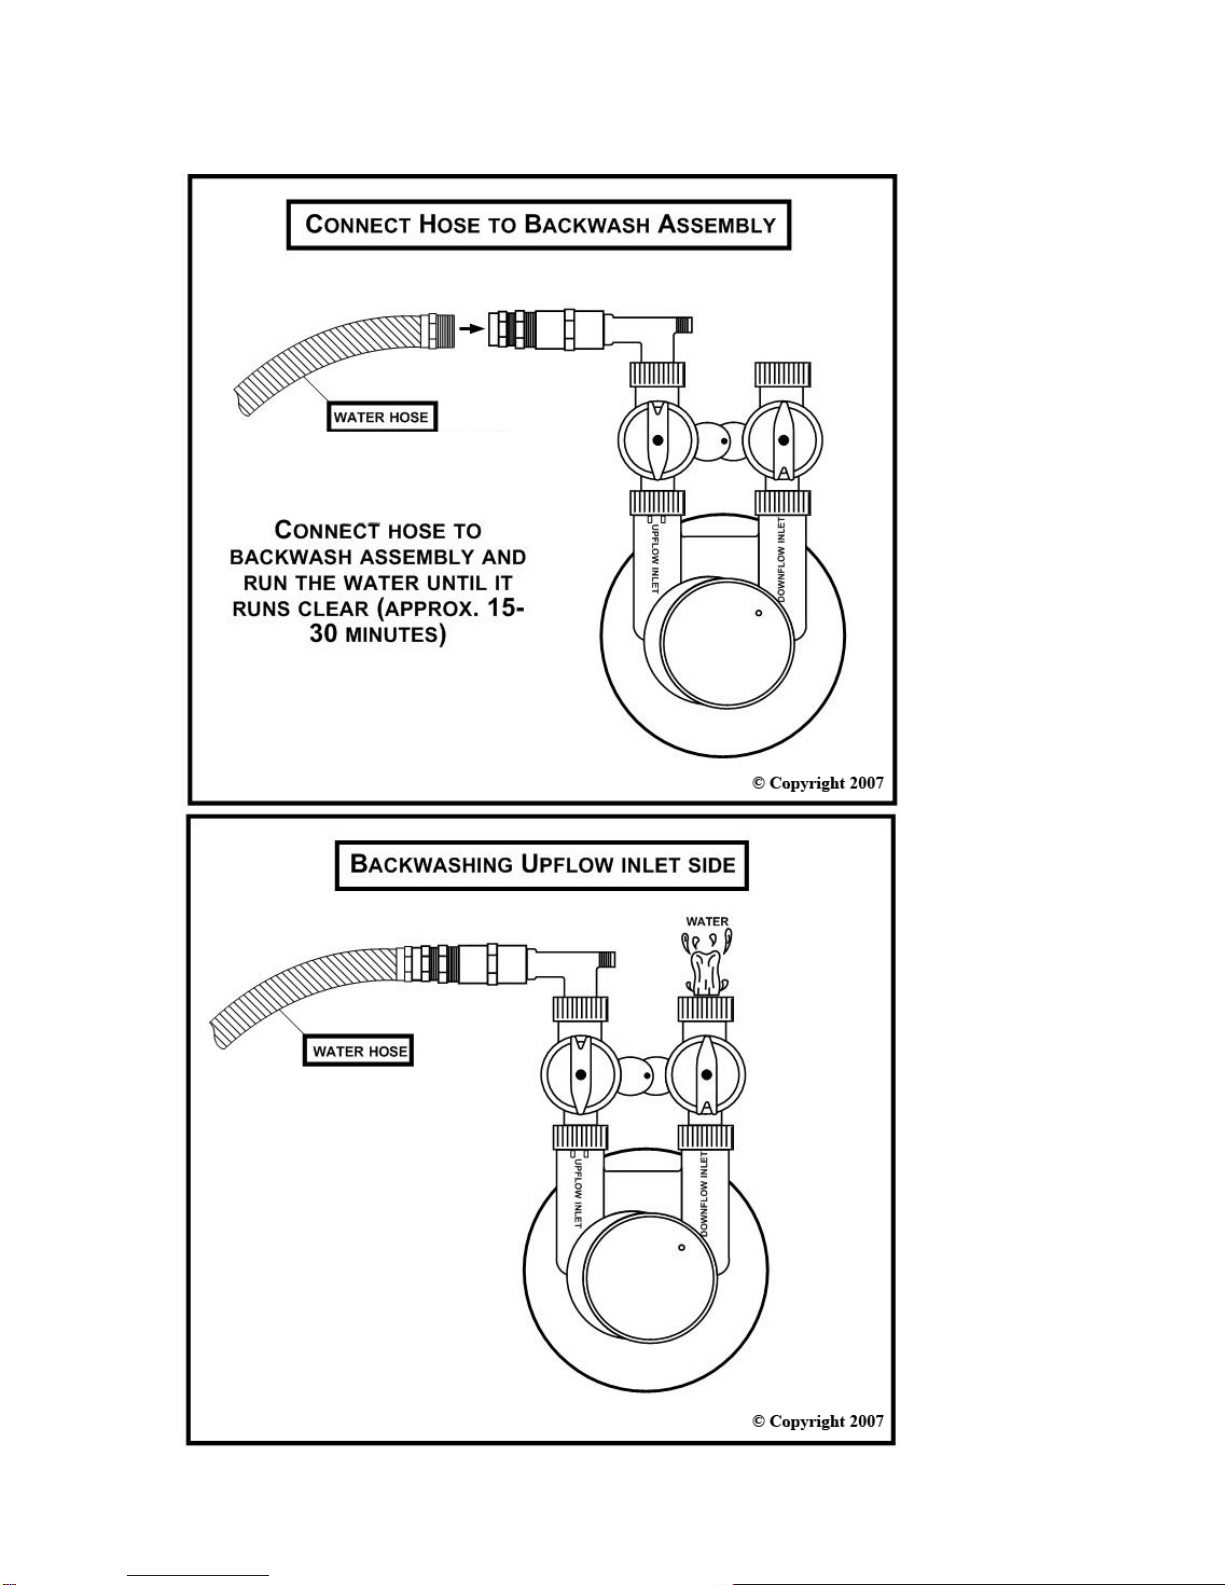
9. Now connect your garden hose to the brass female-to-male fitting now attached
to end of the 90-degree threaded elbow.
10. Turn water on slowly and increase water pressure a little at a time. Run the
water through the up flow inlet side until the tank is full and water begins to
flow out of the other side. (Seen on Diagram 4) Then turn off the water.
Let the water stand in the tank for 48 hours to de-aerate the media bed.
11. You have completed the media soak. Remove the 90-degree elbow assembly
with the hose assembly attached, as it will be used in the next step.

7
Diagram 3 - Carbon Soak and Carbon Wash Assembly
Unassembled
Assembled

8
Diagram 4 – Carbon Soak (top view of tank with hose connected)

9
Carbon Wash (labeled PC600 or PC1000) – Diagrams 3, 5, & 6
1. Attach the assembled 90-degree threaded elbow with the backwashing assembly
attached, to the up-flow side of the bypass valve.
2. Now connect your garden hose to the backwashing assembly now attached to the
bypass valve.
3. Turn water on slowly and increase water pressure a little at a time. Run the water
through the up-flow inlet side for 15-30 minutes or until the water runs clear.
Then turn off the water.
4. Unscrew the 1” quick connect from the tank and remove the 90-degree backwash
assembly.
5. Now insert the 90-degree elbow into the up-flow inlet side of the bypass valve
and then run the water through the down-flow inlet side for 1 minute or until the
water runs clear. Then turn off the water
6. Your backwashing is now completed.
7. You are now ready to install the filter.

10
Diagram 6 – Connect hose to up-flow inlet side second

11
Installation of PC600 or PC1000
NOTE: Before installing make sure the tank has been soaked for 48
hours and tank 1 has been backwashed.
1. The plumbing will start with the shut off valve then the pre-filter followed by the
filter. (See Diagrams 2 & 7)
2. Bypass valve installation – The bypass valve comes complete and ready to install
with o-rings, split rings and black quick connectors. To install simply press the
bypass valve onto the head of the tank and hand tighten both black quick
connectors.
3. Install the appropriate fittings to the bypass valve whether it is pvc or copper.
Follow the diagrams supplied with the fittings.
4. Connect the incoming water supply to the up-flow inlet side and the outgoing
water supply to the down-flow inlet side.
(Outgoing water supply is the waterline returning to the home)
5. Once the tank is hooked up SLOWLY turn the main water supply back on. Turn
the faucet closest to the system to bleed the water lines. Avoid high flow rates
such as bath tubs, multi-headed showers and spas for the first 72 hours.
Your installation is now complete.
NOTE: As with all carbon filters it is completely normal that you may get
some carbon fines or dust turning the water gray coming through the water
lines in the house. It is completely harmless and shouldn’t last for more
than a few days, outside a week. This may or may not happen.
Diagram 7 – Top view of completed installation

12
Diagram 8 - Front view of completed installation
Install may very depending on which side the main water supply is located.
Note: After installation the arrows on the bypass valve may be
pointing in different direction than the diagram shows, if this is the
case simply pull up on the red arrows to take them off and turn them
around.
Note: When installing any of the Pelican tanks from 1 ½” incoming
waterlines you will need to reduce it down to 1¼” then to 1” to

13
connect to the shut off valve. This will not reduce your pressure, as it
will insure proper flow and prevent water pinging.
Diagram 9 - Top view of the filter in Normal Operation Mode (Type of
fittings may vary depending on the type of plumbing used)
Normal Operation Position:Water flows through the control valve during normal
operation.

14
Diagram 10 - Top view of the filter in Bypass Mode (Type of fittings
may vary depending on the type of plumbing used)
Bypass Position:Untreated water is supplied to the home. When the time comes to
change the media this is the position to set the valve at.

15
Helpful Hints and Trouble Shooting
If you notice the pressure dropping off during the carbon rinse turn the water off and let
the tank sit about 30 minutes to allow the carbon to settle down off of the basket inside
the tank. If the pressure drops off again, let the system stand for 24 hours. The reason
for this is there is air trapped in the carbon bed that needs to be released from the tank.
Then continue the carbon rinse by slowly turning the water supply back on.
If you notice that the water inside the house is gray, this is normal with all carbon filters
and this will slowly fade away. The carbon inside the tank can still have air pockets
inside that when released; turn the water a little gray with carbon dust. The carbon dust is
completely harmless.
It is recommended that the pre-filter be replaced every 6-9 months depending on the
amount of sediment present in the water supply.
The system has been working great and the pressure is slowing, it may be time to change
the pre-filter. Check the pre-filter and replace if need be.
If you notice water leaking at the top of the tank around the head, you may need to turn
the head to tighten it up. The tank head is installed hand tight, do not over tighten the
head (just turn it snug).
Do not over tighten any of the fittings; they should be hand tight with the exception of the
pre-filter housing.
The head on the tank is put on hand tight and may need to be tightened up. The head
may have loosened during shipping.
If the tank leans to one side simply raise the tank in the air and set it on the ground until
the tank stands vertical. The bottom boot is used to stand the tank upright because the
bottom of the tank is round without the boot.
After installation the arrows on the bypass valve may be pointing in different direction
than the diagram shows, if this is the case simply pull up on the red arrows to take them
off and turn them around.
Remove the protective film around the chrome tank jacket for a nice look.

16
Replacing the media for the PC600, PC1000
To replace the media, you will unscrew the head from the tank and pull the riser tube out
of the tank. The riser tube will slide out of the upper basket attached to the head. Pour
the old media out of the tank and set the riser tube back into place inside the tank. The
riser tube will rest in the center of the bottom of the tank. I may be necessary to use a
water hose to wash the wet media off the insides of the tank. Cover the top of the riser
tube with a piece of tape then pour the new media into the tank with the funnel provided
with the replacement media. Now take the tape off and take the tank head and place it
over the riser tube now inside the tank and push down to screw the head back onto the
tank. Follow the soak and back wash instructions for the PC600 and PC1000 and put
back into service.

17
Pelican™ Warranty
Manufactures 10 Year Warranty:
Manufacturers 10 year warranty on the filter housing, tank head, and the bypass valve
against manufactures defects
Manufactures Performance Guarantee:
The Pelican™ Carbon Series PC600 is guaranteed to perform for 600,000 gallons or 5
years. The Pelican™ Carbon Series PC1000 is guaranteed to perform for 1,000,000
gallons or (5) years. The manufacturers authorized dealers shall be responsible for the
replacement of defective media only labor to replace the media is the responsibility of the
purchaser.
Note: Manufacturers’ warranty and performance guarantees do not cover acts of God,
misuse or abuse. All products must be used in accordance to the specifications of the
system. All warranties and performance guarantees are valid to the original purchases and
purchasers delivery location. Labor and or cost of damage due to misuse or defective
items are the responsibility of the purchaser. A certified water test may be required for
any warranty claims. Should your water test show contaminates unknown at the time of
purchase or unknown to Pelican™ or Authorized Dealer, this may void the systems
warranty. Please contact your Authorized Pelican™ Dealer for further details. Pelican™
Water Technologies or its Authorized Dealers will not be liable for any circumstance for
consequential or incidental damages. It is the purchaser’s responsibility to insure that the
equipment is installed in compliance with all applicable building codes. All warrantees
and guarantees go thru Waterfilter USA. Call 1-866-767-6401 or email

18
Pelican™ Warranty Registration Form
Date received: _______Order ID#: __________
Model: PSE1800 or PSE2000 (circle one)
Name: ______________________________________________
Address: ____________________________________________
City: _______________ State: __________ Zip: __________
Send To:
Water Filter USA – Attention Pelican Warranty Registration
3121 Suite D Opportunity Court
South Daytona, Fl 32119
Plumbers Information (optional)
We like to recommend good plumbers through out the USA and if you were
happy with your installer please give us their information so we can pass it
on as a courtesy. Thank you for your time.
Name of Plumbing Company used to install system:
_____________________________________________________
Phone #: (_____)-_______________ of the Plumbing installer
Send in this Warranty Registration Form to validate your warranty or visit
www.PelicanWaterTechnologies.com to complete warranty registration form.

19
Customer Loyalty Program
What is the Customer Loyalty Program (CLP)?
The CLP is a program that offers current customers of WaterFilter USA to earn
rewards for referring friends and family to us. For each referral that results in the
purchase of a Pelican whole house system from WaterFilter USA, you will
receive a $50 gift card that is eligible at all of the following restaurants: Olive
Garden, Red Lobster, Bahama Breeze, or Smokey Bones.
How to start earning my rewards?
Simple, when you refer someone to us, put down their name and information
below and mail us your form. If a person on your list orders from us, we will then
send you your $50 gift card. Note, that we will not call or solicit the names listed
below. You must have your referral contact us directly. If you come up with more
names later on that you want to submit to us, simply make copies of this form
and send more in as you need to. Remember to fill in your name and phone at
the bottom of each form you submit to ensure proper credit of rewards to you.
-----------------------------------------------------------------------------------------------------
Please fill out the following information
Name Phone City State Zip Code
Send To:
Water Filter USA – Attention CLP Program
3121 Suite D Opportunity Court
South Daytona, Fl 32119
Our Phone: 1-866-767-6401
Website: http://www.waterfilter-usa.com
Fax: 1-386-760-3218
Your Name: _______________________________________ Phone #: (_____)-_______________
Other manuals for PC600
3
This manual suits for next models
1
Table of contents
Other Pelican Water Dispenser manuals
Popular Water Dispenser manuals by other brands

BRIO
BRIO CLPOU320WUVF4P Setup manual

Coway
Coway CHP-06DL user manual

Elkay
Elkay ezH2O Liv LBWD00 C Series INSTALLATION, CARE & USER MANUAL

Kool Tek
Kool Tek BFHCW4 user manual

Follett
Follett 25 Installation, operation and service manual

Franklin
Franklin PWS1HE Series Installation instructions and owner's manual