Pelican PS48 User manual

Owner’s Manual
PS48/PS80 Advantage Series
Salt Based Water Softeners

PS48/PS80 Advantage Series Salt Based Water Softeners — Rev K
Page 2
© 2015 Enviro Water Solutions LLC
3060 Performance Circle, Suite 2. DeLand, FL 32724 www.pelicanwater.com
(877) 842-1635
© Copyright 2015 Enviro Water Solutions LLC. All rights reserved.
All information contained herein is the property of Pelican Water Systems. Pelican Water Systems makes
no warranty of any kind with regard to this material, including, but not limited to, the implied warranties of
merchantability and fitness for a particular purpose. Pelican Water Systems shall not be liable for technical
or editorial errors or omissions contained herein or for incidental or consequential damages in connection
with the furnishing, performance, or use of this material. The information is provided “as is” without
warranty of any kind and is subject to change without notice. This document contains proprietary
information which is protected by copyright. No part of this document may be photocopied, reproduced, or
translated into another language without the prior written consent of Pelican Water Systems. Pelican Water
Systems is an Enviro Water Solutions LLC Company.

PS48/PS80 Advantage Series Salt Based Water Softeners — Rev K
Page 3
© 2015 Enviro Water Solutions LLC
3060 Performance Circle, Suite 2. DeLand, FL 32724 www.pelicanwater.com
(877) 842-1635
Table of Contents
Table of Contents . . . . . . . . . . . . . . . . . . . . . . . . . . . . . . . . . . . . . . . . . . . . . . . . . . . . . . 3
Product Operation and Specifications . . . . . . . . . . . . . . . . . . . . . . . . . . . . . . . . . . . . . 4
Important Information . . . . . . . . . . . . . . . . . . . . . . . . . . . . . . . . . . . . . . . . . . . . . . . . . 4
Complete Parts List . . . . . . . . . . . . . . . . . . . . . . . . . . . . . . . . . . . . . . . . . . . . . . . . . . . . 5
Installation Overview . . . . . . . . . . . . . . . . . . . . . . . . . . . . . . . . . . . . . . . . . . . . . . . . . . 6
Pre-Installation . . . . . . . . . . . . . . . . . . . . . . . . . . . . . . . . . . . . . . . . . . . . . . . . . . . . . . . 6
Bypass Valve Installation . . . . . . . . . . . . . . . . . . . . . . . . . . . . . . . . . . . . . . . . . . . . . . . . 6
Installation . . . . . . . . . . . . . . . . . . . . . . . . . . . . . . . . . . . . . . . . . . . . . . . . . . . . . . . . . . . 7
Install Electronic Head . . . . . . . . . . . . . . . . . . . . . . . . . . . . . . . . . . . . . . . . . . . . . . . . . 7
Final Setup and Installation . . . . . . . . . . . . . . . . . . . . . . . . . . . . . . . . . . . . . . . . . . . . . . 8
Complete the Installation . . . . . . . . . . . . . . . . . . . . . . . . . . . . . . . . . . . . . . . . . . . . . . . 9
Programming the Electronic Head . . . . . . . . . . . . . . . . . . . . . . . . . . . . . . . . . . . . . . . . . 9
Step 1: Setting the Valve . . . . . . . . . . . . . . . . . . . . . . . . . . . . . . . . . . . . . . . . . . . . . 9
Step 2: Setting the Time . . . . . . . . . . . . . . . . . . . . . . . . . . . . . . . . . . . . . . . . . . . . . 10
Step 3: Performing Manual Regen . . . . . . . . . . . . . . . . . . . . . . . . . . . . . . . . . . . . . . 10
Adding the Pelican Logo Sticker . . . . . . . . . . . . . . . . . . . . . . . . . . . . . . . . . . . . . . . . . . 11
Troubleshooting . . . . . . . . . . . . . . . . . . . . . . . . . . . . . . . . . . . . . . . . . . . . . . . . . . . . . . 12
Warranty . . . . . . . . . . . . . . . . . . . . . . . . . . . . . . . . . . . . . . . . . . . . . . . . . . . . . . . . . . . 13
Warranty Registration Form . . . . . . . . . . . . . . . . . . . . . . . . . . . . . . . . . . . . . . . . . . . . . 14

PS48/PS80 Advantage Series Salt Based Water Softeners
© 2015 Enviro Water Solutions LLC
3060 Performance Circle, Suite 2. DeLand, FL 32724
— Rev K
Page 4
www.pelicanwater.com
(877) 842-1635
Product Operation and Specifications
Important Information
Read these instructions carefully and determine the location of all system components before
beginning installation.
Check all applicable plumbing, building, and electrical codes for installation compliance.
Install the system on the main water supply.
Systems that contain electronic components cannot be installed outside in uncovered areas.
WARNING:
If this or any other system is installed in a metal (conductive) plumbing system, i.e. copper or
galvanized metal, the plastic components of the system will interrupt the continuity of the
plumbing system. As a result any errant electricity from improperly grounded appliances
downstream or potential galvanic activity in the plumbing system can no longer ground
through contiguous metal plumbing. Some homes may have been built in accordance with
building codes, which actually encouraged the grounding of electrical appliances through the
plumbing system. Consequently, the installation of a bypass consisting of the same material
as the existing plumbing, or a grounded "jumper wire" bridging the equipment and re-
establishing the contiguous conductive nature of the plumbing system must be installed prior
to your system’s use.
CAUTION:
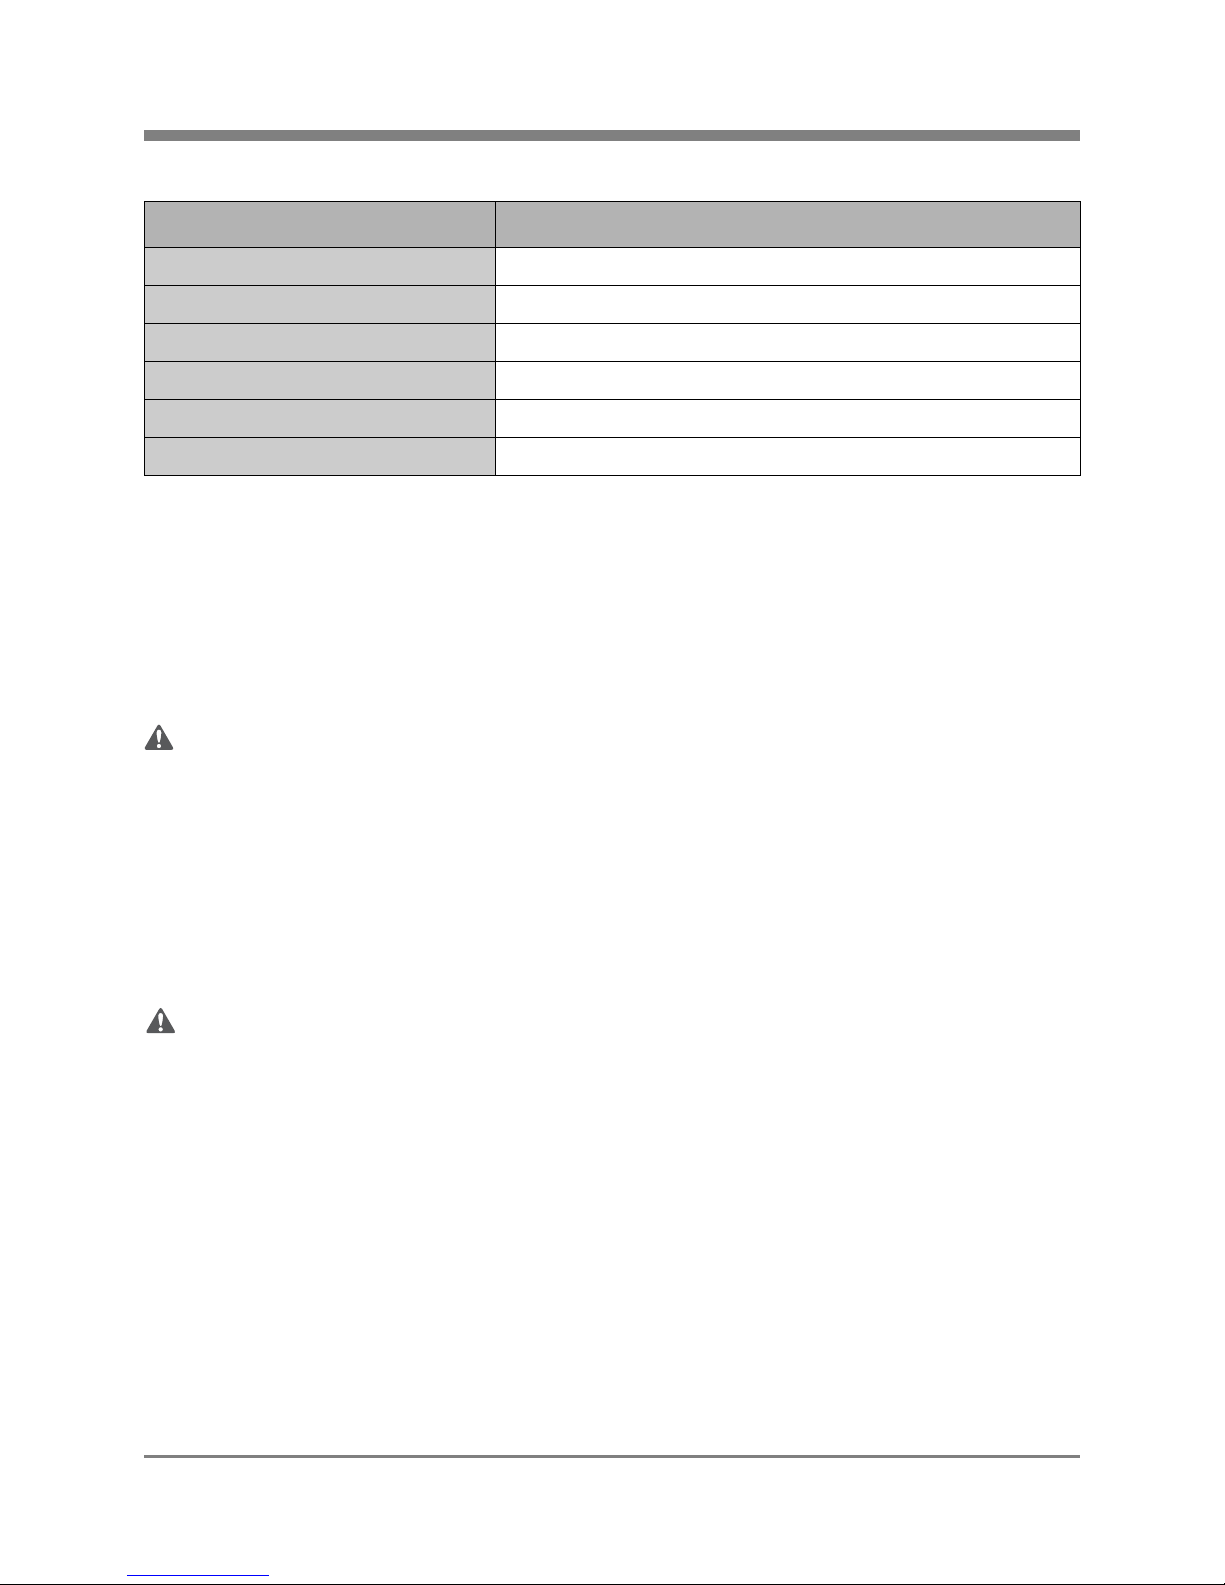
When adding a filtration/softening system to homes/buildings supplied by well water, the system should be
installed following the pressure tank. DO NOT USE this system for pneumatic or hydro pneumatic
applications. If you are using a booster pump, then install this system following the booster
pump. If you have questions, please call customer service.
Specification Description
Rated Service Flow 12-18 GPM (depending on model)
Minimum Working Pressure 25 PSI
Maximum Working Pressure 80 PSI
Maximum Vacuum 5 inch/127 mm Hg
Operating Temperatures 36°F - 120°F
pH Range 6.5 - 11

PS48/PS80 Advantage Series Salt Based Water Softeners
© 2015 Enviro Water Solutions LLC
3060 Performance Circle, Suite 2. DeLand, FL 32724
— Rev K
Page 5
www.pelicanwater.com
(877) 842-1635
Complete Parts List
Note: Enviro Water Products supplies the parts below to accommodate a variety of water supply lines.
Table 1: Parts List
Note: Drawings are not to scale.
Additional fittings will be needed to adapt to your plumbing.
Part Description Qty. Part Description Qty.
Bypass Valve for Electronic
Head 11" PVC Tail Adaptor for
Electronic Head Bypass
(Preinstalled on Bypass
Valve)
2
PVC Tubing Drain Line
(50 ft.) 1Electronic Head 1
Brine Tank 1Mineral Tank 1
Non-Abrasive Auto Wax
4 oz. Bottle 1
WAX

PS48/PS80 Advantage Series Salt Based Water Softeners
© 2015 Enviro Water Solutions LLC
3060 Performance Circle, Suite 2. DeLand, FL 32724
— Rev K
Page 6
www.pelicanwater.com
(877) 842-1635
Installation Overview
Figure 1
Pre-Installation
Bypass Valve Installation
Figure 2
If the Red Clips are in the slots (female opening of Electronic Head) remove them. Push the male O-Ring
side of the Bypass Valve into the female opening of the Electronic Head. Push the Red Clips back into the
slots to tighten.
Notice:
The Bypass Valve on the Electronic Head can be set to Bypass or Service by turning the knobs on the side
of the valve. If the holes are up and down then the tank is in the Bypass Mode. If the holes are side to side
then the tank is in the Service Mode. Do not remove the red clips from the Bypass Valve after connecting
to main water supply.
Softener Tank
Electronic
Head
Discharge
Line
Bypass
Valve
Overflow
Barb
Outgoing
Water to
House
Wall
Incoming
Water
Supply
Brine Tank
Holding Tank
Safety Valve
Softener Tank
Electronic
Head
Bypass
Valve
Red
Clip
Front View

PS48/PS80 Advantage Series Salt Based Water Softeners
© 2015 Enviro Water Solutions LLC
3060 Performance Circle, Suite 2. DeLand, FL 32724
— Rev K
Page 7
www.pelicanwater.com
(877) 842-1635
Installation
Install Electronic Head
Figure 3
Notice:
Follow the raised black arrows on the head of the Softener.
1. Level the Pelican Softener Tank.
Notice:
If the tank is not level, lift the tank straight up 6 inches and tap it on the ground until the tank stands
vertical. The bottom of the tank is round and the boot allows the tank to stand upright.
2. Determine the size and material of your incoming water supply line and choose the appropriate
fittings required to connect it to the Bypass Valve.
CAUTION:
Do not over-tighten any of the fittings during installation.
3. Remove the gray cap from the top of the Softener tank.
4. Remove blue cap from the distributor tube.
5. Screw the Electronic Head onto the tank hand-tight.
6. Install the appropriate fittings onto the inlet and outlet, following the arrows on the Bypass Valve
and head.
7. Connect the incoming water supply to the fitting on the inlet side of the Bypass Valve.
8. Connect the outgoing water supply to the outlet side of the Bypass Valve.
9. Firmly press one end of the discharge PVC Tubing Drain Line onto the barbed nose, and secure the
other end of the line to a drain.
Softener Tank
Electronic
Head
Discharge
Line
Outgoing
Water to
House
Wall
Incoming
Water
Supply
Holding Tank
Safety Valve
Bypass
Valve
Overflow
Barb
Brine Tank

PS48/PS80 Advantage Series Salt Based Water Softeners
© 2015 Enviro Water Solutions LLC
3060 Performance Circle, Suite 2. DeLand, FL 32724
— Rev K
Page 8
www.pelicanwater.com
(877) 842-1635
Final Setup and Installation
Figure 4
10. Attach the Brine Tank hose to the connection on the top of the Electronic Head by removing the
grey clip, fully inserting the Brine Line into the port and replacing the grey clip (Figure 5).
11. Add approximately 160 lbs. of salt or potassium to the brine tank. (Example: four 40-pound bags)
12. Add 6 gallons of water to the brine tank.
Recommended: Install PVC tubing drain line on the brine tank overflow barb and route to a drain.
!IMPORTANT!
Ensure the PVC Tubing Drain Line is not submerged and is free of kinks.
Figure 5
Softener Tank
Electronic
Head
Discharge
Line
Bypass
Valve
Overflow
Barb
Outgoing
Water to
House
Wall
Incoming
Water
Supply
Brine Tank
Holding Tank
Safety Valve
Electronic
Head
Grey
Clip
Softener Tank

PS48/PS80 Advantage Series Salt Based Water Softeners
© 2015 Enviro Water Solutions LLC
3060 Performance Circle, Suite 2. DeLand, FL 32724
— Rev K
Page 9
www.pelicanwater.com
(877) 842-1635
Complete the Installation
1. Set the Bypass Valve into bypass mode.
2. Slowly turn on the main water supply until all pipes are pressurized.
3. Slowly open the bypass valves.
4. Let the Softener Tank fill completely and then open the bypass valves the rest of the way.
5. Check for leaks.
6. Plug in the Electronic Head.
7. Wax stainless steel tank jacket with wax provided or any other non-abrasive auto wax a minimum
of 1-2 times per year or as needed based on the installed environment.
Figure 6
Note: Power Source - For safety reasons the outlet must be protected by a Ground Fault Circuit
Interrupter (GFCI).
Programming the Electronic Head
Note: Remove protective film from electronic head screen.
Note: These settings are specific to this system. Do not make changes to the settings unless instructed by
customer service. All settings have to be set by first setting the clock to 12:01 PM. To restart programming,
you must start over at step 1. Do not go to a previous step, you must start over at step 1.
Figure 7
Step 1: Setting the Valve
1. Press and hold the UP or DOWN button to change the clock to 12:01 PM.
2. Press the EXTRA CYCLE button once.
3. Press and hold the UP and DOWN buttons together, until DF is displayed in the left corner. Scroll
using the UP and DOWN arrows until "GAL" is selected. Press EXTRA CYCLE.
4. Follow the steps in the table below to finish setting the valve. When each setting is displayed, use
the UP and DOWN buttons to scroll to the appropriate data setting displayed in the table. Press
EXTRA CYCLE to select the data setting and go to the next setting.
Side View
Bypass Valve in open position Bypass Valve in bypass position
B
Y
P
A
S
S
B
Y
P
A
S
S
B
Y
P
A
S
S
B
Y
P
A
S
S
B
Y
P
A
S
S
B
Y
P
A
S
S
B
Y
P
A
S
S
B
Y
P
A
S
S
Extra Cycle
Button
Up
Button
Down
Button

PS48/PS80 Advantage Series Salt Based Water Softeners
© 2015 Enviro Water Solutions LLC
3060 Performance Circle, Suite 2. DeLand, FL 32724
— Rev K
Page 10
www.pelicanwater.com
(877) 842-1635
Table 2: Setting the Valve
Step 2: Setting the Time
1. Press and hold the UP or DOWN button to change the clock to the current time.
2. Press the EXTRA CYCLE button when the time is set.
Note: If the fauret icon flashes, it is indicating the need for an extra cycle, and will do so at the indicated
Regeneration Time unless an extra cycle is initiated sooner.
Note: The water drop icon will flash when water is flowing through the softener tank.
Step 3: Performing Manual Regen
!IMPORTANT!
You will not be able to use water in the house for approximately 2 hours during the Regen process.
1. Press and hold the EXTRA CYCLE button for 5-7 seconds until B1 displays.
Note: Gears will make noise and water will start to flow.
2. Allow the system to EXTRA CYCLE for 2 hours.
Your manual regen cycle is complete and the tank is ready for use.
Parameter Display (Left Corner) Data Display Set To
VT (Valve Type) dF2b
CT (Control Type) FD
C (Capacity) Size of system (Example: 48k or 80k)
H (Hardness) 20 minimum (Enter actual hardness if available)
RS (Reserve Selection) SF
SF (Safety Factor) 10
DO (Days Override) 14 - Municiple Water, 7 - Private Well
RT (Regeneration Time) 2:00
B1 (Backwash 1) 10
BD (Brine Draw) 60
B2 (Backwash 2) 5
RR (Rapid Rinse) 10
BF (Brine Fill) 20 (PS48), 30 (PS80)
FM (Flow Meter) 1.2 - Unit will begin syncing

PS48/PS80 Advantage Series Salt Based Water Softeners
© 2015 Enviro Water Solutions LLC
3060 Performance Circle, Suite 2. DeLand, FL 32724
— Rev K
Page 11
www.pelicanwater.com
(877) 842-1635
Adding the Pelican Logo Sticker
1. Peel back plastic to remove it from the tank.
2. Place sticker in the desired location on the tank.

PS48/PS80 Advantage Series Salt Based Water Softeners
© 2015 Enviro Water Solutions LLC
3060 Performance Circle, Suite 2. DeLand, FL 32724
— Rev K
Page 12
www.pelicanwater.com
(877) 842-1635
Troubleshooting
Problem Solution
Water leaking at the top of the tank around the head. You may need to turn the head to tighten it. The tank
head is pre-installed hand-tight, do not overtighten the
head (just turn it snug).
The tank leans to one side or is not level. If the tank is not level, lift the tank straight up 6 inches
and tap it on the ground until the tank stands vertical.
The bottom of the tank is round and the boot allows the
tank to stand upright.
The Brine Tank has too much water or is not filling
properly. Check and tighten all fittings on Brine Tank and
Electronic Head to ensure air is not getting into the
Brine Tank Hose.
The system is backwashing but it is not using up any
salt. If the salt has bridged (too much salt has been added to
the tank and it has formed a solid block of salt), shake
the Brine tank until the block of salt breaks apart.
Unlevel
Tank
Boot
Unlevel
Tank
Boot
Level
Tan k
Unlevel
Boot

PS48/PS80 Advantage Series Salt Based Water Softeners
© 2015 Enviro Water Solutions LLC
3060 Performance Circle, Suite 2. DeLand, FL 32724
— Rev K
Page 13
www.pelicanwater.com
(877) 842-1635
Warranty
Pelican Limited Lifetime Warranty
Pelican Water ("Pelican") warrants to the end user ("customer") that its tanks (13" & smaller), valves, in/
out heads, bypass's, fittings, Natursoft media and housings ("Covered Items") will be free from defects in
material and workmanship under normal use and service for the life of the system. No warranty is made
with respect to defects or damaged due to neglect, misuse, alterations, accident, misapplication, physical
damage, installation on water quality outside guidelines for system or damaged caused by fire, acts of
God, or freezing.**
Pelican 5 Year Limited Warranty
Pelican Water ("Pelican") warrants to the end user ("customer") that its retention tanks and solid-state
electronic heads ("Covered Items") will be free from defects in material and workmanship under normal
use and service for a period of 5 years.
Limitations and Responsibilities
Pelican’s obligation to the customer under these warranties shall be limited, at its option, to replacement
or repair of Covered Items by these warranties, labor is not covered. Prior to return or repair of Covered
Items, the customer must obtain a return goods authorization number from Pelican and at Pelicans option,
return the Covered Items freight prepaid. Any Covered Item repaired or replaced under these warranties
will be returned prepaid standard freight to the original point of shipment. Expedited freight options are
available at customer expense.
No warranty is made with respect to defects or damaged due to neglect, misuse, alterations, accident,
misapplication, physical damage, or damaged caused by fire, acts of God, or freezing. These warranties
apply only to the original registered owner so long as the owner owns the home in which the unit was
originally installed. Customer must register their system with Pelican within 90 days of purchase* in order
to obtain a warranty. Warranty will discontinue after the unit is removed from the location where it was
originally installed. Warranty begins on the date of delivery of product to the customer. Improper
maintenance of system (i.e. not replacing filters or media) on time will be considered "neglect".
Installation of any system on water conditions outside of or beyond the recommended specs of any system
voids any warranty.
Pelican gives this warranty to the customer in lieu of all other warranties, express or implied, including
without limitation any implied warranties of merchantability or fitness for a particular purpose or treatment
of certain water and hereby expressly disclaims all other such warranties. Pelican’s liability hereunder shall
not exceed the cost of the product. Under no circumstances will Pelican be liable for any incidental or
consequential damages or for any other loss, damage or expense of any kind, including loss of use, arising
in connection with the installation or use or inability to use the Covered Items or any water treatment
system the Covered Items are incorporated into. These warranties are governed by the laws of the state of
Florida and may change at any time without notice.
*Failure by California and Quebec residents to complete the product registration form does not diminish
their warranty rights.
**For all orders placed on or after June 3rd, 2011.
Manufacturer’s Performance Guarantee
The Pelican PC600 Premium Whole House Water Filter is guaranteed to perform for 600,000 gallons or (5)
years whichever comes first. The Pelican PC1000 Premium Whole House Water Filter is guaranteed to
perform for 1,000,000 gallons or (5) years whichever comes first. The authorized dealers shall be
responsible for the repair or replacement of defective media only, labor to replace the media is the
responsibility of the purchaser.

PS48/PS80 Advantage Series Salt Based Water Softeners
© 2015 Enviro Water Solutions LLC
3060 Performance Circle, Suite 2. DeLand, FL 32724
— Rev K
Page 14
www.pelicanwater.com
(877) 842-1635
Warranty Registration Form
Send in this Warranty Registration Form to validate your warranty or visit
www.PelicanWater.com to complete warranty registration form online.
Pelican Warranty Registration Form
Send To:
Pelican Water Systems
3060 Performance Circle, Suite 2
DeLand, FL 32724
Phone: (877) 842-1635
Date Item(s) were Received: Order ID#: Model:
Dealer Purchased From:
Name:
Address:
City: State: Zip:
Model/Serial Number:

PS48/PS80 Advantage Series Salt Based Water Softeners
© 2015 Enviro Water Solutions LLC
3060 Performance Circle, Suite 2. DeLand, FL 32724
— Rev K
Page 15
www.pelicanwater.com
(877) 842-1635
!IMPORTANT!
Do not use where water is microbiologically unsafe or with water of unknown quality without proper
disinfection before or after the filter/softener system.
This manual suits for next models
1
Table of contents
Other Pelican Water Dispenser manuals