Peloton GUIDE User manual

USER MANUAL


CAUTION: The information in this manual may not reflect recent updates as we continue to improve our product. Please see
onepeloton.com/manuals for the latest version of the manual.
TABLE OF CONTENTS
WARNINGS AND SAFETY INSTRUCTIONS
MEMBER SUPPORT
MEET THE PELOTON GUIDE
INSTALLATION
SETUP
USING THE PELOTON GUIDE
TAKING A CLASS
Class Plan
Class Screen
Self Mode
Movement Tracker
Strive Score
Voice Control
ACCOUNT
TROUBLESHOOTING
SETTINGS
WARRANTY
USA
Canada
United Kingdom
Australia
4
5
6
11
16
18
23
23
25
25
26
26
26
28
30
32
36
36
39
42
45

WARNINGS AND SAFETY INSTRUCTIONS
READ ALL WARNINGS AND INSTRUCTIONS BEFORE USING THE PELOTON GUIDE.
IMPROPER USE CAN VOID THE LIMITED WARRANTY.
Consult a physician before beginning a new fitness plan or if you have any preexisting condition which might be affected by use of the
Peloton Guide. Consult a physician before using a heart rate sensor if you have a pacemaker or other implanted electronic device.
Incorrect or excessive exercising may result in serious injury or death. If you experience faintness, chest pain, shortness of breath, or
any other adverse health effect, stop exercising immediately and consult a physician.
The Peloton Guide is not a medical device and is not intended to diagnose, treat, mitigate, cure or prevent disease, disorder or
abnormal physical state or any of their symptoms.
Metrics on the screen, including heart rate monitoring, may be inaccurate. Values should be used for reference only.
Keep your workout area clear and free of obstructions. If working out with others, keep at least an arm’s length apart at all times to
avoid injury.
No one under the age of 16 should use the Peloton Guide, unless under adult supervision and participating in a class that is specifically
designed and labeled as appropriate for the user’s age.
Only join and participate in classes or activities that are appropriate for the age and fitness level of all participants.
Do not disassemble. Taking apart the Peloton Guide could create a risk of injury or electric shock.
Do not use Peloton Guide or any accompanying components if they are damaged, faulty, or contaminated by foreign material such as
dust, water, or dirt.
Use only the power cord and power adapter that come with the Peloton Guide. If the power cord or adapter is damaged, stop using
immediately and contact Peloton Member Support.
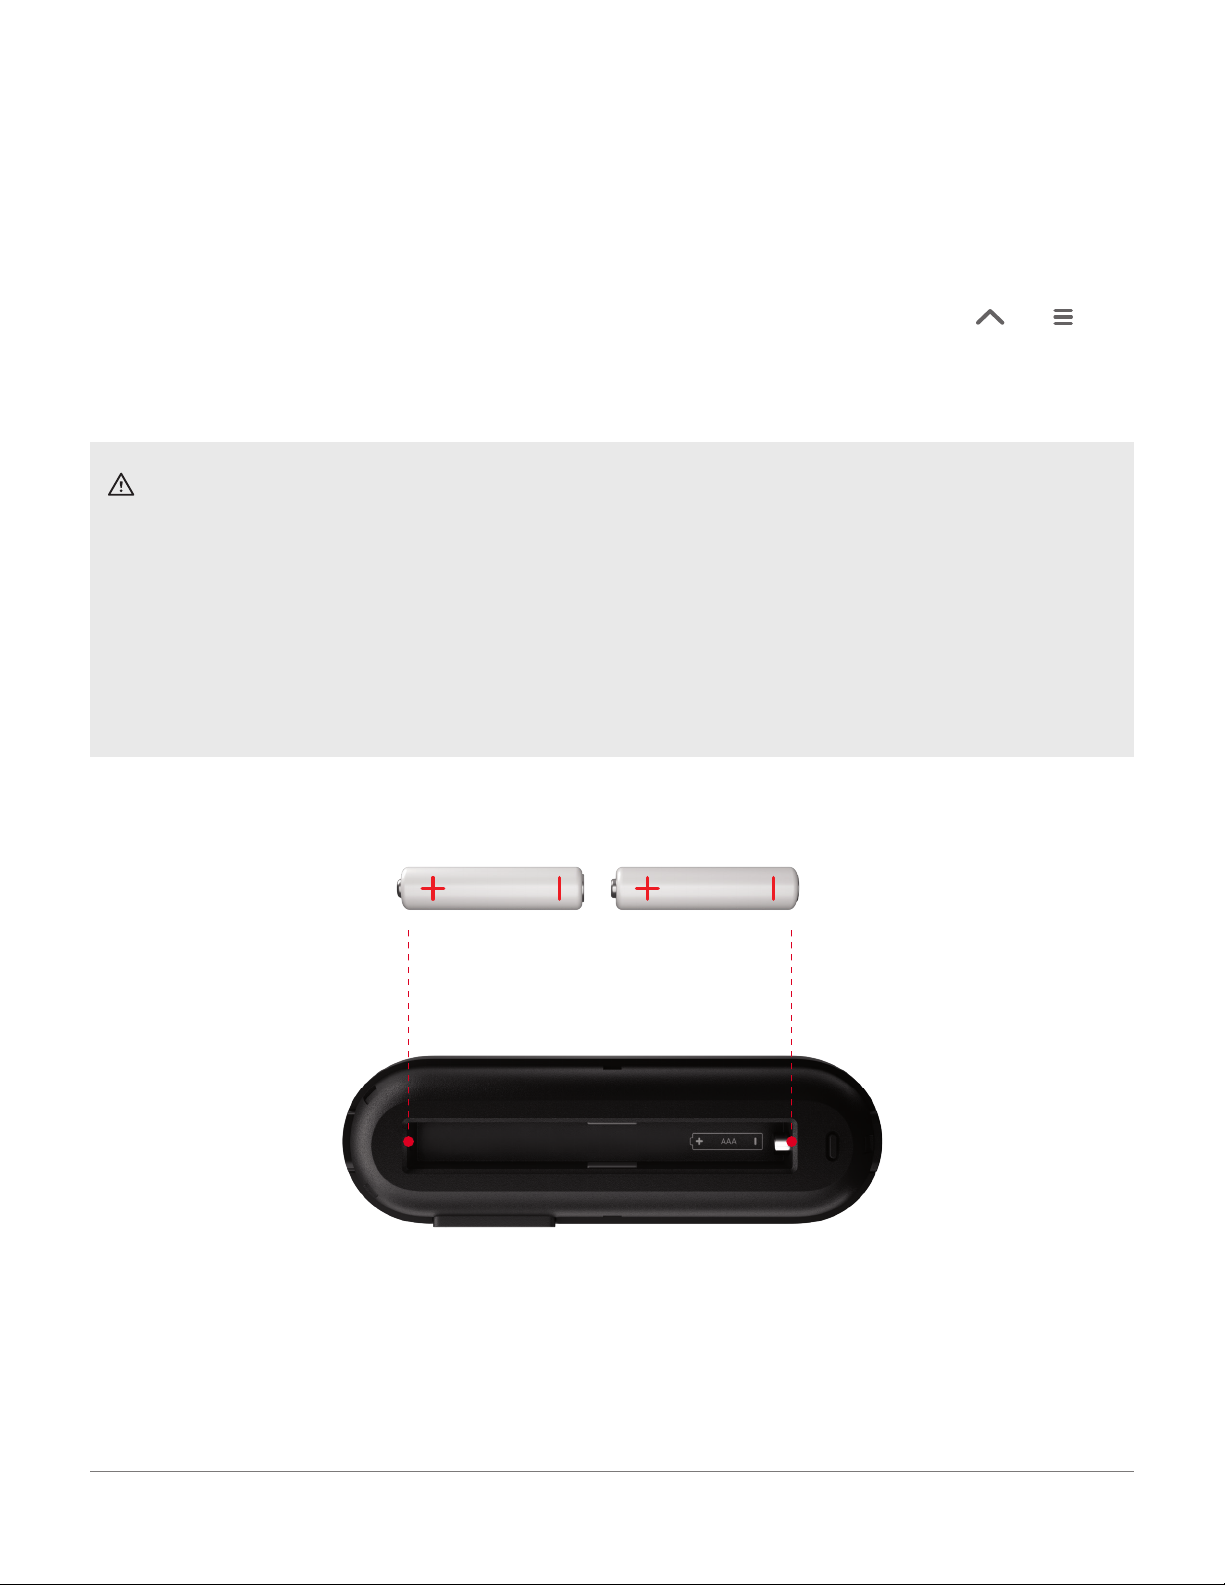
Recycle used batteries promptly and in accordance with local regulations. Replace only with new batteries of the same type and model
number. Do not expose batteries to heat or moisture. Do not use batteries that appear to be damaged or leaking. Keep batteries out of
reach of children at all times.
Do not install the Peloton Guide on a freestanding television. Doing so could cause the freestanding television to tip over. Always install
the Guide on a flat surface or a television securely anchored to a wall.
The Peloton Guide is meant for indoor use only. Do not use outdoors or in a wet or damp location.
SAVE THESE INSTRUCTIONS FOR FUTURE REFERENCE.
WARNINGS AND SAFETY INSTRUCTIONS | 4

MEMBER SUPPORT
Member satisfaction is a top priority for Peloton. If you require assistance or are experiencing issues with the Peloton Guide, please
visit support.onepeloton.com for additional help.
When you contact Member Support, have the following information ready:
1. Guide ID/serial number*
2. Purchase Date
3. The username, phone number, or email address associated with your Peloton account
* To find your Guide’s serial number, navigate to Settings › System › About.
DISTRIBUTED BY:
US/CANADA
Peloton Interactive, Inc.
441 9th Ave, 6th Floor
New York, NY 10001
USA
UK
Peloton Interactive UK Limited
110 Long Acre
Covent Garden
London WC2E 9LH
United Kingdom
GERMANY
Peloton Interactive Deutschland GmbH
c/o WeWork Neue Schönhauser Str. 3-5
Neue Schönhauser Straße 3-5
10178 Berlin
Germany
AUSTRALIA
Peloton Interactive Australia Pty Ltd
ACN 644 958 047
20 Martin Place
Sydney NSW 2000
Australia
MEMBER SUPPORT | 5

POWER CABLE
PELOTON GUIDE MOUNT
REMOTE AND AAA BATTERIES POWER ADAPTER
plug varies by region
HDMI CABLE
MEET THE PELOTON GUIDE
WHAT’S IN THE BOX?
MEET THE PELOTON GUIDE | 6

Navigation buttons
Select
Volume buttons
Back
Menu
Play/Pause
Camera Cover Camera
Power InputHDMI Output Microphone Switch
Status Light
MEET THE PELOTON GUIDE
MEET THE PELOTON GUIDE | 7
Press to release battery cover

MEET THE PELOTON GUIDE
SPECIFICATIONS AND REQUIREMENTS
DIMENSIONS
Guide: 166mm × 64mm × 42mm / 6.5″ L × 2.5″ W × 1.7″ H
Height (mounted): 65mm / 2.6″ H
Weight: 510g / 18oz.
Weight (mounted): 635g / 22.4oz.
Remote: 134mm × 42mm × 19.25mm / 5.3″ L × 1.7″ W × 0.8″ H
Weight (with batteries): 61g / 2.2 oz.
TECHNOLOGY
Bluetooth® 5.0.x, Bluetooth Low Energy (BLE)
BLE remote control with 20ft /6.1m range
12 megapixel front-facing camera with privacy slider
2 microphone top facing array with on/off switch
WiFi 802.11 a/b/g/n/ac
REQUIREMENTS
TV: HDMI Port, 4K or 1080p screen resolution recommended
Network: 2.4GHz or 5GHz WiFi, 15mbps download speed recommended
Note: Wired networks and hidden networks are not supported.
POWER
Power adapter input: AC 100 - 240 V 50- 60 Hz
Power adapter output: DC 5V/3A
Remote: 2x AAA batteries (non-rechargeable)
MEET THE PELOTON GUIDE | 8

MEET THE PELOTON GUIDE
CLEANING THE PELOTON GUIDE
CAUTION: Always unplug the Guide before cleaning. Always follow these instructions to clean the Peloton Guide. Other
cleaning procedures could result in damage to the device.
When cleaning the Peloton Guide:
yMake sure the Guide is unplugged.
yUse a soft dry cloth to clean the camera lens and the outside of the Guide.
yNever use abrasive or harsh chemicals when cleaning the Peloton Guide.
yNever spray or pour liquid directly on the Guide. Never allow liquid to drip into any opening on the Guide.
REMOTE CONTROL
USING THE REMOTE
Use the arrow buttons to navigate
Use the select button to choose a
class or feature.
Many TVs will allow the Guide
remote to control TV volume. To
set up TV volume controls, go to
Settings > Remote > Calibrate
Volume Buttons.
Use to pause or resume an
on-demand class.
Use to return to the previous
screen or exit a menu.
Use to open or exit a menu.
Hold down to quickly navigate
to the home screen, settings menu,
or login screen, or to shut down the
Guide.
MEET THE PELOTON GUIDE | 9
Press the button at the bottom of the
remote to release the battery cover.

MEET THE PELOTON GUIDE
PAIRING A REMOTE
yIf the Peloton Guide can’t find a remote, a screen will appear with pairing instructions.
yWhen a remote is connected, you can access the pairing screen by navigating to Settings › Remote › Pair New Remote.
Once you see the pairing screen, make sure your remote is within 20ft / 6.1m of the Guide, and press and hold the and
buttons for 4 seconds.
REPLACING THE REMOTE BATTERIES
WARNINGS AND SAFETY INFORMATION
Do not expose batteries to heat or moisture.
Do not use batteries that appear to be damaged or leaking.
Dispose of used batteries promptly and replace only with new batteries of the same type and model number.
Keep batteries out of reach of children at all times.
The Guide remote uses two non-rechargeable AAA batteries.
MEET THE PELOTON GUIDE | 10

INSTALLATION
WHERE TO PUT YOUR GUIDE
Finding the right spot to install the Peloton Guide will help you get the most out of the camera and voice features. Use these guidelines
to get set up. After you turn on the Guide, you can refine its position with the help of the camera view.
SPACE
Make sure you have plenty of space to work out.
yGive yourself at least 4.5 ×6 feet/1.4 ×1.8m of unobstructed space--about the size of two yoga mats side by side.
yOrient your mat with the long side facing the camera for better tracking.
yAlways make sure your workout area is free of obstructions, including furniture you could bump into and objects you could step on or
trip over.
yIf you plan to work out with others, you will need to be an arm's length away from them at all times.*
*When working out with others, note that:
yMovement Tracker will not support multiple users.
yOnly the logged-in user will receive credit for the class.
ANGLE
Put the Guide somewhere where the camera can capture your entire body with your arms raised.
yA height of 3 to 6 feet/0.9 to 1.8m from the ground should let the camera see you without distorting your image.
yIf you’re too close to the camera when working out, the camera won’t be able to see all of you.
yIf you’re too far from the camera when working out, Movement Tracker (see p. 26) may not be able to correctly identify your
movements. Try to stay within 6.5 ft/2 m.
yYou can locate the Guide to the side of your workout area, but keep in mind that Self Mode (see p. 25) could show a confusing angle.
INSTALLATION | 11
OR

INSTALLATION
LIGHT
Movement Tracker works best when the camera has a clear view of you and your workout area and there are no confusing movements
in the background.
yAvoid having light sources pointed directly at the camera, including lamps and windows.
yAvoid having sources of movement visible to the camera, including mirrors, televisions, and doorways to high-traffic areas.
yChoose workout clothes that contrast with your background. If you fade into the background, the Guide could have trouble finding
you.
NOISE
Voice commands work best when the microphone hears your voice without interference.
yEnsure no speakers are pointed directly at the Guide, or located within 1ft / 30cm of it.
yTry to keep background noise to a minimum when working out.
INSTALLATION | 12

INSTALLATION
MOUNTING THE PELOTON GUIDE
The Peloton Guide’s mount can sit on a flat, stable surface or unfold to attach to an anchored flatscreen TV.
CAN I MOUNT THE GUIDE ON MY TV?
Is your TV anchored to a wall? Installing the Guide on a freestanding TV could cause the TV to tip. If your TV is not
anchored, please install the Guide on a flat surface instead.
Will the mount fit on your TV? If the mount can’t close to an acute angle when the base is horizontal, your TV
won’t provide enough stability to safely mount the Guide. Please install the Guide on a flat surface instead.
INSTALLATION | 13

INSTALLATION
MOUNTING ON A TV
1. Pull the mount open.
2. Fit the front edge against the bezel of your TV.
3. Fold the back of the mount in to press firmly against the back of the TV.
4. Set the Guide on the mount.
MOUNTING ON A FLAT SURFACE
1. Set the closed mount on a flat, stable surface.
2. Set the Guide on the mount.
Move the Guide back or
forward to tilt up or down.
INSTALLATION | 14

INSTALLATION
INSTALLING THE PELOTON GUIDE
1. Plug the included HDMI cable into the back of the Guide and an HDMI port on your TV.
2. Plug the power cord into the back of the Guide.
3. Plug the other end of the power cord into the power adapter. Plug the power adapter into an electrical socket.
4. Set your TV to the HDMI input used to connect to your Guide. Wait for a Peloton screen to appear.
INSTALLATION | 15

SETUP
The first time you turn on the Peloton Guide, it will walk you through setup and activation. Each step is also accessible via the Settings
(see p. 34) menu.
1. REMOTE SETUP
When you turn on the Guide for the first time, you will be prompted to pair the remote. If you ever want to pair your remote again, or pair
another remote, navigate to Settings › Remote › Pair New Remote.
2. CALIBRATE VOLUME BUTTONS
Many TVs will allow the Guide remote to control TV volume. In this step, your remote will learn how to communicate with the TV. If you
skip this step, you can always set up TV volume controls later by navigating to Settings › Remote › Calibrate Volume Buttons.
3. NETWORK SETUP
Next, you will be prompted to connect to a Wi-Fi network. Select your network and enter the password using the onscreen keyboard.
You can disconnect from a network or connect to a different network at any time by navigating to Settings › Network.
4. TIME ZONE SETUP
To make sure the clock on the Guide is set correctly, select your time zone.
To change your time zone at any time, navigate to Settings › System › Date & Time.
5. CALIBRATE YOUR SCREEN
SETUP | 16

SETUP
This step gives the Guide more precise information about your screen size. When the arrows just touch the edges of the screen, the
Guide knows how to make best use of the available space.
If you connect your Guide to a different TV, you may need to calibrate your screen again. To access screen size calibration, navigate to
Settings › Screen › Calibrate Your Screen.
6. SET UP MOVEMENT TRACKER
You’ll set up Movement Tracker (see p. 26) in three steps.
First, use the camera view to ensure that the Guide is in the best possible location. You should be able to see your whole body and
workout area without distortion. Move or tilt the Guide to fix any problems before proceeding to the next step.
Next, follow a tutorial to learn how the Guide tracks your movements.
Finally, learn how Smart Framing allows you a wider range of movement.
If you would like to go through the tutorial again, navigate to Settings › Movement Tracker › Set Up Movement Tracker.
7. CALIBRATE VOICE CONTROL
If you plan to use voice commands, you can set up that feature in this step.
If you don’t plan to use voice commands, skip this step. You can also completely turn off the microphone using the switch on the back
of the Guide. You can turn on voice commands at any time by navigating to Settings › Voice Control › Voice Control Calibration.
For more information, see Voice Control (p. 26).
8. ACTIVATE YOUR DEVICE
Once you finish the setup steps, an activation code will appear. Go to members.onepeloton.com/activate and enter the code on your
screen.
Next, sign into or create a Peloton account. Activating the Guide requires a Peloton All-Access Membership. If you have an existing
Peloton App Membership, you will be prompted to cancel it and sign up for an All-Access Membership.
Enter or review your profile information to complete the process. When your TV displays
the Home Screen, you’re ready to get started.
For more on accounts or activation, see Account (p. 26).
SETUP | 17

USING THE PELOTON GUIDE
FINDING YOUR WAY AROUND
HOME SCREEN
Each time you turn on the Peloton Guide and log in, you’ll see a Home Screen.
Use the and buttons on your remote to see your recent activity and personalized class recommendations.
Press or to open the main menu, where you can access your Profile, browse Classes, and edit your Settings.
PROFILE
Navigate to the top of the screen to move between the Overview, Workouts, and Achievements tabs, or scroll down to find an
individual module.
30 Day Activity shows a snapshot of your active days over the past month, so you can keep track of your streaks. 30 Day Stats gives
you additional details on the time you spent working out in the same period.
USING THE PELOTON GUIDE | 18

USING THE PELOTON GUIDE
Body Activity highlights the muscle groups you’ve worked on most in the last week and month.
30 Day Movement Tracker Highlights shows your best moves and the moves that could use some work, based on your recent activity.
Total Workouts shows the number of Peloton Workouts you’ve completed in each discipline.
Recent Workouts shows the last classes you took. Select to see the complete list of your workouts in the Workouts tab. Select an
individual workout to see more details on how you did.
Recent Achievements shows badges you earned by hitting milestones, participating in special events, and working out with friends.
Select to see the complete list of your badges in the Achievements tab.
USING THE PELOTON GUIDE | 19

USING THE PELOTON GUIDE
CLASSES
Choose a discipline to browse all available classes.
Select Filter or press to narrow down your results by Length,Instructor,Body Activity, and more.
By default, the Peloton Guide will show you only classes that are compatible with Movement Tracker. Deselect the Movement Tracker
filter to view all classes.
Focus on a class to see a brief preview, or select it to view class details.
PROGRAMS
Programs are groups of classes that you can complete on a recommended schedule to get familiar with a new discipline or help you
reach a goal. Navigate to the top of the screen to switch between all Programs and Completed programs.
COLLECTIONS
Collections are groups of classes centered around a specific theme. Collection themes can include instructor series, artist events,
holidays, and sub-disciplines like Barre or Dance Cardio.
SETTINGS
Use the Settings menu to edit your account or preferences, or to make changes to your Peloton Guide. For a complete list of available
settings, see Settings (p. 32).
SHUT DOWN
To shut down the Guide, navigate to the bottom of the menu and select power symbol.
USING THE PELOTON GUIDE | 20
Table of contents
Other Peloton Fitness Equipment manuals