Peloton ROW User manual

UPRIGHT WALL ANCHOR GUIDE

WARNINGS AND SAFETY
INSTRUCTIONS
WHAT’S IN THE BOX
WHAT YOU’LL NEED
INSTALL ATION
STORING THE PELOTON ROW UPRIGHT
MAINTENANCE
4
6
7
8
12
19
Table of Contents

5
WARNING: For safe use, read and follow
all warnings and instructions in the User
Manual, the Upright Wall Anchor Guide,
and warning labels. Use only as described.
Misuse of this equipment may result in
serious injury or death. Peloton is not
responsible for damage or injury caused
by improper use not in accordance with
these instructions.
RISK OF PERSONAL INJURY—KEEP
PEOPLE UNDER THE AGE OF 16 AWAY
FROM THE PELOTON ROW.
NEVER store the Peloton Row vertically
without properly installing and using the
Peloton Upright Wall Anchor provided.
To avoid risk of serious injury from the
Row tipping over, read and follow all the
instructions in the Upright Wall Anchor
Guide provided.
WARNING: For your safety, Peloton
recommends professional installation of
the Peloton Upright Wall Anchor, such as
a handyman, appliance installer or local
hardware retailer.
The Upright Wall Anchor is designed to be
installed through drywall, on a load-bearing
wall into a wooden stud only. Do not install
into drywall alone, metal studs, or masonry.
Improper installation of the Peloton Upright
Wall Anchor can result in accidental tip-
over and cause injury or damage, including
but not limited to damage to the walls and
paint, damage to electrical wiring (and
fire damage that may be associated with
electrical wiring), damage to plumbing
(and any water damage associated with
plumbing), structural damage (both external
to the wall and internal to the wall), harm
or injury to you or those in the vicinity if the
Peloton Upright Wall Anchor were to fail,
and general damage or harm to any things,
people or structures in the surroundings of
the Peloton Row and Upright Wall Anchor.
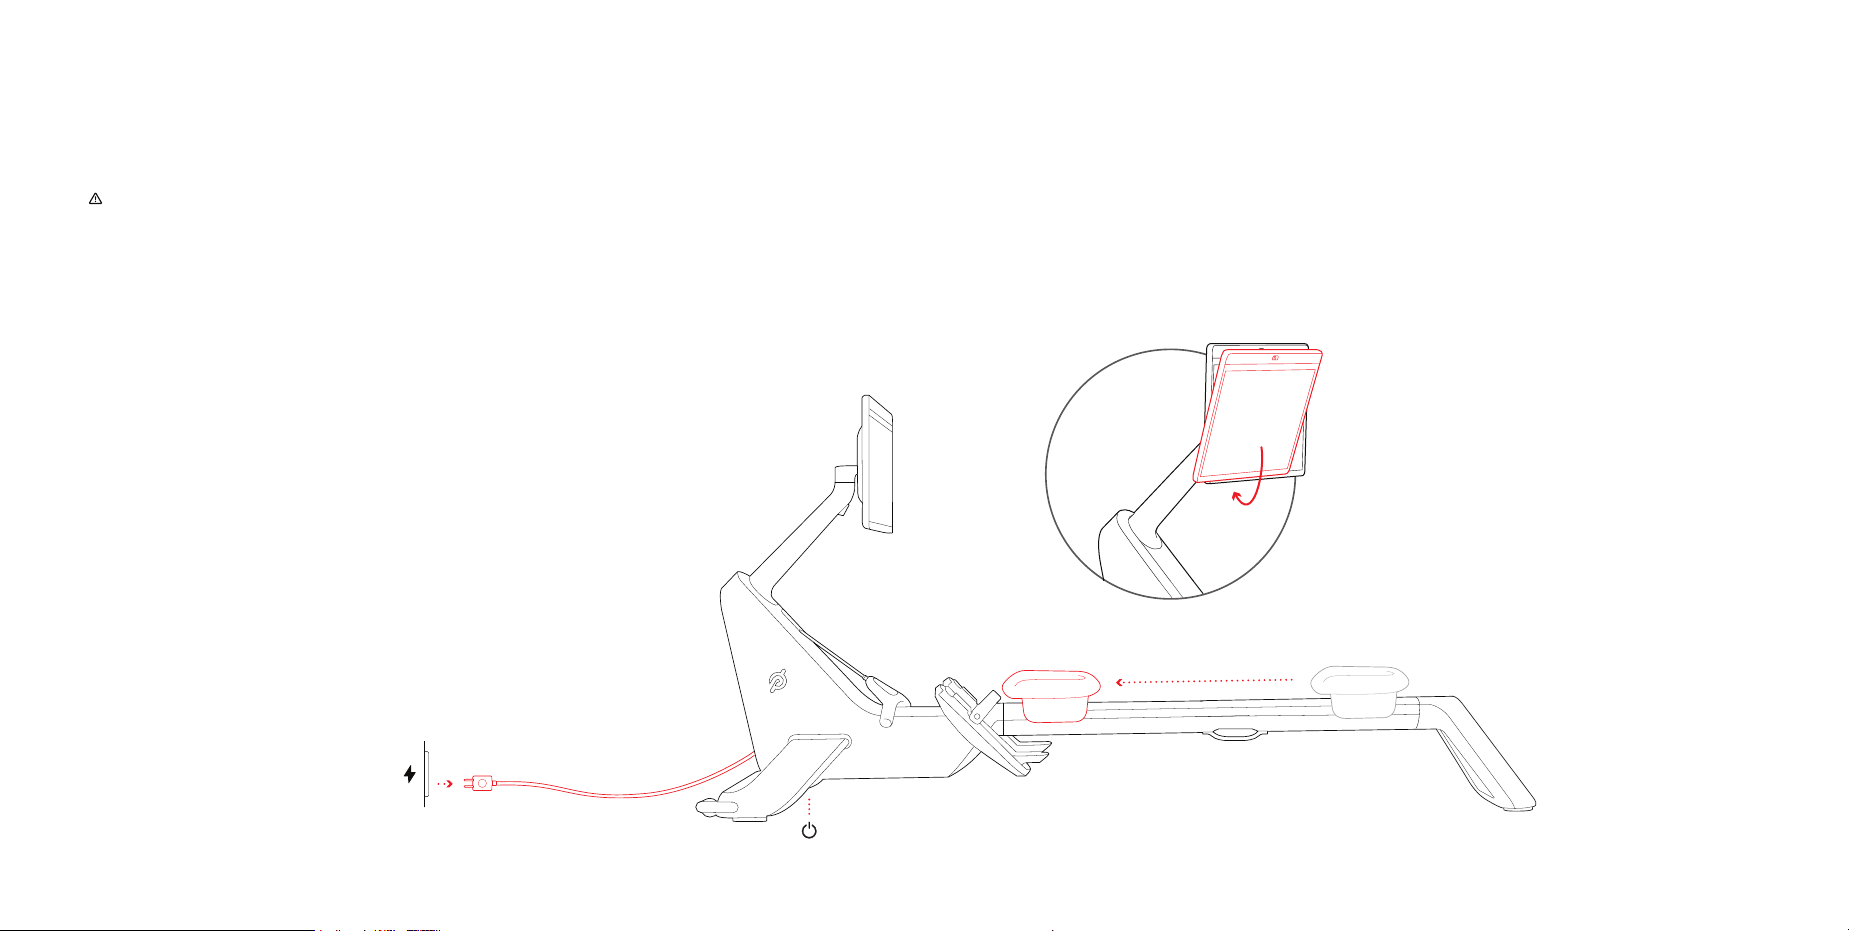
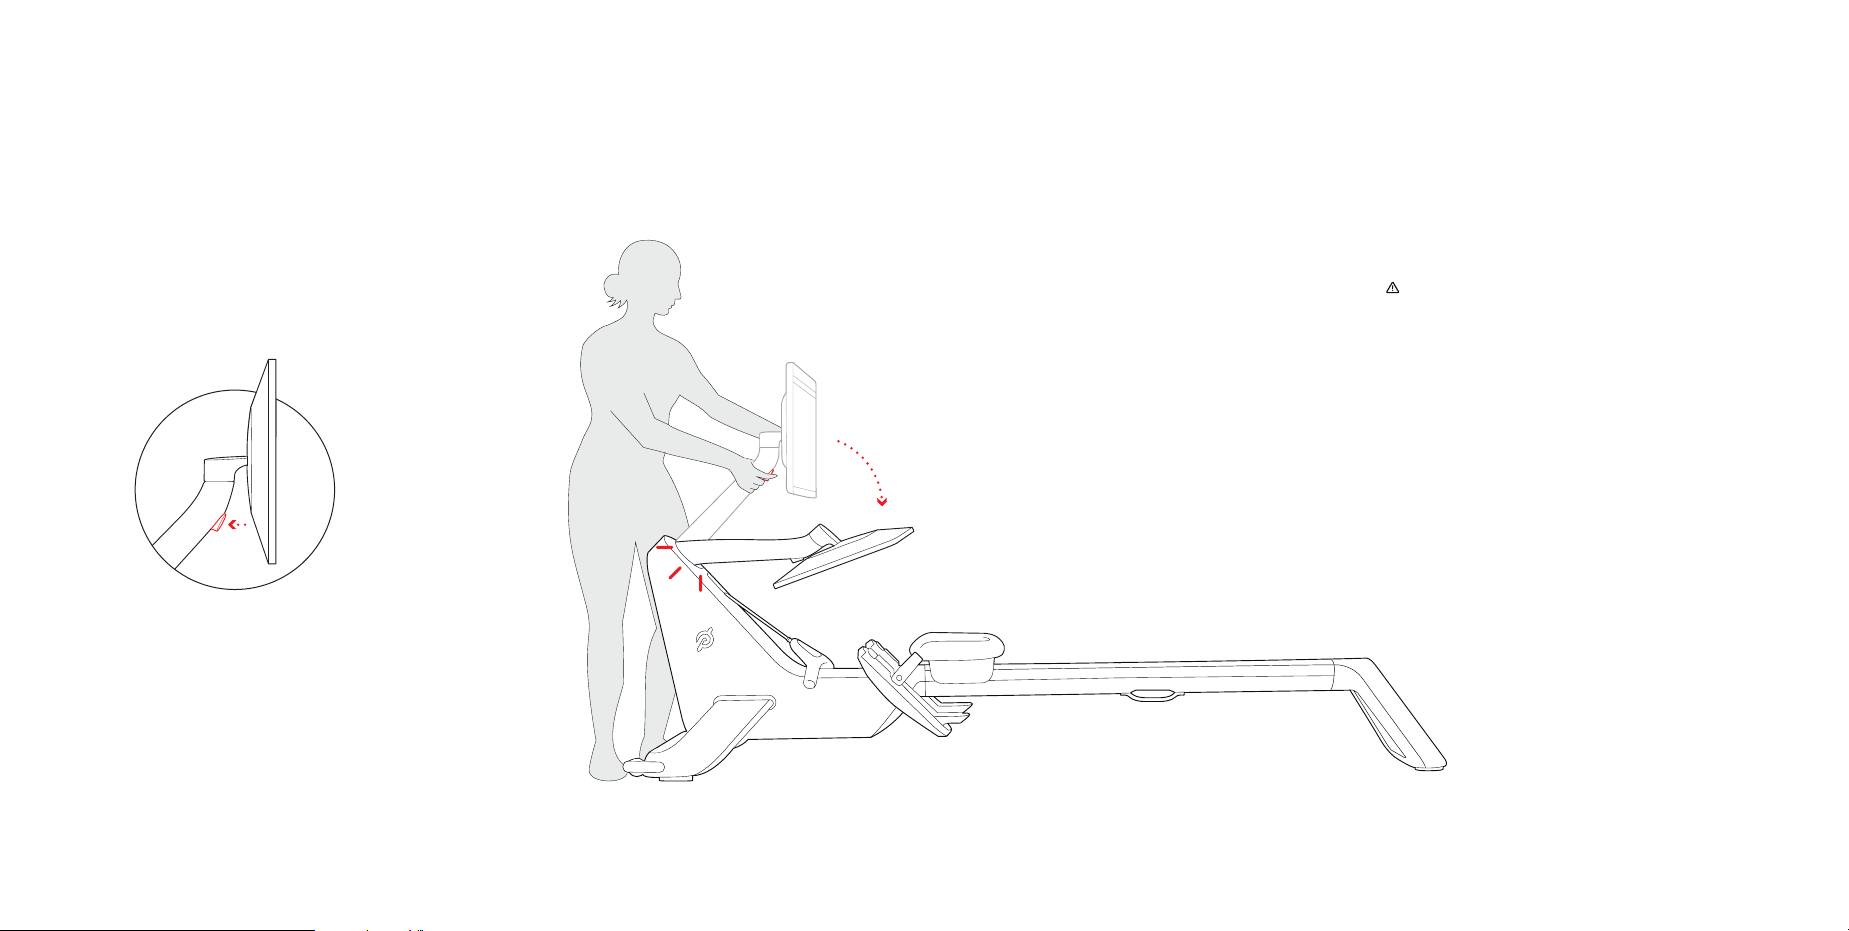
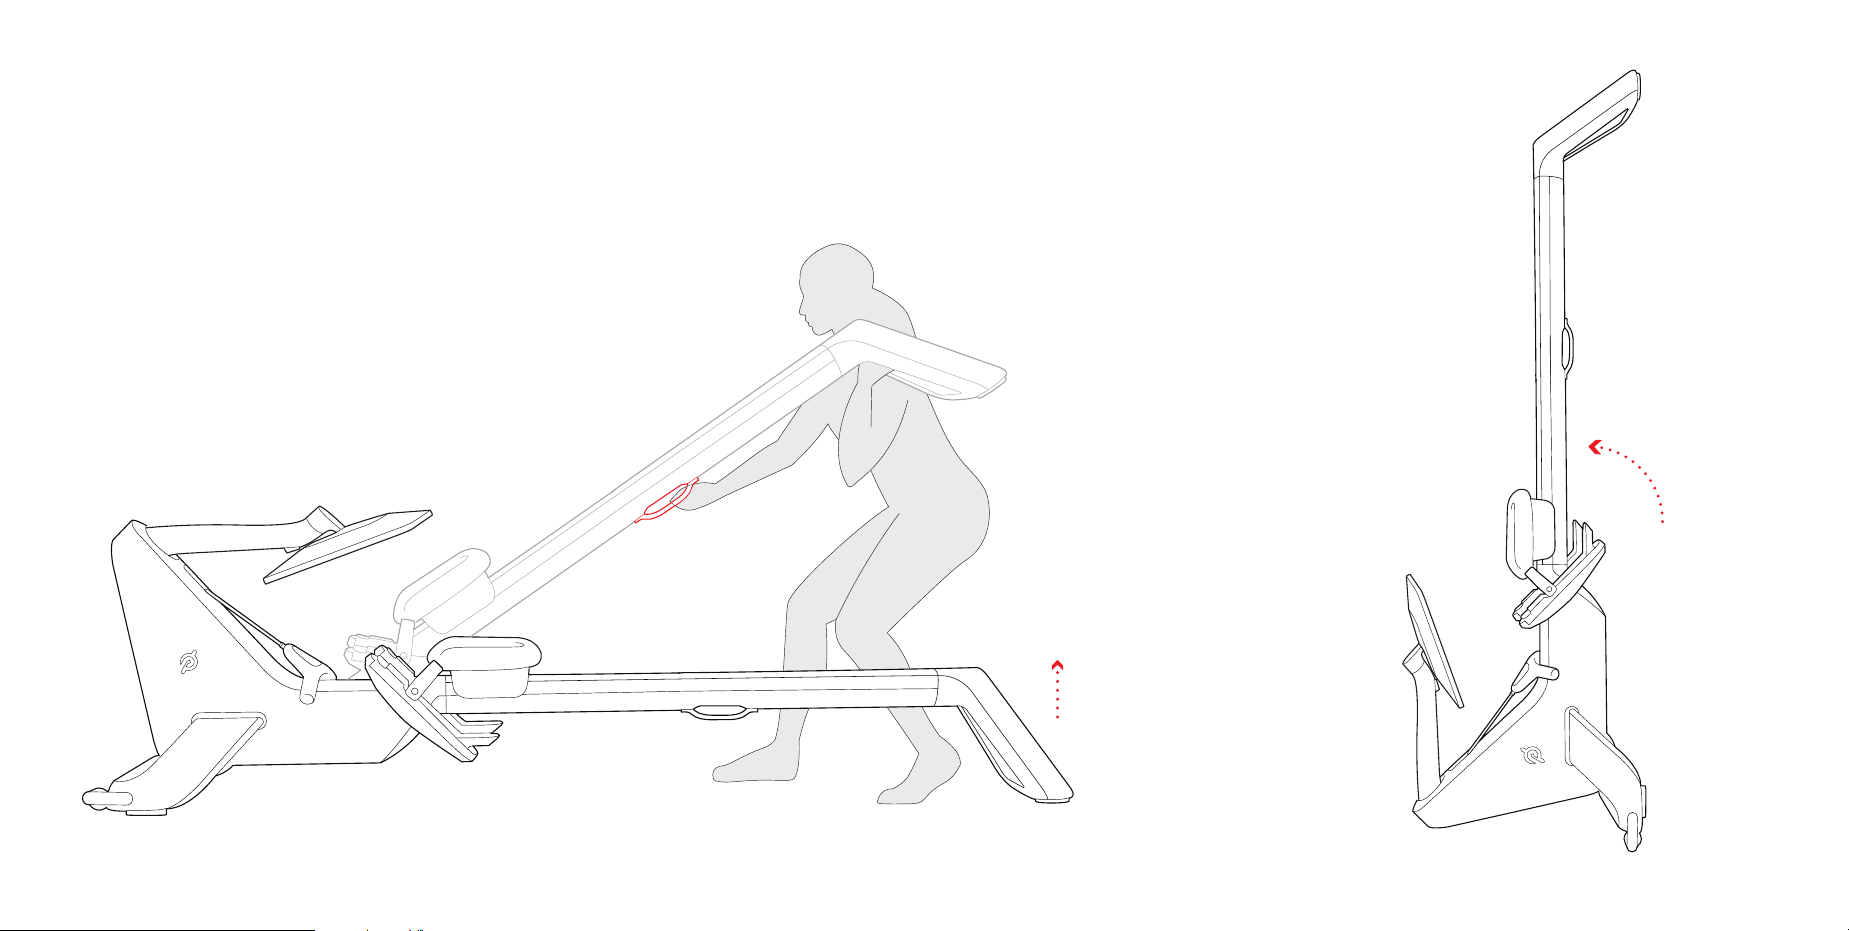
The Peloton Row must be stored a) flat on
the ground with the touchscreen upright OR
b) vertically, with the touchscreen folded
down, and anchored to a wall using the
Row in any other manner could result in:
•• Injury to yourself and/or bystanders,Injury to yourself and/or bystanders,
•• Damage to the Peloton Row or,Damage to the Peloton Row or,
•• Damage to personal property.Damage to personal property.
To avoid risk of injury, set up and operate
the Peloton Row on a solid, level surface
and in an area inaccessible to children, pets,
or anyone else who should not have access
to the Row.
The Peloton Row is intended for users ages
16 and over weighing under 300 lbs/136 kg.
Consult a physician before beginning a new
fitness plan. Incorrect or excessive training
can result in serious injury.
Always verify that the Peloton Upright Wall
Anchor is securely mounted to the wall and
check for damage before using. DO NOT
use the Upright Wall Anchor if any damage
is visible. Using a damaged Upright Wall
Anchor could result in injury to persons,
animals or personal property.
4
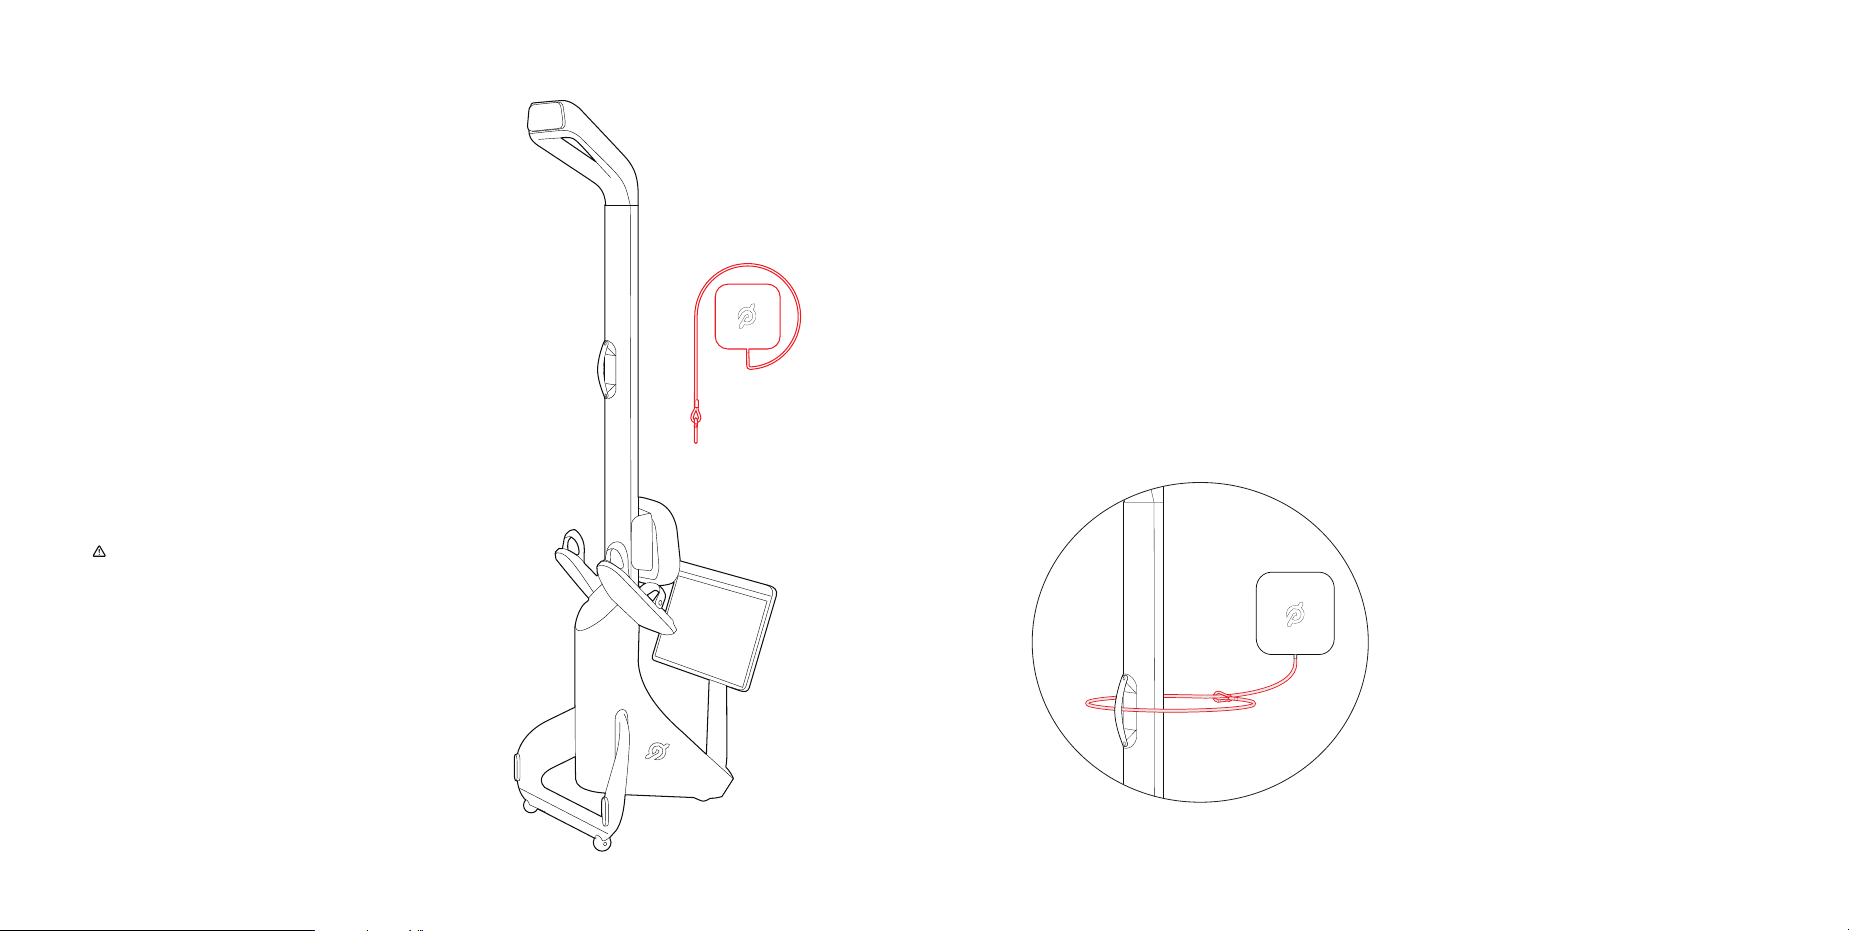
The tether and clip move freely and could
present a strangulation hazard. Always
wrap the tether securely around the
mounting bracket when the Peloton Upright
Wall Anchor is not in use.
Never put your fingers near the seat or rail
when using or storing the Peloton Row.
Exposed moving parts can cause serious
injury. Keep clear.
DO NOT store any items on the Peloton
Row when it is stowed vertically, including
but not limited to clothing, materials,
workout towels, water bottles, and other
accessories.
SAVE THESE INSTRUCTIONS.

7
Before starting assembly, verify that all parts are included and undamaged. Never use damaged
support.onepeloton.com.
What’s in the box What you’ll need
Power drill
(at least 12V)
6 mm
drill bit
6
17 mm x 76 mm
hex lag bolts
Mounting
bracket
Cable loop
assembly
finder
Measuring
tape
Pencil
wrench
17mm hex
socket
Level
Front
Cover

9
1
Locate the wooden stud using a stud finder.
Mark the center of the stud. (Wooden studs
are usually 1.5 in/38.1 mm wide.)
Installation
STOP! Peloton recommends professional
installation of the Peloton Upright Wall
Anchor, such as an appliance installer,
User Manual to make sure you will have
enough clearance on each side of the
Peloton Row.
3
Drill two holes 3 in/76.2 mm deep through
the drywall and wooden stud using a
6 mm drill bit.
WARNING: Do not drill near any electrical
wire or water pipes.
8
2
Hold the mounting bracket against the
wall with the first mark at the center of the
bottom hole. Use your level to make sure
it is centered over the stud. Make another
mark at the center of the top opening.
Using a pencil and measuring tape, make a
mark in the center of the stud at 64 in/1.6 m
from the floor.

Installation
4
Feed the cable loop assembly through the
bottom opening of the mounting bracket
and align it with the two openings on the
mounting bracket.
1110
5
Hold the mounting bracket and cable loop
assembly against the wall and install the
top 17 mm x 76 mm hex lag bolt using an
adjustable torque wrench with a 17 mm hex
socket. Do not fully tighten the bolt.
6
Install the second hex lag bolt. Use a level
to confirm the mounting plate is straight.
Fully tighten the hex lag bolts until the
mounting bracket is firmly clamped against
the wall.
7
A. Hook the bottom tab of the front
cover with the bottom of the
mounting bracket.
B. Push the top of the front cover until it
clicks onto the mounting bracket.
Tug on the mounting bracket to make sure
it is secure. Your Peloton Upright Wall
Anchor is ready for use. Whenever you are
not using the Upright Wall Anchor, make
sure that the tether is wrapped around the
mounting bracket.
A
B

13
NEVER store the Peloton Row vertically
without properly installing and using the
Peloton Upright Wall Anchor provided.
To avoid risk of serious injury from the
Row tipping over, read and follow all the
instructions in the Upright Wall Anchor
Guide provided.
If you are not able to lift more than 40 lbs/
18 kg, get assistance in stowing, unstowing or
moving the Row.
Always verify that the Upright Wall Anchor is
securely mounted to the wall and check for
damage before using.
For your safety, Peloton recommends
professional installation of the Peloton Upright
Wall Anchor, such as by a handyman, appliance
installer or local hardware retailer.
The Upright Wall Anchor is designed to be
installed through drywall, on a load-bearing
wall into a wooden stud only. Do not install into
drywall alone, metal studs, or masonry.
2
Pivot the touchscreen all the
way down.
1
Power off the Row and unplug it.
P O W E R
SWITCH12
3
Move the seat all the way forward. Be
careful not to pinch your fingers as
the seat moves freely.

15
4
Press the touchscreen release button.
14
WARNING: To avoid instability when
stowing the Row vertically, the touchscreen
must be stored with the monitor arm in the
lowered position shown.
5
Carefully lower the touchscreen arm until
you hear a click. Confirm that the touch-
screen arm is locked into place before
attempting to move the Peloton Row.
Click

17
6
Lift the rail foot until you can reach the rail
handle. The wheels will now be engaged so
if you're moving the Peloton Row, you can
roll it to the desired location.
7
When stowing the Peloton Row, carefully lift
it until it is fully upright. Be careful to leave
enough space between the Row and the wall
so your Row doesn't collide with the wall
when you're tipping it up.
16

19
8
Center the Peloton Row in front of the
Peloton Upright Wall Anchor with the rail
foot and handle facing out.
WARNING: Never store the Peloton Row
vertically on the Peloton Mat or any other
mat. Always roll the mat up with the logo
facing out and store it where it will not be a
tripping hazard.
Peloton Row
9
Unwind the tether and loop the tether and
carabiner around the rail and through the
rail handle.
Clip the carabiner to the tether.
18
Maintenance
WEEKLY
• Verify that the Peloton Upright Wall
Anchor is securely attached to
the wall.
BEFORE EVERY CLASS
• Inspect the Peloton Row before use
and do not use if it appears damaged
or inoperable.
M O N T H L Y
• Check the entire Row for wear and
damage, especially the handle strap
and foot straps.
• Regularly remove the front cover of
the Upright Wall Anchor and verify that
the tether is not frayed,it is secured to
the mounting bracket and the bolts are
secured to the wall.

Questions
or concerns:
support@onepeloton.com
©Peloton 2022, Peloton Interactive, Inc. All
rights reserved.
RW01 | 40004547-A.1
Other manuals for ROW
2
Table of contents
Other Peloton Fitness Equipment manuals
Popular Fitness Equipment manuals by other brands

Bodi-Tek
Bodi-Tek Ab & Oblique Trainer Pro user guide

First Degree Fitness
First Degree Fitness Fluid Rower FDR-02 owner's manual

Bowflex
Bowflex Max Trainer M3 Owner's/assembly manual

Kettler
Kettler COACH Series Assembly instructions

Grand Sports
Grand Sports Sportvision SG8_0 Assembly & operating instructions

Energetics
Energetics PWT 30 Exercise instructions