While you are repeating the relaxation and contraction, observe the Contraction
Indicator lights. These lights indicate the strength of your pelvic floor muscle
contractions. With each contraction, try to activate ass mmaannyy bblluuee llights aass yyoouu ccaann. Do
not be discouraged if you cannot activate all eight lights: Muscle tone and strength
should improve over time.
Part # LBL-0004-01
Quick Start Guide
In-Home Pelvic Floor Treatment Model MTI-1
Questions? Visit us at www.pelvital.com or contact
Pelvital Customer Care at 1-866-PELVITAL or
support@pelvital.com.
With the product on and the wand inserted, it’s time to use Flyte™. The “Contract” light in the middle of the device will
tell you when to relax your pelvic floor muscles and when to contract (squeeze or tighten).
• Hold the biofeedback unit and look at the Contract light in the middle of the device.
• Rest until the Contract light turns green. Squeeze and hold your pelvic floor muscles for 5 seconds while the light is
green. You should also feel a vibration from the wand. When the Contract light turns off, rest your muscles. The rest
period lasts 8 seconds, and the cycle begins again when the Contract light is orange. (Do not squeeze when the light is
orange.)
• The cycle occurs 20 times during the 5-minute session and you’ll continue the process of squeezing and resting by
following along.
Watch the center indicator light to guide you during the 5-minute therapy.
Observe the Contraction Indicator lights.
7
8
After 5 minutes of
training, your therapy
is complete for the day and
Flyte™ will power down
automatically. You’ll know
the device is turned o
because the green light will
stop lighting up, and no
other indicator lights will be
displayed.
To end the day’s session,
complete the following
steps:
•Disconnect the
wand cable from the
biofeedback unit.
•Remove the wand from
your vagina.
•Clean the wand by
following the instructions
•Store the Flyte™ system
in the box until the next
session.
•Charge the device once
a week and you’re good
to go!
End the day’s session.
9
Do not squeeze (2 seconds) Squeeze & hold! (5 seconds) Rest (8 seconds)
SIDE 2
Quick Start Guide
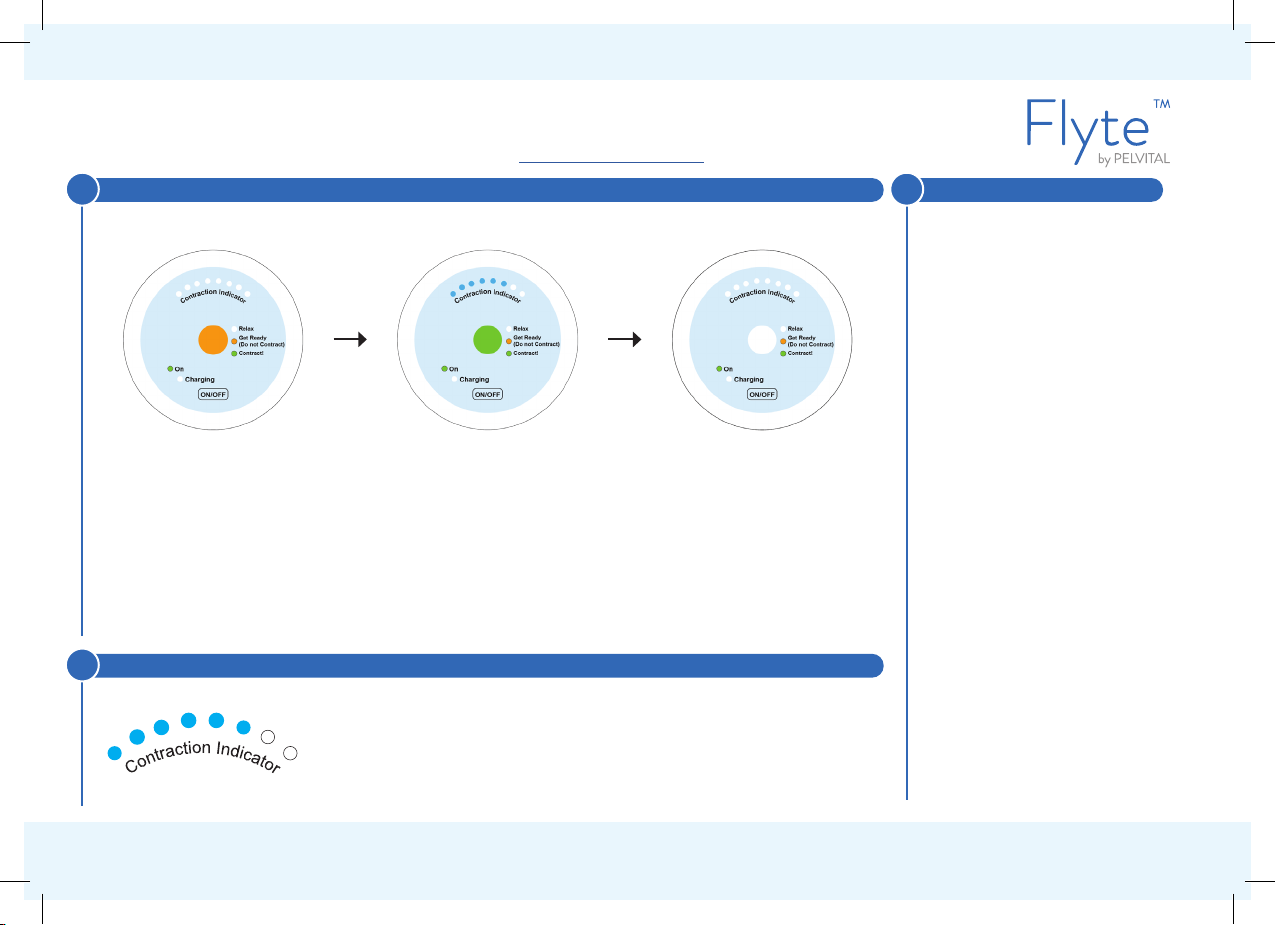
Watch the center indicator light to guide you during the 5-minute therapy.
Observe the Contraction Indicator lights.
7
8
9End the day’s session.
Do not squeeze (2 seconds) Squeeze & hold! (5 seconds) Rest (8 seconds) After 5 minutes of training, your
therapy is complete for the day
and Flyte™ will power down
automatically. You’ll know the
device is turned o because
the green light will stop lighting
up, and no other indicator
lights will be displayed.
With the product on and the wand inserted, it’s time to use Flyte™. The “Contract” light in the middle of the
device will tell you when to relax your pelvic floor muscles and when to contract (squeeze or tighten).
• Hold the biofeedback unit and look at the Contract light in the middle of the device.
• Rest until the Contract light turns green. Squeeze and hold your pelvic floor muscles for 5 seconds while
the light is green. You should also feel a vibration from the wand. When the Contract light turns o, rest
your muscles. The rest period lasts 8 seconds, and the cycle begins again when the Contract light is
orange. (Do not squeeze when the light is orange.)
• The cycle occurs 20 times during the 5-minute session and you’ll continue the process of squeezing and
resting by following along.
While you are repeating the relaxation and contraction, observe the
Contraction Indicator lights. These lights indicate the strength of your
pelvic floor muscle contractions. With each contraction, try to activate as
many blue lights as you can. Do not be discouraged if you cannot activate
all eight lights: Muscle tone and strength should improve over time.
To end the day’s session,
complete the following steps:
• Disconnect the wand cable
from the biofeedback unit.
• Remove the wand from your
vagina.
• Clean the wand by following
the instructions.
• Store the Flyte™ system in the
box until the next session.
• Charge the device once a
week and you’re good to go!
Part # LBL-0004-01
SIDE 2
Questions? Visit us at www.pelvital.com or contact
Pelvital Customer Care at 1-866-PELVITAL
or support@pelvital.com
In-Home Pelvic Floor Treatment Model MTI-1