Performer JC 70 Speed Trike User manual

Congratulations on your purchase of Performer trike. Performer trikes are made
to enhance comfort and to fit your various needs on touring, shopping and communicating.
Let’s have fun with your Performer trike.
When you receive your trike, please make sure all parts referred to in the instructions have
been included. Your new trike has been assembly 50%. Please refer to assembly guide for
more details on individual steps.


Trike parts in the carton
Quick release
Cable housing
Pedal
Rubber
Reflector
Tool
Chain
Brake wire
Shifter wire
Rear derailleur

Table of content
ASSEMBLY GUIDE......................................................................................................................1
ASSEMBLY MAIN FRAME AND WHEELS..............................................................................................1
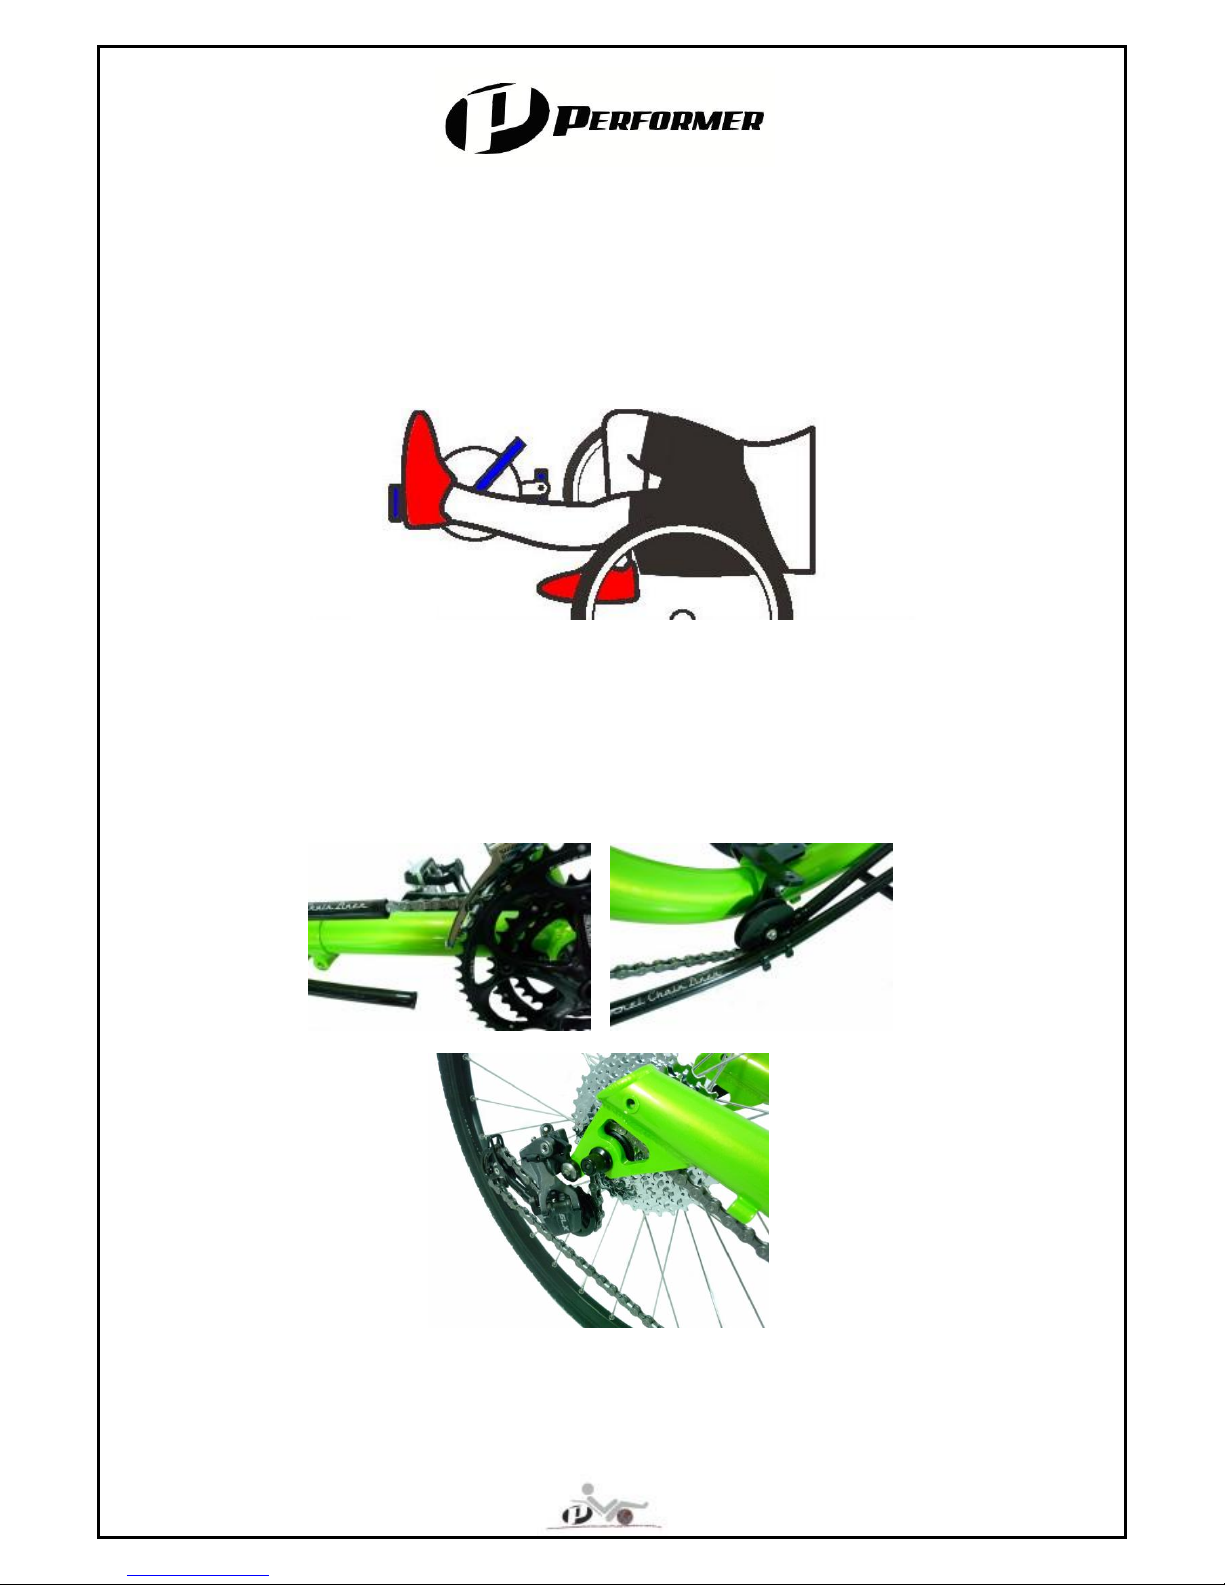
ROUTING CHAIN.........................................................................................................................3
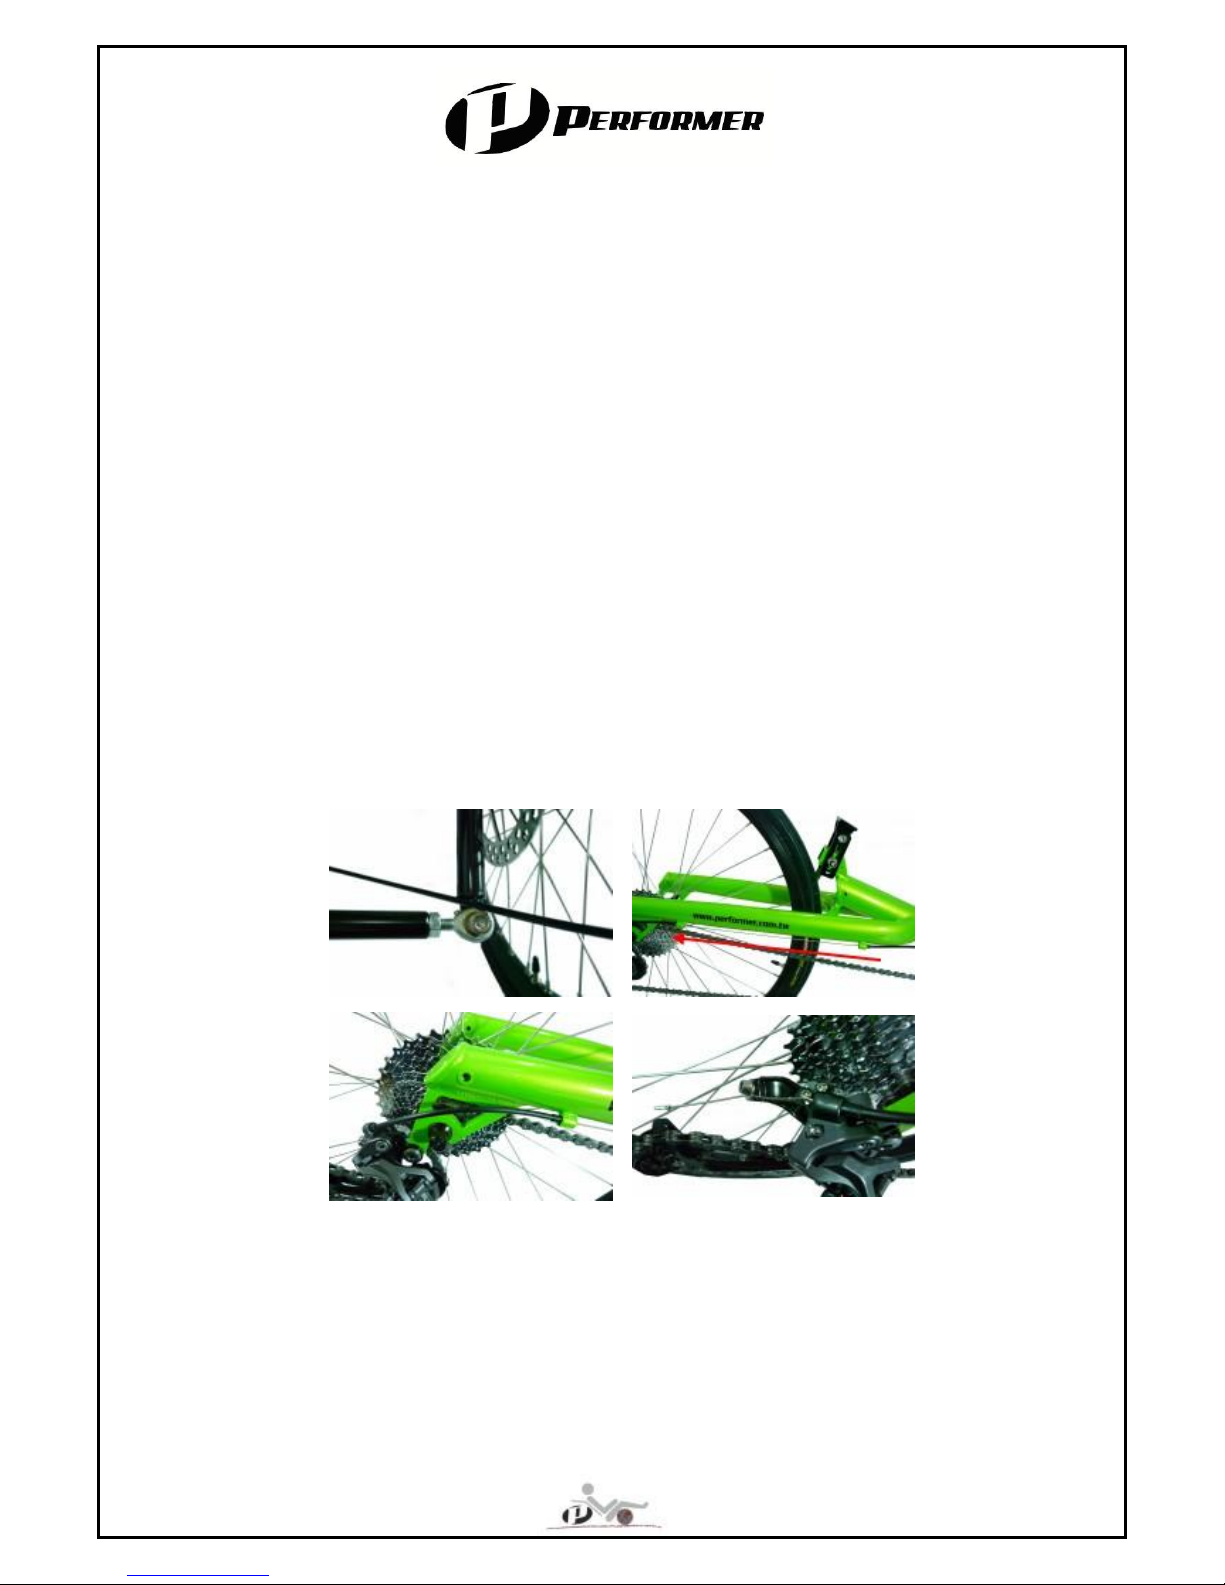
ADJUST THE CHAIN LENGTH....................................................................................................4
INSTALL BRAKE AND SHIFTER CABLE....................................................................................5
SHIFTER CABLE..............................................................................................................................5
CABLE FOR REAR DERAILLEUR (AT RIGHT SIDE).................................................................................5
ADJUST DERAILLEUR......................................................................................................................6
BRAKE CABLE................................................................................................................................7
ADJUST HANDLEBAR................................................................................................................8
INSTALL PEDAL..........................................................................................................................8
SEAT............................................................................................................................................8
GUIDANCE FOR SAFETY USE...................................................................................................8
WARRANTY.................................................................................................................................9
LIMITED WARRANTY........................................................................................................................9
DOES NOT COVER...........................................................................................................................9
PROCEDURE ..................................................................................................................................9

- 1-
Assembly guide
Assembly main frame and wheels
1. Put the main frame on the outrigger tubes (pic 1)
2. Attach the four boom bolts (please don’t tighten it)
3. Install rear wheels by rotating the quick release on rear wheel. (pic 2)
4. Attach the washer on the rear fork and install rear derailleur (pic 3)
5. It is better to adjust rear derailleur first. Press derailleur leg inward. The leg needs to
be parallel to the biggest sprocket (pic 4). If not, please refer to page 6 to adjust rear
derailleur
Pic 1
Pic 2
Pic 3
Pic 4

- 2-
Frame Alignment
1. Make sure the rear wheel is vertical to ground and two wheels are parallel to each
other.
2. As show in picture 5, the rear wheel leans on right, loose the right two bolts and tighten
left two bolts on the frame. Leaning to left side, loose left two bolts and tighten right two
bolts on the frame. Once alignment is done, please tighten four bolts on the main
frame.
3. After the above alignment, attach the tie rod to the underside of hub mount (pic 6)
4. Measure the distance from the center of the tire’s leading edge to the other (pic 7)
5. Measure the distance from the center of the trailing edge to the other (pic 8)
6. Rotate the tie rod until the result of step 4 and step 5 is equal
7. Tighten two tie rod locking nuts (pic 8)
Pic 5
Pic 7
Pic 6
Pic 8
Pic 9

- 3-
Routing chain
Insert front boom to main frame then sit on seat and step vertically on pedal to check your
leg length. By moving front boom in or out to adjust a comfortable leg length. Once you
find out a proper leg length, tighten front boom. (pic 9)
1. Attaching the chain through the front derailleur cage (pic 10)
2. Run through the upper chain tube
3. Under big pulley, over the sprockets and down through the rear derailleur (pic 11/12)
4. Put the rest chain through the lower tube. Please don’t cut or link the chain unless you
find out the proper chain length. (Please refer to adjust chain length)
Pic 9
Pic 10
Pic 11
Pic 12

- 4-
Adjust the chain length
The proper chain length is determined by the sitting place of rear derailleur (pic 13). When
the derailleur cage is sitting too high, the chain is too long (pic 14). On the other hand, the
chain is too short
1. Shift onto the smallest chainring in the front and shift down to the smallest cog in the
rear
2. Pull the chain taut until the rear derailleur is extended like pic 13
3. Check the sitting place of rear derailleur
4. Use the master link to hold the chain together
Pic 14
Pic 13

- 5-
Install Brake and shifter cable
The routing way is not important, while sharp bends are avoided. Cable guides are on the
front boom, rear chain stay or under the frame. Grip shifter has been installed on
handlebar and been threaded shifter wire. As for bar-end shifter, please slide the shifter
wire into the small hole of bar-end shifter first.
Shifter cable
Cable for rear derailleur (at right side)
1. Slide shifter wire into shifter cable
2. Along with the tie rod. Make sure the cable is long enough while turning (pic 15)
3. Tuck shifter cable under seat bracket and into cable guide (pic 16)
4. Thread shifter cable into rear derailleur, pull tightly and seal the end (pic 17/18)
5. Check the cable between the cable stop and derailleur, which shouldn’t be slack
6. Repeat the same for the other side
Pic 15
Pic 18
Pic 17
Pic 16

- 6-
Adjust derailleur
1. Check whether the chain can shift to the largest and smallest cog.
2. If doesn’t work, loosen L/H on rear derailleur.
3. When rear shifter won’t go to the largest cog, you need to loosen the L. When it won’t
shift to the smallest cog, you need to loosen the H.
4. When front shifter won’t go to the largest chainring, you need to loosen the H. When it
won’t shift to the smallest chainring, you need to loosen the L.

- 7-
Brake cable
Front brake cable (at right side):
1. Squeeze the brake lever to open it up and place the head of the cable into the lever.
2. String the brake wire into cable (pic 19)
3. Thread brake cable into brake arm and seal the end (pic 20)
4. Tie brake and shifter cable on tie rod (pic 21). Please make sure the cable is long
enough when turning
5. When the wheel starts to drag slightly, adjust the brake pad relief by using the pad
adjusting knobs.
6. Repeat the same routing way for right side.
Pic 21
Pic 20
Pic 19

- 8-
Adjust handlebar
Screw out the two bolts from handlebar to adjust a comfortable holding angle. Then, screw
in to tighten handlebar. (pic 22)
Install pedal
Performer strongly recommend the clipless pedal system to reduce leg fatigue and to
avoid leg slipped from pedal. Grease pedal and screw in right pedal clockwise and left
pedal anti-clockwise. Make sure it’s tight enough.
Seat
Install seat onto the seat bracket, once you find your prefer position. Lock seat clamp and
headrests tightly. Please make sure the seat is completely tight, otherwise the loosed bolts
on FRP seat will break the seat from the bottom after a period of time. Then, stick open
cell foam on FRP seat.
Guidance for safety use
1. Inspect your Recumbent before every ride.
2. Tighten every loosening parts
3. Find comfortable seat positions and seat angles for your ride.
4. The tires should be inflated to the pressure indicated on the rim.
5. Replace your tires before they wear out.
6. Be careful to ride in wet weather conditions. Ride slower through corners to avoid skid.
7. Equipped reflectors and a front and rear light to ride at night.
Pic 22

- 9-
Warranty
Performer Bike warrants each new recumbent against defects in workmanship and
materials for the Limited Coverage Periods listed below. Under this warranty we will repair
or replace a defective frame, fork or part with the same or comparable model. The
decision to repair and replace is at the sole discretion of Performer. This warranty
coverage extends only to the original purchaser, and is not transferable.
Limited warranty
1. Metal Frame: Five years from the date of purchase
2. Carbon Frame: Three years from the date of purchase
3. Non consumable parts and components: One year from the date of purchase
(exclude tire, brake and shifter cable, grip, crankset, cog and chain)
Does not cover
1. Normal wear and tear, improper assembly or maintenance, or installation of parts or
accessories not originally intended for or incompatible with the bicycle as sold.
2. Any damage caused by crash, misuse or improper riding way and riding place.
3. If you elect to repair a defective product yourself or use the services of someone else
than Performer, or if you use a replacement part not supplied by Performer, Performer
will not be liable for any damage
Procedure
Please notify Performer in writing with attached picture of the frame showing damage to
christine@performer.com.tw
This manual suits for next models
1
Table of contents
Other Performer Bicycle manuals