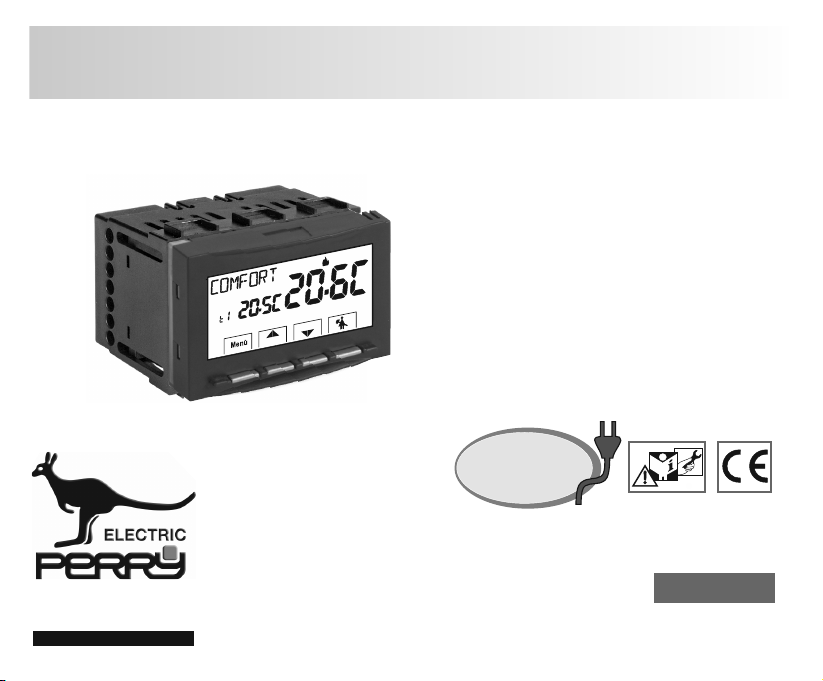
Perry Electric TE541 User manual

PE - DETIPE024EN 12/19
230V~
230V~
Power supply:
www.perry.it
PERRY ELECTRIC Srl
Via Milanese, 11
22070 VENIANO (Como) ITALY
Set
Mod. TE541
DIGITAL THERMOSTAT
MENU DRIVEN with BACKLIT DISPLAY
Recessed installation
Power supply: 230V~
Winter / Summer
2 temperature levels + antifreeze
Input for remote contact
ENGLISH

CONTENTS
5.4 - Electrical connections
pag. 3
5.1 - Overall dimensions
5.2 - Installation regulations
5.3 - Installation example
6 - START THE THERMOSTAT
7 - USE OF THE THERMOSTAT
8 - STRUCTURE OF THE MAIN MENUS (use and configuration)
9 - ACCESS TO MENUS
10 - USER MENU
10.1 - Set WINTER or SUMMER mode
10.2 - Modification or disabling of set antifreeze temperature
10.3 - USER PASSWORD Menu
11.1 - Access to configuration menu
11.2 - Change set language
11.3 - Type of temperature adjustment mode
11.3.1 - Selection of the temperature adjustment mode
(differential on/off or proportional)
11 - CONFIGURATION MENU (installer)
11.3.2 - Setting hysteresis for thermal differential ON-OFF
11.3.3 - Setting period duration for modulating Proportional
11.4 - Change unit of measure for temperature reading
11.5 - Correction of room temperature reading
11.6 - Max and min set temperature lock (winter and summer mode)
11.7 - Connection to external contact for remote thermostat
switching on/off
11.7.1 - Activation / disabling with a Telephone Programmer
11.7.2 - NA Duty - for normally open contact
11.7.3 - NC Duty - for normally closed contact
11.8 - Descaling cycle
11.9 - Display contrast adjustment
11.10 - Display back-lighting
11.11 - Entering and managing password
11.11.1 - Entering a new password
11.11.2 - Password modification or cancellation
pag. 4
pag. 5
pag. 6
pag. 7
pag. 8
pag. 8
pag. 8
pag. 8
pag. 9
pag. 10
pag. 11
pag. 12
pag. 13
pag. 14
pag. 14
pag. 14
pag. 15
pag. 16
pag. 16
pag. 16
pag. 17
pag. 17
pag. 18
pag. 18
pag. 18
pag. 19
pag. 19
pag. 21
pag. 21
pag. 23
pag. 23
pag. 24
pag. 24
pag. 24
pag. 25
pag. 25
pag. 25
7.1 - Temperature adjustment from COMFORT to ECONOMY
(energy saving) and vice-versa pag. 11
7.2 - Modification of T Set temperature set
pag. 11
7.3 - Temperature control pause
pag. 11
7.4 - OFF (disabling the thermostat)
pag. 12
10.3.1 - Entering the user password pag. 15
10.3.2 - Password modification or cancellation pag. 15
11.12 - Restore (Reset)
pag. 26
11.13 - System software information
pag. 26
12 - POSSIBLE PROBLEMS AND SOLUTIONS
pag. 27
pag. 3
2
2 - FACTORY SETTINGS
WARNINGS
3 - KEY FUNCTIONS
DEVICE PRESENTATION
1 - TECHNICAL DATA
4 - DISPLAY FEATURES
5 - INSTALLATION
COMPATIBILITY TO THE MOST COMMON RESIDENTIAL SERIES PLATES
IMPORTANT: for the assembly procedure of the thermostat with the chosen
residential plate, follow instructions contained in the specific compatibility sheet
contained in the package.

WARNINGS!
3
PRESENTATION
Dear Customer, thank you for choosing our product.
Read this manual carefully before using the product as it provides important guidelines regarding safety, installation and use.
The manual must be preserved with care for future reference.
The installation and electrical connection of the programmable thermostat must be implemented only by a qualified
electrician and in conformity with current laws and regulations.
Before starting any operations on the device, disconnect the 230V~ mains power supply
The thermostat is not intended for use by persons (including children) with reduced physical, sensory or mental capabilities, or by those
with a lack of experience and knowledge of the instructions, unless they are supervised or have received the necessary instructions
concerning use of the device by a person responsible for their safety.
Children should be supervised to ensure that they do not play with the device.
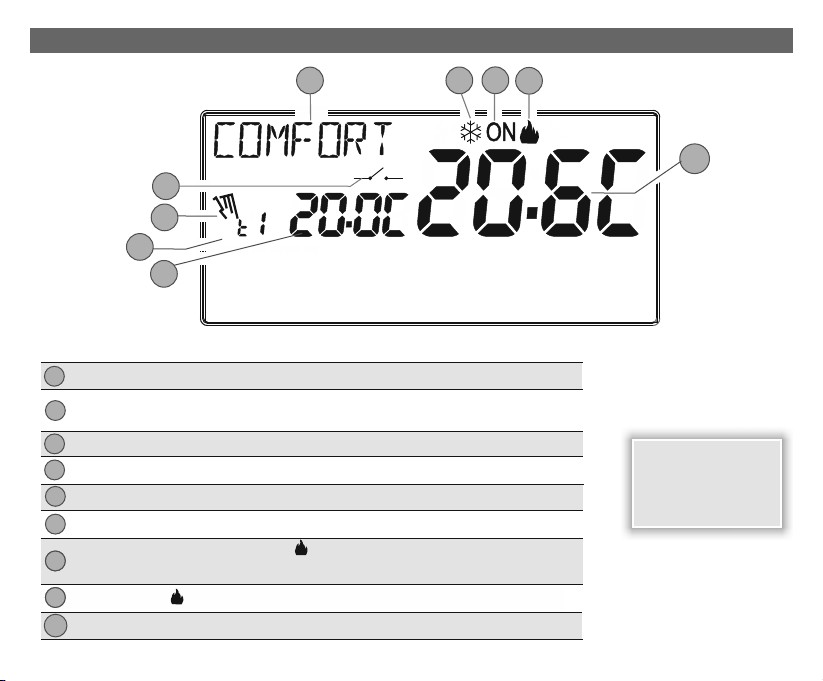
If -5 °C or +37.7 °C (+23°F or + 99.9 °F) room temperature flashes on the display, the measured temperature is beyond the scale.
IMPORTANT: in case of a power black-out (230V~), the thermostat guarantees retention in memory of all the data entered
When mains power is restored, the display turns on and the device returns to the active operating mode before the power failure.
If "Err" flashes on the display, it indicates faulty probe: any temperature control activity is suspended.
If necessary, gently clean the thermostat and the display with a soft, dry cloth.
The manufacturer reserves the right to introduce any technical and/or constructive changes deemed necessary, with no prior notice.
&
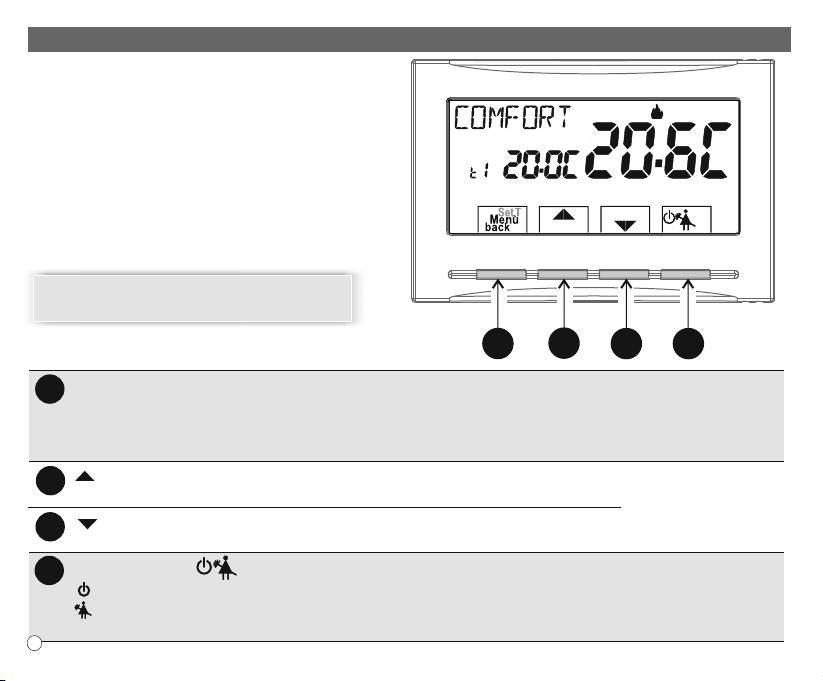
The thermostat, suitable for all heating and/or cooling system, is fitted with a large and clear backlit display to keep all its functions under
control in real time. The fundamental feature is its easy to use menu navigation, which makes it extremely user-friendly despite its
comprehensive range of functions. The thermostat is factory-set to adjust temperature in a Differential ON/OFF manner and hysteresis
can be set from 0.2°C to 1.2°C to adapt to the thermal inertia of your specific installation. Alternatively, modulating Proportional operation
may be selected with settable duration cycles (from 7 to 20 minutes): this system ensures the desired temperature is maintained more
stable, increasing user comfort and is particularly suitable for installations with high thermal inertia such as, for instance, for underfloor
radiant panels. The set temperature scale is in degrees Centigrade (Celsius) with the option to calibrate room temperature measurement
setting a correction value (from -3 to +3 °C).
Special attention was devoted to energy saving: pausing for household cleaning, optional Set temperature (MAX/MIN) lock, adjustable
anti-freeze temperature value, control through an external contact (e.g. optional telephone programmer), are conducive to avoiding
wasting energy with consequent savings. See the following pages for a description of these as well as of other features.

1 - TECHNICAL DATA
Power supply:
Display and key back-lighting:
Type of action, disconnection and device:
Type of output:
230V~ 50-60 Hz
timed 6 secs. / always on / always off
1 / B / U / Electronic
voltage free relay with COM / NO / NC changeover contact,
max 5(3)A/250 V ~
class A
4 kV
2 2
1,5 mm ÷ 2,5 mm
for contact free from potential, minimum insulation 250V~
class II
IP 30
normal
no. 2 « t1 = COMFORT», «t2 = ECONOMY» + t antifreeze
- 5.0 °C ÷ +37.7 °C (+ 23 °F ÷ +99.9 °F)
Flashing + ON (winter) or + ON (summer)
0.1 °C (0.1 °F)
+5 °C ÷ +37.7 °C (+41.0°F ÷ +99.9 °F) limitable
adjustable by 0.1 °C / 0.1 °F sets
adjustable from -3.0 °C (5.4°F) to +3.0 °C (5.4°F) default 0.0 °C/0,0 °F
adjustable + 5 °C ÷ <t3 (41,0 °F ÷ <t3) default 6 °C (42.8 °F)
adjustable from 0.2 °C to 1.2 °C (from 0,3 °F to 2.1 °F) default 0,3 °C (0,4°F)
cycles adjustable from 7 to 20 minutes (default 10 minutes)
max 1°K / 15 min
± 0,5°C (± 0,9°F)
0 °C ÷ +45 °C
-10 °C ÷ +60 °C
LVD - EMC EN60730-2-9
Software:
Rated impulse voltage:
Cross-section of wires to terminals:
Contact input for remote switching on:
Type of insulation:
Degree of protection:
Pollution rating:
Number of temperature levels:
Ambient temperature display range:
Relay ON signal:
Room temperature indicator resolution:
Temperature Set adjustment range
Setting temperature Set:
Temperature correction (Offset):
Antifreeze temperature: (t ):
Type of temperature adjustment:
- DIFFERENTIAL ON/OFF (default)
- Proportional with control period
Thermal gradient:
Temperature reading tolerance:
Operating temperature limits:
Storing temperature limits:
Reference regulations for CE markings:
Keeping memory setting during power failure:
Yes
ErP energy classification: ErP Class I; 1% (Reg. EU 811/2013)
4

2 -FACTORY SETTINGS
5
Set Set
02 4 6810 12 14 16 18 20 22
The data entered in the thermostat called «FACTORY SETTINGS» refer to operation defined as «Standard».
The following chapters describe all customisable functions, in order to satisfy any ambient comfort need.
FACTORY SETTINGS TABLE (default)
PARAMETER DEFAULT
Language
Active season
Temperature unit of measure
Set t1 COMFORT Winter
Set t2 ECONOMY Winter
Set tTantifreeze (Winter)
Set t1 COMFORT Summer
Set t2 ECONOMY Summer
Temp. locks Winter
Temp. locks Summer
Temp. adjustment mode
Differential hysteresis
Modulating proportional
Modulating period
Room temp. correction
Anti-scale protection cycle
Display contrast
Back-lighting
Winter
°C (celsius)
20.0°C
18.0°C
6.0°C
24.0°C
27.0°C
Disabled
Disabled
DIFF. ON/OFF
0.3°C
Prop (not active)
10 min. (not active)
0,0 °C
0,0 °C
Disabled
Level 6
Timed 6 sec.
Restore «reset»
IT (Italian)
Default
Last value
Default
Default
Default
Default
Default
Default
Default
Default
Default
Default
Default
Last value
Default
Default
External input
User password
Installer password
Password reset code
(not active)
none
none
0927
Last value
Default
Default
Default
Default
Default
to confirm
IMPORTANT: in case of a power black-out (230V~), the thermostat guarantees retention in memory of all the data entered.
In case of absence of power supply the display switches off saving all the programmed settings effected, when power supply is
reinstated, the display switches back on and the device returns to its normal functions.
RESTORE «Installer RESET»
Restore many factory settings (default)
RESTORE brings the thermostat back to factory settings with the
exception of some items as shown in the table.
To perform the operation follow the instructions in paragraph 11.12.
Press simultaneously for 4 seconds
RESTART
Should the thermostat feature malfunctioning, wrong displays or other
incorrect conditions, perform a «User reset». Simultaneously press
for 4 secs. the Menu and keys.
The thermostat resumes normal operation.
It does not cancel the entered settings

3 - KEY FUNCTION LEGEND
DISPLAY AND KEY BACK-LIGHTING
Set
ABCD
OK
Touching any key activates back-lighting,
displaying the words selection and navigation,
press the desired key within 6 secs. to vary the
settings (touching any key reactivates a 6 sec time-
out).
Note: setting the backlight always on (par. 11.10) the
words selection and navigation will also always be
visible.
Note: more particular button functions are described
in the specific paragraphs.
AMultifunction Key Menu/back,
its use changes depending on function or active menu:
Menu = press briefly to switch temperature from comfort to economy and vice-versa,
press and hold (3 sec.) access to menus
back = go back to previous item, exit from menus
B
C
Key increases the desired Set temperature;
navigation through the menus: to increase a setting value;
Key decreases the desired Set temperature;
navigation through the menus: to decrease a setting value;
Press the pulse arrow key to
increase/decrease per unit
a n d k e e p p re s s e d t o
increase/decrease rapidly.
DMultifunction Key
OK
thermostat in OFF (disabled temperature control)
current program pause for household cleaning
access to selected menu / confirm function or set value (within the menus)
OK
6

4 - DISPLAY FEATURES
6
8
8
9
2
Display Set temperature
4
8
7
5Info and thermostat operating mode, menu items
7
Current program pause (example: for household cleaning)
1
Enabling thermostat from remote control
3
8
6
Set
7
2
3
4
5
9
1
Note: further displays
are described in the
specific op eration
paragraphs
Detected room temperature
Signalling operating user = ON and flashing (e.g. boiler on)
Signalling operating user = and ON flashing (e.g. conditioner on)
Heating mode ( Winter) active
T
T
Currently active set temperature depending on the desired setting:
t1 Comfort or t2 Economy (saving) or t antifreeze
Cooling mode ( Summer) active
T

5 - INSTALLATION
5.3 - INSTALLATION EXAMPLES
5.1 - DIMENSIONS
Important: the installation and electrical connection of the devices
and appliances must be implemented by qualified personnel and in
conformity with current laws and regulations. The manufacturer
declines all liability in connection with the use of products subject to
special environmental and/or installation standards.
Thermostat installation: independent - fixed
recessed in rectangular box 3 modules.
“Install the thermostat at a height of 1,50 m ÷ 1,70 m from the floor, far from
heat sources, air vents, doors or windows and anything else that could affect
its operation.
Disconnect the 230V~ mains power supply
IMPORTANT: for the assembly procedure of
the thermostat with the chosen residential
plate, follow instructions contained in the
specific compatibility sheet contained in the
package.
5.2 - INSTALLATION REGULATIONS
C C
A B BB
!
h 1,5 m
5265
43,5
47
8
N.B.: the examples contained in this documentation are in principle.
Examples of installation in heating systems with a
thermostat that controls:
A) Wall mounted boiler
B) Burner or Circulation pump or Motorized solenoid valve
C) Zone solenoid valve

5 - INSTALLATION
5.4 - ELECTRICAL CONNECTIONS
ATTENTION! Disconnect the 230V~ mains voltage Examples of electrical connections
! Connect line voltage power supply to the terminals:
n° 3 -NEUTRAL
n° 4 - LINE
Relay terminals
230V~ power supply terminals
LOAD
M
opens
closes
230V~
LN
8
9
10
11
12
13
14
1
2
3
4
5
6
7
NA
C
NC
230V~ 230V~ 230V~
8
9
10
11
12
13
14
1
2
3
4
5
6
7
NA
C
NC
230V~
Connection to a boiler
and to a telephone programmer
N
L
230V~
BOILER
230V~
230V~
NB: with strong inductive loads
(pumps and solenoid valves) it is
recommended to connect an RC
filter in parallel to the load.
Connection to amotorized valve
and to a telephone programmer
N
L
N
L
AUX
AUX
! terminals 1 and 2 may be connected to a telephone
programmer (or switch) for remote programmable
thermostat enabling (see paragraph 11.7 for
external contact setting)
AUX Terminals (remote contact)
example:
Telephone programmer
AWARNING: only connect switches and contacts
with insulation suitable to work at 230Vac mains
voltage.
9
Contact for remote
thermostat control
example:
Telephone programmer
Contact for remote
thermostat control

6 - START THE PROGRAMMABLE THERMOSTAT
Press twice
the back key
10
OK
1° 2°
Set
02 4 6810 12 14 16 18 20 22
OK
Set
The first time mains voltage is engaged, the thermostat performs a lamp-test by switching on all display segments, displaying the installed
software version for a few seconds. When this phase is over, the thermostat asks to select the language of use.
Select the desired language by scrolling through the
available languages using the keys.
Confirm pressing the OK key.
The selectable languages are:
ITALIAN = It (default), ENGLISH = En, FRENCH = Fr,
GERMAN = dE, SPANISH = ES.
Press twice the back key
Winter mode (heating)
ON + flashing = e.g. operating boiler
From normal programmable thermostat operation in stand-by, pressing a key, the backlight activates (if not excluded) and the
words selection and navigation appear. Within 6 secs., a variation is made the second time the desired key is pressed.
See use the thermostat to the next chapter.
The thermostat is operative, displaying: Winter «heating» mode, the temperature Set at 20°C COMFORT, room temperature detected.

7 - USE OF THE THERMOSTAT
7.1 - MODIFICATION of temperature from COMFORT to ECONOMY (energy saving) and vice-versa
Press the MENU key briefly
7.2 - T Set TEMPERATURES SETMODIFICATION OF
Directly press the keys.
11
Set Set
Set Set
Set Set
OK
OK
WINTER = heating (factory setting)
With COMFORT temperature
The thermostat allows temperature values that satisfy the following
conditions:
Winter: t1 greater than or equal to t2 greater than or equal to t
Summer: t2 greater than or equal to t1
IMPORTANT!
In the presence of max and min. temperature locks (see
paragraph 11.6) it is not possible to set a Set t higher or lower
than the entered locks. The display will signal impossibility to
perform the operation by displaying .
Every time the or keys are pressed, it changes by 0.1 degrees;
pressing and holding enables you to scroll through the values rapidly.
Range: +5 °C to +37,7°C (+41,0°F ÷ 99,9°F).
7.3 - TEMPERATURE CONTROL PAUSE (example for household cleaning)
Pressing the key the connected user will switch off for a max
3-hour period from the current time, during which the thermostat
will enter antifreeze mode ( t ).
After 3 hours the thermostat temperature control will resume.
To reactivate the temperature control before the 3 hours have
elapsed, press «back»: the word «CLEANING» disappears.
Note: in the event antifreeze temperature has been permanently disabled
or in "Summer" operation, the connected user (e.g. boiler or air conditioner) will remain disabled for 3 hours maximum.

7 - USE OF THE THERMOSTAT
12
Set
OK
OK
OK
OK
7.4 - OFF (disabling the thermostat)
This setting has the purpose of locking thermostat functions
when heating or cooling must remain off.
2- The display shows OFF, to indicate that the thermostat is disabled and all functions are inactive; are
active the room temperature reading, the descaling function, if enabled and (in WINTER mode) the
temperature Set plus the antifreeze protection symbol t .
in WINTER mode with antifreeze temperature disabled or in Summer mode, the t symbol will not be visible.
3- Press key to reactivate the thermostat.
1- In «CLEANING» mode (par. 7.3), press the button
briefly to set the thermostat to OFF and consequently
«Switch off the system».
8 - STRUCTURE OF THE MAIN MENUS (use and configuration)
The Menus are arranged in sequential order
- LANGUAGE (menu language selection)
- RULE (selection of temperature control mode)
- UNIT (selection of temperature unit of measure °C/°F)
- OFFSET (correction of detected room temperature)
- BLOCKS (it lets you limit the value of set temperature points)
- INPUT (setting an external contact for remotely enabling / disabling
the thermostat)
- PUMP ON (disabling / enabling the descaling function)
- CONTRAST (to change display contrast)
- BACKLIGHT (It lets you enable or disable fixed display and keys
- PASSWORD (to restrict the use of user and/or installer functions
of the thermostat)
- RESTORE (RESET operation)
4 CONFIGUR
- INFO SW (information about the firmware version installed)
1 SEASON (Winter or Summer mode)
2 SET TEMP(modification or disabling of Set antifreeze temperature)
3 USER PASSWORD (set user password)
Installer or skilled user menu
User Menu:
T
backlighting)

9 - ACCESS TO MENUS
From the normal thermostat operation press the Menu key for 3 secs. to access the first available menu.
with the user and installer password
1°
main screen
13
Set
OK
2°
OK
OK
1° 2°
OK
1° 2°
OK
Set
02 4 6810 12 14 16 18 20 22
OK
Set
02 4 6810 12 14 16 18 20 22
OK
the 1st CONFIGUR menu
item is accessed after
entering the installer
password (see par 11.1)
Or, if a secret user and/or installer access code has been previously entered, follow the steps below to access the user or installer menus.
password entry example
no password entered
is displayed
for a few seconds after
pressing the OK key to
indicate incorrect
password.
for
3 secs.
with user password only
the 1st user menu is accessed after
entering the user password
(see next paragraph)
The keys are used to scroll through the menus: press OK to enter the selected menu, press back
to go back to the previous item. Settings in the menus must be confirmed by pressing the OK key where
required, otherwise, after 3 minutes have elapsed, the thermostat goes back to normal stand-by operation
and changes will not be saved.

10.2 - MODIFICATION OR DISABLING OF SET ANTIFREEZE TEMPERATURE
10 - USER MENU
10.1 - SET WINTER OR SUMMER MODE
14
Set
02 4 6810 12 14 16 18 20 22
OK
Set
02 4 6810 12 14 16 18 20 22
OK
Set
02 4 6810 12 14 16 18 20 22
OK
02 4 6810 12 14 16 18 20 22
OK
Set
02 4 6810 12 14 16 18 20 22
OK
Set
02 4 6810 12 14 16 18 20 22
OK
2°
1°
From normal thermostat operation, access the menus
by pressing and holding the «Menu» key.
Press the «back» key to exit.
Under item SEASON SEt confirm with OK.
Select with the keys the WINTER (heating) or
SUMMER (cooling) mode and confirm with OK.
default:
From normal thermostat operation, access the menus
by pressing and holding the «Menu» key.
Use the keys to select item SET TEMP Set.
Press OK to confirm.
The screen displays ANTIFREEZE.
Press OK to confirm.
Use the keys to set the desired antifreeze
temperature.
Every time the or keys are pressed, it changes by 0.1 degrees;
pressing and holding enables you to scroll through the values rapidly.
Range: +5 °C a +12°C
To disable antifreeze temperature t , go below +5.0 °C (41.0 °F).
Set
Set
disabled antifreeze temperature
Confirm with OK. Press the «back» key to exit.

10.3 - USER PASSWORD Menu
10.3.1 - Entering the user password
10 - USER MENU
15
Set
02 4 6810 12 14 16 18 20 22
OK
Set
02 4 6810 12 14 16 18 20 22
OK
1° 2°
Set
02 4 6810 12 14 16 18 20 22
OK
1° 2°
Set
02 4 6810 12 14 16 18 20 22
OK
password entry example
No code is set in the factory configuration.
1- Select item USER PASSWORD SEt with the keys
and confirm with OK.
2- Use the keys enter 4 digits (dashes not
included) between 0000 and 9999, individually
confirm them with «OK».
The thermostat enters normal operation
From normal thermostat operation access the menus by
pressing and holding the «Menu» key.
From now on, the password will be required for any
variation on the thermostat.
10.3.2 - Password modification or cancellation
Press MENU for 3 secs., and enter the previously set password; follow the
procedure described above to access the User PASSWORD SEt menu:
- set 4 hyphens (- - - -), the password will be cancelled,
- set another number and it will be modified.

11 - CONFIGURATION MENU (installer)
11.1 - ACCESS TO CONFIGURATION MENU
ATTENTION: access to the configuration menu is recommended for the installer or experienced users since the
modification of some settings might affect correct system operation.
16
Set
02 4 6810 12 14 16 18 20 22
OK
Set
02 4 6810 12 14 16 18 20 22
OK
1° 2°
Set
02 4 6810 12 14 16 18 20 22
OK
Set
02 4 6810 12 14 16 18 20 22
OK
1° 2°
Select item CONFIGUR Set with the keys and
confirm with OK: access the 1st item LANGUAGE SEt of
the menu (see chapter 8 or the list of available items).
If only an installer password was entered
the display requests entering the 4 digits,
which may be selected using the ;
keys; individually confirm them with «OK».
From normal thermostat operation access the menus by
pressing and holding the «Menu» key.
11.2 - CHANGE SET LANGUAGE
When LANGUAGE SEt is displayed, press OK to confirm.
• Use the keys to select the desired language
scrolling through available ones.
• Confirm by pressing OK.
•Press the «back» key to exit.
The selectable languages are:
ITALIAN = It (default), ENGLISH = En, FRENCH = Fr, GERMAN = dE, SPANISH = ES.

11 - CONFIGURATION MENU (installer)
11.3 - TYPE TEMPERATURE ADJUSTMENT METHODS
Set
02 4 6810 12 14 16 18 20 22
OK
Set
02 4 6810 12 14 16 18 20 22
OK
Set
02 4 6810 12 14 16 18 20 22
OK
17
The thermostat is factory set to work in THERMAL DIFFERENTIAL mode
ON/OFF with a preset thermal differential value (Hysteresis) of 0,3 °C.
Note: adjustable from 0,2 °C to 1,2 °C (from 0,3 °F to 2,1 °F).
The hysteresis value must be set according to the system's thermal
inertia; a low value is recommended for systems with radiators made of
e.g. cast iron and a high value for systems with fan coils.
A long cycle is recommended for systems with high thermal inertia (cast
iron radiators, floor systems) and a short cycle for systems with low
thermal inertia (fan coils).
whit the keys, select item RULE Set.
Press OK to confirm.
It will be possible to select temperature adjustment mode
between Thermal differential (On:OFF) factory setting or
Modulating proportional (PrOP) operation.
Use the keys, to select the desired temperature adjustment
mode. After making your choice press OK to confirm and display
the screen to set HYSTERESIS if you have opted for On:OFF, or to
set the PERIOD if you have opted for PrOP (see next paragraphs:
11.3.2 and 11.3.3).
11.3.1 - SELECTION OF THE TEMPERATURE ADJUSTMENT MODE (DIFFERENTIAL ON/OFF OR PROPORTIONAL)
From normal thermostat operation access the menus by pressing and holding the «Menu» key, select CONFIGUR Set, confirm with OK .
As opposed to the thermal differential, the temperature can be adjusted
MODULATING PROPORTIONALLY (PROP) setting cycles from 7 to 20
minutes (default 10 minutes).
This system maintains the desired temperature more stable, whilst
increasing the user's comfort sensation and saving on energy
consumption.
time
T SET
hysteresis
thermal inertia over temperature
of the heating element
ON ON
OFF
OFF
°C/°F
ON OFF ON OFF ON
T SET
time
°C/°F
example of modulating proportional adjustment
example of differential adjustment
OFF
thermal inertia over temperature
of the heating element

11 - CONFIGURATION MENU (installer)
18
Set
02 4 68
10 12 14 16 18 20 22
OK
OK
Set
02 4 6810 12 14 16 18 20 22
OK
1° 2°
Set
02 4 6810
Set
02 4 6810 12 14 16 18 20 22
OK
1° 2°
OK
OK
Set
02 4 6810 12 14 16 18 20 22
OK
Set
Set
11.4 - CHANGE UNIT OF MEASURE FOR TEMPERATURE READING
11.3.2 - Setting hysteresis for thermal differential ON-OFF
•Through the path CONFIGUR SEt -> RULE SEt -> select On:OFF, then press OK.
•With the keys enter the desired hysteresis value
(values may be set from 0.2 °C to 1.2 °C / from 0.3 °F to 2.1 °F - default 0.3 °C/0.4 °F).
•Press OK to confirm.
•Press the back key to exit.
From normal thermostat operation access the menus by pressing and holding the «Menu» key.
11.3.3 - Setting period duration for modulating Proportional
•Through the path CONFIGUR SEt -> RULE SEt -> select PrOP, then press OK.
•With the keys enter the duration of the desired period
(settable from 7 to 20 minutes, default 10 min.).
•Press OK to confirm.
•Press the back key to exit.
From normal thermostat operation access the menus by pressing and holding the «Menu» key.
The thermostat is pre-set in the factory to display temperatures in degrees Centigrade (Celsius), it is
possible to switch to the Fahrenheit scale or vice versa with the following procedure:
From normal thermostat operation access the menus by pressing and holding the «Menu» key.
•Through the path CONFIGUR SEt -> select UNIT SEt then press OK.
•Select the desired unit of measure with the keys: °C or °F,
then press OK to confirm.
All temperature set points will be updated according to the new scale.
•Press the back key to exit.

11 - MENU PER LA CONFIGURAZIONE (installatore)
11 - CONFIGURATION MENU (installer)
19
OK
OK
Set
02 4 6810 12 14 16 18 20 22
OK
Set
Set
Set
Set
If for any reason the thermostat must be installed in a position where the measured
room temperature might be affected (e.g. perimeter wall which is on average colder
in winter and warmer in summer than the rest of the dwelling) the device has 2
separate parameters to adjust the room temperature measured in the Winter and
Summer modes.
11.5 - CORRECTION OF ROOM TEMPERATURE READING
• Through the path CONFIGUR SEt -> select item OFFSET Set.
Press OK to confirm.
From normal thermostat operation access the menus by pressing and holding the «Menu» key.
The display alternates the empty fields to be inserted (- - - -) with the current
temperature value.
•Use the key to enter positive values, the key to enter negative values (sign «-»).
At each selection the display will show the new correction value (e.g.: 0.6°C) alternated
to the detected temperature value (e.g.: 21.2°C).
•After performing the correction press «OK».
The display shows the OFFSET for the Summer mode ( ); proceed with the correction
as per the above procedure or press back to quit.
Possible correction -3.0 °C (-5.4 °F) ÷ 3.0 °C (5.4 °F)
default 0.0 °C/°F = - - - -
to cancel any previously set temperature corrections take OFFSET
back to .
OFFSET for winter mode ( )
11.6 - MAX AND MIN SET TEMPERATURE LOCK (Winter and Summer mode)
In certain thermostat installations (public buildings, hotels, etc.) it might be useful to limit the maximum and/or minimum temperature set points.
This avoids incorrect settings by unauthorised personnel (energy savings).
It is possible to limit (lock) the maximum, minimum or both temperature values settable on the thermostat.
The restriction may be applied either to the Winter or Summer mode.

11 - CONFIGURATION MENU (installer)
20
OK
OK
OK
OK
Set
02 4 6810 12 14 16 18 20 22
OK
Set Set
Set
Set
Set
In a sequential manner it is possible to set maximum temperature locks (t1 comfort) and/or minimum (t2 economy) for the winter mode and/or
maximum temperature (t1 comfort) and/or minimum (t2 economy) for the Summer mode .
If no locks have been entered yet, the display shows empty flashing fields (- - - -).
•Use the , keys to set the desired temperature lock values from time to time.
•Upon completing each setting press OK to confirm and move to the next lock item.
Press the OK impulse key to move to a different item. Press the back key to exit.
•Through the path CONFIGUR SEt ->, select item LOCKS SEt. Press OK to confirm.
From normal thermostat operation access the menus by pressing and holding the «Menu» key.
To cancel any previously set locks bring the MAX/MIN set
points back to .
General rule
If Set temperature t1 (comfort) is greater than the maximum entered lock, it will level out with it.
If Set temperature t or t2 is less than the minimum entered lock, it will level out with it.
The following rule will apply to all other temperatures: WINTER ( ) = t1 > t2 > t - SUMMER ( ) = t1 < t2
During thermostat operation, the user may not set a Set t higher or lower than the max and min. locks entered.
The display will signal impossibility to perform the operation by displaying .
Table of contents
Other Perry Electric Thermostat manuals

Perry Electric
Perry Electric Recess Series User manual

Perry Electric
Perry Electric MODULE Series User manual

Perry Electric
Perry Electric TE540 User manual

Perry Electric
Perry Electric V002 Series Guide

Perry Electric
Perry Electric 1TX CR028WIFI Guide

Perry Electric
Perry Electric TE542 User manual

Perry Electric
Perry Electric RECESS Series User manual