Pfaff COVERLOCK 3.0 - User manual

Owner’s Manual

This household sewing machine is designed to comply with IEC/EN 60335-2-28 and UL1594
IMPORTANT SAFETY INSTRUCTIONS
When using an electrical appliance, basic safety precautions should always be followed, including the
following:
Read all instructions before using this household sewing machine.
DANGER - To reduce the risk of electric shock:
• A sewing machine should never be left unattended when plugged in. Always unplug this sewing
machine from the electric outlet immediately after using and before cleaning.
• Always unplug before relamping. Replace bulb with same type rated 15 Watt.
:$51,1*7RUHGXFHWKHULVNRIEXUQVÀUH
electric shock, or injury to persons:
• This sewing machine is not intended for use by persons (including children) with reduced physical,
sensory or mental capabilities, or lack of experience and knowledge, unless they have been given
supervision or instruction concerning use of the sewing machine by a person responsible for their safety.
• Children should be supervised to ensure that they do not play with the sewing machine.
• Use this sewing machine only for its intended use as described in this manual. Use only attachments
recommended by the manufacturer as contained in this manual.
• Never operate this sewing machine if it has a damaged cord or plug, if it is not working properly, if
it has been dropped or damaged, or dropped into water. Return the sewing machine to the nearest
authorized dealer or service center for examination, repair, electrical or mechanical adjustment.
• Never operate the sewing machine with any air openings blocked. Keep ventilation openings of the
sewing machine and foot controller free from the accumulation of lint, dust, and loose cloth.
.HHSÀQJHUVDZD\IURPDOOPRYLQJSDUWV6SHFLDOFDUHLVUHTXLUHGDURXQGWKHVHZLQJPDFKLQHQHHGOH
and blades.
• Always use the proper needle plate. The wrong plate can cause the needle to break.
• Do not use bent needles.
'RQRWSXOORUSXVKIDEULFZKLOHVWLWFKLQJ,WPD\GHÁHFWWKHQHHGOHFDXVLQJLWWREUHDN
• Wear safety glasses.
6ZLWFKWKHVHZLQJPDFKLQHRII´µZKHQPDNLQJDQ\DGMXVWPHQWLQWKHQHHGOHDUHDVXFKDVWKUHDGLQJ
needle, changing needle, or changing presser foot, etc.
• Always unplug sewing machine from the electrical outlet when removing covers, lubricating, or when
making any other user servicing adjustments mentioned in the instruction manual.
• Never drop or insert any object into any opening.
• Do not use outdoors.
• Do not operate where aerosol (spray) products are being used or where oxygen is being administrated.
7RGLVFRQQHFWWXUQDOOFRQWUROVWRWKHRII´µSRVLWLRQWKHQUHPRYHSOXJIURPRXWOHW
• Do not unplug by pulling on cord. To unplug, grasp the plug, not the cord.
SAVE THESE INSTRUCTIONS

Table of contents
Introduction
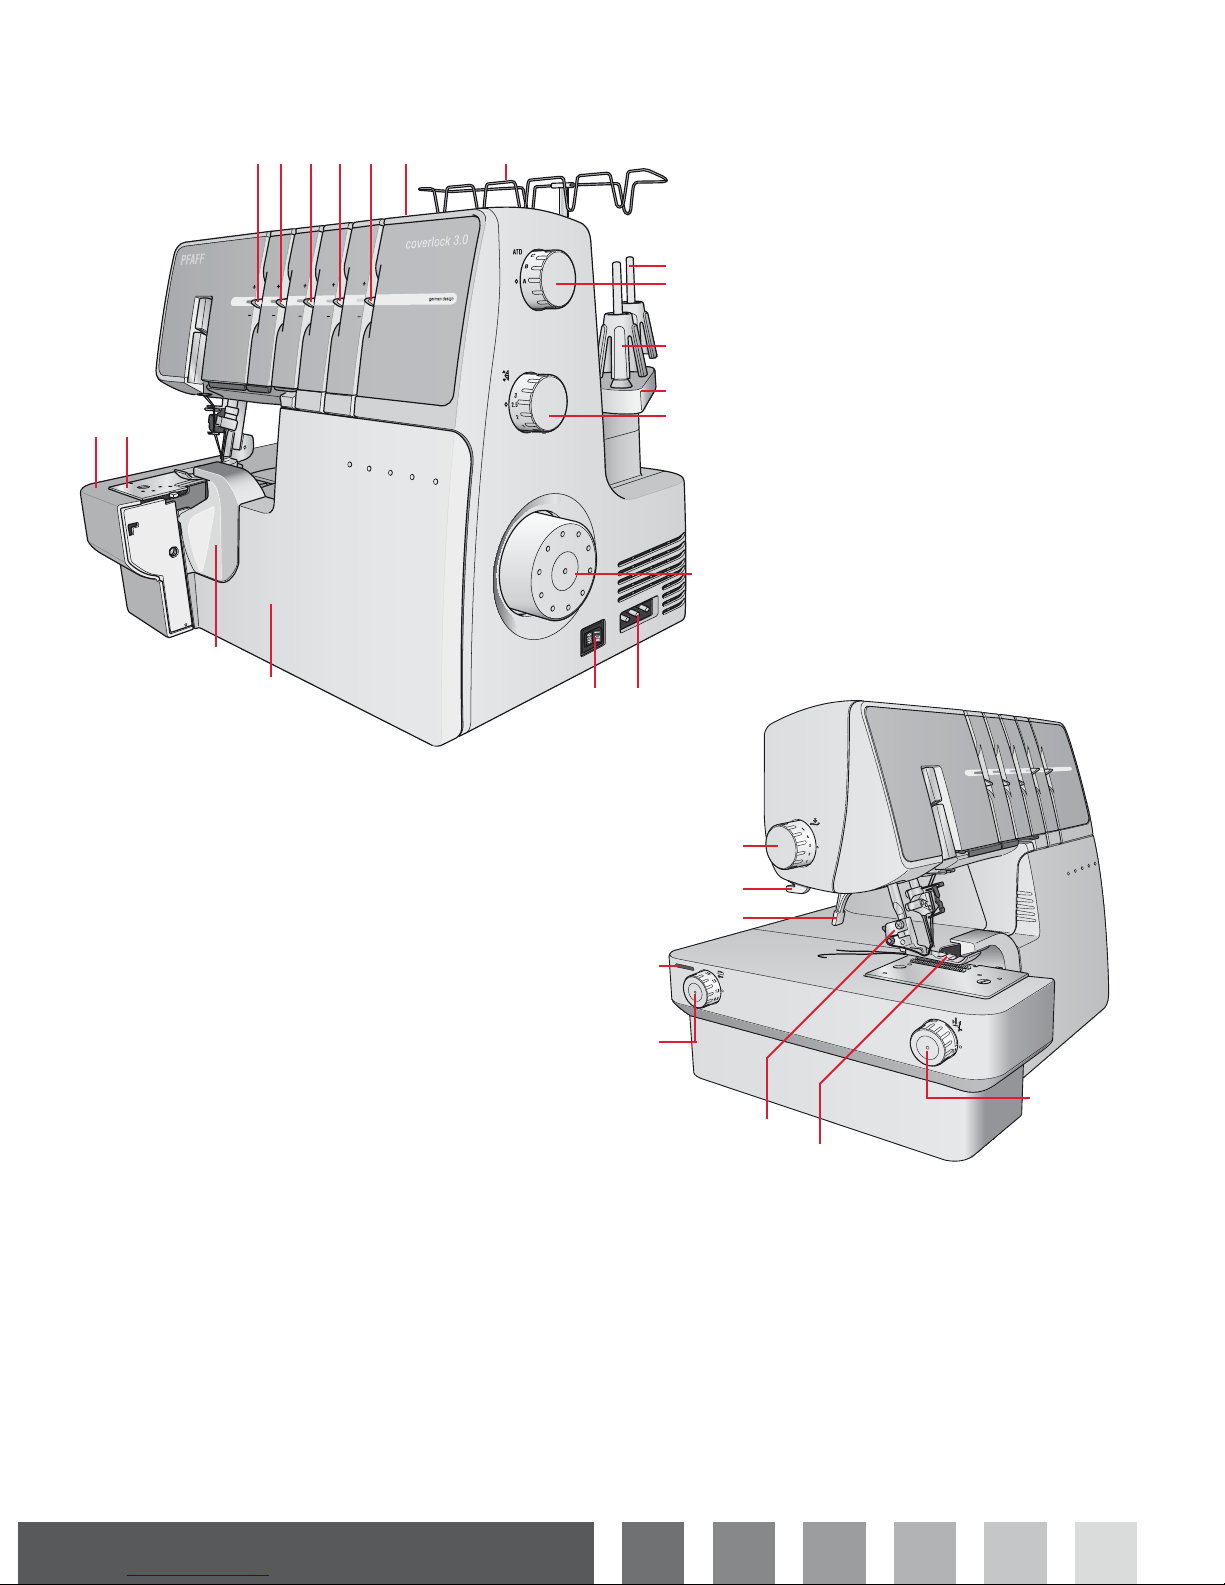
Parts of the machine........................................................4
Accessories...........................................................................5
Optional accessories from INSPIRA™........................6
Preparations
Connecting the foot control
and the power supply......................................................7
Setting up the spool stand ............................................7
Setting up the telescopic thread stand....................7
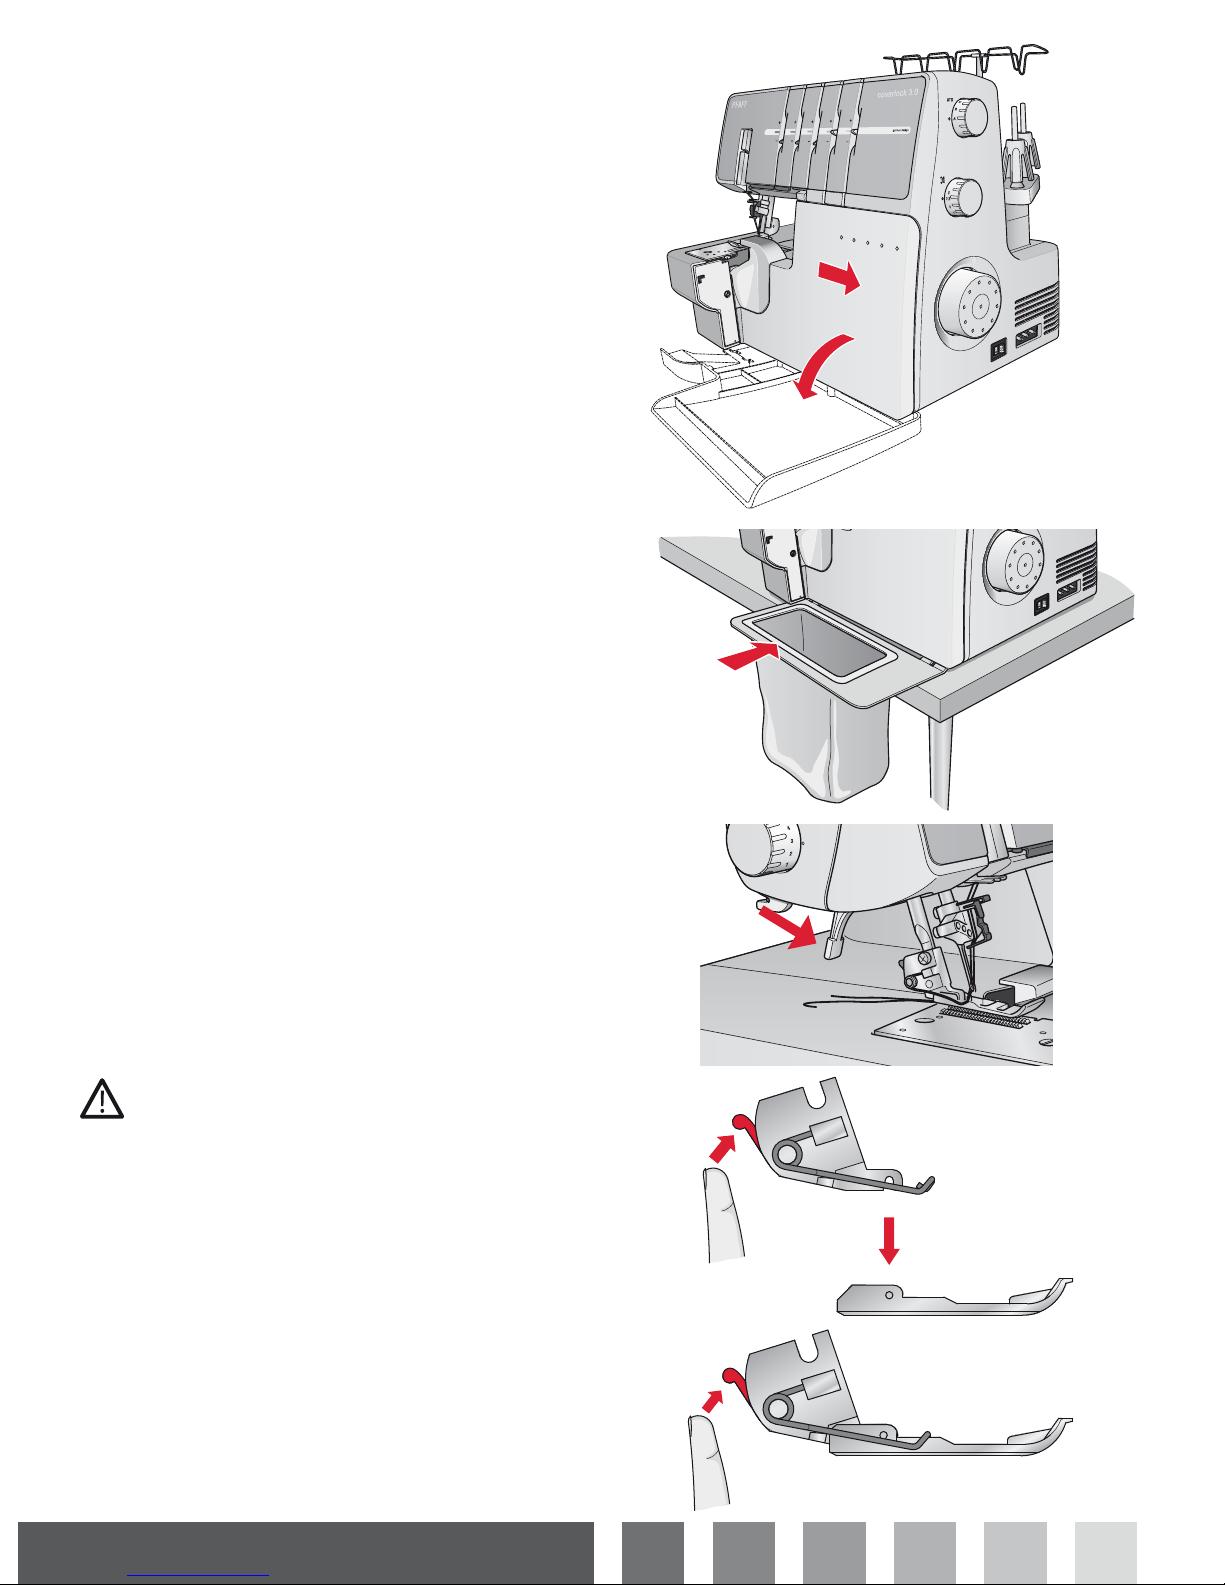
Front cover ...........................................................................8
Open........................................................................................................8
Close........................................................................................................8
Attaching the waste tray.................................................8
Presser foot lift ...................................................................8
Changing the presser foot .............................................8
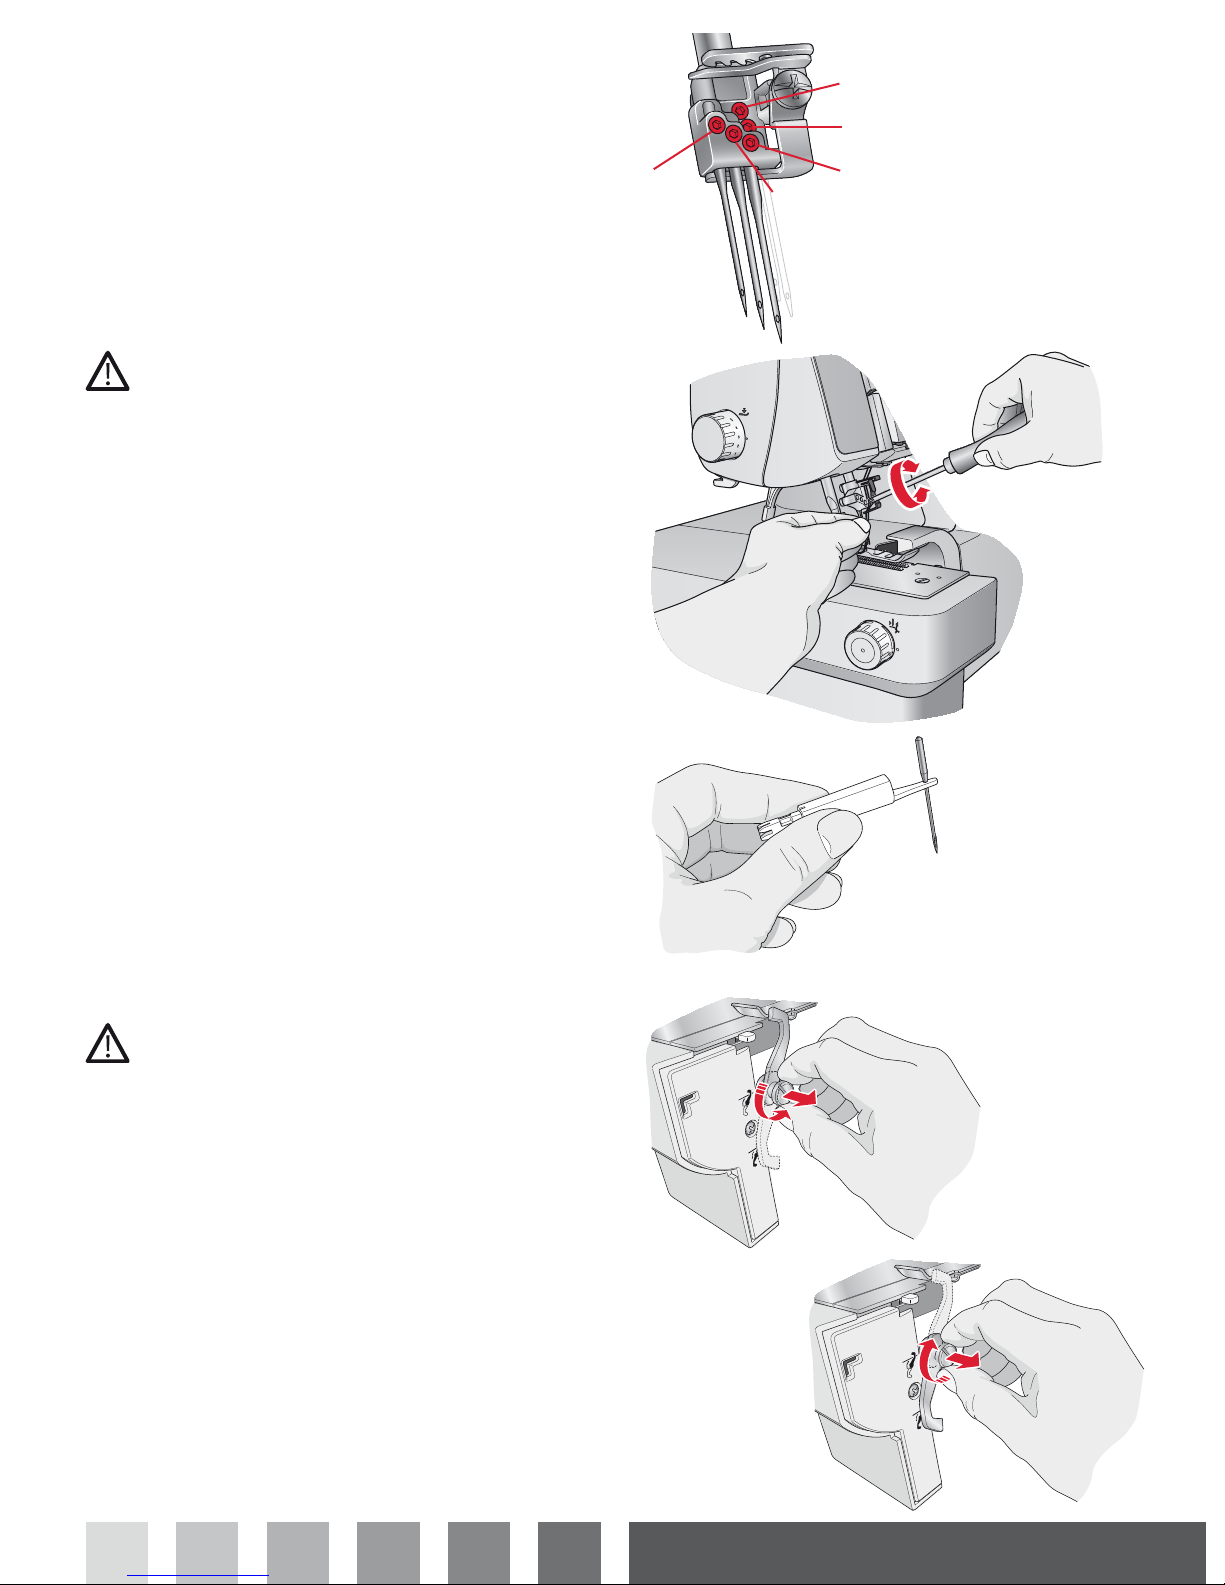
Needle information...........................................................9
Changing the needles......................................................9
Movable upper cutter .....................................................9
Disengaging, position B ..................................................................9
Engaging, position A.........................................................................9
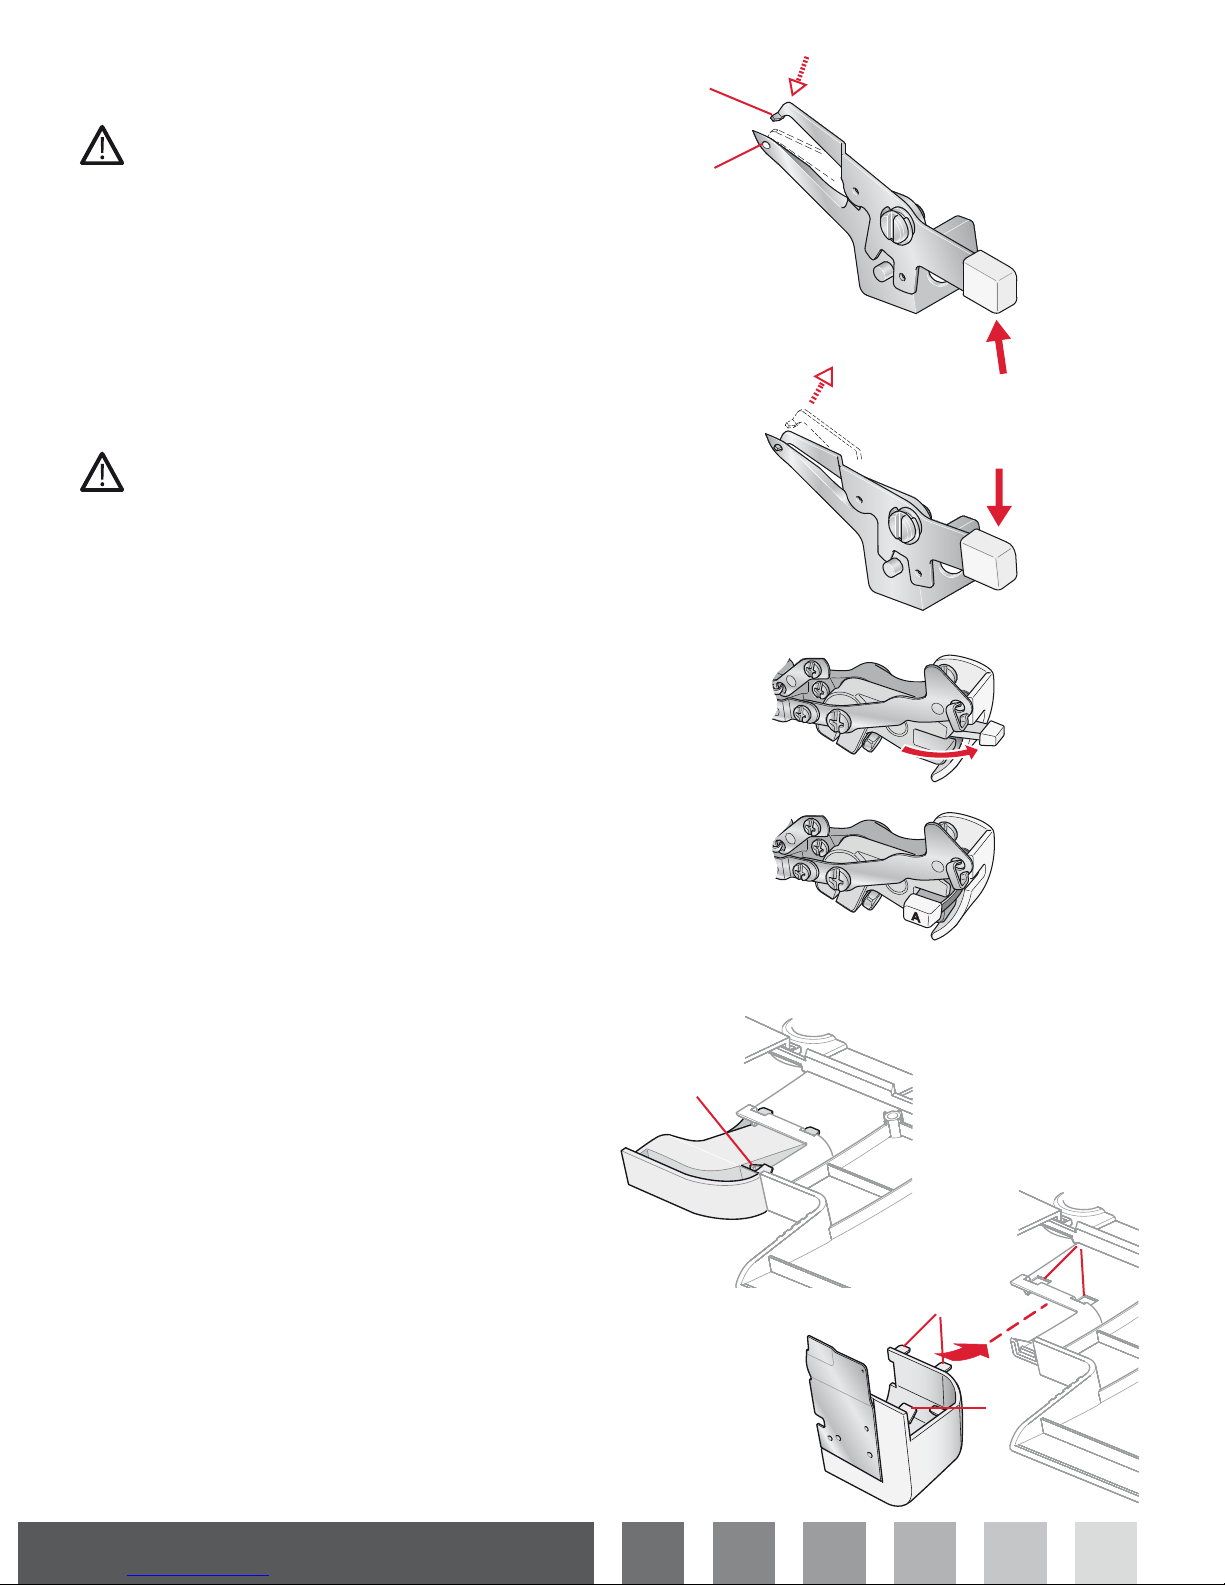
2-thread overlock converter....................................... 10
Engaging.............................................................................................10
Disengaging ......................................................................................10
Upper looper .................................................................... 10
Disengaging ......................................................................................10
Engaging.............................................................................................10
Changing to coverstitch table B ............................... 10
6WLWFKÀQJHUOHYHUVHWWLQJ ............................................ 11
Threading
General threading information ................................. 11
Threading the upper looper (red)............................ 12
Threading the lower looper (yellow)....................... 13
Threading chainstitch looper (purple)................... 14
Threading the right needle ........................................ 15
Threading the left needle ........................................... 16
Threading the chainstitch needle............................ 17
Threading the coverstitch needles .......................... 18
Needle threader .............................................................. 21
Changing thread ............................................................. 21
Stitches & Sewing techniques
Stitch overview................................................................. 22
Start sewing ...................................................................... 28
Pin placement..................................................................................28
Chain off .............................................................................................28
Rolled edge sewing........................................................ 29
Coverstitch sewing ......................................................... 29
Machine set up................................................................................29
Start sewing ......................................................................................29
Securing the coverstitch seam end ........................................29
Flatlock sewing ................................................................ 30
6WDQGDUGÁDWORFNVWLWFK................................................................30
2UQDPHQWDOÁDWORFNVWLWFK...........................................................30
Ladder stitch.....................................................................................30
Chainstitch sewing ......................................................... 31
Machine set up................................................................................31
Start and end of sewing...............................................................31
Sewing hints ..................................................................... 31
Pintuck sewing.................................................................................31
Sew in circles....................................................................................31
Securing the thread chain ..........................................................31
Sewing with heavy decorative threads in the loopers.....31
Braiding by chaining off ..............................................................31
Stitch adjustments
Stitch width adjustment .............................................. 32
Width adjustment by changing needle position................32
Width adjustment with the cutting width dial....................32
Presser foot pressure adjustment ........................... 32
Stitch length adjustment............................................. 32
Differential feed adjustment ...................................... 33
Gathered overlock (stretch, knit fabrics)...............................33
Stretch overlock (lightweight fabrics).....................................33
7KUHDGWHQVLRQÀQHWXQLQJ ......................................... 34
Maintenance
Machine maintenance.................................................. 36
Cleaning..............................................................................................36
Oiling....................................................................................................36
Replacing the movable upper cutter......................................36
Changing the light bulb ...............................................................37
Storage................................................................................ 37
Servicing............................................................................. 37
Trouble shooting ............................................................. 38
0DFKLQHVSHFLÀFDWLRQV................................................. 39
Intellectual Property ...................................................... 39

2
89
34 5 6 7 1
11
10
15
16
17
19
18
14
12 13
PFAFF
coverlock 3.0
german design
22
20
21
24
23
25
26
27
Introduction4
Parts of the machine
1. Telescopic thread stand
2. Handle
/HIWQHHGOHWKUHDGWHQVLRQÀQHWXQLQJOHYHUEOXH
5LJKWQHHGOHWKUHDGWHQVLRQÀQHWXQLQJOHYHUJUHHQ
8SSHUORRSHUWKUHDGWHQVLRQÀQHWXQLQJOHYHUUHG
/RZHUORRSHUWKUHDGWHQVLRQÀQHWXQLQJOHYHU\HOORZ
&KDLQVWLWFKORRSHUWKUHDGWHQVLRQÀQHWXQLQJOHYHU
(purple)
6WLWFKSODWH
9. Flat bed extension
10.Cutter cover A
11.Front cover
12.Power & light switch
13.Foot control/electric power cord socket
14.Handwheel
6WLWFKOHQJWKGLDO
6SRROVWDQG
17.Cone holder
18.Auto tension dial (ATD)
6SRROSLQ
20.Presser foot pressure adjusting dial
21.Thread cutter
22.Presser foot lift
23.Hole for extension table
24.Differential feed adjusting dial
25.Presser foot ankle
26.Presser foot
27.Cutting width dial

33
34
3536
28
3029 32
31
23 4 5 6 7 8
9
11
1
10
12
14
13
Introduction 5
Accessories
Accessories are contained in the accessory box.
1. Accessory box
6FUHZGULYHU
3. Knife blade (for the movable upper cutter)
4. Thread unreeling discs (5)
5. Thread spool nets (5)
6. Oiler
7. Allen key
8. Tweezers
9. Coverstitch table B (for Cover/chainstitch)
10.Cone holders (5)
11.Dust cover
12.Lint brush
13.Waste tray
14.Needle threader
15.Extension table including four legs and push pin (not
pictured).
Assemble the extension table and legs according to the
illustrations provided with the table. The push pin is
used in the small holes in the table to hold your fabric
in place when sewing circles (see page 31).
16.Needle pack (not pictured) system ELx705 including
three needles, size #14/90 and two needles, size
#12/80. Two needles, size #14/90, are in the machine
on delivery.
28.Moveable upper cutter
6WLWFKÀQJHUOHYHU
6WDWLRQDU\ORZHUFXWWHU
31.Chainstitch/Coverstitch looper
32.Lower looper
33.Upper looper
34.2-thread converter
35.Upper looper clutch
36.Chain/coverstitch thread guide

Introduction6
Optional accessories from INSPIRA™
Optional presser feet specially prepared for this machine are available at your PFAFF® dealer. The snap-on type
presser foot used on this machine allows easy removal and replacement.
Some fabrics have a lot of excess dye which can cause discoloration on other fabric but also
RQ\RXURYHUORFNPDFKLQH7KLVGLVFRORULQJPD\EHYHU\GLIÀFXOWRULPSRVVLEOHWRUHPRYH
)OHHFHDQGGHQLPIDEULFHVSHFLDOO\UHGDQGEOXHRIWHQFRQWDLQDORWRIH[FHVVG\H
,I\RXVXVSHFWWKDW\RXUIDEULFUHDG\WRZHDUJDUPHQWFRQWDLQVDORWRIH[FHVVG\HDOZD\V
SUHZDVKLWEHIRUHVHZLQJWRDYRLGWKHGLVFRORULQJ
Elastic Foot 620 08 65-96
7KH(ODVWLF)RRWJXLGHVDQGVWUHWFKHVQDUURZHODVWLFõôµPPDV\RXVHZLWWRIDEULF,W
LVJUHDWIRUVHZLQJIRUDFWLYHZHDUOLQJHULHDQGRWKHUHODVWLFLQVHUWLRQWHFKQLTXHV
Blindhem & Lace Foot 620 08 69-96
The Blindhem Foot is perfect for sewing invisible hems and for applying lace. The hem is
sewn, overcast and trimmed in one step.
Beading Foot 620 08 66-96
The Beading Foot smoothly guides beads and pearls through a channel on the foot for easy
application on garments or crafts.
Piping Foot 620 08 67-96
The Piping Foot is perfect for inserting packaged piping into seams and on edges for a
WDLORUHGÀQLVK7KHWULPLVVHZQEHWZHHQWKHWZROD\HUVRIIDEULFLQRQHVWHS$JURRYHXQGHU
WKHIRRWKHOSVJXLGHWKHSLSLQJ<RXFDQDOVRFUHDWH\RXURZQSLSLQJIRUDFXVWRPÀQLVK
The Piping Foot makes it fast and easy to cover cording with fabric and to insert piping into
seams for a professional look!
Taping Foot 620 08 68-96
The Taping Foot is used to apply seam tapes to seams to prevent stretching. It is especially
good for stabilizing shoulder seams. With this foot you can reinforce and construct seams in
one step.
Corded Wavy Edge Foot 620 09 72-96
6HZLQJDGHFRUDWLYHZDY\HGJHLVHDV\ZLWKWKH&RUGHG:DY\(GJH)RRW7KHFXUY\VRIWO\
UXIÁHGHGJHLVDSHUIHFWÀQLVKIRUEULGDOYHLOVÀJXUHVNDWLQJFRVWXPHVEDOOHWVNLUWVFUDIWVDQG
more.
Gathering Foot 620 08 83-96
The Gathering Foot is perfect for gathering a single layer of fabric or simultaneously
gathering and stitching two layers of fabric. (The bottom fabric layer will be gathered and the
WRSOD\HUUHPDLQVÁDW6XLWDEOHIRUOLJKWDQGPHGLXPZHLJKWZRYHQIDEULFV

coverlock 3.0
german design
A
B
C
ATD
A
Preparations 7
Connecting the foot control and the
power supply
Foot control to use with this machine:
7\SH&%IRU86$&DQDGD
7\SH&*IRU(XURSH
7\SH&*IRU8.
7\SH&*IRU$XVWUDOLD
Before plugging your machine in, make sure the voltage
is the same as indicated on the plate under the machine.
6SHFLÀFDWLRQVYDU\IURPFRXQWU\WRFRXQWU\
• Connect the foot control/electric power cord to the
socket on the machine.
• Plug the power cord plug into the electric outlet.
3XVKWKHSRZHUVZLWFKWR´µWRWXUQRQWKHPDFKLQH
• Press the foot control to start sewing. Use the foot
control to adjust the sewing speed. The harder you
press, the faster the machine will sew.
On the right side of the foot control is a speed control
slide (A) for selecting full or half maximum speed. If
you press the foot control to the bottom, the machine
runs at the maximum speed set by the speed control
slide. To stop the machine from sewing, remove your
foot from the control.
3XVKWKHSRZHUVZLWFKWR´µWRWXUQRIIWKHPDFKLQH
1RWH:KHQWKHIURQWFRYHULVRSHQWKHVDIHW\VZLWFKLVDFWLYDWHG
DQGSUHYHQWVWKHPDFKLQHIURPVHZLQJHYHQLIWKHIRRWFRQWUROLV
SUHVVHG
Note: Your coverlock™RYHUORFNPDFKLQHLVDGMXVWHGWRSURYLGH
WKHEHVWVWLWFKUHVXOWDWQRUPDOURRPWHPSHUDWXUH([WUHPHKRW
DQGFROGWHPSHUDWXUHVFDQDIIHFWWKHVHZQUHVXOW
Setting up the spool stand
Insert the spool stand then push to right as illustrated.
Setting up the telescopic thread stand
Extend the telescopic thread stand to its full height, then
turn until it clicks into place. Place the thread spools over
the cone holders on the spool pin.
If the machine is already threaded, straighten the threads
to prevent tangling.
POLARIZED PLUG INFORMATION
(FOR U.S.A. & CANADA ONLY)
This appliance has a polarized plug (one blade wider
than the other). To reduce the risk of electric shock,
WKLVSOXJLVLQWHQGHGWRÀWLQDSRODUL]HGRXWOHWRQO\
ZD\,IWKHSOXJGRHVQRWÀWIXOO\LQWKHRXWOHWUHYHUVH
WKHSOXJ,ILWVWLOOGRHVQRWÀWFRQWDFWDTXDOLÀHG
electrician to install the proper outlet. Do not modify
the plug in any way.

Preparations8
Front cover
Open
First push the cover to the right as far as it will go and
then pull it downward toward you.
Close
First pull the cover upward and then slide it to the left
until it locks.
Note: The front cover has a safety switch and the machine will
QRWVHZLIWKHIURQWFRYHULVRSHQ
Attaching the waste tray
Position the machine so the front is nearly aligned with
the edge of the table. Insert the U-shaped hooks of the
waste tray onto the two suction cups on the underside of
the machine. Make sure the trim falls into the bag while
sewing.
Presser foot lift
Raise the presser foot by lowering presser foot lift at the
back of the machine.
Pressing down on the presser foot lift puts the presser foot
in the extra lift position.
Changing the presser foot
7XUQRIIWKHPDLQSRZHUVZLWFKDQGXQSOXJWKHPDFKLQH
• Raise the presser foot.
• Turn the handwheel toward you until the needles are
at the highest position.
• Push the red button on the back of the presser foot
ankle to release the presser foot.
• Raise the presser foot to the extra lift position and the
foot will come off.
• Place the new foot with the pin right underneath the
groove of the ankle while in the extra lift position.
Lower the presser foot. Push the red button on the back
of the presser foot ankle and the foot will snap into
place.
1
2

B
A
B
B
A
B
german design
A. Overlock left needle
B. Overlock right needle
C. Coverstitch left needle
D. Coverstitch middle needle
E. Coverstitch right needle
A
B
E
D
C
Preparations 9
Needle information
7KLVRYHUORFNXVHVDÁDWVKDQNLQGXVWULDOQHHGOHWKDW
eliminates the possibility of inserting the needle backwards.
Do not attempt to use a standard household sewing machine
needle of any size or type in this overlock.
8VH,163,5$QHHGOH(/[VL]HVDQG
supplied with this machine.
Changing the needles
7XUQRIIWKHPDLQSRZHUVZLWFKDQGXQSOXJWKHPDFKLQH
• Turn the handwheel toward you until the needles are at
the highest position.
• Place a thick piece of fabric under the presser foot. Lower
the needles halfway into the fabric.
• Loosen, but do not remove the needle clamp screw with
the allen key while you are holding the needles.
1RWH:KHQLQVHUWLQJQHHGOHVLQWRWKH$DQGRU%QHHGOHFODPSVLW
LVQHFHVVDU\WRORRVHQWKHQHHGOHFODPSVFUHZVIRUERWK$DQG%
• Remove the selected needle.
+ROGWKHQHZQHHGOHZLWKWKHÁDWVXUIDFHWRWKHEDFN
• Insert the needle into the needle clamp as far as it will go.
Note: We recommend using the hole in the needle threader to hold
the needle.
6HFXUHO\WLJKWHQWKHQHHGOHFODPSVFUHZXVLQJWKHDOOHQ
key.
1RWH'RQRWRYHUWLJKWHQWKHVFUHZDVWKLVPD\FDXVHWKHQHHGOH
FODPSWREHGDPDJHG
Movable upper cutter
Disengaging, position B
7XUQRIIWKHPDLQSRZHUVZLWFKDQGXQSOXJWKHPDFKLQH
• Turn the handwheel toward you until the upper cutter is
raised to the highest position.
• Open the front cover.
• Pull the movable cutter knob to the right as far as it will
go.
• Turn the knob toward you counter clockwise until the
cutter clicks into the locked position B.
Engaging, position A
• Open the front cover and pull the movable cutter knob to
the right as far as it will go.
• Turn the knob clockwise until the cutter clicks into the
cutting position A.

A
B
B
A
1
2
3
4
Preparations10
2-thread overlock converter
Engaging
7XUQRIIWKHPDLQSRZHUVZLWFKDQGXQSOXJWKHPDFKLQH
2-thread overlock stitches are sewn using one needle
thread and the lower looper thread. Before sewing, the
2-thread converter must be attached to the upper looper.
The 3-thread stretch overlock stitch is also sewn with the
2-thread overlock converter engaged.
• Open the front cover.
• Raise the white handle on the 2-thread converter to
insert the sharp edge (A) of the converter in the eye (B)
of the upper looper.
Disengaging
7XUQRIIWKHPDLQSRZHUVZLWFKDQGXQSOXJWKHPDFKLQH
• Lower the white handle on the converter and remove
the sharp edge (A) from the eye (B) of the upper looper.
Upper looper
Disengaging
For coverstitch and chaintitch sewing the upper looper
needs to be disengaged.
• Turn the handwheel until the upper looper is in its
lowest position.
• Push the clutch lever to the right and back until
position B is visible from the front.
Engaging
• Turn the handwheel until the upper looper is in its
lowest position.
• Pull the clutch lever toward you until position A is
visible from the front.
Changing to coverstitch table B
For coverstitch and chainstitch sewing the coverstitch
table B should be used.
• Lift the hook (1) to release the cutter cover A and pull it
towards you.
,QVHUWWKHFRYHUVWLWFKWDEOH%E\ÀWWLQJWKHWZRIURQW
pins (2) into the holes (3) and make sure the hook (4)
clicks into place.

R
N
N
R
N
R
Threading 11
General threading information
$FRORUFRGHGGLDJUDPLVORFDWHGLQVLGHWKHIURQWFRYHUIRUTXLFNUHIHUHQFH$OZD\VVWDUWWKUHDGLQJWKH
upper looper, followed by the lower looper and then the needles from right to left.
6HHWKHWDEOHEHORZIRUUHFRPPHQGDWLRQVRQZKDWQHHGOHVDQGWKUHDGWRXVHIRUGLIIHUHQWIDEULFZHLJKWV
7LS<RXUQHZPDFKLQHLVWKUHDGHGWRVHZDVWDQGDUGRYHUORFN7LH\RXURZQWKUHDGVWRWKHVHWKUHDGVDQGFDUHIXOO\
SXOOWKHPWKURXJKWKHPDFKLQHWRHDVLO\WKUHDG\RXUQHZRYHUORFNPDFKLQHWKHÀUVWWLPH
Re-threading if a thread breaks
If the two loopers are not threaded in the correct order they will not create a stitch. If a looper thread
breaks always do the following:
1. Unthread the needle(s)
2. Unthread the loopers
3. Thread the upper looper
4. Thread the lower looper
5. Thread the needle(s) from right to left
The following pages give you detailed step by step instructions on threading.
Fabric Light fabric
(voil, crepe, georgette, etc.)
Medium fabric
(cotton, chino, wool, satin
etc.)
Heavy fabric
(denim, jersey, tweed etc.)
Needles #12/80 #14/90 #14/90
Thread Polyester
VSXQÀODPHQW
Twisted thread
#60/2 - #100/3
Twisted thread
#80/3 - #100/3
Twisted thread
#60/2
Twisted thread
#50/2 - #60/2
6WLWFKÀQJHUOHYHUVHWWLQJ
7KHVWLWFKÀQJHUOHYHUVKRXOGEHVHWWR1IRUDOOVWDQGDUG
overlock sewing. To sew rolled edge you need to retract
WKHVWLWFKÀQJHUE\VHWWLQJWKHVWLWFKÀQJHUOHYHUWR5
:KHQPRYLQJWKHVWLWFKÀQJHUOHYHUEHVXUHWRSXVKWKH
lever as far as it will go in each direction.
1RWH:KHQXVLQJVWDQGDUGWKUHDGVSRROVSODFHWKHWKUHDG
XQUHHOLQJGLVFDVVKRZQWRSUHYHQWWKHWKUHDGIURPJHWWLQJ
FDXJKWRQWKHHGJHRIWKHVSRRO

11
2
3
4
5
6
7
8
9
9
2
Threading12
Threading the upper looper (red)
• Raise the presser foot to release tension discs.
• Pass the thread from back to front through the thread
guide on the thread stand (1).
• Thread the top cover thread guide by pulling the
thread towards the right until it slips under the guide.
Then pull the thread along the right side of the button
as illustrated (2).
• Lift up the handle and bring the thread under it. While
holding the thread with both hands, pass it between
the tension discs and pull it down to make certain it is
properly placed between the tension discs (3)
• Thread the looper area of the machine following the
red color coded thread guides (4-9).
• Use the tweezers to thread the hole in the upper looper
from front to back (9).
• Pull about 10 cm (4µof thread through the looper and
place it to the back of the stitch plate.

1
1
2
3
9
4
5
6
7
8
9
10
5
B
A
C
2
Threading 13
Threading the lower looper (yellow)
• Raise the presser foot to release tension discs.
• Pass the thread from back to front through the thread
guide on the thread stand (1).
• Thread the top cover thread guide by pulling the
thread towards the right until it slips under the guide.
Then pull the thread along the right side of the button
as illustrated (2).
• Lift up the handle and bring the thread under it. While
holding the thread with both hands, pass it between
the tension discs and pull it down to make certain it is
properly placed between the tension discs (3).
• Turn the handwheel toward you until the lower looper
extends out 10 mm (3/8µfrom the needle plate edge.
• Thread the looper area of the machine following the
yellow color coded thread guides (4-10).
• Place the thread through threading guide (4).
• Place the thread through the right slot of threading
guide (5).
• To thread the last thread guide (9), pull about 10 cm
µRIWKUHDGWKURXJKWKHJXLGH
7LS0RYLQJWKHVWLWFKÀQJHUOHYHUWR5PDNHVWKHWKUHDGLQJ
HDVLHU5HPHPEHUWRVHWLWEDFNWR1EHIRUHVWDUWLQJWRVHZ
• Thread the looper eye (A) from front to back using
WKHWZHH]HUV0DNHVXUHWKHWKUHDGUXQVLQWRWKH´9µ
cutouts (B) on threader lever. Firmly hold the thread
tail with left hand and pull the threader lever (C) up
into place and back to snap the thread into thread
guide 9.

1
2
3
1
10
8
4
5
6
7
8
9
10 11
5
C
B
A
2
Threading14
Threading chainstitch looper (purple)
• Raise the presser foot to release tension discs.
• Pass the thread from back to front through the thread
guide on the thread stand (1).
• Thread the top cover thread guide by pulling the
thread towards the right until it slips under the guide.
Then pull the thread along the right side of the button
as illustrated (2).
• Lift up the handle and bring the thread under it. While
holding the thread with both hands, pass it between
the tension discs and pull it down to make certain it is
properly placed between the tension discs (3).
• Turn the handwheel toward you until the chainstitch
looper is at the far right.
• Thread the looper area of the machine following the
purple color coded thread guides (4-11).
• Place the thread through threading guide (4).
• Place the thread through the front slot of threading
guide (5).
• Thread the chainstitch thread guide (8) by holding the
thread in front of the thread guide pin and pulling the
thread backward and up, until the thread rests inside
the thread guide loop and under the spring.
• To thread the last thread guide (10), pull about 10 cm
µRIWKUHDGWKURXJKWKHJXLGH
7LS0RYLQJWKHVWLWFKÀQJHUOHYHUWR5PDNHVWKHWKUHDGLQJ
HDVLHU5HPHPEHUWRVHWLWEDFNWR1EHIRUHVWDUWLQJWRVHZ
• Thread the looper eye (A) from front to back using the
WZHH]HUV0DNHVXUHWKHWKUHDGUXQVLQWRWKHOHIW´9µ
cutout (B) on threader lever. Firmly hold the thread tail
with left hand and pull the threader lever (C) up into
place and back to snap the thread into thread guide 10.

4
5
6
7
8
9
9
1
2
3
1
2
Threading 15
Threading the right needle
(green, B on needle clamp)
• Raise the presser foot to release tension discs.
• Pass the thread from back to front through the thread
guide on the thread stand (1).
• Thread the top cover thread guide by pulling the
thread towards the right until it slips under the guide.
Then pull the thread along the right side of the button
as illustrated (2).
• Lift up the handle and bring the thread under it. While
holding the thread with both hands, pass it between
the tension discs and pull it down to make certain it is
properly placed between the tension discs (3).
• Continue to thread points (4-8).
6OLSWKHWKUHDGLQWRWKHUHDUVORWRQWKHWKUHDGJXLGH
and into the slot on the take-up lever cover (6). Then
slip the thread into the right slot on the thread guides
(7) and (8).
• Before threading the eye of the needle, make sure the
thread is behind the thread guide located on the bottom
of the needle clamp.
• Thread the eye of the needle (9). Use the needle
threader (see page 21) to make needle eye threading
easier.
3XOODERXWFPµRIWKUHDGWKURXJKQHHGOHH\HWR
hang free.
• Place the thread to the back, under the presser foot.

1
2
3
1
4
5
6
7
8
9
9
2
Threading16
Threading the left needle
(blue, A on needle clamp)
• Raise the presser foot to release tension discs.
• Pass the thread from back to front through the thread
guide on the thread stand (1).
• Thread the top cover thread guide by pulling the
thread towards the right until it slips under the guide.
Then pull the thread along the right side of the button
as illustrated (2).
• Lift up the handle and bring the thread under it. While
holding the thread with both hands, pass it between
the tension discs and pull it down to make certain it is
properly placed between the tension discs (3).
• Continue to thread points (4-8).
6OLSWKHWKUHDGLQWRWKHPLGGOHVORWRQWKHWKUHDGJXLGH
(5) and the slot on the take-up lever cover (6). Then slip
the thread into the middle slot on the thread guides (7)
and (8).
• Before threading the eye of the needle, make sure the
thread is behind the thread guide located on the bottom
of the needle clamp.
• Thread the eye of the needle (9). Use the needle
threader (see page 21) to make needle eye threading
easier.
3XOODERXWFPµRIWKUHDGWKURXJKQHHGOHH\HWR
hang free.
• Place the thread to the back, under the presser foot.

4
5
6
7
8
9
1
3
9
2
1
2
Threading 17
Threading the chainstitch needle
(blue, D on needle clamp)
• Raise the presser foot to release tension discs.
• Pass the thread from back to front through the thread
guide on the thread stand (1).
• Thread the top cover thread guide by pulling the
thread towards the right until it slips under the guide.
Then pull the thread along the right side of the button
as illustrated (2).
• Lift up the handle and bring the thread under it. While
holding the thread with both hands, pass it between
the tension discs and pull it down to make certain it is
properly placed between the tension discs (3).
• Continue to thread points (4-8).
6OLSWKHWKUHDGLQWRWKHPLGGOHVORWRQWKHWKUHDGJXLGH
(5) and into the slot on the take-up lever cover (6). Then
slip the thread into the middle slot on the thread guides
(7) and (8).
• Before threading the eye of the needle, make sure the
thread is in front of the thread guide located on the
bottom of the needle clamp.
• Thread the eye of the needle (9). Use the needle
threader (see page 21) to make the threading easier.
• 3XOODERXWFPµRIWKUHDGWKURXJKQHHGOHH\HWR
hang free.
• Place the thread to the back, under the presser foot.

11
2
3
4
5
6
7
8
9
9
2
Threading18
Threading the coverstitch needles
1RWH7KUHDGWKHQHHGOHVLQWRIROORZLQJRUGHUULJKW(PLGGOH
'OHIW&
Threading the right coverstitch needle
(red, E on the needle clamp)
• Raise the presser foot to release tension discs.
• Pass the thread from back to front through the thread
guide on the thread stand (1).
• Thread the top cover thread guide by pulling the
thread towards the right until it slips under the guide.
Then pull the thread along the right side of the button
as illustrated (2).
• Lift up the handle and bring the thread under it. While
holding the thread with both hands, pass it between
the tension discs and pull it down to make certain it is
properly placed between the tension discs (3).
• Continue to thread points (4-8).
6OLSWKUHDGLQWRWKHUHDUVORWRQWKHWKUHDGJXLGHDQG
into the slot on the take-up lever cover (6). Then slip
the thread into the right slot on the thread guides (7)
and (8).
• Before threading the eye of the needle, make sure the
thread is in front of the thread guide located on the
bottom of the needle clamp for coverstitch.
• Thread the eye of the needle (9). Use the needle
threader (see page 21) to make the threading easier.
• 3XOODERXWFPµRIWKUHDGWKURXJKQHHGOHH\HWR
hang free.
• Place the thread to the back, under the presser foot.

1
4
5
6
7
8
9
9
2
1
2
3
Threading 19
Threading the middle coverstitch/chainstitch
needle (green, D on the needle clamp)
• Raise the presser foot to release tension discs.
• Pass the thread from back to front through the thread
guide on the thread stand (1).
• Thread the top cover thread guide by pulling the
thread towards the right until it slips under the guide.
Then pull the thread along the right side of the button
as illustrated (2).
• Lift up the handle and bring the thread under it. While
holding the thread with both hands, pass it between
the tension discs and pull it down to make certain it is
properly placed between the tension discs (3).
• Continue to thread points (4-8).
6OLSWKHWKUHDGLQWRWKHPLGGOHVORWRQWKHWKUHDGJXLGH
(5) and into the slot on the take-up lever cover (6). Then
slip the thread into the middle slot on the thread guides
(7) and (8).
• Before threading the eye of the needle, make sure the
thread is in front of the thread guide located on the
bottom of the needle clamp for coverstitch and for
chainstitch.
• Thread the eye of the needle (9). Use the needle
threader (see page 21) to make the threading easier.
• 3XOODERXWFPµRIWKUHDGWKURXJKQHHGOHH\HWR
hang free.
• Place the thread to the back, under the presser foot.

4
5
6
7
8
9
1
9
2
1
2
3
Threading20
Threading the coverstitch left needle
(blue, C on the needle clamp)
• Raise the presser foot to release tension discs.
• Pass the thread from back to front through the thread
guide on the thread stand (1).
• Thread the top cover thread guide by pulling the
thread towards the right until it slips under the guide.
Then pull the thread along the right side of the button
as illustrated (2).
• Lift up the handle and bring the thread under it. While
holding the thread with both hands, pass it between
the tension discs and pull it down to make certain it is
properly placed between the tension discs (3).
• Continue to thread points (4-8).
6OLSWKHWKUHDGLQWRWKHIURQWVORWRQWKHWKUHDGJXLGH
(5) and the slot on the take-up lever cover (6). Then slip
the thread into the left slot on the thread guides (7) and
(8).
• Before threading the eye of the needle, make sure the
thread is in front of the thread guide located on the
bottom of the needle clamp.
• Thread the eye of the needle (9). Use the needle
threader (see page 21) to make the threading easier.
• 3XOODERXWFPµRIWKUHDGWKURXJKQHHGOHH\HWR
hang free.
• Place the thread to the back, under the presser foot.
Other manuals for COVERLOCK 3.0 -
3
Table of contents
Other Pfaff Sewing Machine manuals

Pfaff
Pfaff Cover style 4850 User manual

Pfaff
Pfaff 1245 User manual

Pfaff
Pfaff POWERLINE 3741 User manual

Pfaff
Pfaff fashion User manual

Pfaff
Pfaff 3588-04/020 User manual

Pfaff
Pfaff creative EMBELLISHMENT ATTACHMENT User manual

Pfaff
Pfaff 5480 series User manual

Pfaff
Pfaff Hobby 521 User manual

Pfaff
Pfaff Creative Vision User manual

Pfaff
Pfaff 9 User manual

Pfaff
Pfaff Smart 200c User manual

Pfaff
Pfaff Select 3.0 User manual

Pfaff
Pfaff Sewing Machine User manual

Pfaff
Pfaff 8303-040 User manual

Pfaff
Pfaff 1293 Guide

Pfaff
Pfaff 335 User manual

Pfaff
Pfaff COVERLOCK 4.0 - User manual

Pfaff
Pfaff ClassicStyle 1525 User manual

Pfaff
Pfaff 360 User manual

Pfaff
Pfaff 60 User manual