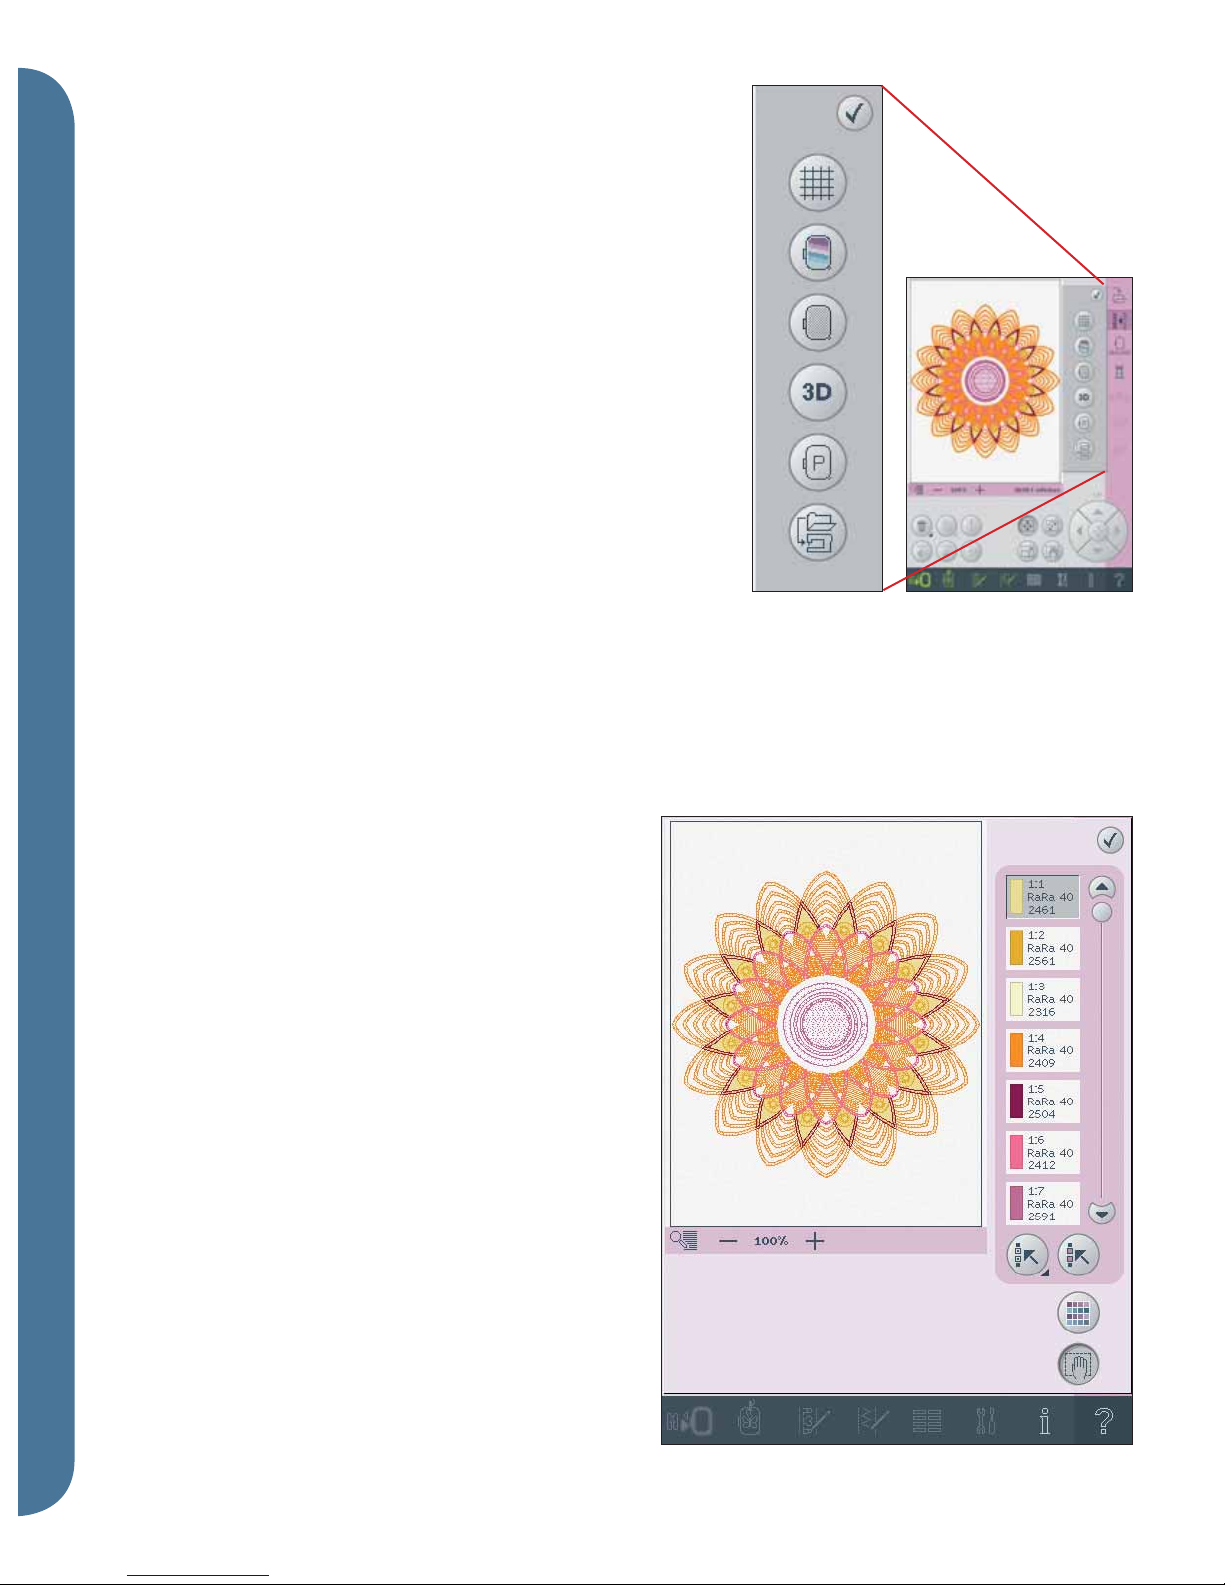
Pfaff Creative Vision User manual

creative vision™
All information and instructions on new functions
are in this booklet, which complements your
Owner’s manual. The numbered headlines refer to
the corresponding chapter in the Owner´s manual.

1 Introduction
New stitches
4.8 Decorative stitches - Borders 5.1 Maxi stitches - Stippling stitches
5.2 Maxi stitches - Leaves and Áowers 5.3 Maxi stitches - Art stitches
5.4 Maxi stitches - Fun stitches 6.2 Sewing techniques - Specialty feet stitches
Alphabets
Grand

E
A
B
C
D
2 Preparations
How to update your machine
Update via USB embroidery stick
This new software version makes it possible to
update your machine using the USB embroidery
stick and there is no need to connect your machine
to the computer.
Updating instructions
• Go to the PFAFF® web site at www.pfaff.com
to Ànd information about available updates.
• Follow the update wizard to prepare your USB
embroidery stick for the update.
• While pressing and holding the stitch restart
button and needle up/down button, turn your
machine on to start in update mode. Follow
the instructions on the PFAFF® HD screen to
update.
Note: The designs loaded on your machine will now be
included with the latest version of update, the machines
will no longer be delivered with a design CD.
Visit www.pfaff.com to learn more about how to register
and update your machine. When registering your
machine via Smart Update, you will be notiÀed when a
new update is available.
Threading
When threading, pull the thread into the thread
guide by pulling it from the front to the back (A).
Make sure the thread clicks into place.
Then pull the thread underneath the bobbin thread
guide (B) on the pre-tension disc (C).
Winding while threaded
Make sure that the presser foot and the needle
are in the up position. To prevent the needle from
bending, pull the thread out of the needle.
Bring the thread up from the needle thread guide
(D), upward through the left-hand threading slot
and through the bobbin thread guides (E). Then
follow original winding instructions in the Owner’s
manual (page 2:7).

A
3 PFAFF® HD screen
Machine settings
Beading foot (A)
The beading foot setting will make sure that the
tie-off is not made in the center position, where it
might hit a pearl. You will Ànd beading stitches in
stitch category 6.2.
Deselect the beading foot setting to go back to
normal sewing.

A
D
C
B
8 Embroidery mode - edit
Load a stitch
It is possible to load previously stored patchwork,
single stitch and tapering programs into
embroidery edit to stitch-out in the hoop.
If the stitch contains tapering, the stitch
combination will be converted to an embroidery
design.
Zoom
Use the + and - icons to zoom in or out in the
embroidery Àeld. Touch the zoom icon (A) to open
a list of zoom options.
Zoom to box (B) lets you decide how much and
where to zoom in the embroidery area. First, select
zoom to box in the pop-up. The zoom icon starts
Áashing, indicating that zoom to box is active. In
the embroidery Àeld on the PFAFF® HD screen,
touch and drag with your stylus to deÀne the
area to be zoomed. Zoom to box will then be
deactivated.
Note: While zoom to box is active the touch functions
are disabled. To deactive zoom to box without making
any selection, touch any of the touch function icons.
How much you can zoom in depends on the selected
hoop.
Zoom to all (C) will show all the designs in the
embroidery combination in the largest view
possible.
Zoom to hoop (D) will adjust the view to show the
selected hoop.
Note: The new zoom functions are available in both
embroidery edit and embroidery stitch-out mode. The
new zoom icons are also available in Stitch Creator.

ED
C
B
A
More options
Background color (A)
Touch the background color icon (A) to change the
active background color in the embroidery Àeld. A
window will appear where you can select from 64
different colors.
Background fabric (B)
Touch the background fabric icon (B) to activate/
deactivate the background fabric. When activated,
a fabric texture will be shown in the embroidery
Àeld. To change the color of the fabric, use the
background color icon (A).
3-dimensional view (C)
Touch the 3-dimensional view icon (C) to turn on
or off a 3-dimensional view of the designs in the
embroidery Àeld.
By default, the designs are displayed in
2-dimensional view in the embroidery Àeld. In
2-dimensional view, the designs load faster on the
screen and it is easier to see the color blocks in the
design. The view setting remains as selected even
when you turn your machine off.
Note: The background color, background fabric and
3-dimensional view icons are also available in more
options in embroidery stitch-out mode.
Thread color edit
Multi-select (D) and select equal (E)
If you want to change more than one color block
at a time, use the multi-select icon (D). Touch the
multi-select icon to activate the function, then
touch the color blocks you want to select. Long
touch the multi-select icon (D) to select all color
blocks in the color list. To deselect a color block,
touch it in the list. Touch the multi-select icon
again to deactivate the multi-select function.
Use the select equal icon (E) to automatically select
all color blocks with the identical thread color(s)
and the currently selected color block(s). When
the select equal icon is used and more than one
color block is selected, multi-select is automatically
activated.
The selected color block(s) will be highlighted in
the embroidery Àeld.

A
BC
HGF
ED
J
I
L
K
Shaping
Shaping is a unique way to use your beautiful 9mm
stitches, sequences or even embroidery designs to
form new shapes.
The creative vision™ 5.5 version contains a number
of new shaping functions for more creative
possibilities with shapes.
Shaping overview
A Select shape
B Zoom
C Delete/Duplicate last object
D Select control points
E Select spacing
F Select line positioning
G Select side positioning
H Select design angle
I Control points
J Baseline
Select shape (A)
Select a shape by touching it in the list (A).
The stitches or designs will be placed along the
baseline in the order that they were loaded into
embroidery edit. The stitches or designs will follow
the line in the direction indicated by a small arrow
in the icons in the select shape list.
Delete/Duplicate last object (C)
If you want to delete the last object in the shape,
touch the - icon. Only the last object in the shape
will be deleted.
If you want to add a copy of the last object, use
the + icon. The last object in the shape will be
duplicated and the copy will be added after the last
object on the baseline.
DeÀnition of a control point
A control point is a point affecting the selected
shape. Each shape is built by several control points.
Together they deÀne what the shape will look like.
A selected control point is marked with a Àlled
square (K). An unselected control point is marked
with an outlined square (L). All control points are
visible when you are editing the points.
By adjusting the control points, the selected shape
can be changed with unlimited possibilites.

F
D
E
Select control points (D)
Touch the select control points icon (D) to open a
pop-up. For each shape, there are pre-deÀned sets
of control points. Select all or some of the control
points.
When you have selected a set of control points, you
can make adjustments to the shape. Use the touch
functions or your stylus to move, rotate and scale
your selected control points. The adjustments made
will only affect the selected control points.
Use the slider to increase or decrease the attraction
percentage of the selected control points. The
higher the attraction percentage, the closer the
baseline will be to the selected control points.
Select spacing (E)
Touch the select spacing icon (E) to open a pop-up.
The default setting spaces the objects evenly along
the baseline (placing the same distance between
each).
You can choose left or right justiÀcation on the
baseline. The gap between the objects can be
increased or decreased by using the slider. The
actual gap is shown above the slider in the pop-up.
Select line positioning (F)
Touch the select shape line positioning icon (F) to
open a pop-up. You can choose to place the objects
on the top of the baseline, or on the baseline or
under the baseline. The selected positioning will
affect all objects on the shape.

H
G
Select side positioning (G)
Select which side of the objects that shall be
positioned on the baseline. Touch the select side
positioning icon (G) to open a pop-up. You can
choose to place the bottom, top, right or left side of
the objects along the baseline. The selected setting
will affect all objects on the actual shape.
Select design angle (H)
Decide how to align the objects on the baseline.
Touch the select design angle icon (H) to toggle
between objects placed parallel to the baseline or
to keep the current angle. The setting affects all
objects on the shape.
Embroidery edit pop-ups
Exceeded maximum number of stitches
The design combination you are trying to
make contains too many stitches. Your design
combination can have up to approximately 500.000
stitches.
Embroidery combination is too complex
This pop-up message appears for one of the
following reasons:
• The design combination contains too many
color blocks.
• There are too many designs in the combination.
• One or more designs have been grouped and
re-grouped too many times.

A
B
C
D
9 Embroidery mode - stitch out
Basting
Basting enables you to secure your fabric to a
stabilizer placed beneath it. It is especially useful
when the fabric to be embroidered cannot be
hooped. Basting provides support for stretchy
fabrics.
Touch the basting icon (A) to activate basting.
Long touch the icon to open a window to select to
add the basting stitch around the design area and/
or around the hoop area.
Select baste around design and the machine
will add a basting stitch around the design area,
outlining the area where the design will be placed
on the fabric. Select baste around hoop area to add
a basting stitch close to the inner edge of the hoop.
The baste stitches will be added as the Àrst separate
color block(s) at the beginning of the in the color
list (B). You can step stitch by stitch and step in and
out of the baste color block(s).
Note: Basting can only be enabled while on the Àrst
stitch in the embroidery.
Precise positioning
Zoom to needle (C)
Precise positioning is easy to use with the new
zoom to needle option. Touch the zoom to needle
icon (C) to pan to the current needle position and
zoom in as much as possible on the screen. You can
position the locking and matching point exactly
where you want them.
Disable needle warning (D)
Check allow lower needle icon (D) to temporarily
allow the needle to be in a lower position while
moving the hoop. The needle can then remain close
to the fabric when using precise positioning. Just
make sure the needle is above the fabric to prevent
damage to the needle and fabric.
Note: The warning cannot be disabled when the needle is
below the stitch plate.

A
B
C
10 Files & Folders
File formats
Your machine can load the following Àle formats:
• .SHV, .DHV, .VP3, .VIP, .HUS, .PEC, .PES,
.PCS, .XXX, .SEW, .JEF, .EXP, .10* and .DST
(embroidery Àles)
• .SPX (stitch Àles)
• .SFX (stitch font Àles)
• .VF3 (embroidery font Àles)
• .TXT and .HTM/HTML-Àles
Browse Files & Folders
List view (A)
Touch the list view icon (A) to show the Àles in the
current folder listed in alphabetical order. Each Àle,
Àle name and type will be displayed. Touch the list
view icon again to switch back to thumbnail view.
To open a folder in Files & Folders, long touch the
folder. The content of the folder will be displayed
in the center window.
To load a Àle, touch load (B) or long touch the Àle.
Delete (C)
To delete a Àle or folder, select it and touch delete
(C). A pop-up asks you to conÀrm the deletion.
If a folder is deleted, all Àles within the folder are
deleted as well.
To delete all Àles and folders in the current folder,
long touch the delete button.

413 24 60-26A • English • InHouse • PFAFF, CREATIVE and CREATIVE VISION are registered trademarks or trademarks of VSM Group AB. © 2009 VSM Group AB • All rights reserved •
Printed in Sweden on environmentally-friendly paper
Other manuals for Creative Vision
12
Table of contents
Other Pfaff Sewing Machine manuals

Pfaff
Pfaff varimatic 6085 User manual

Pfaff
Pfaff 487 User manual

Pfaff
Pfaff 3822-1/22 User manual

Pfaff
Pfaff CREATIVE 2170 PREPARATIONS User manual

Pfaff
Pfaff 94 User manual

Pfaff
Pfaff Coverstyle User manual

Pfaff
Pfaff admire 1000 User manual

Pfaff
Pfaff C1100 Pro User manual

Pfaff
Pfaff Ambition line User manual

Pfaff
Pfaff Hobbylock 784 User manual

Pfaff
Pfaff Powerline 2545 User manual

Pfaff
Pfaff Creative 7530 User manual

Pfaff
Pfaff 433 User manual

Pfaff
Pfaff 335 User manual

Pfaff
Pfaff 9371-SPS User manual

Pfaff
Pfaff dorina 72 User manual

Pfaff
Pfaff STITCH CREATOR User manual

Pfaff
Pfaff select 2.0 User manual

Pfaff
Pfaff 481 User manual

Pfaff
Pfaff 3811-3/55 User manual