manuals.online logo
Brands
  1. Home
  2. •
  3. Brands
  4. •
  5. Pfister
  6. •
  7. Plumbing Product
  8. •
  9. Pfister McAllen RT6-5MCA User manual

Pfister McAllen RT6-5MCA User manual

Installation Support • Soporte de Instalación • Support d’Installation
Personal Assistance, Product Specs, &
“How-to” Questions:
Asistencia personal, especificaciones del
producto y preguntas sobre “cómo hacerlo”:
Aide personnelle, spécifications du produit
et questions « pratico-pratiques » :
1800PFAUCET (7328238)
pisterfaucets.com/support
Installation Videos Available
Videos de instalación a disposición
Vidéos d’installation disponibles
pisterfaucets.com/videos
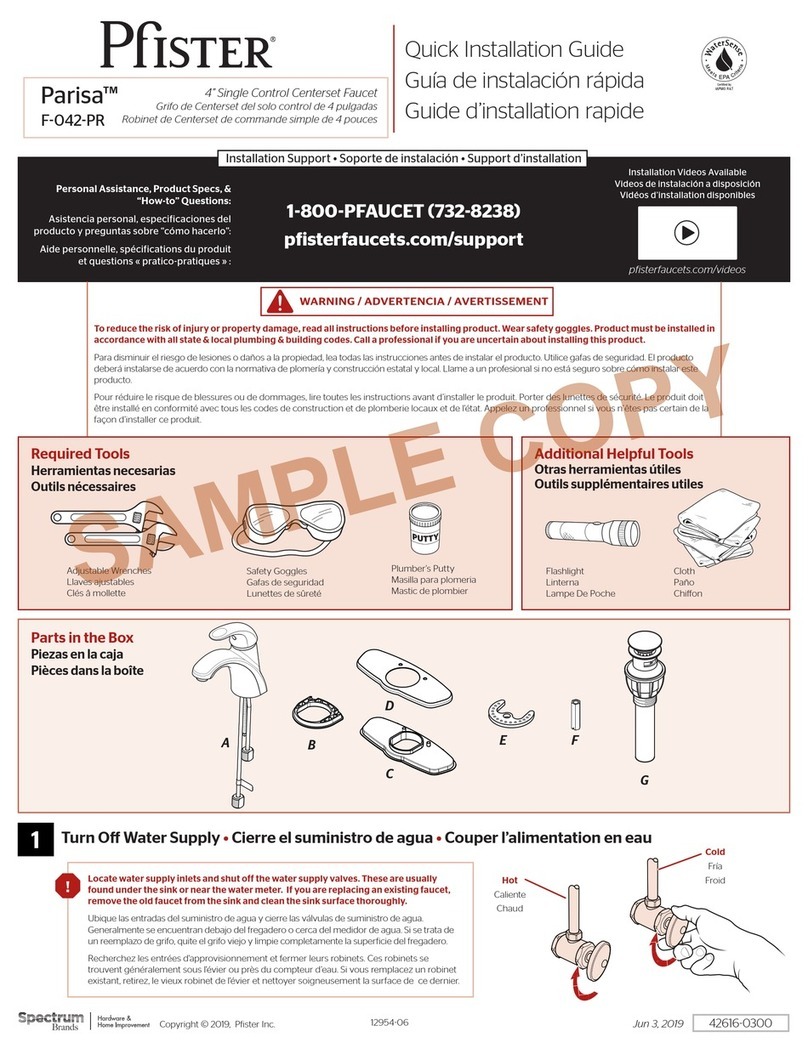
Required Tools
Herramientas necesarias
Outils nécessaires
Additional Helpful Tools
Otras herramientas útiles
Outils supplémentaires utiles
Parts in the Box
Piezas en la caja
Pièces dans la boîte
To reduce the risk of injury or property damage, read all instructions before installing product. Wear safety goggles. Product must be installed in
accordance with all state & local plumbing & building codes. Call a professional if you are uncertain about installing this product.
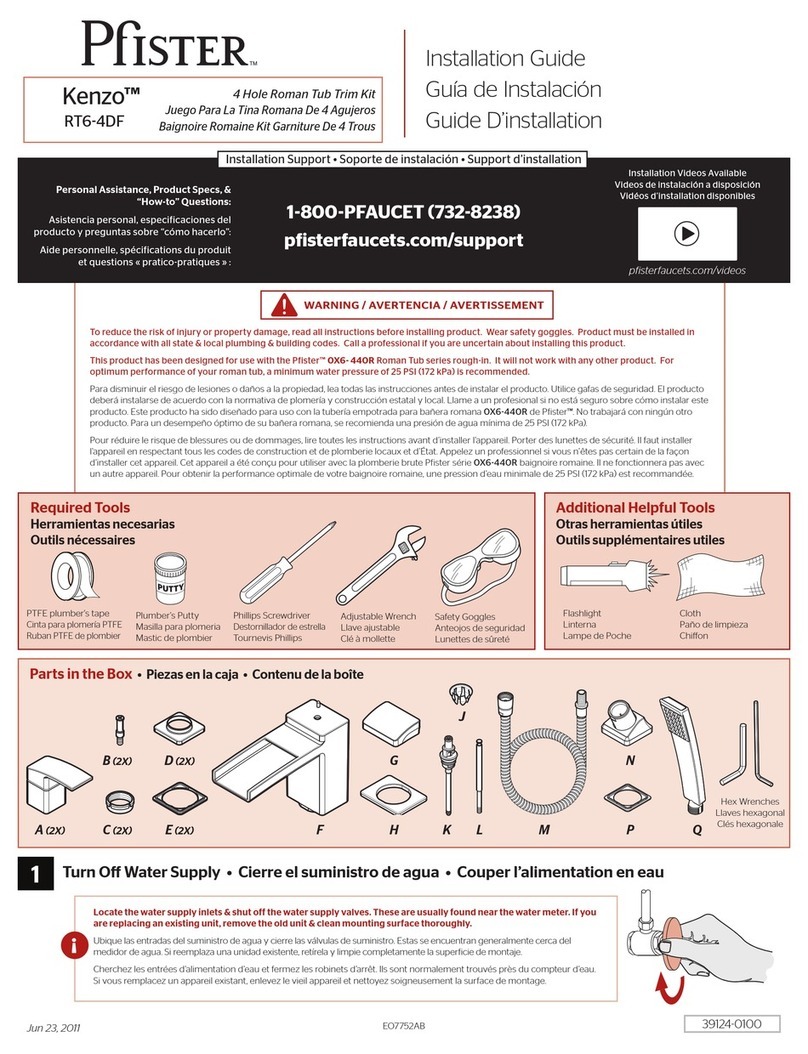
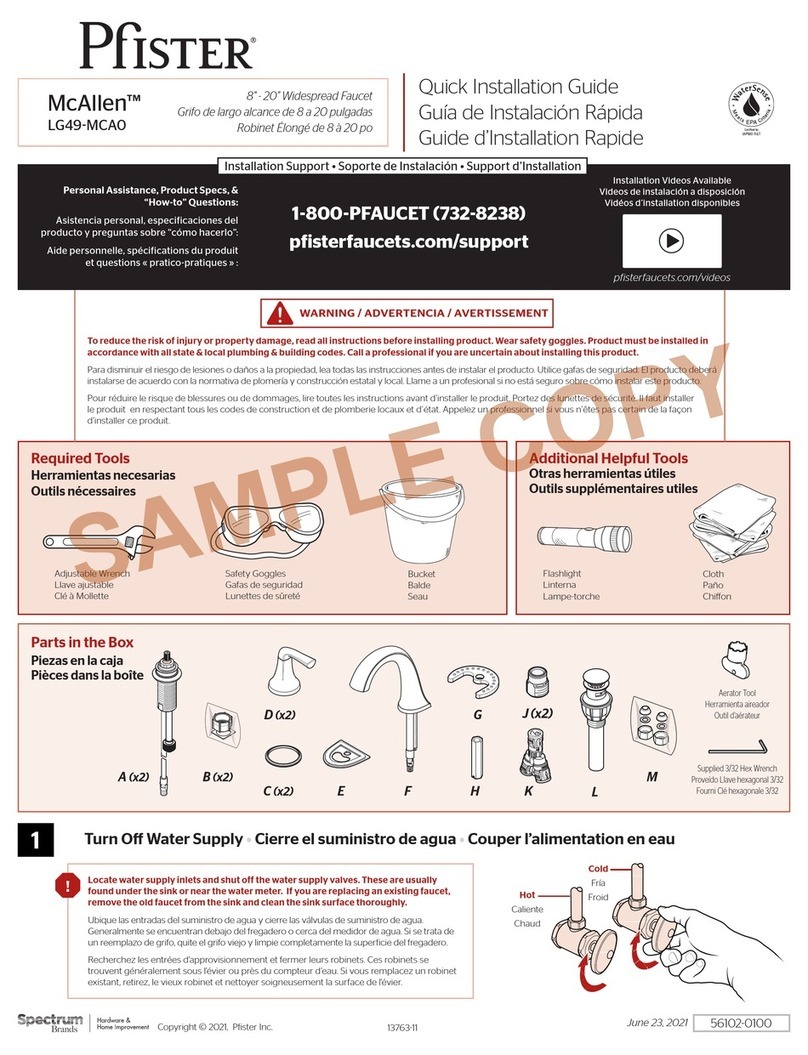
This product has been designed for use with the Pister™ 0X605 or 0X615 Roman Tub series rough-in. It will not work with any other product. For
optimum performance of your roman tub, a minimum water pressure of 25 PSI (172 kPa) is recommended.
Para disminuir el riesgo de lesiones o daños a la propiedad, lea todas las instrucciones antes de instalar el producto. Utilice gafas de seguridad. El producto
deberá instalarse de acuerdo con la normativa de plomería y construcción estatal y local. Llame a un profesional si no está seguro sobre cómo instalar este
producto. Este producto ha sido diseñado para uso con la tubería empotrada para bañera romana 0X605 o 0X615 de Pister™. No trabajará con ningún otro
producto. Para un desempeño óptimo de su bañera romana, se recomienda una presión de agua mínima de 25 PSI (172 kPa).
Pour réduire le risque de blessures ou de dommages, lire toutes les instructions avant d’installer l’appareil. Porter des lunettes de sécurité. Il faut installer
l’appareil en respectant tous les codes de construction et de plomberie locaux et d’État. Appelez un professionnel si vous n’êtes pas certain de la façon
d’installer cet appareil. Cet appareil a été conçu pour utiliser avec la plomberie brute Pister série 0X605 ou 0X615 baignoire romaine. Il ne fonctionnera pas
avec un autre appareil. Pour obtenir la performance optimale de votre baignoire romaine, une pression d’eau minimale de 25 PSI (172 kPa) est recommandée.
WARNING / AVERTENCIA / AVERTISSEMENT
Turn O Water Supply •Cierre el suministro de agua •Couper l’alimentation en eau
1
Safety Goggles
Gafas de seguridad
Lunettes de sûreté
Adjustable Wrench
Llave ajustable
Clé réglable
Flashlight
Linterna
Lampe-torche
Cloth
Paño de limpieza
Chion
Hacksaw
Sierra Para Metales
Scie à Métaux
B (x2) C (x2)A E
559250100
Hex Wrench
Llave hexagonal
Clé hexagonale
D (x2)
3-Hole Roman Tub Trim
Borde para bañera romana con 3 agujeros
Garniture de baignoire romaine avec 3 trous
Quick Installation Guide
Guía de Instalación Rápida
Guide d’Installation Rapide
August 9, 2021
Copyright © 2021, Pister Inc. 1376325
Plumber’s Putty
Masilla para plomeria
Mastic de plombier
Locate the water supply inlets & shut o the water supply valves. These are usually
found near the water meter. If you are replacing an existing unit, remove the old
unit & clean mounting surface thoroughly.
Ubique las entradas del suministro de agua y cierre las válvulas de suministro. Estas
se encuentran generalmente cerca del medidor de agua. Si reemplaza una unidad
existente, retírela y limpie completamente la supericie de montaje.
Repérez les entrées d’alimentation d’eau et fermez les robinets d’arrêt. Ils sont
normalement trouvés près du compteur d’eau. Si vous remplacez un appareil existant,
enlevez le vieil appareil et nettoyez soigneusement la surface de montage.
McAllen™
RT65MCA
Cold
Fría
Froid
Hot
Caliente
Chaud
SAMPLE COPY
2
Spout Gap Dimensions
Dimensiones del espacio del conducto
Dimensions de espace de bec
Prepare Rough-In & Set Up Stem Rotation
Prepare la tubería empotrada y conigure la rotación del vástago
Préparez la plomberie brute et réglez la rotation
2A 2B
Thin Surface Installation
Instalación de una supericie delgada
Installation sur une surface mince
Stem Rotation Set Up
Determinacion de la rotacion de las espigas
Rotation de la tige
Thick Surface Installation
Instalación de una supericie gruesa
Installation sur une surface épaisse Hot
Caliente
Chaud
Cold
Fría
Froid
Hot
Caliente
Chaud
Cold
Fría
Froid
Option 1 • Opción 1 • Option 1
Option 2 • Opción 2 • Option 2
Pister™Stem Extension Kit 974375 must be used . Sold separately. Trim will not work if
the stem height is less than 5/8" and more than 11/8".
Se debe usar el kit de extensión de vástago Pfister™ 974-375. Se vende por separado. El borde no
funcionará si la altura del vástago es menor que 5/8" y más de 1-1/8".
Le kit d’extension de tige Pister™ 974375 doit être utilisé. Vendu séparément. La garniture ne
fonctionnera pas si la hauteur de la tige est inférieure à 5/8 "et supérieure à 11/8".
Two P  i ster™ 974375 Stem Extension Kits must be used. Sold separately. Trim will
not work if stem is located more than 3/8" below the deck and more than 1/8" over
the deck.
Se deben usar dos kits de extensión de vástago Pfister ™ 974-375. Se vende por separado. El
borde no funcionará si el vástago está ubicado a más de 3/8 "debajo de la plataforma y más
de 1/8" sobre la plataforma.
Deux kits d’extension de tige Pister™ 974375 doivent être utilisés. Vendu séparément.
La garniture ne fonctionnera pas si la tige est située à plus de 3/8" sous le pont et à plus
de 1/8" du pont.
Stem Stop can be inserted into Stem in either of two ways, depending on
the rotation you want to have for your handles.
El tope de la espiga puede ser insertado en la espiga en dos posiciones,
dependiendo de la rotación que se quiera tener en los puños.
L’Arrêt De La Tige peut être introduit dans la tige de deux façons, selon la
rotation que l’on veut obtenir pour les leviers.
Stem Stop
Tope del vástago
Arrêt de la tige
Stem Stop
Tope del vástago
Arrêt de la tige
Stem
Vástago
Tige
Stem
Vástago
Tige
153⁄ 64 -21⁄ 32"
(4659 mm)
15/8"
11⁄ 32 "
(34 mm) Max
1/8" above to
3/8" under
Thick Surface Installation
Instalación de una supericie gruesa
Installation sur une surface épaisse
2
5/8" to 11/8"
8-1/2
[215.7]
3
3A 3B
3
Hex Wrench
Llave hexagonal
Clé hexagonale
Plumber’s Putty
Masilla para plomeria
Mastic de plombier
Adjustable Wrench
Llave ajustable
Clé réglable
Refer to 0X6/JX6 Installation Instructions for correct placement of valves.
Reiérase a las instrucciones de instalación 0X6/JX6 para la correcta colocación de las válvulas.
Voir les instructions d’installation 0X6/JX6 pour l’emplacement correct des valves.
Apply Plumber’s Putty in
highlighted grooves beneath C
(x2). If installing on marble, no
putty needed.
Aplique masilla de
plomero en los surcos
destacados debajo
de C (x2). Si instala en
mármol, no es necesario
aplicar masilla.
Appliquez le mastic de plombier
dans les rainures soulignées
sous C (x2). Le mastic n’est pas
nécessaire si vous installez sur
du marbre.
Use Hex Wrench to tighten set screw behind A.
Utilice una llave hexagonal para apretar lo tornillo de ijación detrás de A.
Utilisez une clef hexagonale pour serrer le vis derrière A.
Install Handles & Spout
Instale las manijas y el surtidor
Installez las poignées et le bec
C (x2) E
B (x2)A D (x2)
A
E
B
C
D
Flush the Faucet
Enjuague el grifo
Vidanger l’robinet
5
5A
Allow full hot & full cold water to run for at
least 15 seconds each.
Deje correr el agua caliente y fría durante al menos
15 segundos cada una.
Permettez à l'eau chaude et l'eau froide de couler
au moins 15 secondes chacun.
15
sec
Turn On Water & Confirm Proper Installation
Active el suministro de agua y conirme que la instalación está adecuadamente efectuada
Ouvrez l’eau et conirmez que l’installation est adéquate
Hot
Caliente
Chaud
Cold
Fría
Froid
Check for leaks above and below the deck.
Revise si hay fugas encima y debajo de la cubierta.
Assurez-vous qu’il n’y a pas de fuite au dessus ou au dessous du pont.
4
For Additional Installation Help:
Para la instalación adicionales de ayuda:
Pour les aides supplémentaires à l’installation:
1800PFAUCET (7328238)
pisterfaucets.com
SAMPLE COPY

Other Pfister Plumbing Product manuals

Pfister Deckard LG42-DAP User manual

Pfister

Pfister Deckard LG42-DAP User manual

Pfister Avalon 016-CB1 User manual

Pfister

Pfister Avalon 016-CB1 User manual

Pfister Ashfield 42-YP User manual

Pfister

Pfister Ashfield 42-YP User manual

Pfister 807-PF2L User manual

Pfister

Pfister 807-PF2L User manual

Pfister Modern RT6-1MF User manual

Pfister

Pfister Modern RT6-1MF User manual

Pfister Vorena 8P8-VO User manual

Pfister

Pfister Vorena 8P8-VO User manual

Pfister Weller LG42-WR0 User manual

Pfister

Pfister Weller LG42-WR0 User manual

Pfister 015-4WD User manual

Pfister

Pfister 015-4WD User manual

Pfister 0X6-270R User manual

Pfister

Pfister 0X6-270R User manual

Pfister Deckard R89-7DA User manual

Pfister

Pfister Deckard R89-7DA User manual

Pfister JX8-110A User manual

Pfister

Pfister JX8-110A User manual

Pfister Marielle LG532 Series User manual

Pfister

Pfister Marielle LG532 Series User manual

Pfister Arkitek LG42-LPM User manual

Pfister

Pfister Arkitek LG42-LPM User manual

Pfister PARISA LG42 Series User manual

Pfister

Pfister PARISA LG42 Series User manual

Pfister Avalon LG42-CB1 User manual

Pfister

Pfister Avalon LG42-CB1 User manual

Pfister Vorena F534-7VO User manual

Pfister

Pfister Vorena F534-7VO User manual

Pfister Zanna F-529-7ZN3 User manual

Pfister

Pfister Zanna F-529-7ZN3 User manual

Pfister Pfirst Series F529-7PF User manual

Pfister

Pfister Pfirst Series F529-7PF User manual

Pfister Weller LG48-WR0 User manual

Pfister

Pfister Weller LG48-WR0 User manual

Pfister Neera LG529-NEC User manual

Pfister

Pfister Neera LG529-NEC User manual

Pfister Contempra R89-1NC User manual

Pfister

Pfister Contempra R89-1NC User manual

Pfister PARISA LG42 Series User manual

Pfister

Pfister PARISA LG42 Series User manual

Pfister Lita GT533-PF User manual

Pfister

Pfister Lita GT533-PF User manual

Pfister Iyla 016-TR1 User manual

Pfister

Pfister Iyla 016-TR1 User manual

Popular Plumbing Product manuals by other brands

SwedHeat Lumi 1 Assembly instructions

SwedHeat

SwedHeat Lumi 1 Assembly instructions

American Standard PORTSMOUTH 4285.100 installation instructions

American Standard

American Standard PORTSMOUTH 4285.100 installation instructions

jablotron JB-150N-HEAD manual

jablotron

jablotron JB-150N-HEAD manual

Mustee 3739 installation instructions

Mustee

Mustee 3739 installation instructions

PolyJohn PS14 Series Operation & maintenance guide

PolyJohn

PolyJohn PS14 Series Operation & maintenance guide

KWC F5SM2025 Installation and operating instructions

KWC

KWC F5SM2025 Installation and operating instructions

Harvia VARIANT Assembly instructions

Harvia

Harvia VARIANT Assembly instructions

Brizo RSVP 6790 installation instructions

Brizo

Brizo RSVP 6790 installation instructions

METHVEN 01-8222 installation guide

METHVEN

METHVEN 01-8222 installation guide

KWC F4LT2003 Installation and operating instructions

KWC

KWC F4LT2003 Installation and operating instructions

Kalia SKYRIDGE KF1713 Installation instructions / warranty

Kalia

Kalia SKYRIDGE KF1713 Installation instructions / warranty

Calflex CARIMALI 21620-CR Installation

Calflex

Calflex CARIMALI 21620-CR Installation

American Standard YKD063C Installation operation & maintenance

American Standard

American Standard YKD063C Installation operation & maintenance

Viega 8655.11 Instructions for use

Viega

Viega 8655.11 Instructions for use

Helvex Vertika TV-081-S installation guide

Helvex

Helvex Vertika TV-081-S installation guide

Haws 8320 Installation, operation & maintenance instructions

Haws

Haws 8320 Installation, operation & maintenance instructions

DURAVIT C.1 C14220 0000 Instructions for mounting and use

DURAVIT

DURAVIT C.1 C14220 0000 Instructions for mounting and use

Ideal-Standard W3718AA Installation

Ideal-Standard

Ideal-Standard W3718AA Installation

manuals.online logo
manuals.online logoBrands
  • About & Mission
  • Contact us
  • Privacy Policy
  • Terms and Conditions

Copyright 2025 Manuals.Online. All Rights Reserved.