PFX Jet Blaster 900 User manual

Jet Blaster 900
PFX900V Instruction Manual
CAUTION - ATTENTION - VORSICHT
RISK OF ELECTRIC SHOCK- DO NOT OPEN
RISQUE D’ELECTROCUTION - NE PAS OUVRIR
STROMSCHLAGGEFAHR - NICHT OFFNEN
In Compliance with the followin directives: RoHS Directive (2002/95/EU) and
WEEE directive (2002/96/EU)
If this product is no lon er functional or reached the end of its usable life, please
take it to an approved recyclin plant.

User Manual
PFX900V Jet Blaster 900
Dear Customer,
T ank you for purc asing t e Perform FX PFX900V Jet Blaster. Wit decades of experience in design and
production, Perform FX are one of t e leading manufacturers of professional effects and lig ting equipment.
T is fog mac ine as been designed and manufactured to t e ig est of standards, so you can be assured you
ave made a good investment.
For your safety and to ensure you make full use of all t e features available, please make sure you read t is
manual in full.
Important Safety Advice:
• You must read t is manual in full before commencing operation.
• T e mac ine s ould be operated by a responsible and competent adult only.
• Keep t is manual in a safe place for future reference.
• Heed all warnings and instructions, bot in t is manual and on t e product.
• Carry and transport t is product wit care.
• Impact to t is mac ine or dropping may result in serious mec anical failure. T e mac ine s ould not be
used if it as been subjected to suc incident.
• Turn off and unplug t is mac ine from t e mains supply w en not in use.
• T is mac ine is not water-proof and s ould not be used outside.
• In t e event of any liquid entering t e ousing, unplug immediately & contact a qualified engineer.
• You must not attempt to modify t is unit
• T e manufacturer accepts no responsibility for injury or damage caused as a result of not following t e
manual provided.
Protection from Electric Shock:
• Only connect t is unit to a mains socket wit suitable trip and RCD protection.
• To disconnect from t e mains socket, always remove by t e mains plug. Do not attempt to remove by
pulling t e mains cable.
• Disconnect t e unit from t e mains supply before cleaning. Cleaning s ould be carried out wit a soft, dry
clot .
• Do not submerge or expose t is mac ine to any liquid.
• Do not operate near exposed water or in ig umidity.
• C oose a suitable route for mains cables, ensuring trip azards are avoided and t e mains cable is not at
risk of being crus ed.
• Do not open t is unit to service. T ere are no user-serviceable parts inside. Any servicing or repairs s ould
be carried out by a qualified engineer only. Any attempt to service or adapt t is unit will leave your
warranty void and could result in serious malfunction or injury.
Protection from Fire:
• Do not place near sources of eat or ignition.
• Do not cover or block any ventilation oles.
• C eck your AC wall socket will take t e power you are applying to avoid overloading t e mains supply.

Protectin Your Machine From Dama e:
• Always install in a suitable location w ere vibrations to t e unit are avoided.
• C eck t is unit matc es t e mains voltage and frequency before plugging it in to your mains socket.
• In t e event t at any object or liquid enters t e mac ine switc off immediately, remove from mains and
consult a qualified engineer.
• S ould you experience any malfunction or damage to t e mains cable, disconnect from t e mains supply
immediately and consult a qualified engineer.
• All parts s ould be replaced wit genuine spare parts and carried out by a qualified engineer.
• Do not add liquids of any kind, especially flammable liquids to t is mac ine or its intended fluid. Use only
water based fluid, specifically designed for effects mac ines.
• Use ig quality water-based liquid, recommended by your dealer to reduce clogging.
• During operation ensure t ere is sufficient fluid in t e tank. Operating wit out fluid will damage t e pump.
• If your mac ine fails to work disconnect immediately, remove all liquid and return in original packing to
your dealer.
• Always drain t e fluid and water tanks before transporting.
• Follow t e cleaning and maintenance advice in t is manual.
• If your mac ine fails to work, disconnect immediately, remove all liquid and return in original packing to
your dealer.
Dan er of Injury or Burns:
• For operation by adults only, ensure installation is away from t e reac of c ildren.
• Never leave t e mac ine running unattended.
• Avoid all contact wit t e eater.
• Never aim t e nozzle directly at people.
• Use only in a well ventilated area & do not cover t e mac ine vents. In order to guarantee adequate
ventilation, allow a free air space of at least 20cm around all sides of t e mac ine.
• Effects fluids can cause irratation and injury, andle wit care and keep out of t e reac of c ildren. Avoid
contact wit t e eyes and skin, if t is occurs rinse wit warm water. If ingested call a doctor immediately.
Before Use:
Before commencing setup c eck t e mac ine as not been damaged in transit. In t e event t ere is any
damage to t e ousing, cable or internal components contact your dealer immediately.
Contents Includes:
PFX900V
Power Cable
Wireless remote and receiver
Instructions
Specifications:
Code: PFX900V
Mains Supply: 230Vac 50Hz
Power Consumption: 950 Watts
Heat Up Time: 4 min
Liquid Consumption Rate: Approx 230ml/min
Dimensions: 340 x 250 x 130mm
Weig t: 6.5Kg

Features:
• Powerful vertical fog output.
• Vertical blast of around 6m.
• Red, Green and Blue LED colour mixing.
• Six 3 watt tri-LEDs.
• DMX controllable, 5 Control C annels.
• Wireless Remote controllable.
Description:
T e PFX900V is a powerful vertical smoke mac ine t at can be used on t e floor or ung upside down from
trussing.
1. Heater Nozzle: Smoke output, will get very ot do not touc ..
2. Fluid Tank: Fill t e fluid tank wit standard fog liquid, do not spill t e liquid as t is could damage t e
electronics.
3. Eye Bolt: Used to connect safety wire.
4. DMX Input: Female 3 pin to connect from a DMX controller or previous DMX fixture.
5. DMX Output: Male 3 pin to connect to next DMX fixture in t e c ain.
6. Power Switch: To turn t e fogger on and off.
7. Fuse Holder: If t is blows once, replace if t e correct size fuse, if it blows again, t ere may be a problem
wit t e mac ine, seek professional elp from an engineer.
8. Mains Lead: Connect t is to a suitable mains supply (230 Vac).
9. Remote Control: For connection of t e wireless receiver.
10. Menu Button: To browse t e setup menu.
11. Up Button: To adjust setting in t e menu.
12. Down Button: To adjust setting in t e menu
13. Enter Button: Used enter sub menus in t e main menu.
14. RGB LEDs: T ese lig t up w en fog is produced.
❶
❸
⓮
❷
❻
❼
❽
❾❺
❹❿⓫
⓬
⓭

Set Up Menu:
T e setup menu is used to adjust t e different parameters of t e smoke mac ine.
T e MENU button is used to navigate t roug t e menu options.
• Addr:
Press enter, use t e up and down buttons to adjust t e DMX address, t en press enter to save settings.
• rENo:
Wireless control options. Press MENU button until rENo is displayed, press t e ENTER button to enter t is sub menu.
Here you ave 5 settings: CH1, CH2, CH3, CH4, CH5, OFF, use t e up and down buttons to c oose one and
t en press ENTER to save your setting.
• CH5:
By c oosing t is mode t e remote will control 4 different colours w en smoke is being emitted. A= Red,
B=Green, C=Blue, D=Yellow. T is is 4 colour mode.
• CH1,CH2,CH3,CH4:
By selecting one of t ese you can c oose w at button on t e remote activates t e fog mac ine at full output.
T is is 4 zone mode. T is mode is useful w en controlling multiple PFX900V units from one controller.
By selecting CH1 t e mac ine will work from button A, CH2 button from B and so on. T e colour can be set in
t e next menu sub group.
• OFF:
If t is setting is used t e wireless remote as no function.
• CoLo:
T is menu sub group adjusts w at colour is produced w en CH1,CH2,CH3 or CH4 is selected in t e previous
sub menu. Co 0=no colour, Co 1=red, Co 2=green, Co 3=blue, Co 4=red and blue.
Press MENU to enter t is sub menu, press ENTER to enter setup mode, use t e UP and DOWN buttons to
select t e desired colour. Press ENTER to save your settings.
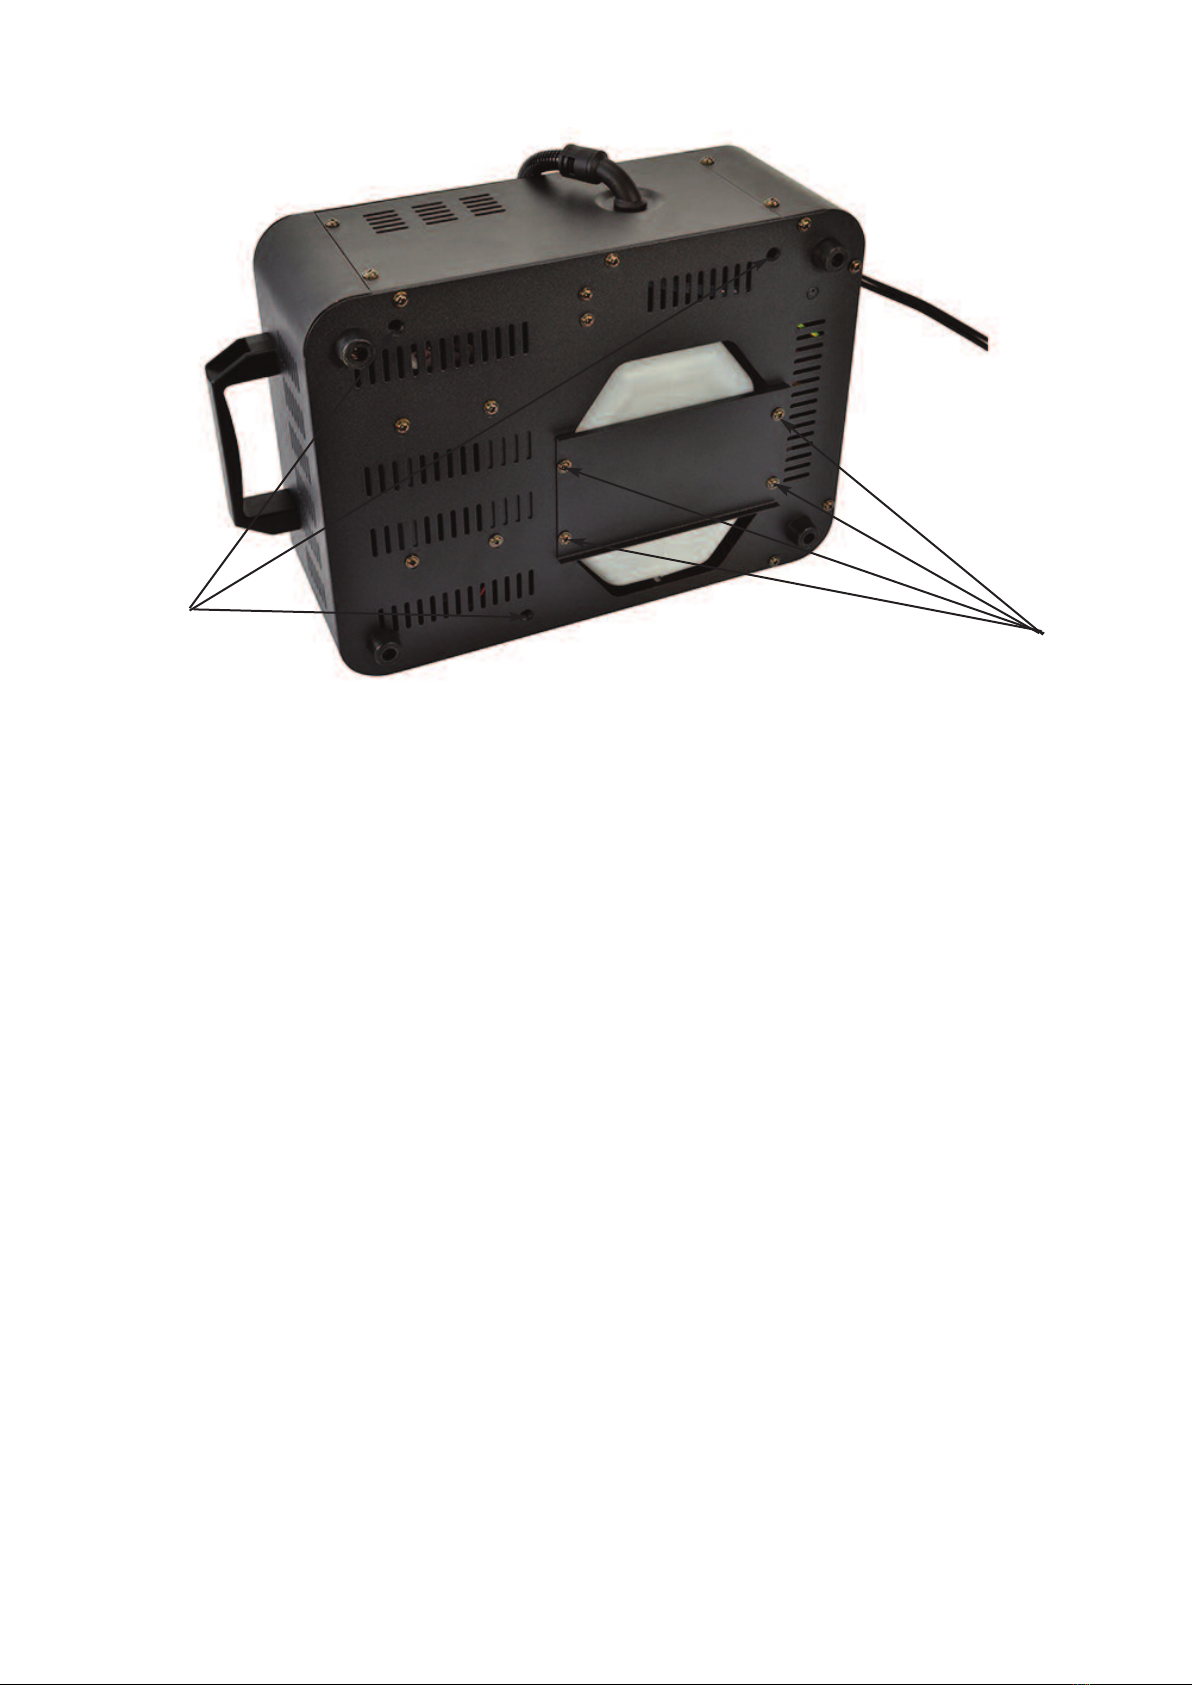
First Time Operation - Panel Controls:
• Before you start using t is unit, please c eck t ere is no transportation damage, s ould t ere be any, please
do not use t e device and contact your dealer immediately.
• T e PFX900V is designed to be used wit water based fog or vapour liquid, NEVER OIL BASED.
• Put t e smoke mac ine on a flat stable surface or ang from a suitable truss and use a safety wire as a
secondary support. Make sure no one can put any body part close to t e eater output
• Unscrew t e Lid on t e fluid bottle, fill up wit a suitable fog liquid, make sure not to over fil. T en screw
t e plastic cap back on. Make sure t e tank never runs dry during operation.
• Connect t e PFX900V to a suitable mains supply.
• T ere is a simple 4 button menu wit LCD display on t e back of t e unit, t e 4 buttons control menu, up,
down and enter.
• W en you first turn on t e smoke mac ine you will need to wait for around 3-5 minutes for t e eater to
warm up. T en you will get access to t e controls. Press t e menu button to scroll t roug options and use
t e up down buttons to make c anges.
First Time Operation with Wireless Remote:
• Before you start using t is unit, please c eck t ere is no transportation damage, s ould t ere be any, please
do not use t e device and contact your dealer immediately.
• T e PFX900V is designed to be used wit water based smoke, fog or vapour liquid.
• Put t e smoke mac ine on a flat stable surface or truss mount following t e instructions in t is manual
carefully. Make sure no one can put any body part close to t e eater output.
• Unscrew t e Lid on t e fluid bottle, fill up wit a suitable fog liquid, do not to overfill. Screw t e plastic cap
back on and ensure t e tank never runs dry during operation.
• Plug t e mains plug into a suitable mains supply and allow t e unit to warm up for around 4 minutes.
• T e wireless remote can be used at a distance of up to 25 metres. You can c oose 2 ways to control,
depending on t e settings you make in t e menu.
• T e wireless remote as 4 buttons, A,B,C,D. Depending t e menu settings t e remote can control 4 colours or 4 zones.

First Time Operation With DMX:
• Before you start using t is unit, please c eck t ere is no transportation damage, s ould t ere be any, please
do not use t e device and contact your dealer immediately.
• T e PFX900V is designed to be used wit water based smoke, fog or vapour liquid.
• Put t e smoke mac ine on a flat stable surface or truss mount following t e instructions in t is manual
carefully. Make sure no one can put any body part close to t e eater output.
• Unscrew t e Lid on t e fluid bottle, fill up wit a suitable fog liquid, do not to overfill. Screw t e plastic cap
back on and ensure t e tank never runs dry during operation.
• Connect a DMX controller to t e DMX input socket. Terminate t e output socket or connect to ot er DMX
fixtures.
• Plug t e mains plug into a suitable mains supply. Allow t e unit to warm up for around 4 minutes
T is unit uses 4 c annels of DMX.
• Set a suitable DMX address via t e digital display.
DMX Channel Layout:
Note: C annels 2, 3 and 4 connect be combined toget er, c annel 3 as priority over 4 and c annel 2 as
priority over 3 and 4.
Overhead Ri in :
T e installation must be carried out by a qualified engineer only. Improper installation can result in injuries or
damage to property. Over ead rigging requires experience, working loads s ould be ad ered to and certified
materials s ould be used. T e installed device s ould be regularly inspected for safety.
• Make sure t e working area is clear from people and obstructions during rigging, de rigging and servicing.
• Locate t e smoke mac ine in a well ventilated area away from flammable materials and liquids. T e smoke
mac ine needs to be 50cm away from surrounding walls and fixtures.
• T e smoke mac ine s ould be installed out of reac of people and not w ere people are seated, walking or standing.
• W en mounting make sure t e installation point can take t e weig t.
• Make sure a safety c ain or wire is always used and can take t e weig t of t e smoke mac ine. T e safety
bond s ould not be used as a primary support.
• T e mac ine s ould be well fixed and free from swinging.
• Do not cover any ventilation oles.
• Disconnect t e power w en t e mac ine is not in use.
• T e operator must make sure t e smoke mac ine as been installed correctly to all t e necessary
guidelines before eac use. T e installation s ould be inspected every 6 mont s.
C annel: Value: Function:
1000-005 NO fog output
006-255 FOG output ON
2
000-005 No Colour
006-085 RED
086-170 GREEN
171-255 BLUE
3
000-005 No Colour
006-085 RED + BLUE
086-170 GREEN + RED
171-255 BLUE + GREEN
4000-005 No Colour
006-085 RANDOM Colour

Flyin The Machine Upside Down
• If you want to ang t e PFX900V upside down t e fog liquid container needs to be moved.
• Remove t e 2 screws older t e top plate of t e fluid container.
• Remove t e cap and tube for t e liquid container.
• Remove t e liquid container.
• Turn t e mac ine upside down.
• Remove t e base plate. (A)
• Turn t e mac ine again to its normal position. Put t e base plate t is side.
• Turn t e mac ine upside down again.
• Install t e liquid container back inside.
• Install t e top plate back on.
• Hang t e smoke mac ine via t e 3 M10 fixing points, eit er wit clamps, eye bolts or stud. (B)
• Make sure you use a safety c ain or wire as a secondary support.
Maintenance:
• Do not allow liquid to become contaminated. Always replace t e cap on t e liquid container immediately
after filling.
• After every 40 ours of operation, or if t e unit is not to be used for one mont , It is recommended to run a
cleaning solution of 20% clear vinegar and 80% distilled water t roug t e system to prevent clogging in t e
eater. T is s ould be carried out in a well-ventilated room.
• Always empty t e fluid and water tanks after every use. Use a dry clot to wipe down t e outside of t e fog
mac ine. Make sure t e power cable is disconnected from t e mains supply.
• Make sure t e mains cable is in impeccable condition and s ould be replaced w en a small defect is
detected.
• All ot er maintenance s ould be carried out by a qualified engineer.
BA

DMX BASICS:
• DMX is s ort for “digital multiplexer”, w ic is a universal protocol designed for t e entertainment industry.
It allows control of intelligent fixtures like scanners, moving eads, LED par cans, dimmer packs & effects
mac ines etc.
• DMX allows you to control many fixture c annels, normally up to 512, wit varying c annels from 0-255 (0-
100%).
• T is will give control of c annels suc as gobo selection, movement, colours, dimming and timing to name
just a few.
• DMX is a very good system, as all t is information can be sent down one cable. Used in conjunction wit a
DMX controller wit memory, all of your c annel settings can be saved and recalled easily.
• DMX was designed so t at all manufacturers can use t e same protocol/language to control t eir fixtures,
allowing t e end user to use any make of fixture from t eir DMX controller as long as bot are DMX
compatible, and t e controller as enoug c annels to control t e fixture t at is attac ed.
• Fixtures ave an input and output DMX socket, allowing you to connect from t e controller to t e first
fixture t en from t at fixture to t e next (t is is often referred to as “daisy c aining”).
• Sockets are normally 3 pin XLR but can be 5 pin XLR.
DMX fixtures need to ave a DMX address set, t is is so t ey can t en decode t e correct information from
t e controller. T is is normally done by a digital display panel, w ere t e address can be c anged by simple
up and down buttons; t e address ranges from 1-512. Alternatively it may be controlled by a row of small
switc es, called dip switc es; on t is type system, t e required address is t en converted to a binary number.
DMX Connector Wirin
3 Pin wiring is more common, but t e 5 pin configuration is often used on larger equipment. Wit t e 5 pin
configuration, not all pins are used, t oug it is wort c ecking t e fixture manual, as some equipment use
t e extra pins for low voltage control. 5 Pin connectors are ideal so t ere is no confusion over mixer leads and
DMX leads in larger rigs. Sending a mixers 48v p antom power down a DMX cable could damage t e DMX
lig t or fixture.
If making cables, always use suitable DMX cable and do not connect pin 1 GND to t e outer casing of t e
connector as you mig t do wit audio cables, as t is may cause erratic be aviour from your fixture.
Do not make “Y” leads to split cables to fixtures; always use t e in and out sockets or a DMX splitter, as again
t is may cause erratic be aviour from your fixture.
We recommend you to plug a DMX terminator into any fixture t at asn’t got a DMX lead connected from t e
output socket to anot er fixture; T is again is to reduce unexpected be aviour. A DMX terminator is simply a
male XLR plug wit 120 o m, ¼ watt resistor soldered across pin 2 & 3.
3 PIN 5 PIN
PIN 1 GND PIN 1 GND
PIN 2 - PIN 2 -
PIN 3 + PIN 3 +
PIN 4 NOT USED
PIN 5 NOT USED

Eac fixture takes up 5 DMX C annels (See Above)
You ave a cable from t e controller to t e first fixture cable, t en from first to second and so on. T e last
lig t t en as a DMX terminator plugged in.
Fixture 1 would be set to DMX address 1
Fixture 2 would be set to DMX address 6
Fixture 3 would be set to DMX address 11
Fixture 4 would be set to DMX address 16
W en setting t ese addresses, ensure t at t e fixture addresses dont overlap. You can set two fixtures to t e
same address as long as t ey ave t e same c annel layout, t ey will t en perform in t e same way.
We recommend you to read manuals for your DMX fixture and controller in full. Some controllers tell you
w at eac fixture address needs to be, and some equipment will need ot er settings c anged before t ey will
work.
This manual suits for next models
1
Table of contents
Other PFX Fog Machine manuals