PFX Vertical Fog 1500 User manual

Vertical Fog 1500
PFX1500V Instruction Manual
CAUTION - ATTENTION - VORSICHT
RISK OF ELECTRIC SHOCK- DO NOT OPEN
RISQUE D’ELECTROCUTION - NE PAS OUVRIR
STROMSCHLAGGEFAHR - NICHT OFFNEN
In Compliance wit t e following directives: RoHS Directive (2002/95/EU) and
WEEE directive (2002/96/EU)
If t is product is no longer functional or reac ed t e end of its usable life, please
take it to an approved recycling plant.

User Manual
PFX1500V
Dear Customer,
Thank you for purchas ng the Perform FX PFXLOWFOG 1500. W th decades of exper ence n des gn and
product on, Perform FX are one of the lead ng manufacturers of profess onal effects and l ght ng equ pment.
Th s fog mach ne has been des gned and manufactured to the h ghest of standards, so you can be assured you
have made a good nvestment.
For your safety and to ensure you make full use of all the features ava lable, please make sure you read th s
manual n full.
Important Safety Advice:
• You must read th s manual n full before commenc ng operat on.
• The mach ne should be operated by a respons ble and competent adult only.
• Keep th s manual n a safe place for future reference.
• Heed all warn ngs and nstruct ons, both n th s manual and on the product.
• Carry and transport th s product w th care.
• Impact to th s mach ne or dropp ng may result n ser ous mechan cal fa lure. The mach ne should not be
used f t has been subjected to such nc dent.
• Turn off and unplug th s mach ne from the ma ns supply when not n use.
• Th s mach ne s not water-proof and should not be used outs de.
• In the event of any l qu d enter ng the hous ng, unplug mmed ately & contact a qual f ed eng neer.
• You must not attempt to mod fy th s un t
• The manufacturer accepts no respons b l ty for njury or damage caused as a result of not follow ng the
manual prov ded.
Protection from Electric S ock:
• Only connect th s un t to a ma ns socket w th su table tr p and RCD protect on.
• To d sconnect from the ma ns socket, always remove by the ma ns plug. Do not attempt to remove by
pull ng the ma ns cable.
• D sconnect the un t from the ma ns supply before clean ng. Clean ng should be carr ed out w th a soft, dry
cloth.
• Do not submerge or expose th s mach ne to any l qu d.
• Do not operate near exposed water or n h gh hum d ty.
• Choose a su table route for ma ns cables, ensur ng tr p hazards are avo ded and the ma ns cable s not at
r sk of be ng crushed.
• Do not open th s un t to serv ce. There are no user-serv ceable parts ns de. Any serv c ng or repa rs should
be carr ed out by a qual f ed eng neer only. Any attempt to serv ce or adapt th s un t w ll leave your
warranty vo d and could result n ser ous malfunct on or njury.
Protection from Fire:
• Do not place near sources of heat or gn t on.
• Do not cover or block any vent lat on holes.
• Check your AC wall socket w ll take the power you are apply ng to avo d overload ng the ma ns supply.
Protecting Your Mac ine From Damage:
• Always nstall n a su table locat on where v brat ons to the un t are avo ded.
• Check th s un t matches the ma ns voltage and frequency before plugg ng t n to your ma ns socket.

• In the event that any object or l qu d enters the mach ne sw tch off mmed ately, remove from ma ns and
consult a qual f ed eng neer.
• Should you exper ence any malfunct on or damage to the ma ns cable, d sconnect from the ma ns supply
mmed ately and consult a qual f ed eng neer.
• All parts should be replaced w th genu ne spare parts and carr ed out by a qual f ed eng neer.
• Do not add l qu ds of any k nd, espec ally flammable l qu ds to th s mach ne or ts ntended flu d. Use only
water based flu d, spec f cally des gned for effects mach nes.
• Use h gh qual ty water-based l qu d, recommended by your dealer to reduce clogg ng.
• Dur ng operat on ensure there s suff c ent flu d n the tank. Operat ng w thout flu d w ll damage the pump.
• If your mach ne fa ls to work d sconnect mmed ately, remove all l qu d and return n or g nal pack ng to
your dealer.
• Always dra n the flu d and water tanks before transport ng.
• Follow the clean ng and ma ntenance adv ce n th s manual.
• If your mach ne fa ls to work, d sconnect mmed ately, remove all l qu d and return n or g nal pack ng to
your dealer.
Danger of Injury or Burns:
• For operat on by adults only, ensure nstallat on s away from the reach of ch ldren.
• Never leave the mach ne runn ng unattended.
• Avo d all contact w th the heater.
• Never a m the nozzle d rectly at people.
• Use only n a well vent lated area & do not cover the mach ne vents. In order to guarantee adequate
vent lat on, allow a free a r space of at least 20cm around all s des of the mach ne.
• Effects flu ds can cause rr tat on and njury, handle w th care and keep out of the reach of ch ldren. Avo d
contact w th the eyes and sk n, f th s occurs r nse w th warm water. If ngested call a doctor mmed ately.
Before Use:
Before commenc ng setup check the mach ne has not been damaged n trans t. In the event there s any
damage to the hous ng, cable or nternal components contact your dealer mmed ately.
Contents Includes:
PFX1500V
Power Cable
W reless remote and rece ver
Instruct ons
Specifications:
Code: PFX1500V
Ma ns Supply: 230 Vac 50Hz
Power Consumpt on: 1500 Watts
Heat Up T me: 4 m n
D mens ons: 490 x 390 x 280mm
We ght: 8.5Kg
Features:
• Powerful vert cal fog output.
• Vert cal blast of around 6 metres.
• Red, Green and Blue LED colour m x ng l ghts.
• S x h gh eff c ency 3 watt tr LEDs.
• DMX controllable, 5 Control Channels.
• W reless Remote Control

Description:
The PFX1500V s a powerful vert cal smoke mach ne that can be used on the floor or hung ups de down from
truss ng.
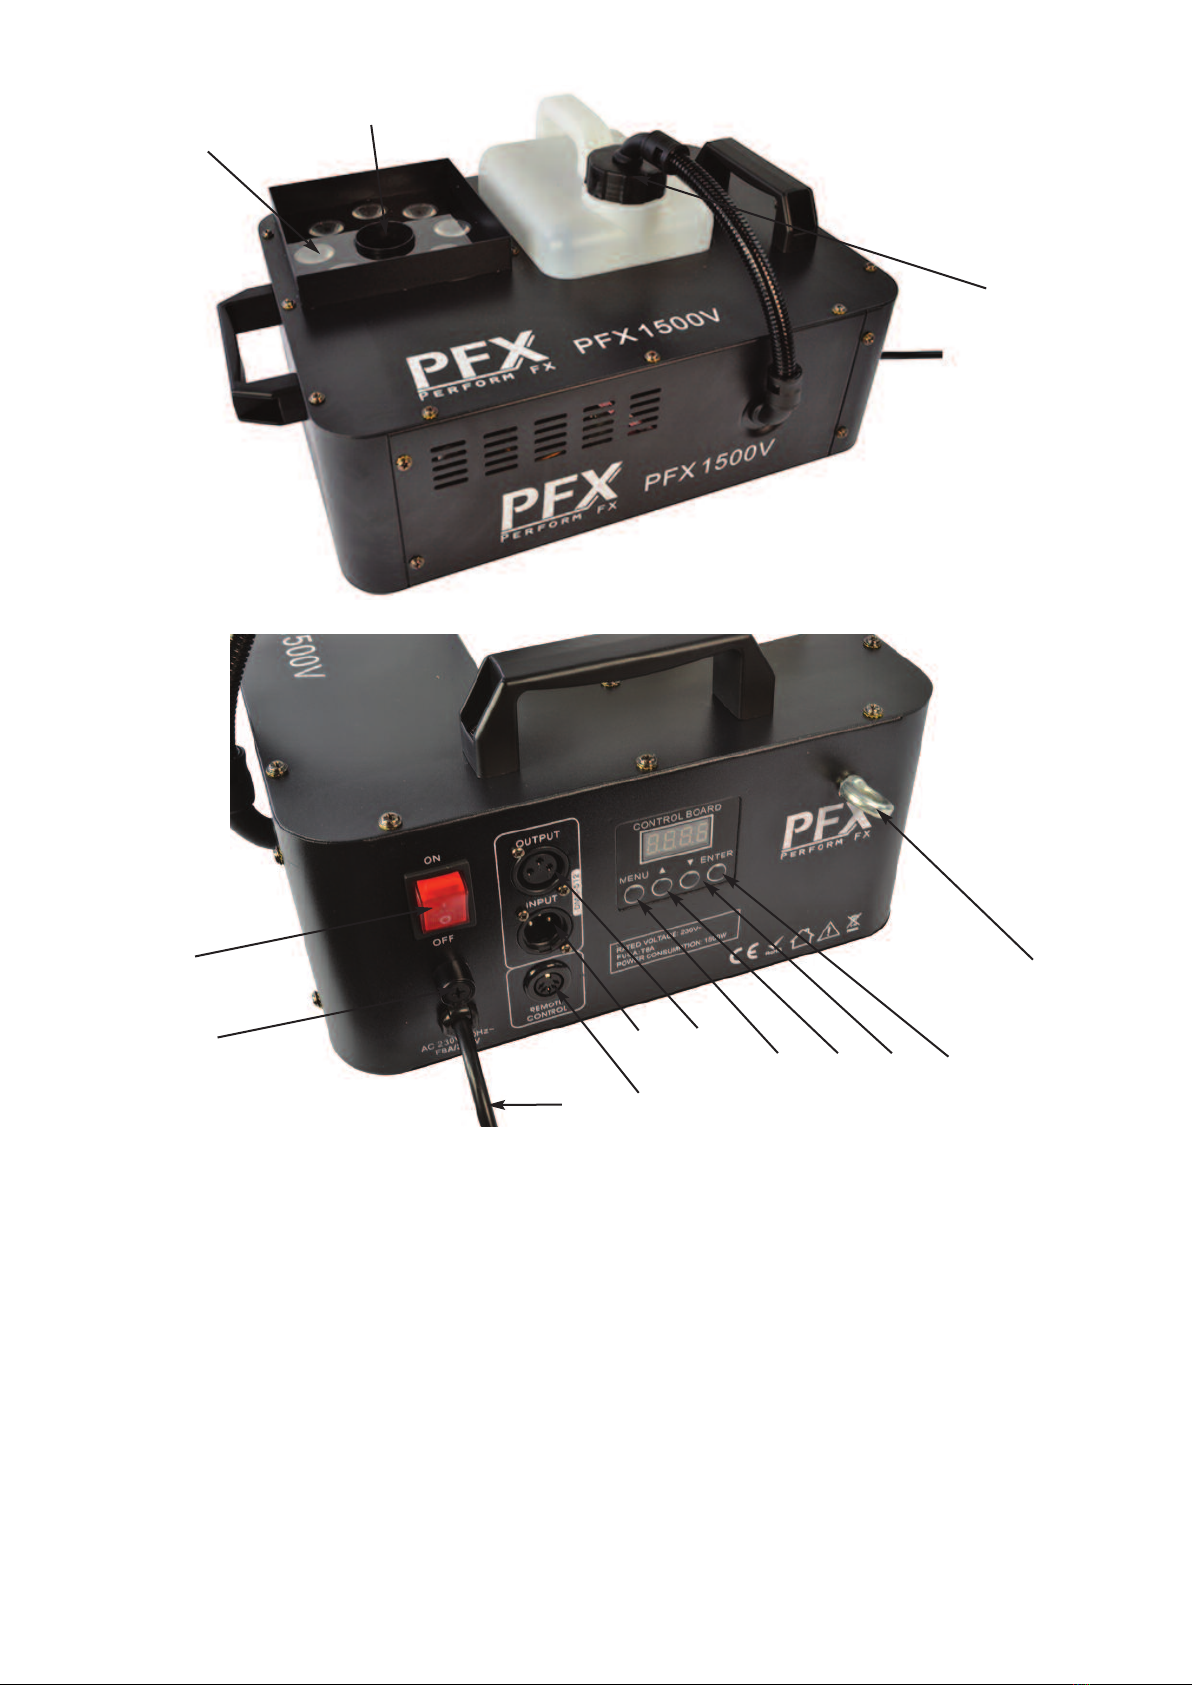
1. Heater Nozzle: Smoke output, w ll get very hot do not touc .
2. Fluid Tank: F ll the flu d tank w th standard fog l qu d, do not sp ll the l qu d as th s could damage the
electron cs.
3. DMX Input: Female 3 p n used to connect from a DMX controller or prev ous DMX f xture
4. DMX Output: Male 3 p n used to connect to next DMX f xture n the cha n.
5. Power Switc : Used to turn the smoke mach ne on and off.
6. Fuse Holder: If th s blows once, replace w th the correct s ze fuse, f t blows aga n, there may be a problem
w th the mach ne, seek profess onal help from an eng neer.
7. Mains Lead: Connect th s to a su table ma ns supply (230Vac).
8. Remote Control: For connect on to the w reless rece ver.
9. Menu Button: For brows ng the setup menu.
10. Up Button: To adjust sett ngs n the menu.
11. Down Button: To adjust sett ngs n the menu
12. Enter Button: Used to enter sub menus n the ma n menu.
13. Eye Bolt: For connect ng to a safety w re or cha n.
14. RGB LEDs: L ght up when fog s em tt ng.
Set Up Menu:
The setup menu s used to adjust the d fferent parameters of the smoke mach ne.
The MENU button s used to nav gate through the menu opt ons.
•Addr:
Press enter, use the up and down buttons to adjust the DMX address, then press enter to save sett ngs.
• rENo:
W reless control opt ons. Press MENU button unt l rENo s d splayed, press the ENTER button to enter th s sub
menu. Here you have 5 sett ngs: CH1, CH2, CH3, CH4, CH5, OFF, use the up and down buttons to choose one
and then press ENTER to save your sett ng.
• CH5:
By choos ng th s mode the remote w ll control 4 d fferent colours when smoke s be ng em tted. A= Red,
B=Green, C=Blue, D=Yellow. Th s s 4 colour mode.
• CH1,CH2,CH3,CH4:
By select ng one of these you can choose what button on the remote act vates the fog mach ne at full output.
Th s s 4 zone mode. Th s mode s useful when controll ng mult ple PFX1500V un ts from one controller.
By select ng CH1 the mach ne w ll work from button A, CH2 button from B and so on. The colour can be set n
the next menu sub group.
• OFF:
If th s sett ng s used the w reless remote has no funct on.
• CoLo:
Th s menu sub group adjusts what colour s produced when CH1,CH2,CH3 or CH4 s selected n the prev ous
sub menu. Co 0=no colour, Co 1=red, Co 2=green, Co 3=blue, Co 4=red and blue.
Press MENU to enter th s sub menu, press ENTER to enter setup mode, use the UP and DOWN buttons to
select the des red colour. Press ENTER to save your sett ngs.
First Time Operation - Panel Controls:
• Before you start us ng th s un t, please check there s no transportat on damage, should there be any, please
do not use the dev ce and contact your dealer mmed ately.
• The PFX1500V s des gned to be used w th water based fog or vapour l qu d. NEVER OIL BASED.
• Put the smoke mach ne on a flat stable surface or hang from a su table truss, make sure you use a safety
w re as a secondary support. Make sure no one can put any body part close to the heater output
• Unscrew the L d on the flu d bottle, f ll up w th a su table fog l qu d, do not to overf ll. Screw the plast c cap
back on and ensure the tank never runs dry dur ng operat on.

❷
❶
⓮
❻
❺
❼❽
❸❹❾❿⓫⓬
⓭
• Connect the PFX1500V to a su table ma ns supply.
There s a s mple 4 button menu w th LCD d splay on the back of the un t, the 4 buttons control menu, up,
down and enter. When you f rst turn on the fog mach ne you w ll need to wa t for around 3-5 m nutes for the
mach ne to warm up, then you w ll get access to the controls.
• Press the menu button to scroll through opt ons and use the up down buttons to make changes.
First Time Operation wit Wireless Remote:
• Before you start us ng th s un t, please check there s no transportat on damage, should there be any, please
do not use the dev ce and contact your dealer mmed ately.
• The PFX1500V s des gned to be used w th water based smoke, fog or vapour l qu d.
• Put the smoke mach ne on a flat stable surface or truss mount follow ng the nstruct ons n th s manual
carefully. Make sure no one can put any body part close to the heater output.
• Unscrew the L d on the flu d bottle, f ll up w th a su table fog l qu d, do not to overf ll. Screw the plast c cap
back on and ensure the tank never runs dry dur ng operat on.
• Plug the ma ns plug nto a su table ma ns supply and allow the un t to warm up for around 4 m nutes.

• The w reless remote can be used at a d stance of up to 25 metres. You can choose 2 ways to control,
depend ng on the sett ngs you make n the menu.
• The w reless remote has 4 buttons, A,B,C,D. Depend ng the menu sett ngs the remote can control 4 colours
or 4 zones.
First Time Operation Wit DMX:
• Before you start us ng th s un t, please check there s no transportat on damage, should there be any, please
do not use the dev ce and contact your dealer mmed ately.
• The PFX1500V s des gned to be used w th water based smoke, fog or vapour l qu d.
• Put the smoke mach ne on a flat stable surface or truss mount follow ng the nstruct ons n th s manual
carefully. Make sure no one can put any body part close to the heater output.
• Unscrew the L d on the flu d bottle, f ll up w th a su table fog l qu d, do not to overf ll. Screw the plast c cap
back on and ensure the tank never runs dry dur ng operat on.
• Connect a DMX controller to the DMX nput socket. Term nate the output socket or connect to other DMX
f xtures.
• Plug the ma ns plug nto a su table ma ns supply. Allow the un t to warm up for around 4 m nutes
Th s un t uses 4 channels of DMX.
• Set a su table DMX address v a the d g tal d splay.
DMX C annel Layout:
There s some useful DMX nfo at the end of th s manual.
Over ead Rigging:
The nstallat on must be carr ed out by a qual f ed eng neer only. Improper nstallat on can result n njur es or
damage to property. Overhead r gg ng requ res exper ence, work ng loads should be adhered to and cert f ed
mater als should be used. The nstalled dev ce should be regularly nspected for safety.
• Make sure the work ng area s clear from people and obstruct ons dur ng r gg ng, de r gg ng and serv c ng.
• Locate the smoke mach ne n a well vent lated area away from flammable mater als and l qu ds. The smoke
mach ne needs to be 50cm away from surround ng walls and f xtures.
• The smoke mach ne should be nstalled out of reach of people and not where people are seated, walk ng or stand ng.
• When mount ng make sure the nstallat on po nt can take the we ght.
• Make sure a safety cha n or w re s always used and can take the we ght of the smoke mach ne. The safety
bond should not be used as a pr mary support.
• The mach ne should be well f xed and free from sw ng ng.
• Do not cover any vent lat on holes.
• D sconnect the power when the mach ne s not n use.
• The operator must make sure the smoke mach ne has been nstalled correctly to all the necessary
gu del nes before each use. The nstallat on should be nspected every 6 months.
Channel: Value: Funct on:
1000-005 NO fog output
006-255 FOG output ON
2
000-005 No Colour
006-085 RED
086-170 GREEN
171-255 BLUE
3
000-005 No Colour
006-085 RED + BLUE
086-170 GREEN + RED
171-255 BLUE + GREEN
4000-005 No Colour
006-085 RANDOM Colour

Flying T e Mac ine Upside Down
• If you want to hang the PFX1500V ups de down the fog l qu d conta ner needs to be moved.
• Remove the 2 screws holder the top plate of the flu d conta ner.
• Remove the cap and tube for the l qu d conta ner.
• Remove the l qu d conta ner.
• Turn the mach ne ups de down.
• Remove the base plate. (A)
• Turn the mach ne aga n to ts normal pos t on. Put the base plate th s s de.
• Turn the mach ne ups de down aga n.
• Install the l qu d conta ner back ns de.
• Install the top plate back on.
• Hang the smoke mach ne v a the 3 M10 f x ng po nts, e ther w th clamps, eye bolts or stud. (B)
• Make sure you use a safety cha n or w re as a secondary support.
Maintenance:
• Do not allow l qu d to become contam nated. Always replace the cap on the l qu d conta ner mmed ately
after f ll ng.
• After every 40 hours of operat on, or f the un t s not to be used for one month, It s recommended to run a
clean ng solut on of 20% clear v negar and 80% d st lled water through the system to prevent clogg ng n the
heater. Th s should be carr ed out n a well-vent lated room.
• Always empty the flu d and water tanks after every use. Use a dry cloth to w pe down the outs de of the fog
mach ne. Make sure the power cable s d sconnected from the ma ns supply.
• Make sure the ma ns cable s n mpeccable cond t on and should be replaced when a small defect s
detected.
• All other ma ntenance should be carr ed out by a qual f ed eng neer
A
B

DMX BASICS:
• DMX s short for “d g tal mult plexer”, wh ch s a un versal protocol des gned for the enterta nment ndustry.
It allows control of ntell gent f xtures l ke scanners, mov ng heads, LED par cans, d mmer packs & effects
mach nes etc.
• DMX allows you to control many f xture channels, normally up to 512, w th vary ng channels from 0-255 (0-
100%).
• Th s w ll g ve control of channels such as gobo select on, movement, colours, d mm ng and t m ng to name
just a few.
• DMX s a very good system, as all th s nformat on can be sent down one cable. Used n conjunct on w th a
DMX controller w th memory, all of your channel sett ngs can be saved and recalled eas ly.
• DMX was des gned so that all manufacturers can use the same protocol/language to control the r f xtures,
allow ng the end user to use any make of f xture from the r DMX controller as long as both are DMX
compat ble, and the controller has enough channels to control the f xture that s attached.
• F xtures have an nput and output DMX socket, allow ng you to connect from the controller to the f rst
f xture then from that f xture to the next (th s s often referred to as “da sy cha n ng”).
• Sockets are normally 3 p n XLR but can be 5 p n XLR.
DMX f xtures need to have a DMX address set, th s s so they can then decode the correct nformat on from
the controller. Th s s normally done by a d g tal d splay panel, where the address can be changed by s mple
up and down buttons; the address ranges from 1-512. Alternat vely t may be controlled by a row of small
sw tches, called d p sw tches; on th s type system, the requ red address s then converted to a b nary number.
DMX Connector Wiring
3 P n w r ng s more common, but the 5 p n conf gurat on s often used on larger equ pment. W th the 5 p n
conf gurat on, not all p ns are used, though t s worth check ng the f xture manual, as some equ pment use
the extra p ns for low voltage control. 5 P n connectors are deal so there s no confus on over m xer leads and
DMX leads n larger r gs. Send ng a m xers 48v phantom power down a DMX cable could damage the DMX
l ght or f xture.
If mak ng cables, always use su table DMX cable and do not connect p n 1 GND to the outer cas ng of the
connector as you m ght do w th aud o cables, as th s may cause errat c behav our from your f xture.
Do not make “Y” leads to spl t cables to f xtures; always use the n and out sockets or a DMX spl tter, as aga n
th s may cause errat c behav our from your f xture.
We recommend you to plug a DMX term nator nto any f xture that hasn’t got a DMX lead connected from the
output socket to another f xture; Th s aga n s to reduce unexpected behav our. A DMX term nator s s mply a
male XLR plug w th 120 ohm, ¼ watt res stor soldered across p n 2 & 3.
3 PIN 5 PIN
PIN 1 GND PIN 1 GND
PIN 2 - PIN 2 -
PIN 3 + PIN 3 +
PIN 4 NOT USED
PIN 5 NOT USED

Each f xture takes up 5 DMX Channels (See Above)
You have a cable from the controller to the f rst f xture cable, then from f rst to second and so on. The last
l ght then has a DMX term nator plugged n.
F xture 1 would be set to DMX address 1
F xture 2 would be set to DMX address 6
F xture 3 would be set to DMX address 11
F xture 4 would be set to DMX address 16
When sett ng these addresses, ensure that the f xture addresses dont overlap. You can set two f xtures to the
same address as long as they have the same channel layout, they w ll then perform n the same way.
We recommend you to read manuals for your DMX f xture and controller n full. Some controllers tell you
what each f xture address needs to be, and some equ pment w ll need other sett ngs changed before they w ll
work.
This manual suits for next models
1
Table of contents
Other PFX Fog Machine manuals