RGB LED szalag - 55843
Use Manual
Getting started, warnings:
1. Before use, make sure that the LED strip and the power cord are undamaged. The LED strip must not be operated
on the plastic drum required for safe transport! The coiled LED strip can be damaged and cause a malfunction!
2. The device is controlled by radio frequency, please do not use it in the immediate vicinity of a signal or high current
magnetic eld.
3. The LED strip part of the device has an IP65 rated, water shielded silicone cover. The power supply may only be
installed indoors (IP20) in a place free of water and moisture. Please keep these ratings in mind when installing the
device! Deviations from this are strictly forbidden!
4. Do not expose the LED strip to direct sunlight, high temperatures, humidity and humidity.
5. Keep out of reach of children! Not a child’s toy!
6. You can shorten the light strip: you can cut every 3 LEDs, look for the lines at the copper connectors along which
cutting is allowed. After cutting, we recommend that you insulate the tape properly. In this case, use caution
during installation and later use. The quality of the factory insulation is damaged, the IP rating changes!
7. Do not use dierent batteries (alkaline, conventional, rechargeable) in the remote control of the device! If you do
not use the device for a long time, please unplug it and remove the batteries from the remote control.
8. In case of failure, it is forbidden to disassemble or modify the device. Have the appliance repaired by a specialist.
9. The manufacturer and distributor are not liable for damage resulting from incorrect installation and operation.
Assembling the device:
1. Connect the cables of the LED strip consisting of 3 colored cables (white, green, red) to the connector of the
control unit consisting of sockets of the same color. When connecting, make sure that the cable sequence is
correct and that the retaining tabs on the connector t properly.
2. The other 2 cables (red and white) from the LED strip are used to connect the auxiliary power supply required for
any LED strip splicing. In the case of a set, it is not necessary to connect these cables.
3. Connect the DC plug of the control unit to the power supply in the box and then to the mains. (middle positive
connector)
LED xing:
1. The power supply should be placed in a well-ventilated area away from direct sunlight, heat, and moisture.
2. The LED strip can only be glued to a well-cleaned, dry, smooth surface.
3. Depending on the surface to be installed, you can use an alcohol wipe for cleaning.
4. Peel o the protective strip on the back of the LED strip. Always pull o only what you glue at once.
Adding more LED strip:
If you have several identical LED strips, it is possible
to control them with one remote control. Connect the
appropriate connectors (3-pin) and, if required, provide
an auxiliary power supply for the LED strip used for
splicing. (Red - Positive, White - Negative). Attention!
Use only a power supply with the same output voltage
and current for splicing! Do not operate on power
supplies with dierent parameters!
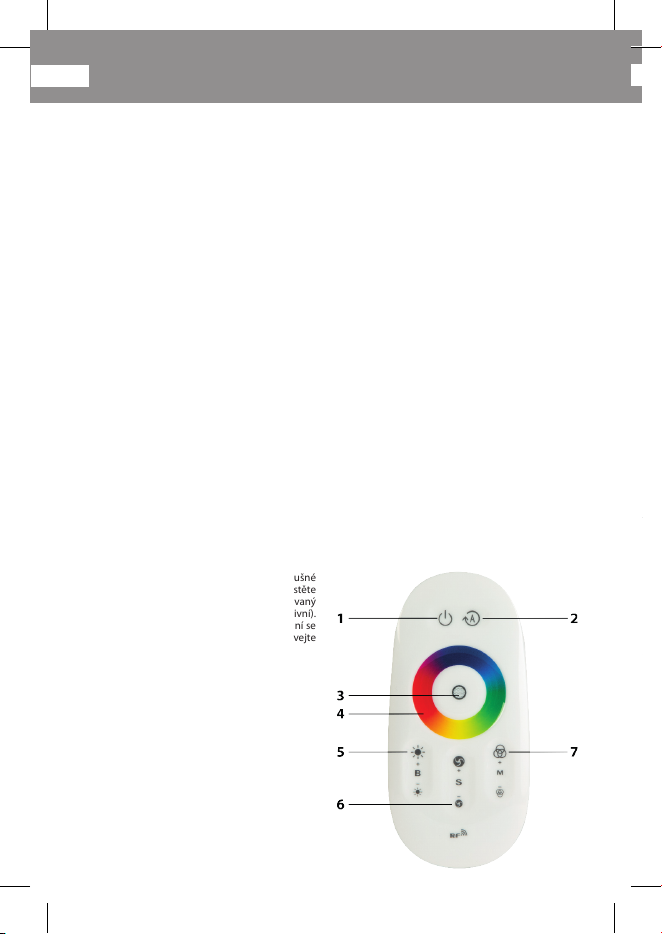
Remote controller:
1. On / o button
2. Pause
3. Color picker ring
4. RX indicator LED
5. Brightness (+ / -)
6. Speed (+ / -)
7. Lighting program mode selector (+ / -)
Használati útmutató
Első lépések, gyelmeztetések:
1. Használat előtt bizonyosodjon meg róla, hogy LED szalag és a tápkábel sértetlen. A LED szalagot a biztonságos
szállításhoz szükséges műanyag dobon tilos üzemeltetni! A feltekert LED szalag károsodhat és hibás működést
eredményezhet!
2. A készülék vezérlése rádiófrekvencián történik, kérjük ne használja jelzajos vagy nagy áramerősség, mágneses
mező közvetlen közelében.
3. A készülék LED szalag része IP65 besorolású, vízsugár ellenvédett szilikon borítással rendelkezik. A tápegység
kizárólag beltéren (IP20), víz és páramentes helyen helyezhető el. Kérjük a készülék telepítésekkor tartsa szem
előtt ezeket a besorolásokat! Ettől eltérni szigorúan tilos!
4. Ne tegye ki a LED szalagot közvetlen napsütésnek, magas hőmérsékletnek, nedvességnek és páratartalomnak!
5. Gyerekektől távol tartandó! Nem gyerekjáték!
6. A fényszalagot lerövidítheti: 3 LED-enként vághatja el, keresse a réz csatlakozóknál elhelyezett vonalakat, amely
mentén engedélyezett a vágás. Vágás után javasoljuk gondoskodjon a szalag megfelelő szigeteléséről. Ilyen
esetben járjon el körültekintően a telepítés és a később használat során! A gyári szigetelés minősége sérül, az IP
besorolás változik!
7. A készülék távirányítójába ne használjon eltérő elemeket (alkáli, hagyományos, újratölthető)! Ha hosszabb ideig
nem használja az eszközt kérjük húzza ki a hálózati csatlakozóját és vegye ki az elemeket a távirányítóból.
8. Meghibásodás esetén tilos az eszközt szétszerelni, módosítani. A készülék javítását bízza szakemberre.
9. A gyártó és forgalmazó a helytelen telepítésből és üzemeltetésből eredő károkért felelősséget nem vállal.
Készülék összeszerelése:
1. A LED szalag 3 kábelből (fehér, zöld, piros) álló csatlakozóját csatlakoztassa a vezérlőegység ugyanilyen színű
kábeleiből álló csatlakozójához. A csatlakozáskor ügyeljen a helyes kábelsorrendre, illetve, hogy a csatlakozó
rögzítő fülei megfelelően illeszkedjenek.
2. A LED szalagból érkező további 2 kábel (piros és fehér) az esetleges LED szalag toldásnál szükséges segéd
tápegység bekötésére szolgálnak. Egy szett esetén ezen kábelek csatlakoztatására nincsen szükség.
3. Csatlakoztassa a vezérlőegység DC csatlakozóját a dobozban található tápegységhez, majd a hálózati
áramforráshoz. (közép pozitív csatlakozó)
LED rögzítése:
1. A tápegységet jól szellőző, közvetlen napfénytől, hőtől és nedvességtől védett helyen kell elhelyezni.
2. A LED szalag felragasztása csak jól megtisztított, száraz, sima felületre lehetséges.
3. A tisztításhoz - a telepítendő felülettől függően - használhat alkoholos kendőt.
4. Húzza le a LED szalag hátoldalán található védőcsíkot. Mindig csak annyit húzzon le, amit azonnal fel is ragaszt.
LED szalag toldása:
HatöbbugyanilyenLEDszalaggalrendelkezik,lehetőség
van ezek egy távirányítóval történő vezérlésére. Dugja
össze a megfelelő (3 lábú) csatlakozókat és igény esetén
lássa el segéd tápegységgel a toldáshoz használt LED
szalagot. (Piros – Pozitív, Fehér – negatív). Figyelem!
A toldáshoz csak ugyanilyen kimenő feszültséggel és
áramerősséggel rendelkező tápegységet használjon!
Tilos eltérő paraméterekkel rendelkező tápegységekről
üzemeltetni!
Távirányító:
1. Be / kikapcsoló gomb
2. Szüneteltetés
3. Színválasztó gyűrű
4. RX visszajelző LED
5. Fényerő (+ / -)
6. Sebesség (+ / -)
7. Fényprogram módválasztó (+ / -)
HU