ENGLISH
Introduction
Congratulations on your purchase and welcome to
Philips AVENT! To fully benet from the support
that Philips offers, register your product at
www.philips.com/welcome
Your new Philips AVENT toddler hair clipper allows
you to give your child a professional haircut in the
comfort of your own home.The ultra-silent motor
and child-safe, lightweight design makes cutting hair
a pain-free, easy experience for you and your child.
The extra-wide blade, contour-following comb,
and preset easy-cut settings help you to create a
smooth, even cut, every time.
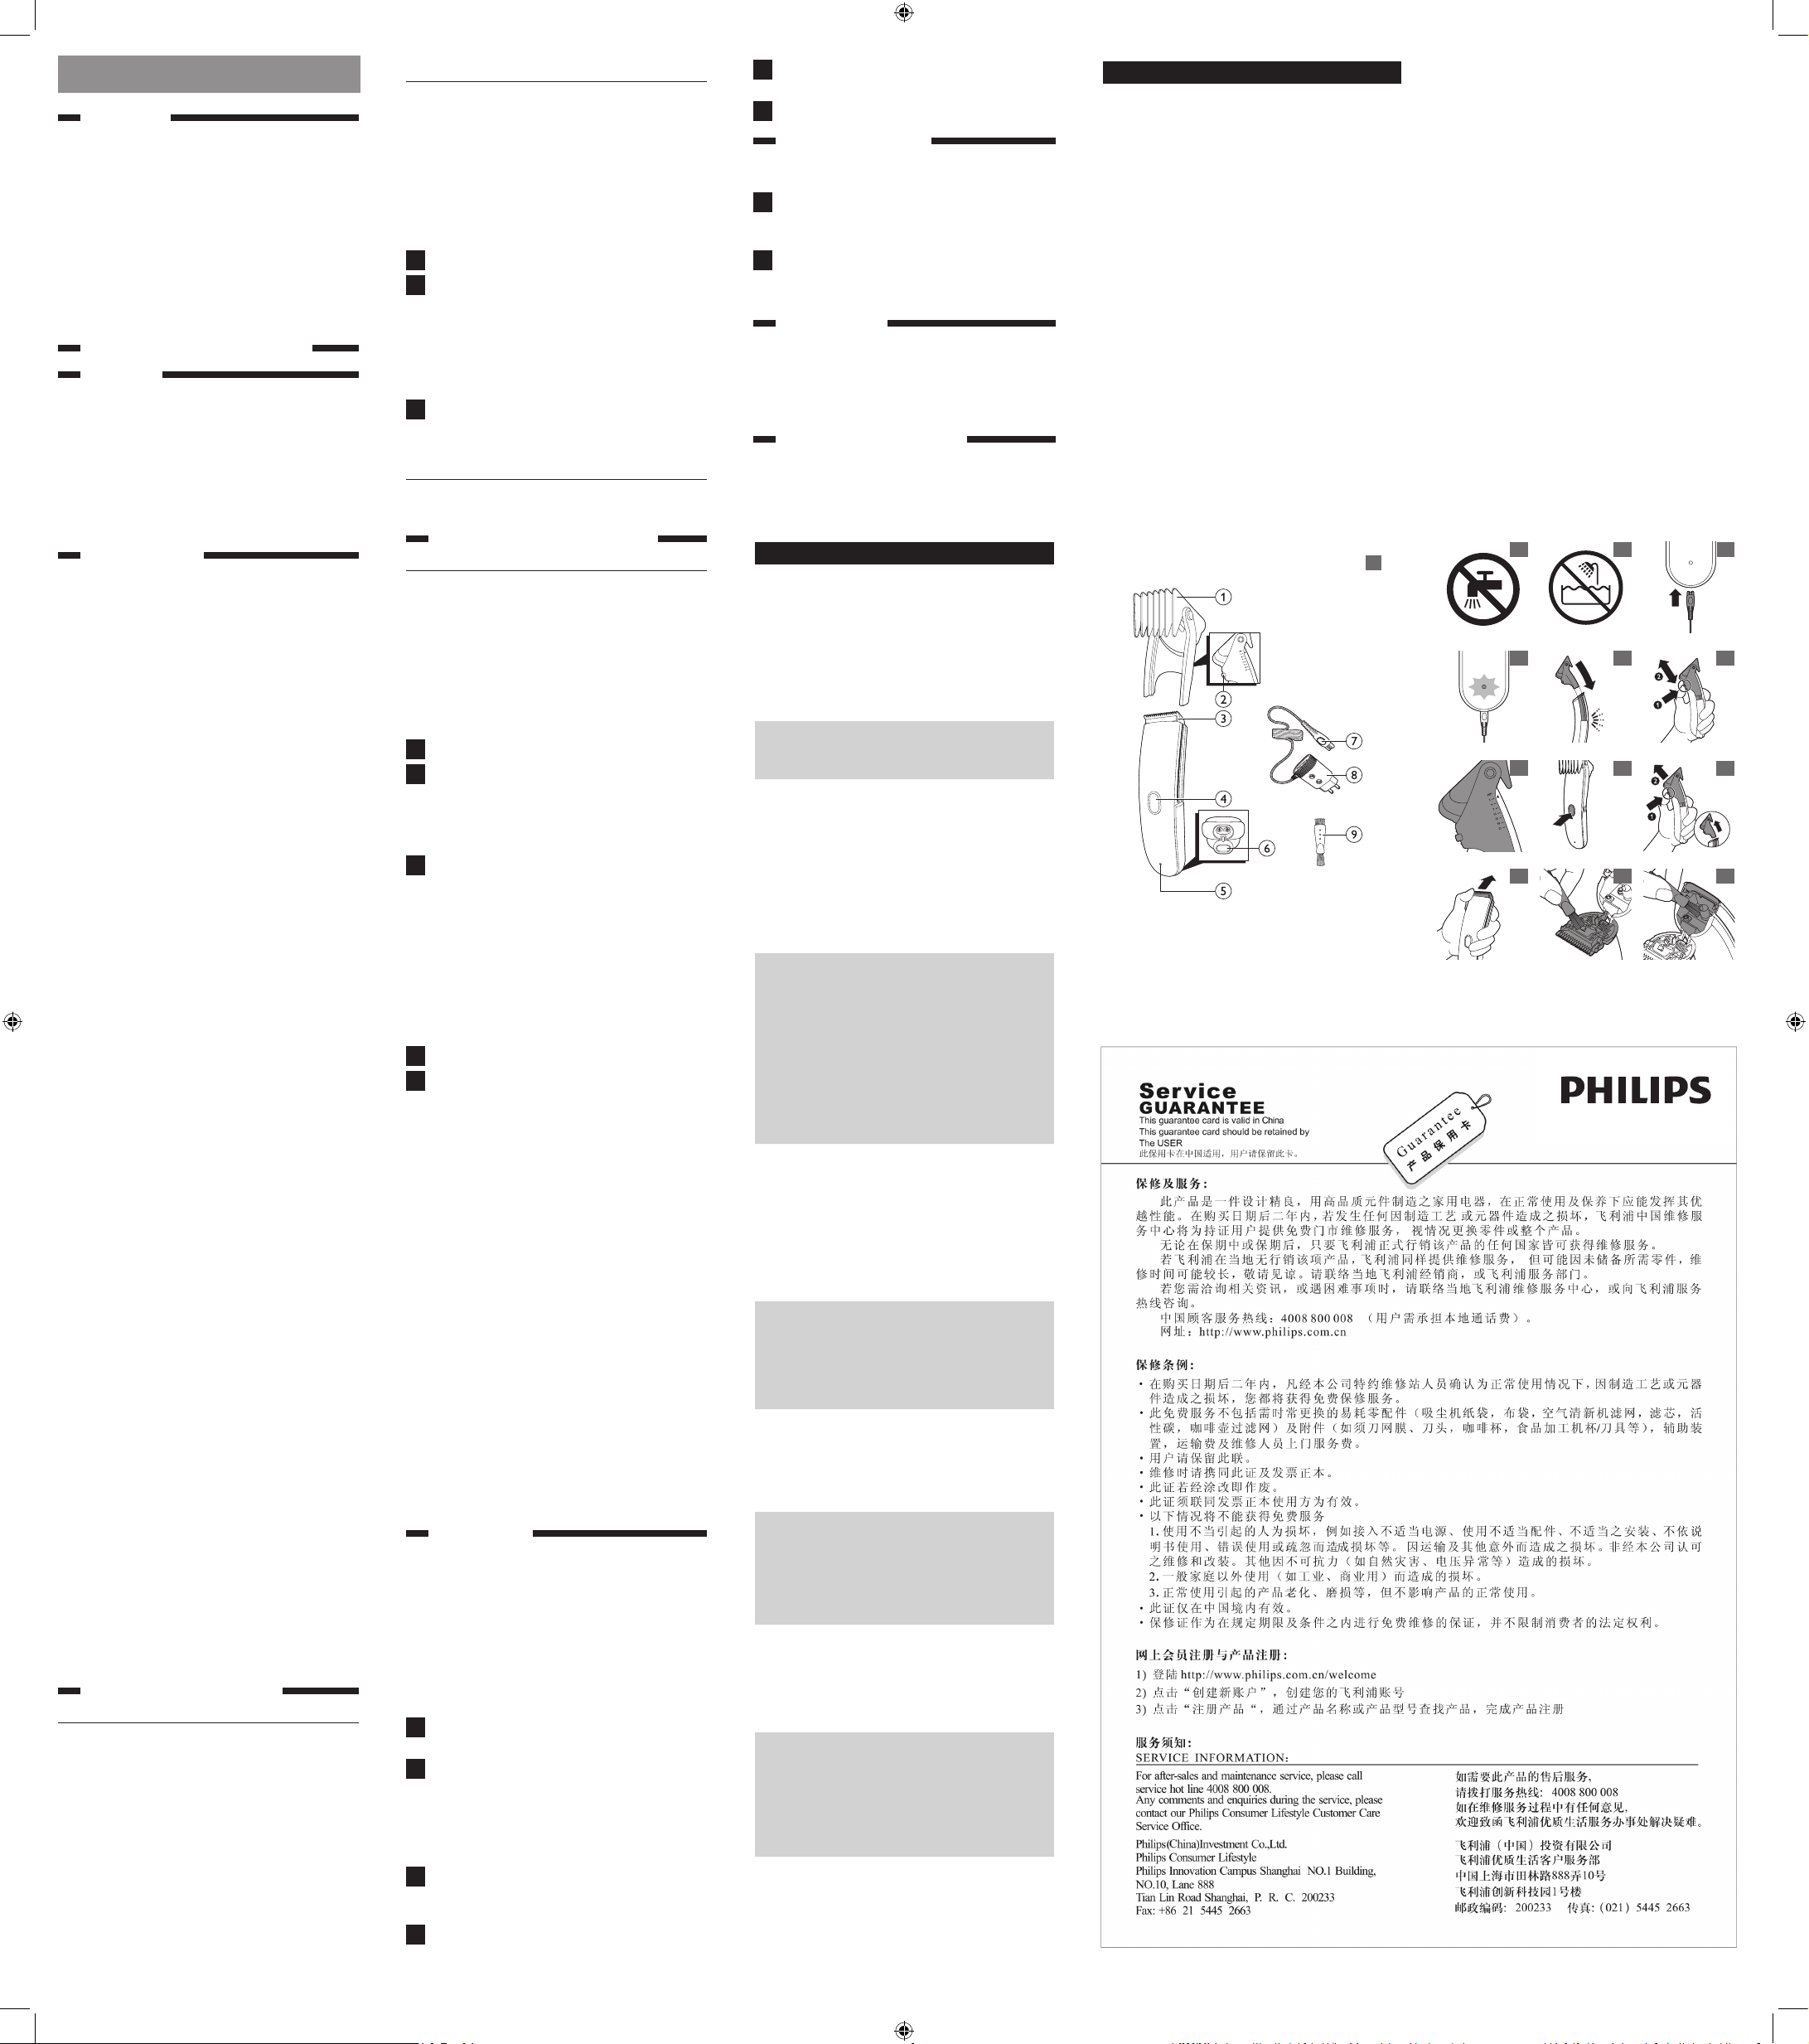
General description
(Fig. 1)
1 Contouring comb
2 Setting selector
3 Cutting unit
4 On/off button
5 Battery light
6 Appliance socket with dust protection cap
7 Appliance plug
8 Adapter
9 Cleaning brush
Important
Read this user manual carefully before you use
theappliance and save it for future reference.
Danger
- Keep the appliance and the adapter dry.
- This symbol means: Forbidden to clean under
a running tap.
- This appliance and its accessories are NOT
toys. If the appliance is used on young children’s
hair, it must be operated by a responsible adult.
Keep the appliance and its accessories out of
the reach of young children (Fig. 2).
Warning
- This appliance is not waterproof or water-
resistant.
- This symbol means: Forbidden to use in the
shower (Fig. 3).
- Warning: Do not use this appliance close to a
bathtub, shower or other containers lled with
water.
- The adapter contains a transformer. Do not cut
off the adapter to replace it with another plug,
as this causes a hazardous situation.
- This appliance and its accessories are not
intended for use by persons (including
children) with reduced physical, sensory or
mental capabilities, or lack of experience
and knowledge, unless they have been given
supervision or instruction concerning use of
the appliance and its accessories by a person
responsible for their safety.
- Children should be supervised to ensure that
they do not play with the appliance and its
accessories.
- Only remove the rechargeable battery when
you discard the appliance.Take it to the
professionals or hand it in at an ofcial collection
point for recycling. Make sure the battery is
completely empty when you remove it.
- Do not connect the appliance to the mains
again after you have removed the battery.
Caution
- Use, charge and store the appliance at a
temperature between 5°C and 35°C.
- Do not charge the appliance in a pouch or
cassette.
- Only use the adapter supplied.
- If the adapter is damaged, always have it
replaced with one of the original type in order
to avoid a hazard.
- For optimal safety, we advise you to always use
the appliance with the contouring comb.
- Do not use the appliance if the cutting unit or
the contouring comb is damaged or broken, as
this may cause injury.
- This appliance is only intended for clipping
human scalp hair. Do not use it for another
purpose.
General
- The adapter transforms 100-240 volts to a safe
low voltage of less than 24 volts.
Electromagnetic elds (EMF)
- This Philips appliance complies with all
applicable standards and regulations regarding
exposure to electromagnetic elds.
Preparing for use
Charge indications
Charging
- When you charge the appliance, the battery
light ashes green to indicate that the appliance
is charging.
Battery fully charged
- When the battery is fully charged,
the battery light stops ashing.
Battery running low
- When the battery is running low, the battery
light turns orange.
Note:When the battery light turns orange, the battery
still contains enough power for one haircut (approx.
15 minutes). Recharge the appliance as soon as the
motor starts to run more slowly.
Charging the appliance
Charge the appliance for at least 8 hours before
you use it for the rst time and after a long period
of non-use. Also charge the appliance when the
battery light turns orange to indicate that the
battery is almost empty.When it is fully charged,
the appliance has a cordless operating time of up
to 45 minutes.
Note: Do not leave the appliance connected to the
mains for more than 24 hours.
1 Switch off the appliance.
2 Insert the appliance plug into the appliance and
put the adapter in the wall socket (Fig. 4).
,After a few seconds, the battery light starts
ashing green to indicate that the appliance is
charging.
,When the battery is fully charged, the battery
light stops ashing (Fig. 5).
3 Remove the appliance plug from the appliance
and the adapter from the wall socket when the
battery is fully charged (after 8 hours).
Corded clipping
When the rechargeable battery is empty, you can
also operate the appliance from the mains.
Using the appliance
Clipping with contouring comb
Caution: For optimal safety, we advise you to always
use the appliance with the contouring comb.
Note: Make sure the hair is clean and dry. Do not use
the appliance on wet hair.
Note: Make sure the head of the person whose hair
you are cutting is at the same level as your chest.This
ensures that all parts of the head are clearly visible
and within easy reach.
1 Comb the hair in the direction of hair growth.
2 Slide the contouring comb into the guiding
grooves of the appliance (‘click’) (Fig. 6).
Make sure that the arms of the contouring comb
have been slid properly into the grooves on both
sides of the appliance.
3 Press the setting selector (1) and slide the
contouring comb to the desired hair length
setting (2).Then release the setting selector to
lock the hair length setting (Fig. 7).
Hair length settings
- The settings are shown on the arms of the
contouring comb.The settings correspond to
the remaining hair length after cutting (Fig. 8).
- The contouring comb cuts the hair to a length
of 3mm, 6mm, 9mm, 12mm, 15mm, 18mm or
21mm.
4 Switch on the appliance (Fig. 9).
5 Move the appliance through the hair slowly.
Note: Make sure that the at part of the contouring
comb is fully in contact with the scalp to obtain an
even cutting result.
Tips:
- Start clipping at the highest hair length setting
of the contouring comb and reduce the hair
length setting gradually.
- Write down the hair length settings you use
to create a certain hairstyle as a reminder for
future clipping sessions.
- To clip most effectively, move the appliance
against the hair growth direction.
- Move the appliance in different directions
(upward, downward or across), because hair
doesn’t all grow in the same direction.
- Make overlapping passes over the head to
ensure that the appliance catches all the hairs
that need to be cut.
- Make sure that the at part of the contouring
comb is fully in contact with the scalp to obtain
an even cutting result.
- Regularly remove cut hair from the contouring
comb If a lot of hair has accumulated in the
contouring comb, remove it from the appliance
and blow and/or shake the hair out of it.
Cleaning
- Clean the appliance every time you have used
it.
Warning: Never use scouring pads, abrasive
cleaning agents or aggressive liquids such as
alcohol, petrol or acetone to clean the appliance.
Warning: Only clean the appliance with the
cleaning brush supplied.
Note:The appliance does not need to be lubricated.
1 Make sure the appliance is switched off and
disconnected from the mains.
2 Press and hold the setting selector (1) with
one hand and pull the contouring comb off the
appliance (2) with your other hand (Fig. 10).
Warning: Never pull at the exible top of the
contouring comb. Always pull at the bottom part.
3 Push the middle part of the cutting unit
upwards with your thumb until it opens (Fig.
11).
4 Clean the cutting unit with the cleaning brush
supplied (Fig. 12).
5 Clean the inside of the appliance with the
cleaning brush supplied (Fig. 13).
6 Close the cutting unit (‘click’).
Replacement
- Only replace a damaged or worn cutting unit
with an original Philips cutting unit.
1 Push the middle part of the cutting unit
upwards with your thumb until it opens and
then pull it off the appliance (Fig. 11).
2 Place the lug of the new cutting unit into
the slot and push the cutting unit onto the
appliance (‘click’).
Recycling
- Do not throw away the product with the
normal household waste at the end of its life,
but hand it in at an ofcial collection point for
recycling. By doing this, you help to preserve
the environment.
Troubleshooting
This chapter summarises the most common
problems you could encounter with the appliance.
If you are unable to solve the problem with the
information below, contact the Consumer Care
Centre in your country.
Problem Possible cause Solution
The
appliance
produces
an uneven
cutting result.
The comb
does not
touch the
skin when
you move
the appliance
through the
hair.
Make sure that
the at part
of the comb is
always fully in
contact with
the skin when
you move
the appliance
through the hair.
You used the
appliance on
wet hair.
Do not use the
appliance on wet
hair.
You only
move the
appliance in
one direction.
Because not
all hairs grow
in the same
direction, move
the appliance
in different
directions
(upwards,
downwards and
across).
The setting
of the comb
has changed
during
clipping.
Check the
setting of
the comb. If
you push the
appliance too
hard onto the
scalp, you may
accidentally
change the
setting of the
comb.
The comb
is not
assembled
correctly.
Remove the
comb and
reattach it. Slide
the comb into
the guiding
grooves on both
sides of the
appliance until
you hear a click.
Slide the comb
into the guiding
grooves on both
sides of the
handle until you
hear a click.
The cutting
element and/
or the comb
are dirty.
Clean the cutting
element and/
or the comb
(see chapter
'Cleaning').
The cutting
performance
decreases
when the
battery runs
low.
Make sure the
battery contains
enough energy
or connect the
appliance to the
mains.
The
appliance
does not
work when I
press the on/
off button.
The
rechargeable
battery is
empty.
Charge the
appliance
(see chapter
'Preparing for
use').
The
appliance
is not
connected to
the mains.
Insert the
appliance
plug into the
appliance and
put the adapter
in the wall
socket.
Problem Possible cause Solution
The battery
light does not
start ashing
green to
indicate that
the appliance
is charging
when I
connect the
appliance to
the mains.
There is a
power failure
or the wall
socket is not
live.
Check if the
power supply is
working. If it is,
check whether
the socket is
live by plugging
in another
appliance.
4222.005.0422.1
4222_005_0422_1_DFU-Leaflet_A5_v4.indd 1 19-9-2013 15:45:25
12 3 4
56 7
89 10
11 12 13


