Installation
Important notes for users in the U.K.
Mains plug
This apparatus is fitted with an approved 13 Amp plug.
To change a fuse in this type of plug proceed as follows:
1Remove fuse cover and fuse.
2Fix new fuse which should be a BS1362 5 Amp, A.S.T.A. or BSI approved type.
3Refit thefuse cover.
If the fitted plug is not suitable foryour socket outlets, it should be cut off and an appropriate plug fitted in its place.
If the mains plug containsa fuse, thisshould havea value of 5Amp.If a plug without a fuse is used, the fuse at the
distribution board should not be greater than 5 Amp.
Note: The severed plug must be disposed of to avoid a possible shock hazard shouldit be inserted into a13 Amp
socket elsewhere.
How to connect a plug
The wires in the mains lead are coloured with the following code: blue = neutral (N), brown = live (L). As these
colours may not correspond with the colour markings identifying the terminals in your plug, proceed as follows:
•Connect the blue wire to the terminal marked N orcoloured black.
•Connect thebrown wire to the terminalmarked Lor coloured red.
•Do not connecteither wire tothe earth terminal in the plug,marked E (or ) or coloured green (or green andyellow).
Before replacing the plug cover,make certain that the cordgripis clamped over the sheath of the lead - not simply
over the two wires.
Copyright in the U.K.
Recording and playback of material may require consent.SeeCopyright Act 1956and The Performer's Protection
Acts 1958to 1972.
No rgeNorg e
No r g eN o rg eN or g e
Typeskilt finnes på apparatens underside.
Observer: Nettbryteren er sekundert innkoplet.
Den innebygde netdelen er derforikke frakoplet
nettet sålenge apparatet er tilsluttet nettkontakten.
Forå redusere faren for brann eller elektrisk støt,
skal apparatetikke utsettes for regn eller fuktighet.
Deutschland
Hiermit wird bescheinigt, daß dieses Gerät in
Übereinstimmung mit den Bestimmungen der
Amtsblattverfügung 1046/1984 funkentstört ist.
Der Deutschen Bundespost wurde das
Inverkehrbringen diesesGerätes angezeigt und
die Berechtigung zur Überprüfung der Serie auf
Einhaltung der Bestimmungen eingeräumt.
Nederlands
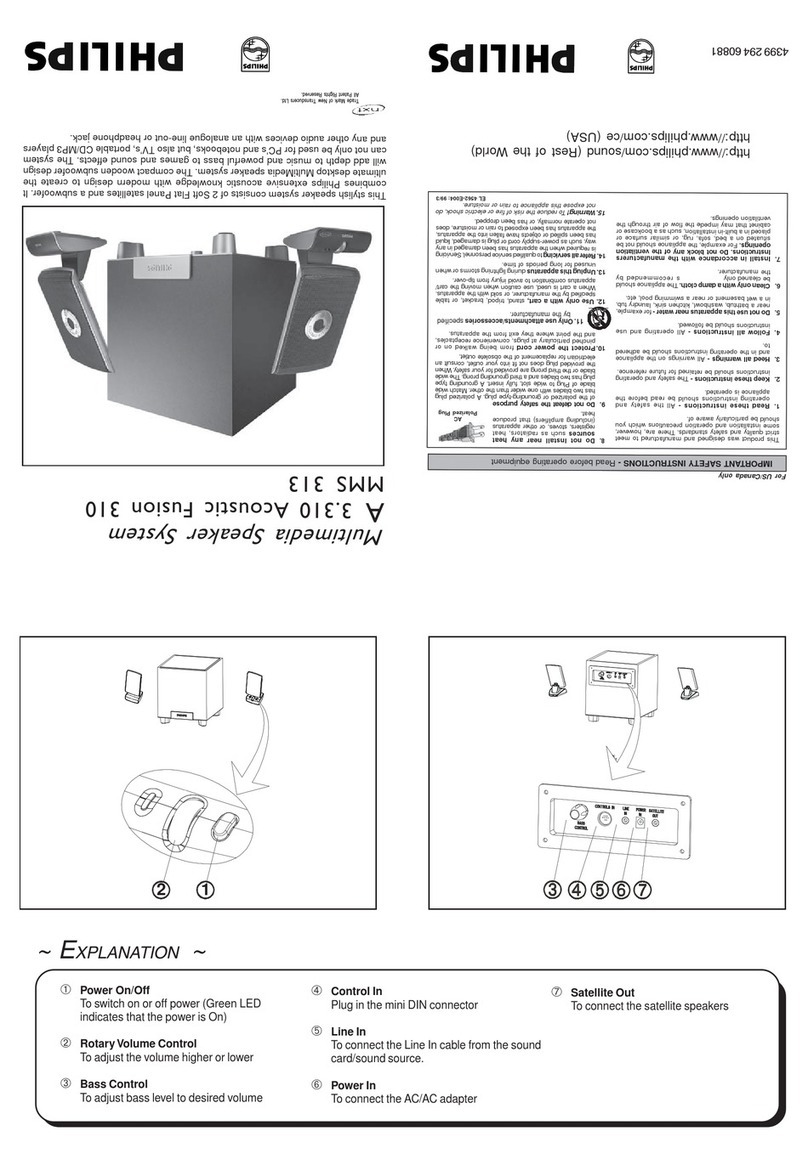
1. Sluit d e sa te lliet luidsp re kers aa n op de aud io -
uitgang. (5 )
2. Sluit de groene 3.5-mm stereostekker van de regelaar
aan op de audio-uitgang van de PC-geluidskaart of
een andere geluids bron. (6)
3. Sluit de zwarte 3.5-mm stereostekker aan op de audio-
ingang. (4)
4. Stop de netstekker in een wandco ntactdoos.
5. Sch akel het syst eem aan o f uit m et d e aan/uit -
schakelaar aan de achterzijde van de subwoo fe r.
6. Stel het systeem af met de PC-geluidskaart of een
andere geluidsbron.
7. Stel het volume in met de volumekop op de regelaar
in de kabel.
8. Het subwoofervolume kunt u instellen met de Bass
Control-knop op de subwoofer.
Opmerking:
1. Sluit de netstekker pas aan op de wandcontactdoos
wanneer alle kabels aa ngesloten zijn.
2. De ingangen zijn gekle urd volgens de PC 2002-
kleurcodering (groen voor L/R-ingang)
Français
1. Branchez les deux hauts-parleurs satellites sur la sortie
Audio Output. (5)
2. Branchez la fiche stéréo verte 3.5 mm de la commande
par câble sur la sortie Audio Output de la carte son du
PC ou toute autre source sonore. (6)
3. Branchez la fiche stéréo noire 3.5 mm sur l’e ntrée
Audio Input. (4)
4. Branchez la prise d’alimentation sur le secteur.
5. Allumez/éteignez le système au moyen de l’interrupteur
situé à l’arrière du caisson de basses.
6. Réglez le système au moyen de la carte son du PC ou
d’une autre source sonore.
7. Réglez le volume au moyen du bouton prévu à cet effet
de la commande par câble.
8. Vous pouvez régler le niveau des basses à l’aide du
bouton de réglage des basses du caisson.
Rem arqu e :
1. N’insérez pas la fiche d’alimentation dans la prise
secteur avant d’avoir effectué toutes les connexions.
2. Les entrées répondent au code de couleur PC 2002
(vert pour l’entrée G/D).
English
1. Connect both satelli te speakers to “Audio Output”
connector. (5)
2. Connect 3.5mm green stereo plug on the cable control
to “Audio Output” connector on the PC sound card or
other sound source. (6)
3. Connect 3.5mm blac k stereo plug to “Audio Input”
connector. (4)
4. Plug the power supply to mains plug.
5. Switch on/off the system by using the power switch at
the rear of subwoofer.
6. Tune system, using PC sound card or other sound source.
7. Tune volume, using volume knob on the cable control.
8. Subwoofer level can be tuned on the bass control knob
on the subwoofer.
Note:
1. Do not insert the power plug into AC outlet until all
connections are made.
2. Inputs are following PC 2002 color coding (green for L/
R input)
Èesky
1. Pøipojte oba sate litní reproduktory k e k onektoru
zvukového výstupu. (5)
2. Zapojte 3.5mm zástrèku zelené barvy na ovládání na
kabelu do konektoru zvukového výstupu na zvukové
kartì v poèítaèi nebo jiném zdroji zvuku. (6)
3. Zapoj te 3 .5mm zástrèku èerné barvy do konektoru
zvukového vstupu. (4)
4. Pøipojte zdroj napájení do elektrické zásuvky.
5. Systém zapnete nebo vypnete pomocí vypínaèe na
zadní stranì subwooferu.
6. Nalaïte systém pomocí zvukové karty v poèítaèi nebo
jiného zdroje zvuku.
7. Pomocí ovladaèe hlasitosti na kabelovém ovládání
nastavte hlasitost.
8. Hladinu subwooferu lze nastav it pomocí knoflíku
ovladání basù na subwooferu.
Pozná m k a:
1. Pøed pøipojením napájecí šòùry do elektrické zásuvky
propoj te všechny èásti.
2. Oznaèení vstupù je v souladu s barevným kódováním
PC 2002 (zelená pro vstup L/P)
Magyar
1. Cs atlakoztassa mindkét szatellit hangsugárzót az
“Audio Output” kimenethez. (5)
2. Csatlak oztassa a vezér lõkábel 3.5 m m-es zöld
sztereocsatlakozóját a PC hangkártya vagy egyéb eszköz
“Audio Output” kimenetéhez. (6)
3. Csatlakoztassa a 3.5 mm-es fekete sztereocsatlakozót
az “Audio Input” bemenetbe. (4)
4. Csatlakoztassa a tápvezetéket a fali aljzatba.
5. Kapcsolja be/ki a rendszert a mélynyomó hátuljánál
található tápka pcsolóval.
6. Hangolja be a rendszert a PC-hangkártya vagy más
hangforrás használatáva l.
7. Állítsa be a hangerõt a vezérlõkábelen lévõ hangerõ
gombbal.
8. A bas szus szint a mél ynyomó basszus gombjával
állítható be.
Megjegy zés:
1. Ne csatlakoztassa a tápkábelt a fali aljzatba, amíg el
nem végezte az összes egyéb csatlakoztatást.
2. A bemeneteket a PC 2002 színkódolás jelöli (zöld a L/
R input).
Italiano
1. Collegare entrambi gli altoparlanti satellite al connettore
“Audio Output”. (5)
2. Collegare la presa stereo verde da 3,5mm sul comando
del cavo al connettore “Audio Output” alla scheda audio
del PC o a un’altra sorgente audio. (6)
3. Collegare la presa stereo nera da 3,5mm al connettore
“Audio Input”. (4)
4. Collegare il cavo di alimentazione alla presa di corrente.
5. Accendere/spegnere il sistema usando l’interruttore
dell’alimentazione che si trova sul retro del subwoofer.
6. Sintonizzare il sistema mediante la scheda audio del
PC o un’altra sorgente audio.
7. Regolare il volume mediante la manopola che si trova
sul comando del cavo.
8. Il livello del subw oofer può essere regolato dalla
manopola per i bassi che si trova sul subwoofer.
Nota:
1. Inserire la spina di alimentazione nella presa CA solo
dopo aver effettuato tutti i collegamenti.
2. Gli ingressi si basano sulla codifica dei colori per PC
2002 (verde per l’ingresso L/R)
Português
1. Li gue os altifalantes satélite aos con ectores de
saída de áudio. (5)
2. Ligue a ficha estéreo verde de 3.5 mm no controlo do
cabo ao conector de saída de áudio que se encontra na
placa de som do computador ou outra fonte de som. (6)
3. Ligue a ficha estéreo preta de 3.5 mm ao conector
de entrada de áudio. (4)
4. Ligue a fonte de alimentação à tomada eléctrica.
5. Ligue/desligue o sistema util izand o o interruptor na
parte de trás do subwoofer.
6. Sintonize o sistema, utilizando a placa de som do
computador ou outra fonte de som.
7. Ajuste o volume, utilizando o botão do volume de
som no controlo do cabo.
8. O nível do subwoofer pode ser sintonizado no botão
de Controlo de Graves do subwoofer.
Nota:
1. Não introduza a ficha de alimentação na tomada CA
até ter feito todas as li gações.
2. As en tradas seguem a co dificaç ão de cores para
computadores de 2002 (verde para a entrada L/R)
Slovenský
Español
1. Conecte los do s a ltavoces satélite a la toma de
salida de audio. (5)
2. Conecte el enchufe estéreo verde de 3.5 mm del control
de cables a la toma de salida de audio de la tarjeta de
sonido del PC o de otra fuente de sonido. (6)
3. Conecte el enchufe estéreo negro de 3.5 mm a la
toma de entrada de audio. (4)
4. Conecte el cable a la fuente de alimentación.
5. Utilice el interruptor de alimentación de la parte posterior
del subwoofer para encender o apagar el sistema.
6. Ajuste el sistema mediante la tarjeta de sonido del
PC u otra fuente de sonido.
7. Ajuste el vo lumen mediante e l mando de volumen
del control de cables.
8. El nivel del subwoofer se puede ajustar en el mando
de control de graves del subwoofer.
Nota :
1. No conecte el enchufe de alimentación a la toma de
CA hasta ha ber realiza do todas las conexio nes.
2. Las entradas s iguen la codificación de colores PC
2002 (verde para las entradas I/D)
Turkçe
1. Her iki uydu hoparlörünü “Audio Output” (Ses Çýkýþý)
konektörüne baðlayýn. (5)
2. Kablo lu kumandada ki 3.5 mm’lik yeþil stereo fiþini
PC ses kartý ya da baþka bir ses kaynaðýnýn “Audio
Output” (Ses Çýkýþý) konektörüne baðlayýn. (6)
3. 3.5 mm’lik siyah stereo fiþini “Audio Input” (Ses Giriþi)
konektörüne baðlayýn. (4)
4. Güç kaynaðýný ana þebekeye baðlayýn.
5. Su bwoofer’ýn arkasýndaki açma-kapama düðmesini
kullanarak sis temi açýn/kapatýn.
6. PC ses kartý veya baþka bir ses kaynaðýný kullanarak
sisteme hassas ayar yapýn.
7. Ka blolu k u m a nda daki ses düze yi düðme sini
kullanarak ses düzeyini ayarlayýn.
8. Su bwoofer düzeyi subwoo fer’daki bass control (bas
denetimi) düðmesinden a yarla nabilir.
Not:
1. Tüm baðlantýlarý yapmadan elektrik fiþini AC prizine
takmayýn.
2. Giriºler PC 2002 renk kodunu izlemektedir (L/R giriº
iç in yeºil)
Suomi
1. Liit ä molemmat satelli ittikaiutti met A udio Outp ut
(ää nilähtö) -liitäntään. (5)
2. Liitä johdollisen kaukosäätimen 3,5 mm:n vihreä
stereo l ii tin ti etoko neen ää nikor ti n tai mu un
äänilähteen Audio Output (äänilähtö) -liitäntään. (6)
3. Li it ä 3, 5 mm:n mu s t a s te re oliit in A udio I nput
(äänitulo) -liitäntään. (4)
4. Kytke virtalähde pistorasi aan.
5. Kytke ta i k atkaise järjestelmän virta subw ooferi n
takaosassa sijaitsevalla virtakytkimellä.
6. S äädä jä rjest e lm ää P C :n ääni k o r tin t ai mu un
äänilähteen avulla.
7. Säädä äänenvoimakkuutta johdollisen kaukosäätimen
valitsinnupilla.
8. Bassotasoa voi säätää subwooferin bassovalitsimella.
Huo mautu s:
1. Älä kytke virtajohtoa pistorasiaan, ennen kuin kaikki
liitännät on tehty.
2. Tulot noudattavat PC 2002 -värikoodeja (vihreä L/R -tulolle)
Deutsch
1. Sch ließen Sie beide Satellitenlauts precher an den
Audioausgang an. (5)
2. Verbinden Sie den grünen 3.5-mm-Stereostecker an
dem kabelgebundenen Regler mit dem Audioausgang
an der Soundkarte des PC oder einer anderen
Tonquelle. (6)
3. Verbinden Sie den schwarzen 3.5-mm-Stereostecker
mit dem Audioeingang. (4)
4. Verbinden Sie den Netzstecker mit einer Steckdose.
5. Schalten Sie das System mithilfe des Netzschalters
an der Rückseite des Subwoofers ein/aus.
6. Stel len Sie das System mithilfe der PC-Soundkarte
oder einer anderen Quelle ein.
7. Stellen Sie die Lautstärke mithilfe des Lautstärkereglers
an dem kabelgebundenen Regler ein.
8. Sie können die Lautstärke des Subwoofers über den
Bassregler am Sub woofer einstellen.
Hinweis:
1. Überprüfen Si e, ob alle Verbindungen hergestellt
wurden , bevor Sie den Net zstecker an die
Stromversorgung anschließen.
2. Die Eingänge sind entsprechend der Farbkodierung
PC 2002 gekennzeichnet (Grün für Eingang ‘L/R’).
Norsk
1. Koble begge satellitthøyttalerne til
lydutgangskontakten. (5)
2. Koble 3.5 mm grønn stereokontakt til kabelkontrollen
til lydutgangskontakten på PCens lydkort eller en
annen lydkilde. (6)
3. Koble 3.5 mm svart stereokontakt til
lydinngangskontakten. (4)
4. Koble strømledningen til strømnettet.
5. Slå av/på systemet ved hjelp av av/på-knappen bak
på subwooferen.
6. Still inn systemet ved hjelp av lydkortet på PCen
eller en annen lydkilde.
7. Juster volumet ved hjelp av volumknappen på
kabelkontrollen .
8. Subwoofer-nivået kan stilles inn med
basskontrollknappen. (3)
Merk :
1. Ikke sett strømledningen i strømuttaket før alle andre
tilkoblinger er gjort.
2. Inngangene følger PC 2002-fargekoding (grønn for L/
R-inngang)
Polski
Svenska
1. Anslut båda sat telithö gt alare t ill “A udio Output”-
ingången. (5)
2. Ansl u t de n grö na 3 ,5 m m - st er eok ont akten på
kabelkon trol len til l “ Audi o Out put ”-ingå ngen på
datorns ljudkort eller en annan ljud källa. (6)
3. Anslut den svarta 3,5 mm-stereokontakten till “Audio
Input”-ingången. (4)
4. Anslut strömkabeln till vägguttaget.
5. Slå på/av s y s te met genom att trycka på
strömomkopplaren på subwoofern s b aksida.
6. Ställ in systemet med hjälp av datorns ljudkort eller
annan ljud källa.
7. Ställ in volymen med hjälp av volymratten på kabelkontrollen.
8. Subwoofer-nivån kan ställas in på baskontrollratten
på s ubwoofern.
Obs!
1. Sät t i nte i kont ak te n i n ät utta get för rän al la
anslutningar är gjorda.
2. Ingångarna följer färgkodningen för PC 2002 (grön
för L/R-ingång)
Zhong Wen
