philrouge EOS Quick setup guide

Dezember 2014
Montage- und Bedienungsanleitung, Pflegehinweise.
Notice de montage et d’utilisation, conseils d’entretien.
Assembly and use manual, care instructions.

Öffnen Sie die Verpackung nicht mit einem Teppichmesser, um Beschädigungen
Ihres Polsterbettes zu vermeiden.
N’ouvrez pas l’emballage avec un cutter afin d’éviter toute détérioration de votre sommier
tapissier.
To avoid damaging your upholstered bed, do not open the packaging with a box knife.
Nicht auf die Ecken stellen oder fallen lassen.
Ne pas poser sur les coins, ni laisser tomber.
Do not stand on the corners or allow to fall.
Achtung: Entstandene Beschädigungen durch Nichtbeachtung obiger Hinweise führen
zum Verlust der Garantie.
Attention: les détériorations résultant du non-respect des instructions susmentionnées
rendent la garantie caduque.
Please note: any damage resulting from non-compliance with the above instructions
will lead to loss of warranty rights.
Montage- und Bedienungsanleitung, Pflegehinweise
Notice de montage et d’utilisation, conseils d’entretien
Assembly and use manual, care instructions
B O X S P R I N G
Flachbox
Sommier plat
Flat box

2 3
Diese Anleitung hilft Ihnen bei der Montage Ihres neuen Betts.
Wir empfehlen Ihnen dringend, die Anleitung bei der Montage zu benutzen.
Achtung: Bitte beachten Sie ergänzende Dokumentationen für Zubehörteile,
die den jeweiligen Zubehörteilen beigepackt sind. Die im vorliegenden Doku-
ment beschriebenen Abläufe können dadurch beeinflusst werden.
Wenn das Bett beschädigt wird, weil die verschiedenen, in dieser Anleitung
beschriebenen Montageschritte nicht richtig beachtet wurden, führt dies zum
Verlust der Garantie.
Bitte diese Anleitung sorgfältig durchlesen und aufbewahren.
(voir page 10)
Cette notice vous aide lors du montage de votre nouveau lit.
Nous vous recommandons fortement d’utiliser la notice lors du montage.
Attention: Veuillez tenir compte de la documentation complémentaire pour
les accessoires qui est jointe aux accessoires correspondants. Les déroulements
décrits dans le présent document peuvent en être influencés.
Toute détérioration du lit résultant du non-respect des différentes étapes
de montage décrites dans cette notice rendent la garantie caduque.
Veuillez lire cette notice soigneusement et la conserver.
(see page 17)
This manual will help you during the installation of your new bed.
We strongly recommend that you use the manual during assembly.
Attention: Please observe the additional documentation enclosed with the
respective accessories, as this may affect the procedures described in this
document.
If the bed is damaged because the different assembly steps as described
in this manual have not been followed correctly, this will void warranty.
Please read this manual carefully and keep it for reference.
Einführung / Introduction Inhalt / Übersicht Montageteile
Übersicht Montageteile .......................................................................................................... 3
Boxspring fix
1. Montage der Füße ....................................................................................................... 4–5
2. Montage des Kopfteils ..................................................................................................... 6
Sicherheit und Nutzung
1. Hinweise zur Nutzung und Aufstellung des Bettes ........................................... 7–9
DE
FR
EN
DE
FR
EN
DE
FR
EN
DE
FR
EN
DE
FR
EN
DE
FR
EN
DE
FR
EN
DE
FR
EN
Boxspring fix
001 – Maschinenschrauben für Kopfteilbeschlag 4
002 – Holzschrauben für Kopfteilbeschlag 4
003 – Kopfteilbeschlag zu Box 2

4 5
Boxspring fix
1. Montage der Füße
Anzahl der Füße
Boxspring Einzelbett (80/90/100/120/140 cm)
Set mit 4 Füßen und 1 Mittelfuß
Boxspring Doppelbetten (160/180/200 cm)
Set mit 4 Füßen und 1 Mittelfuß (pro Box)
DE
FR
EN
DE
FR
EN
Boxspring fix
1. Montage der Füße
1.1 Box 1 entweder auf die Längsseite oder flach
auf die Oberseite legen und die Position des Klett-
bandes beachten.
Fußseitig ist ein Klettband angebracht, welches
das Auseinanderdriften der Boxen verhindert.
1.2 Füße in die Fußaufnahme «A» oder «B» und
den Mittelfuß in die Aufnahme «D» schrauben.
Achtung: Pro Box ist immer 1 Mittelfuß erforderlich.
AA BCD
E
E
1.3 Kopfteilbeschlag (mit dem langlochseitigen
Schenkel) mit den Maschinenschrauben (001) in eine
der Bohraufnahnem «E» einschrauben und leicht
festziehen. Bitte benützen Sie jeweils die dem Klett-
band entfernter gelegene Bohrung. Damit stellen Sie
sicher, dass die Beschläge am Schluss jeweils in der
äußeren Bohrung sitzen. Bei Einzelbetten beide
Bohrungen «E» verwenden.
Anschließend mit den Holzschrauben (002) stirn-
seitig fixieren. Danach auf der Unterseite fest
anziehen.
1.4 Anschließend Box1 aufstellen.
1.5 An Box 2 analog Box 1 verfahren und Box 2
neben Box 1 stellen.
DE
FR
EN
DE
FR
EN

A
A
B
B
6 7
Boxspring fix
2. Montage des Kopfteils
2.1 Heben Sie das Kopfteil zu zweit an. Beschlägeteile
der Box auf die Beschläge des Kopfteils ausrichten.
2.2 Schieben Sie die Schiebeelemente auf
dem Kopfteil (A) in die Schiebeelemente
der Box (B).
2.3 Fußseitigen Verbindungsfuß festziehen
und/oder Klettband schließen.
2.4 Beim Aufstellen des Bettes immer darauf
achten, dass das ganze System spannungsfrei
und waagrecht steht bzw. ausnivelliert ist.
Justierung der Verstellfüße bzw. Unterlegung
geeigneter Materialien.
DE
FR
EN
DE
FR
EN
Sicherheit und Nutzung
1. Hinweise zur Nutzung und Aufstellung des Bettes
DE
FR
EN
DE
FR
EN
1.1 Geräuschbildung/Knarren
Unsere Bettsysteme sind selbstverständlich so kon-
struiert und dimensioniert, dass Geräuschbildung
vermieden bzw. soweit minimiert wird, dass sie
nicht als störend empfunden wird.
Voraussetzung dafür ist aber auch, dass das Bett
gemäß den Schritten in der Montageanleitung auf-
gebaut und montiert wurde.
Zudem ist auf eine verwindungsfreie und spannungs-
freie Aufstellung des Bettes zu achten. Einseitige
Montage auf Teppichkanten oder schiefen Böden
führt zum Verzug des Bettkastens und der gesamten
Unterkonstruktion und in der Folge zu Verwindung
von beweglichen Bauteilen wie Motorengestänge
und Lagern. Justierung der Verstellfüße bzw. Unter-
legung geeigneter Materialien.
1.2 Druckstellen auf Böden
Auf weichen Böden (Holz, Kunststoff, Kork, Teppich,
etc.) können Möbelfüße Eindrücke und Kratzer
verursachen. Abhilfe kann zumindest geschaffen
werden, bei glatten Böden durch Unterkleben von
Filzgleitern und bei rauhen Böden durch Unter-
kleben von Möbelgleitern.
1.3 Raumklima
Schützen Sie Ihr Bett vor direkter Sonneneinstrahlung
bzw. hellem Licht, da es eine absolute Lichtechtheit
von Stoffen und Hölzern nicht gibt. Auch energie-
reiches Neon- oder Halogenlicht kann zu Farb- oder
Materialveränderungen und Ausbleichen führen.
Die ideale Luftfeuchtigkeit im Raum sollte zwischen
45% und 55% liegen. Bei darunter liegenden Werten
werden Naturmaterialien brüchig und Synthetik
neigt zu erhöhter elektrostatischer Aufladung und
Verschmutzung. Höhere Luftfeuchten bilden gute
Voraussetzungen für mögliche Schimmelbildung.
Beachten Sie die folgenden Hinweis:
– Lüften Sie regelmäßig Ihren Schlafraum
(kurzzeitiges Stoßlüften).
– Für genügend Luftzirkulation auf und unter der
Matratze sorgen, deshalb Bettdecken, Kissen
regelmäßig aufschütteln und für einige Stunden
zurückschlagen. Tagesdecken erst nach dem
Auslüften des Betts wieder ausbreiten.
– Insbesondere bei zusätzlichem Einsatz eines
Toppers muss dieser von Zeit zu Zeit gewendet
werden.
– Achten Sie auf genügend Abstand zu Heizkörpern
und gewährleisten Sie ausreichend Hinterlüftung
zwischen Wand und Kopfteil.
1.4 Nutzungserscheinungen
Selbst die verwendeten hochwertigen Oberflächen,
Stoffe und Bezüge halten nicht allen Beanspruchun-
gen des täglichen Lebens stand. Beschädigungen
oder Spuren können beispielsweise hinterlassen:
– scharfe, spitze Gegenstände, wie Armbänder,
Schmuck, Ketten, Haarspangen, etc.
– Krallen von Haustieren
– chemische Substanzen, wie Haarfärbemittel,
Haargel, Haarspray, Make up, Cremes und
Lotionen, Kosmetika
– Haarfette und Schweiss, Ausdünstungen von
Personen mit regelmäßiger Medikamenten-
einnahme
– alkoholische Flüssigkeiten und Fruchtsäfte
Gezogene Fäden nicht abschneiden sondern nach
innen ziehen. Ist ein Faden gerissen, entsteht ein
Loch im Bezug!
Nutzungserscheinungen dieser Art sind von der
Gewährleistung ausgeschlossen und stellen keinen
Reklamationsgrund dar.
1.5 Anfärbungen durch Bekleidungen oder
Bettbezüge, Pilling
Für Farbechtheiten anderer Bekleidungs- und Bett-
bezugstoffe, welche auf das Polsterbett übertragen
werden können, kann keine Gewährleistung über-
nommen werden. Es handelt sich hierbei keineswegs
um einen Fehler am Bezugsstoff, sondern um einen
Mangel am Bekleidungsstoff oder der verwendeten
Bettwäsche.
Unter Pilling versteht man Knötchenbildung auf
Stoffen, die meist durch Reibung von unterschiedli-
chen Stoffen aufeinander (unechtes Pilling) entsteht,
z.B. Bettwäsche. Die Pillingneigung kann durch
feuchtes Klima und/oder elektrostatische Aufladung
gefördert werden.

8 9
DE
FR
EN
DE
FR
EN
Dies ist eine warentypische Eigenschaft und kein
Mangel. Mit einem speziellen Fusselrasierer lassen
sich die Pillings problemlos wieder entfernen.
1.6 Farbabweichungen
Neben produktions- und verarbeitungstechnischen
Farbabweichungen durch unterschiedliche Strich-
richtungen weisen Bezugsmaterialien handelsübliche
Farbabweichungen auf. Auch zum Muster in der
Ausstellung oder zu früher gelieferten Teilen sind
deshalb Farbabweichungen möglich.
1.7 Verarbeitungsmerkmale
Je nach Polsteroptik werden gepolsterte Produkte
sowohl straff als auch legère verarbeitet. Eine legère
Verarbeitung bedeutet einen erhöhten Komfort durch
weiches Einsinken in das Polster. Die gewollte Optik
entsteht im Gebrauch durch individuelle Falten- und
Wellenbildung, auf Grund der geringeren Bezugs-
spannung, z.B. bei in Möbelstoff bezogenen
Matratzen. Die Flächen lassen sich nach der Benut-
zung nach aussen hin wieder glatt streichen oder
aufschütteln.
Im Polsterbereich werden viele weiche Materialien
verarbeitet. Polstern und Nähen sind Handarbeit
deshalb sind Maßunterschiede zu den angegebenen
Maßangaben möglich, von +/- 1% in Länge und
Breite.
Maßdifferenzen können auch durch Lagerung und
Transport auftreten. In der Regel erholt sich das
rodukt während der Nutzung wieder auf das
Nennmaß.
1.8 Neugeruch und Einliegeverhalten
Neue Produkte haben immer einen materialspezi-
fischen Eigengeruch. Dieser ist absolut unbedenklich
und verliert sich im Laufe der Zeit. Abhilfe schafft
häufigeres Lüften.
Jedes Polsterbett und jede Matratze passen sich im
Laufe der Zeit dem Schläfer an. Die hochwertigen
Feinpolsterschichten werden komprimiert. Dadurch
bildet sich eine Mulde an der Matratzen-Oberfläche.
Durch regelmäßiges Wenden und/oder Drehen
der Matratze erholt sich die Polsterauflage wieder.
Matratzen werden im Gebrauch etwas weicher, im
Durchschnitt ca. 10 –15%. Dies sind warentypische
Eigenschaften und normale Festigkeitsabweichun-
gen, welche nicht unter die Garantie fallen.
1.9 Pflege und Fleckenentfernung
Regelmäßige Pflege
Staub, Krümel, oberflächlichen Schmutz mit einer
weichen Polsterdüse bei geringer Saugstärke leicht
absaugen und mit einer weichen Bürste abbürsten.
Topper und Matratzen in Matratzenstoffen niemals
absaugen! Niemals Dampfreiniger einsetzen!
Bei Matratzen mit Matratzenbezug und Toppern
die Hinweise auf den eingenähten Pflegeetiketten
beachten.
Kunstleder
Bezug mit sauberem leicht feuchten Fensterleder
vorsichtig abreiben. Feuchtigkeit hält das Material
elastisch. Hartnäckige Flecken mit leichter Seifen-
lauge behandeln.
Flecken
Zeit zählt, je schneller Sie einen Fleck entfernen,
desto besser die Erfolgsaussichten. Dabei je nach-
dem von Naht zu Naht aber immer vom Rand zur
Mitte arbeiten, damit der Fleck nicht größer wird.
Verwenden Sie ein sauberes, weiches, weisses Tuch
und arbeiten Sie mit geringem Kraftaufwand, damit
die Oberflächenstruktur nicht verletzt wird.
DE
FR
EN
DE
FR
EN
Blut, Ei, Kot, Urin Mit kaltem, destilliertem Wasser, evtl. mit Lösung aus Haar
Shampoo oder Feinwaschmittel und Wasser nachbehandeln,
kein heisses Wasser verwenden, da Eiweiss gerinnt.
Kaffee mit Milch, Kakao, Kopierstift,
Kugelschreiber, Lippenstift, Mayonnaise,
Parfüm, Sahne, Saucen, Suppen,
Erbrochenes
Mit lauwarmer Lösung aus Shampoo oder Feinwaschmittel und
destilliertem Wasser behandeln. Falls Rückstände, nach dem
Trocknen mit Spiritus bzw. Waschbenzin oder Fleckenentferner
nachbehandeln.
Spirituosen, Bier, Cola-Getränke,
Fruchtsäfte, Limonade, Kaffee, Tee
Nicht eintrocknen lassen, sofort mit lauwarmer Lösung aus
Shampoo oder Feinwaschmittel und destilliertem Wasser
behandeln.
Butter, Bohnerwachs, Farbe, Fett, Lack,
Nagellack, Möbelpolitur, Öl, Harz,
Kohle, Kopierstift
Mit Lösemitteln wie Waschbenzin, 70%-igem Isopropylalkohol,
Spiritus oder handelsüblichem Fleckenwasser behandeln.
Kaugummi, Knetgummi Handelsüblicher Vereisungsspray nach Vorschrift einsetzen.
Bei Velour Gefahr der Oberflächenverletzung.
Kerzenwachs Nicht mit dem Bügeleisen arbeiten! Soweit wie möglich
zerbröckeln und
– vorsichtig abheben (bei Velour Gefahr der Oberflächen-
verletzung)
– mit Waschbenzin unter Umständen mehrmals nachbehandeln
Eingetrocknetes Blut Weisses Tuch mit Zitronensäurelösung (1 gestrichener Esslöffel
auf 100 ml kaltes Wasser) anfeuchten und auftragen. Nicht bei
Baumwolle, Leinen, Viskose. Säure schädigt die Faser.
– Grobe Teile mit einem Löffel vorsichtig entfernen.
Versuchen Sie niemals eingetrocknete Flecken
abzukratzen oder herauszuziehen.
– Tuch mit Reinigungs- oder Fleckenentfernungsmittel
gemäß Empfehlung tränken.
– Reinigungsmittel dürfen nie direkt auf den Bezug-
stoff aufgebracht werden.
– Bei Einsatz von Fremdmitteln Farbechtheit und
Oberflächenveränderung an möglichst unsicht-
barer Stelle testen.
– Flecken niemals durchnässen.
– Immer mit destilliertem Wasser arbeiten, damit
keine Kalkränder entstehen.
– Bei Flecken unbekannter Herkunft zunächst
verfahren wie «wasserlösliche Flecken». Sollte
dies erfolglos sein, Behandlung wie unter
«wasserunlöslichen Flecken» wiederholen.
– Nach der Behandlung den Bezug mit einem
trockenem weissen Tuch abtupfen und zuletzt
abbürsten und bei Raumtemperatur trockenen
lassen. Nach dem Trocknen mit einer weichen
Bürste nochmals bürsten!
– Bei schwierigen Flecken Fachmann hinzuziehen.
– Niemals Dampfreiniger einsetzen.
Wasserlösliche Flecken
Wasserunlösliche Flecken

10 11
Sommaire / Aperçu pièces de montage
Aperçu pièces de montage ................................................................................................ 10
Boxspring fixe
1. Montage des pieds .................................................................................................. 11 – 12
2. Montage de la partie tête ............................................................................................. 13
Sécurité et utilisation
1. Instructions relatives à l’utilisation et la mise en place du lit...................14 –16
DE
FR
EN
DE
FR
EN
Boxspring fixe
1. Montage des pieds
Nombre de pieds
Lit simple Boxspring (80/90/100/120/140 cm)
Set avec 4 pieds et 1 pied central
Lits doubles Boxspring (160/180/200 cm)
Set avec 4 pieds et 1 pied central (par boîte)
DE
FR
EN
DE
FR
EN
Boxspring fixe
001 – Vis mécaniques pour élément de fixation
de la partie tête 4
002 – Vis à bois pour élément de fixation de la partie tête 4
003 – Élément de fixation de la partie tête sur le sommier 2

AA BCD
E
E
A
A
B
B
12 13
Boxspring fixe
1. Montage des pieds
DE
FR
EN
DE
FR
EN
1.1 Poser le sommier 1 soit sur le côté longitudinal,
soit à plat sur la face supérieure et respecter la
position du ruban auto-agrippant. Du côté du pied
se trouve un ruban auto-agrippant qui empêche
l’écartement des deux sommiers.
1.2 Visser les pieds dans le logement pour pied
«A» ou «B» et le pied central dans le logement «D».
Attention: 1 pied central par sommier est toujours
requis.
1.3 Visser l'élément de fixation de la partie tête
(avec la patte côté trou oblong) à l'aide des vis
mécaniques (001) dans un des logements de per-
çage «E» et serrer légèrement. Veuillez utiliser
respectivement le perçage éloigné du ruban auto-
agrippant. Vous vous assurez ainsi que les éléments
de fixation en fin des opérations reposent respec-
tivement dans le perçage extérieur. Pour les lits
individuels, utiliser les deux perçages «E».
Ensuite, fixer du côté façade à l'aide des vis à bois
(002). Ensuite, serrer fermement sur la face infé-
rieure.
1.4 Ensuite disposer le sommier 1.
1.5 Procéder sur le sommier 2 de la même façon
que pour le sommier 1 et poser le sommier 2 à côté
du sommier 1.
Boxspring fixe
2. Montage de la partie tête
2.1 Soulever la partie tête à deux. Positionner les
éléments de fixation du sommier sur les fixations
de la partie tête.
2.2 Faites coulisser les éléments coulissants de
la partie tête (A) dans les éléments coulissants
du sommier tapissier box (B).
2.3 Serrer le pied de liaison du côté du pied et/ou
fermer le ruban auto-agrippant.
2.4 Lors de la mise en place du lit, il convient
de toujours veiller à ce que le système complet
se trouve sans tension et à l’horizontale, par de
niveau. Calage au moyen des pieds réglables ou
bien en positionnant des matériaux appropriés
sous les pieds.
DE
FR
EN
DE
FR
EN

14 15
1.1 Formation de bruits/grincements
Nos systèmes de lit sont évidemment construits et
dimensionnés de sorte que la formation de bruits
soit évitée, ou bien minimisée jusqu’à ne plus être
ressentie comme gênante.
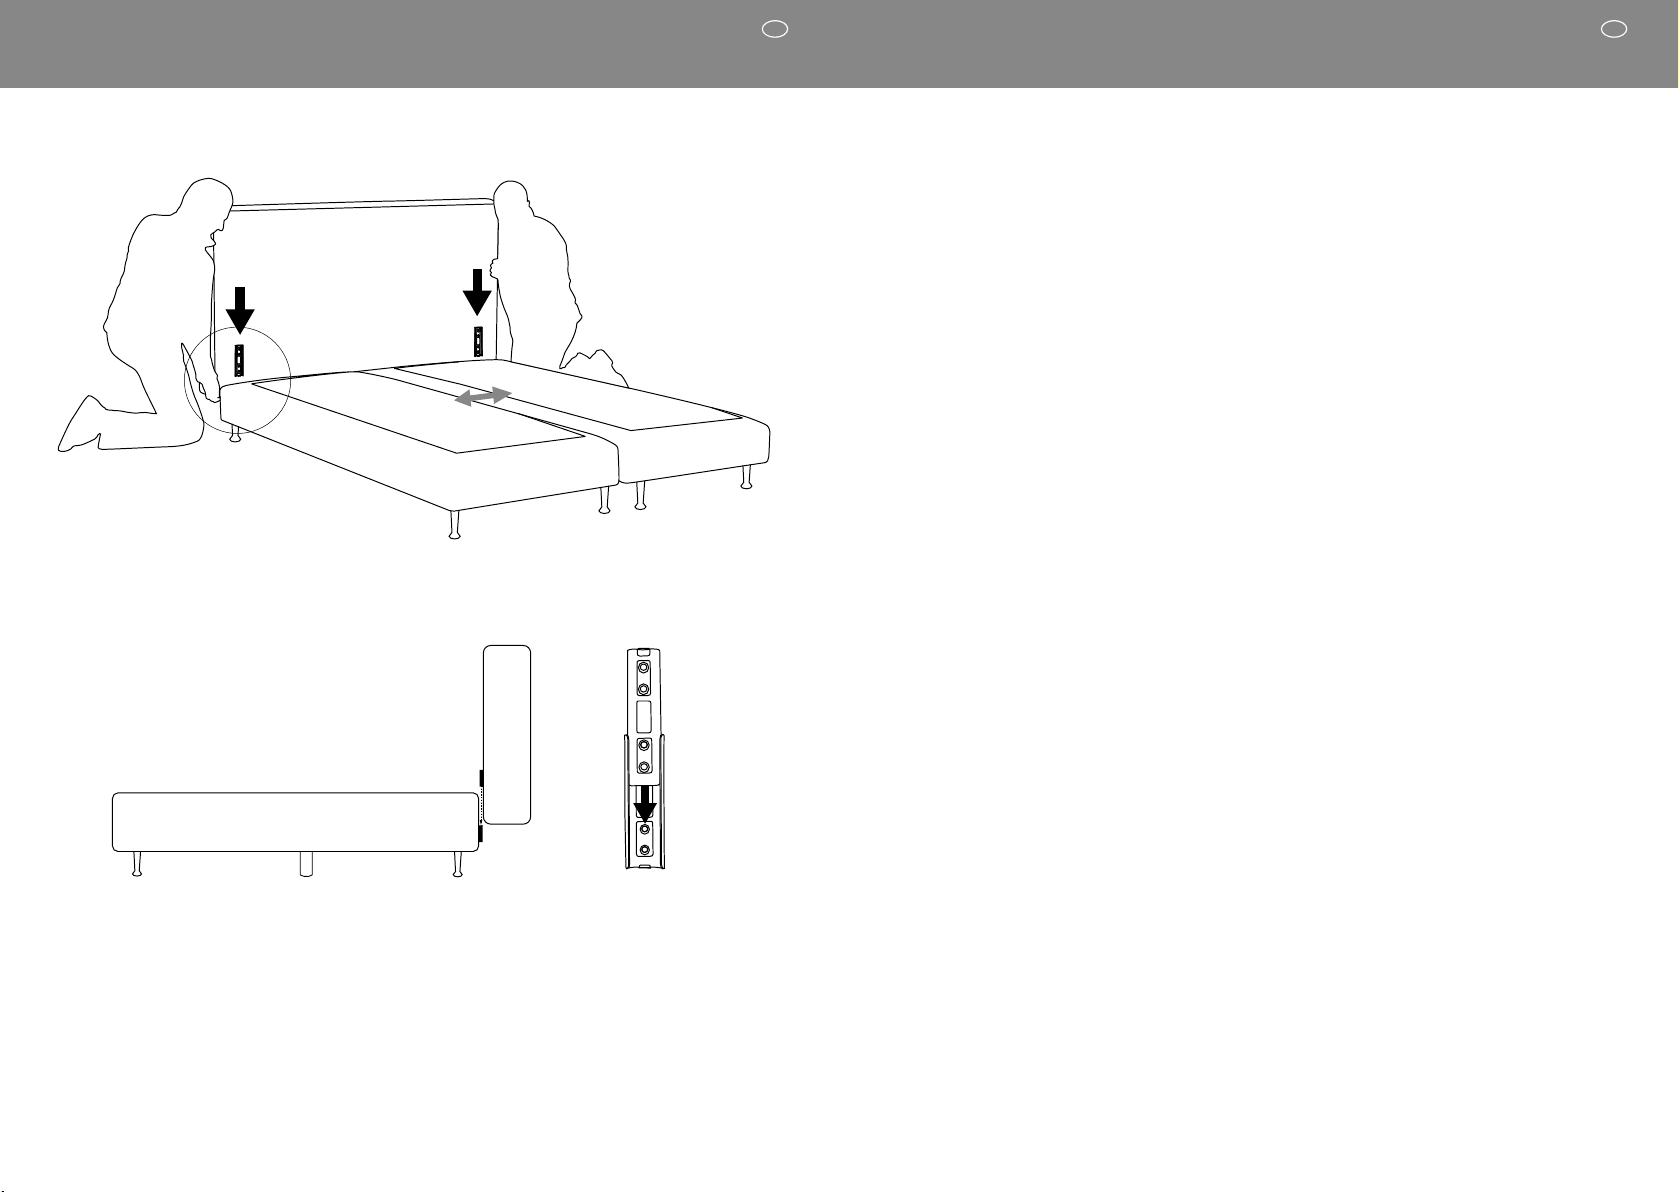
Cela suppose toutefois également que le lit ait été
assemblé et monté selon les étapes de la notice de
montage.
Il convient en outre de veiller à une mise en place
sans torsion ni tension du lit. Le montage d’un seul
côté sur les bords d’un tapis ou des sols irréguliers
entraîne la déformation du coffre à literie et de
l’ensemble du support et par la suite, la torsion de
composants mobiles tels que la tige des moteurs et
les paliers. Calage au moyen des pieds réglables
ou bien en positionnant des matériaux appropriés
sous les pieds.
1.2 Points de pression au sol
Sur les sols souples (bois, plastique, liège, moquette,
etc.), les pieds de meubles peuvent laisser des mar-
ques et des égratignures. Il est au moins possible de
remédier à cela, en cas de sols lisses en apposant
des patins de protection en feutre sur l’envers et en
cas de sols rugueux en apposant des rondelles de
feutre.
1.3 Climat intérieur
Protégez votre lit contre une exposition directe au
soleil ou bien une lumière vive étant donné que les
tissus et bois n’ont pas une résistance absolue à la
lumière. Un fort éclairage au néon ou halogène peut
également entraîner une altération de la couleur ou
du matériau et une décoloration.
Le taux d’humidité idéal dans la pièce devrait se
situer entre 45% et 55%. En cas de valeurs inféri-
eures, les matériaux naturels deviennent cassants et
le synthétique a tendance à se charger en électricité
statique et à plus s’encrasser. Une hygrométrie plus
élevée favorise le développement éventuel de moisis-
sures. Veuillez respecter les instructions suivantes:
Sécurité et utilisation
1. Instructions relatives à l’utilisation et la mise en place du lit
– Aérez régulièrement votre chambre à coucher
(brève aération).
– Afin de garantir une circulation d’air suffisante
au-dessus et en-dessous du matelas, secouer
régulièrement couvertures et coussins et les retour-
ner quelques heures. Etendre à nouveau le couvre-
lit uniquement après aération du lit.
– Particulièrement en cas d’utilisation supplémentaire
d’un sur-matelas (topper), celui-ci doit être retourné
de temps en temps.
– Veillez à ce qu’il y ait suffisamment de distance
jusqu’aux radiateurs et assurez une aération
arrière suffisante entre le mur et la partie tête.
1.4 Traces d’usure
Même les surfaces, tissus et housses de haute qualité
employés ne résistent pas à toutes les contraintes
d’une utilisation quotidienne. Des détériorations ou
traces peuvent par exemple résulter de:
– objets tranchants, pointus, tels que des bracelets,
bijoux, chaînes, barrettes, etc.
– griffes d’animaux domestiques
– substances chimiques, telles que des teintures
capillaires, du gel coiffant, de la laque, du maquil-
lage, des crèmes et lotions, des cosmétiques
– cheveux gras et transpiration, effluves de person-
nes sous traitement médical régulier
– liquides alcoolisés et jus de fruits
Ne pas couper les fils tirés mais les tirer vers l’inté-
rieur. Si un fil est arraché, cela crée un trou dans la
housse!
Des traces d’usure de ce type sont exclus de la
garantie et ne peuvent pas faire l’objet de réclama-
tions.
1.5 Altérations de la couleur dues à des vêtements
ou housses de couette, boulochage
Aucune responsabilité ne pourra être assumée pour
la résistance des couleurs d’autres tissus de vête-
ments et de housses de couette pouvant déteindre
sur le sommier tapissier. Il ne s’agit ici nullement d’un
défaut du tissu de la housse mais d’une défectuosité
des tissus de vêtements ou du linge de lit employé.
DE
FR
EN
DE
FR
EN
Le terme boulochage désigne la formation de
nodules sur des tissus, résultant la plupart du temps
du frottement de différents tissus (faux boulochage),
p. ex. de linge de lit. La tendance à boulocher peut
être favorisée par un climat humide et/ou de l’élec-
tricité statique.
Il s’agit d’une caractéristique typique du matériau et
non d’une défectuosité. Avec un rasoir anti bouloche
spécial, les boulochages peuvent de nouveau être
éliminés sans problème.
1.6 Variations de couleurs
Outre les variations de couleurs dus à différents sens
de tissus résultant de la production ou du traitement,
les matériaux de la housse présentent des variations
de couleurs d’usage. C’est pourquoi des variations
de couleurs sont également possibles au niveau de
l’échantillon en exposition ou de pièces livrées anté-
rieurement.
1.7 Caractéristiques de traitement
Selon l’aspect du matelas, les produits rembourrés
sont traités de façon tonique ou moelleuse. Un traite-
ment moelleux signifie un confort accru grâce à
l’accueil en douceur dans le matelas. L’aspect voulu
se forme à l’usage par la formation individuelle de
plis et ondulations en raison la faible tension de la
housse, p. ex. en cas de matelas recouvert de tissus
d’ameublement. Après utilisation, les surfaces peu-
vent être aplanies vers l’extérieur ou tapotées.
Dans la zone de matelas, de nombreux matériaux
souples sont travaillés. Le rembourrage et la couture
sont réalisés à la main – c’est pourquoi des diffé-
rences de dimensions par rapport aux tailles indi-
quées sont possibles, de +/- 1% en longueur et en
largeur. Des différences de taille peuvent également
résulter du stockage ou du transport. En règle géné-
rale, le produit retrouve sa dimension nominale lors
de l’utilisation.
1.8 Odeur de neuf et comportement en position
allongée
Les nouveaux produits ont toujours une odeur pro-
pre, spécifique au matériau. Cela est absolument
sans risques et disparaît au fil du temps. Un remède
consiste en une aération plus fréquente.
Chaque sommier tapissier et chaque matelas
s’adapte au fil du temps au dormeur. Les fines cou-
ches de rembourrage de haute qualité sont com-
pactées. Ainsi se forme un creux à la surface du
matelas. En tournant le matelas régulièrement, le
revêtement du rembourrage se détend de nouveau.
Les matelas s’assouplissent légèrement à l’usage,
en moyenne d’env. 10–15 %. Ce sont des propriétés
typiques du produit et des variations de fermeté
qui ne sont pas couvertes par la garantie.
1.9 Entretien et élimination des tâches
Entretien régulier
Passez délicatement l’aspirateur avec une brosse à
épousseter et brossez avec une brosse souple pous-
sières, miettes, salissures superficielles.
Ne jamais aspirer le sur-matelas et les matelas dans
les tissus de matelas! Ne jamais utiliser de nettoyeur
à vapeur!
En cas de matelas avec housse de matelas et de
sur-matelas (topper), respecter les instructions sur
les étiquettes d’entretien cousues.
Cuir synthétique
Frotter avec précaution la housse avec une peau
de chamois propre, légèrement humide. L’humidité
préserve l’élasticité du matériau. Traiter les taches
tenaces avec de l’eau légèrement savonneuse.
Taches
Le temps compte, plus vous éliminerez une tache
rapidement, meilleures seront les chances de réus-
site. Pour cela, selon les cas, travailler de couture
en couture mais toujours du bord vers le milieu afin
que la tache ne s’agrandisse pas. Utilisez un chiffon
blanc, souple, propre, et travaillez en exerçant une
légère pression afin de ne pas abîmer la structure
superficielle.
DE
FR
EN
DE
FR
EN

16 17
Sang, œuf, excréments, urine Poursuivre le traitement avec de l’eau distillée froide, éventuelle-
ment avec une solution à base de shampoing pour cheveux ou
de la lessive pour linge délicat et de l’eau, ne pas utiliser d’eau
chaude car les protéines coagulent.
Café au lait, cacao, stylo indélébile,
stylo bille, rouge à lèvre, mayonnaise,
parfum, crème, sauces, soupes, vomi
Traiter avec une solution tiède à base de shampoing ou de
lessive pour linge délicat et de l’eau distillée. En cas de résidus,
poursuivre le traitement après le séchage avec de l’alcool à
brûler ou bien de l’essence de lavage ou du détachant.
Spiritueux, bière, boissons au cola,
jus de fruits, limonade, café, thé
Ne pas laisser sécher, traiter immédiatement avec une solution
tiède à base de shampoing ou de lessive pour linge délicat et
de l’eau distillée.
Beurre, cire, peinture, huile, laque,
vernis, encaustique, huile, résine,
charbon, stylo indélébile
Traiter avec des solvants tels que de l’essence de lavage,
de l’alcool isopropylique à 70%, de l’alcool à brûler ou du
détachant liquide du commerce.
Chewing-gum, pâte à modeler Utiliser un spray réfrigérant en suivant les prescriptions.
En cas de velours, risque d’abîmer la surface.
Cire de bougie Ne pas utiliser de fer à repasser! Effriter autant que possible et
– soulever avec précaution (en cas de velours, risque d’abîmer
la surface)
– répéter éventuellement le traitement à plusieurs reprises avec
de l’essence de lavage
Sang séché Humidifier un chiffon blanc avec une solution d’acide citrique
(1 cuillère à soupe rase pour 100 ml d’eau froide) et appliquer.
Pas avec du coton, du lin, du viscose. L’acidité abîme les fibres.
– Enlever les parties grossières avec précaution à
l’aide d’une cuillère. N’essayez jamais de gratter
ou extraire des taches séchées.
– Imbiber le chiffon de produit de nettoyage ou de
détachant conformément aux recommandations.
– Les produits de nettoyage ne doivent jamais être
appliqués directement sur le tissu de la housse.
– En cas d’utilisation produits étrangers, tester la
résistance des couleurs et la modification de la
surface à un endroit si possible non-visible.
– Ne jamais laisser traverser les taches.
– Toujours travailler avec de l’eau distillée afin
d’éviter la formation de marques calcaires.
– En cas de taches d’origine inconnue, procéder
dans un premier temps comme des «taches solu-
bles à l’eau». Si cela devait s’avérer vain, répéter
le traitement comme indiqué sous «taches solubles
à l’eau».
– Après le traitement, tamponner la housse avec
un chiffon blanc sec et en dernier lieu, brosser
et laisser sécher à température ambiante. Après
le séchage, brosser de nouveau avec une brosse
souple!
– En cas de taches difficiles, consulter un expert.
– Ne jamais utiliser de nettoyeur à vapeur.
Taches solubles à l’eau
Taches non solubles à l’eau
DE
FR
EN
DE
FR
EN
Contents / Summary of assembly parts
Summary of assembly parts ............................................................................................... 17
Fixed Boxspring
1. Assembling the feet ............................................................................................... 18 –19
2. Assembling the head section ....................................................................................... 20
Safety and use
1. Instructions on use and set-up of the bed ....................................................... 21–23
DE
FR
EN
DE
FR
EN
Fixed Boxspring
001 – Machine screws for head section fitting 4
002 – Wood screws for head section fitting 4
003 – Fitting between head section and box 2

AA BCD
E
E
18 19
Fixed Boxspring
1. Assembling the feet
Number of feet
Boxspring single bed (80/90/100/120/140 cm)
Set of 5 feet and 1 middle foot
Boxspring double beds (160/180/200 cm)
Set of 4 feet and 1 middle foot (per box)
DE
FR
EN
DE
FR
EN Fixed Boxspring
1. Assembling the feet
DE
FR
EN
DE
FR
EN
1.1 Place Box 1 either on the long side or flat on the
top side and note the position of the Velcro fastener.
A Velcro fastener which prevents the boxes from
drifting apart is provided at the foot end.
1.2 Screw feet into foot socket «A» or «B», and
middle foot into socket «D». Attention: One middle
foot is required for each box.
1.3 Screw head section fitting (with the bracket
featuring the slotted holes) into one of the bore holes
«E» using the machine screws (001) and tighten
slightly. Please use the hole that is further away from
the Velcro fastener in each case. This will ensure
that the fittings will sit in the respective outer hole
in the end. With single beds, use both holes «E».
Then fasten at the front using the wood screws
(002). Next fasten tightly at the bottom side.
1.4 Then set up Box 1.
1.5 Assemble Box 1 in the same way as Box 2
and place Box 2 next to Box 1.

A
A
B
B
20 21
Fixed Boxspring
2. Assembling the head section
2.1 Two persons lift the head section. Align the fitting
parts of the box to the fittings of the head section.
2.2 Slide the sliding elements of the head section
(A) into the box sliding elements (B).
2.3 Tighten the connecting foot at the foot end
and/or close the Velcro fastener.
2.4 When setting up the bed, always take care
that the whole system is standing horizontally and
stress-free or has been levelled. Adjust the feet or
lay suitable material underneath.
DE
FR
EN
DE
FR
EN
1.1 Noise/creaking
Our bed systems are of course constructed and sized
to prevent noise or keep it to a minimum, so that it
does not become a nuisance.
However, an essential condition for the above is that
the bed is assembled and installed according to the
stages in the assembly instructions.
It is also necessary to ensure that the bed is set up
to be distortion-free and stress-free. Assembly with
one side on the edge of a carpet or on sloping floors
will lead to warping of the bed box and the whole
base and as a consequence to distortion of movable
components such as motor rods and bearings.
Adjust the feet or lay suitable material underneath.
1.2 Pressure points on floors
On soft floors (wood, synthetics, cork, carpet, etc.)
furniture feet may leave pressure marks and
scratches. This can be corrected by gluing felt pads
underneath on smooth floors and, for rough floors,
gluing furniture gliders underneath.
1.3 Indoor climate
Protect your bed from direct sunlight or very bright
light, as no wood or fabric is completely fade-proof.
High-energy neon or halogen light can also lead
to changes in color or material and bleaching.
The ideal humidity in the room should be between
45% and 55%. At lower values, natural materials
become brittle and synthetic fibers have a higher
tendency to develop electrostatic charge and
become soiled. Higher humidity values provide
good conditions for mold to form. Please observe
the following:
– Regularly air your bedroom (short, intermittent
periods of full ventilation).
– Take care to ensure sufficient air circulation on
and underneath the mattress, regularly shaking
up bedcovers and pillows and folding them back
for some hours. Do not replace the bedspread
until the bed has been fully aired.
Safety and use
1. Instructions on use and set-up of the bed
– In particular, if an additional mattress topper
is used, this must be turned from time to time.
– Take care to ensure enough distance from heaters
and that there is sufficient back ventilation between
the wall and the head section.
1.4 Signs of wear
Even the high-quality surfaces, fabrics and covers
that we use will not stand up to all the stresses of
everyday life. For example, the following may cause
damage or leave traces:
– sharp, pointed objects, such as bracelets, jewelry,
necklaces, hair clips, etc.
– Pet claws
– chemical substances, such as hair dyes, hair gel,
hair spay, make-up, creams and lotions, cosmetics
– Hair grease and sweat, perspiration from persons
regularly taking medication
– alcoholic liquids and fruit juice
Do not cut pulled threads, but draw them to the
inside. Once a thread is broken, this will create
a hole in the cover!
Signs of wear of this type are excluded from
warranty and give no grounds for a claim.
1.5 Discoloration by clothing or bedlinen, pilling
We can accept no liability for the colorfast qualities
of other bedding and cover materials, which may
transfer to the upholstered bed. This has nothing
to do with faults in the bed cover material, but with
defects in the covers or bedlinen used.
Pilling refers to the formation of little bobbles on
fabric, generally caused by the friction of different
fabrics rubbing together (non-genuine pilling), e.g.
bedlinen. The tendency to pilling can be increased
by a moist atmosphere and/or electrostatic charge.
This is a typical quality of these goods and not a
defect. Pilling can be easily removed with a special
fabric shaver.
DE
FR
EN
DE
FR
EN

22 23
1.6 Color variation
Along with color variations due to production and
finishing techniques, caused by different stroke
directions, the cover materials display the color
variations usual in the trade. It its therefore possible
that there may be variations in color even compared
to display samples or previously delivered parts.
1.7 Characteristic finish features
According to the look of the upholstery, upholstered
products are given either a tight-fitting or a looser
finish. A looser finish means increased comfort due
to soft sinking into the upholstery. The desired look
is created during use, by individual fold and ripple
formation, due to the somewhat looser covering,
for instance for mattresses covered in furnishing
fabric. After use, the surfaces can be smoothed
again, working towards the outside, or by shaking
up.
Many soft materials are used in the upholstered
area. Upholstery and sewing are hand crafts –
which means that divergences from the measure-
ments given are possible, up to +/- 1% in length
and width.
Differences in measurements can also be caused
by storage and transport. Generally, the product
will recover during use and regain its nominal
dimensions.
1.8 New product smell and indentation
of the mattress
New products always have a material-specific
individual smell. This is completely harmless and
will disappear over the course of time. Frequent
ventilation will help.
Every upholstered bed and every mattress will
adjust over time to the sleeper. The high-quality,
fine layers of padding are compressed. This forms
an indentation in the surface of the mattress.
Regular turning of the mattress, head to foot or
right over, will allow the padding to recover.
Mattresses become a little softer with use, on
average about 10–15%. These are qualities typical
of the goods and normal divergences from firmness,
and do not come under guarantee.
1.9 Care and stain removal
Regular care
Lightly vacuum with a soft brush nozzle to remove
dust, crumbs and surface dirt and brush off with
a soft brush.
Never vacuum mattress toppers or mattresses
with fabric covers! Never use steam cleaners!
For mattresses with mattress covers or toppers,
observe the instructions on the stitched-on care
labels.
Imitation leather
Carefully wipe down the cover with a clean, slightly
damp chamois leather. Moisture will keep the
material elastic. Treat stubborn stains with mild soap
suds.
Stains
Time is important. The sooner you remove a stain,
the better the chances of success. According to
circumstances, move from seam to seam but always
from the edge to the centre, to avoid enlarging the
stain. Use a clean, soft, white cloth and use little
force when cleaning, to avoid damaging the surface
structure.
DE
FR
EN
DE
FR
EN
Blood, egg, feces, urine Treat with cold, distilled water. If necessary, follow up treatment
with a solution of shampoo or delicate fabrics wash agent.
Do not use hot water as the proteins will coagulate.
Coffee with milk, cocoa, indelible
pencil, ballpoint pen, lipstick,
mayonnaise, perfume, cream, sauces,
soups, vomit
Treat with a lukewarm solution of shampoo or delicate fabrics
wash agent and distilled water. If traces remain, treat with spirit,
cleaner’s solvent or stain remover after drying.
Spirits, beer, cola-based drinks, fruit
juices, lemonade, coffee, tea
Do not allow the stain to dry but treat immediately with
a lukewarm solution of shampoo or delicate fabrics wash
agent and distilled water.
Butter, wax floor polish, paint, fat,
varnish, nail varnish, furniture polish,
oil, resin, charcoal, indelible pencil
Treat with solvents such as cleaning solvent, 70% isopropyl
alcohol, spirit or standard stain remover.
Chewing gum, modeling clay Use a standard freezing spay according to instructions.
With velour, there is a danger of damage to the surface.
Candle wax Do not use an iron! Break up as much as possible and
– carefully lift off (with velour, there is danger of damage
to the surface)
– follow up this treatment, if required, several times with
cleaning solvent
Old blood stains Moisten a white cloth with citric acid solution (1 level tablespoon
to 100 ml cold water) and apply. Do not use for cotton, linen or
viscose. Acid will damage the fibres
– Carefully remove thick sections with a spoon.
Never try to scrape or pull off dried-on stains.
– Soak a cloth with a recommended cleaning
or stain removal medium.
– Cleaning materials must never be applied directly
to the cover material.
– If cleaning materials from an outside source are
used, test for color fastness and surface changes
on a spot that is as far as possible not visible.
– Never soak stains.
– Always use distilled water to avoid limescale
edges.
– With stains of uncertain origin, proceed initially
in the same way as for water soluble stains. If this
is not successful, repeat treatment as for non-water
soluble stains.
– After treatment, pat the cover dry with a dry white
cloth and finally brush and allow to dry at room
temperature. After drying, brush again with a soft
brush!
– For difficult stains, seek advice from a specialist.
– Never use steam cleaners.
Water soluble stains
Non-water soluble stains
DE
FR
EN
DE
FR
EN

DOC AG
Mövenstrasse 8
CH-9015 St.Gallen
Tel: +41 (0)71 313 90 80
Fax: +41 (0)71 313 90 89
info@doc.ch
www.doc.ch
Table of contents
Languages:
Other philrouge Indoor Furnishing manuals
Popular Indoor Furnishing manuals by other brands

Argos
Argos Capella Assembly instructions

Steelcase
Steelcase Elective Elements Blade Accessory Shelf manual

HPFI
HPFI ETC 461 quick start guide

Paragon
Paragon A&D Crossfit Motion user guide

Coopers of Stortford
Coopers of Stortford 10497 instructions

RH Baby&child
RH Baby&child MODERN METAL DISPLAY SHELF Assembly instructions