Phonak Profilo WL-Kit DM User manual

Prolo WL-Kit DM
Prolo WL-Kit AC
Prolo LM-Kit AC
User Guide
Gebrauchsanweisung
Mode d'emploi
Profilo Kits

Welcome
Congratulations on choosing a Prolo kit from Phonak Communications.
Prolo kits are unique, state-of-the-art communication systems that have been developed for
use in combination with a Prolo Nano earpiece and a wireless PTT for covert operations.
Please read this User Guide thoroughly to make the most out of your Prolo kit. If you have any
questions, please contact your local Phonak Communications support center.
Phonak Communications AG
www.phonak-communications.com
Profilo Kits

Willkommen
Herzlichen Glückwunsch zum Kauf eines Prolo-Sets von Phonak Communications.
Prolo-Sets sind einzigartige, hochmoderne Kommunikationssysteme, die für den Einsatz mit
einem Prolo Nano-Ohrhörer und einer drahtlosen Sprechtaste für verdeckte Operationen
konzipiert sind.
Bitte lesen Sie diese Gebrauchsanweisung sorgfältig, um Ihr Prolo-Set optimal nutzen zu
können. Sollten Sie Fragen haben, setzen Sie sich bitte mit Ihrem örtlichen Support-Center von
Phonak Communications in Verbindung.
Phonak Communications AG
www.phonak-communications.com
Profilo Sets
Bienvenue
Merci d’avoir choisi un kit Prolo de Phonak Communications
Les kits Prolo sont des systèmes de communication uniques et à la pointe de la technologie. Ils
ont été développés pour une utilisation avec une oreillette Prolo Nano et une PTT sans l pour
une utilisation en toute discrétion.
Veuillez lire entièrement ce mode d’emploi pour proter pleinement de votre kit Prolo. Veuillez
contacter votre centre de support Phonak local pour toute question.
Phonak Communications AG
www.phonak-communications.com
Kits Profilo

Gebrauchsanweisung
Seite 25 bis 37
Mode d’emploi
page 41 à 53
User Guide
page 9 to 21
EnglishDeutschFrançais

9
Protect the device from excessive moisture (bathing, swimming), heat (radiator, car dashboard),
and direct contact with skin when sweating.
Excessive bending (e.g. over 90 degrees or over sharp edges) or applying of strong pull forces
on the cables might lead to cable defects and hence a malfunctioning of the device, such as
loss of communication or sound coming out of the radio loudspeaker.
Your device should only be repaired by an authorized service center. Changes or modications
to this device that were not explicitly approved by Phonak Communications will void the
warranty and might compromise the proper operation of the device.
Safety information
P
r
o
f
i
l
o
N
a
n
o
Junction-box
Figure 1
Radio connector

11
1 System overview and Prolo wirings components 11
2 How to use the Prolo kits 13
2.1 Attaching the Prolo kits to the radio
2.2 Talking
2.3 Listening
3 Troubleshooting 18
4 Spare parts 19
5 Technical data 19
6 Warranty 20
7 Conformity declaration 20
8 Description of symbols 21
Content 1 System overview
Profilo WL-wiring (DM or AC) or
Profilo LM-wiring
1 Profilo Nano earpiece is not included in the Profilo kits.
2 Wireless PTT is included only in the Profilo WL-kit (DM or AC).
3 The handheld radio is not included in the Profilo kits.
P
r
o
f
i
l
o
N
a
n
o
P
r
o
f
i
l
o
N
a
n
o
Wireless PTT 2Handeld radio 3
Figure 2
Profilo Nano earpiece 1

12 13
P
r
o
f
i
l
o
N
a
n
o
1 Prolo wirings components 2 How to use the Prolo kit
Attaching the Prolo wiring to the radio
uAttach the Profilo wiring to a radio via the radio connector (figure 5). Please refer to the
radio user-guide for information on the correct way to attach the connector.
P
r
o
f
i
l
o
N
a
n
o
P
r
o
f
i
l
o
N
a
n
o
P
r
o
f
i
l
o
N
a
n
o
Radio connector
Radio connector
Junction-box
Junction-box
2-key PTT
In-line PTTFigure 3
Figure 4 Figure 5
Loop-box
Loop-box
Microphone
Microphone
Neck-loop
Junction-box
Radio connector
Neck-loop
Quick-release safety disconnects
Prolo WL wirings
Prolo LM wirings

14 15
2 How to use the Prolo kit2 How to use the Prolo kit
Warnings
Ask an authorized technician to program the radio parameters correctly. Phonak is not
responsible for programming of the radio parameters.
Make sure the radio connector is compatible with the radio to be used. For information on
radio and connector compatibility, please contact your local representative.
To prevent any sound coming out of the radio loudspeaker, we recommend the use of radio
connectors or radio adapters that include accessory identications. This will ensure that the
radio will see an accessory attached, and mute the loudspeaker. Phonak is not liable for any
consequences in the event the loudspeaker turns on during operations.
Once turned o, some radios still provide power to the accessories. In such cases, the Prolo
wiring will continue to draw current from the radio battery. For more information, please
contact your radio supplier.
Advices
The Prolo wiring power supply comes directly from the radio battery. The Prolo wiring power
consumption has a low impact on the lifetime of the radio battery.
Talking
uPlace the neck-loop around the neck and insure that the loop-box remains directly under
the mouth (figure 6).
uAs the microphone is located at the top of the loop-box (figure 6), the loop-box should be
as close as possible from the mouth. To achieve this, there are several neck-loop lengths
available as spare parts.
uAttach the quick-release safety disconnects correctly (figure 7).
P
r
o
f
i
l
o
N
a
n
o
Microphone
Loop-box
Earpiece
Transmission range
Neck-loop
Figure 7Figure 6
Quick-release safety disconnects

16 17
2 How to use the Prolo kit2 How to use the Prolo kit
Activating the microphone
uPress the In-line PTT, the 2-key PTT, or use the PTT function from the wireless PTT paired
to the junction-box to activate the microphone (figure 8).
Listening
uPlace a Profilo Nano earpiece in the ear (figure 9). For more information, please see the
Profilo Nano user guide or contact your local representative. The audio from the radio is
transmitted to the earpiece via the neck-loop (figure 6).
Advices
Prolo WL wirings and Prolo LM wirings can only be used with a Prolo Nano earpiece.
The transmission range is very small and remains in the vicinity of the end-user’s head.
(No risk of message interception.) (gure 6).
The quick-release safety disconnects should be closed correctly to transmit the signal – there
should be no gap between the quick-release safety disconnects (gure 7).
No pairing between the Prolo loop and the Prolo Nano earpiece is needed (any Prolo Nano
earpiece will work with any Prolo loop).
Notes
uThe wireless PTT included in the Profilo WL-kit is paired with the junction-box at the
factory. It is possible to pair a new wireless PTT (see Covert Wireless PTT AC user guide) for
both Profilo WL-kit and Profilo LM-kit.
uFor more information regarding the wireless PTT, please check the Covert Wireless PTT AC
user guide or contact your local representative.
P
r
o
f
i
l
o
N
a
n
o
P
r
o
f
i
l
o
N
a
n
o
P
r
o
f
i
l
o
N
a
n
o
P
r
o
f
i
l
o
N
a
n
o
Wireless PTT Profilo WL-kit junction-box
In-line PTTPTT button
Tone board or volume control
Figure 8
Figure 9
Profilo LM-kit junction-box 2-key PTT
PTT button
Tone board or inactive

18 19
4 Spare parts
5 Technical Data
3 Troubleshooting
I cannot hear
uCheck if the radio connector is attached correctly to the radio.
uCheck the radio battery level.
uCheck if the radio is muted or if the radio volume setting is too low.
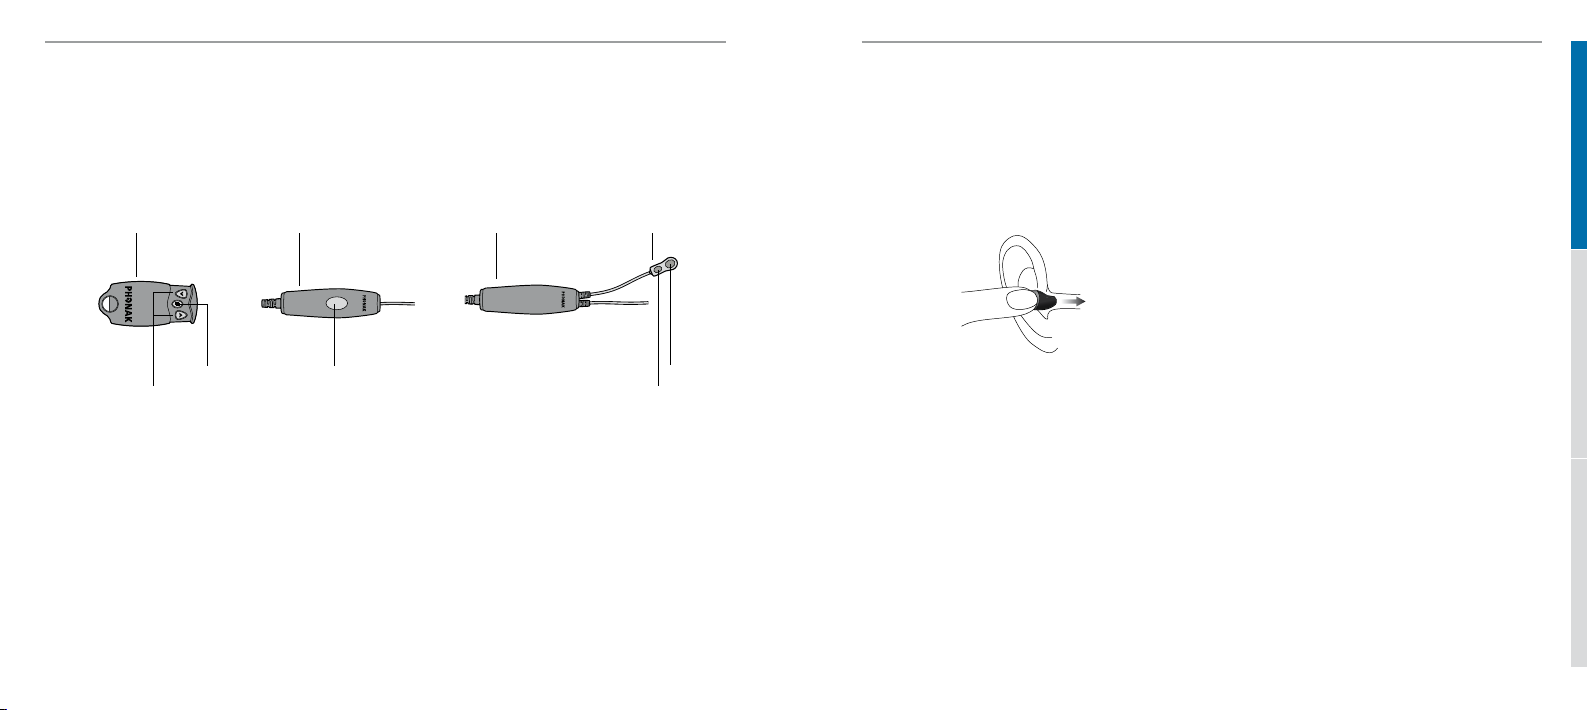
uChange the Profilo Nano earpiece battery.
uCheck if the quick-release safety disconnects are closed correctly.
uCheck if no PTT button is pressed.
uCheck if the radio connector is compatible with the radio used.
uIf the volume control function is activated on the wireless PTT, increase the volume of the
Profilo Nano earpiece.
uAsk an authorized technician to verify that the radio parameters are programmed correctly.
I cannot be heard
uCheck if the radio connector is attached correctly to the radio.
uCheck the radio battery level.
uPress a PTT button.
uIf the wireless PTT battery is low/empty, use the PTT button of the junction-box.
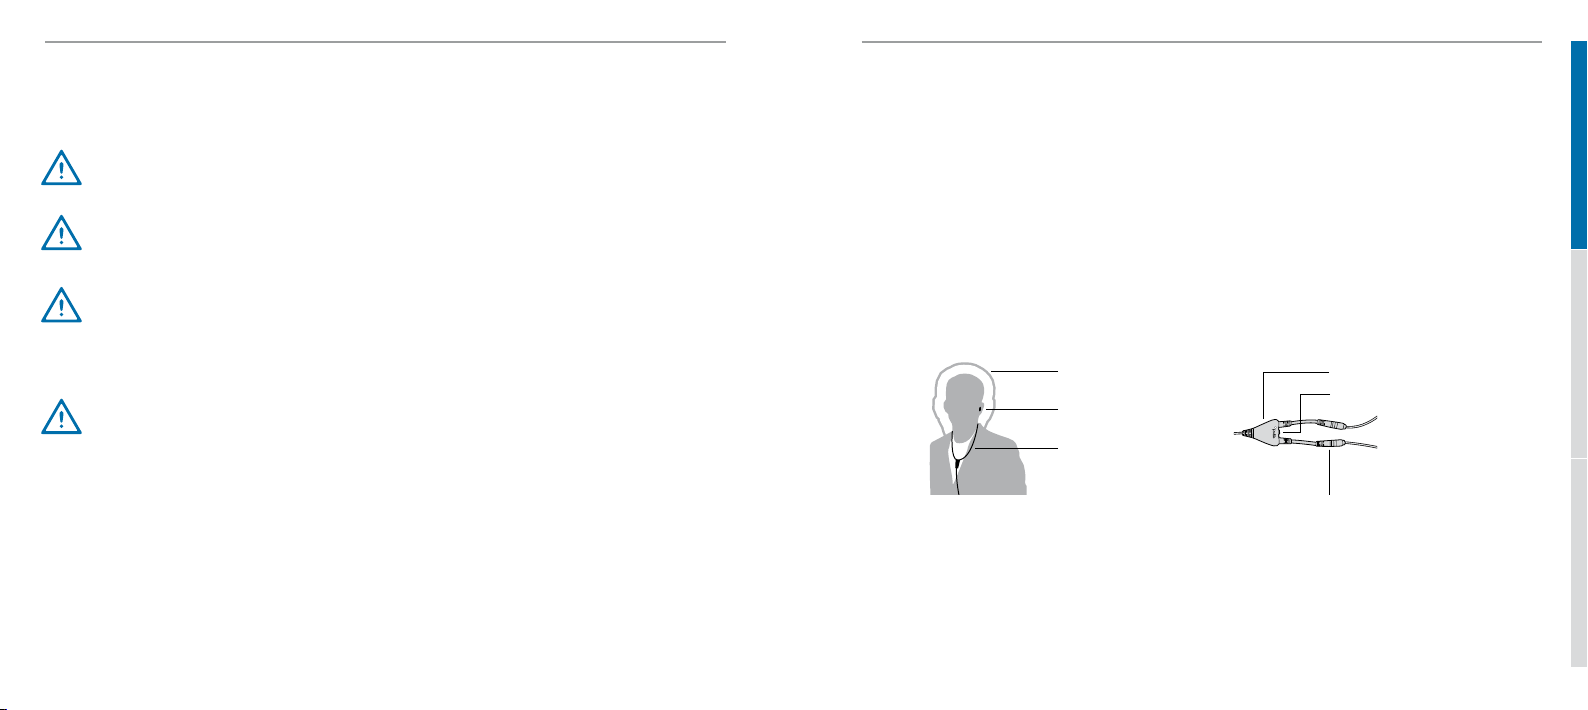
uThe micro may be too far from the mouth. Adjust the neck-loop lengths.
uCheck if the radio connector is compatible with the radio used.
uAsk an authorized technician to verify that the radio parameters are programmed correctly.
uThere are several neck-loop lengths available as spare parts.
uFor more information, please contact your local representative.
Prolo WL-wiring
Supply voltage External power required
(LV 3.3V – 10V DC) (HV 10V – 28V DC)
Power consumption Max. 30mA (~15mA stand-by) @ 5V
(dependant on power voltage)
Microphone (part of loop-box)
Type Omni-directional electret
Frequency response 100 Hz –10 kHz
Sensitivity @1kHz (dB re 1V / 1PA) -34.0 +/- 3dB

20
This symbol on the product or its packaging means that it should not be disposed of with
your other household waste. It is your responsibility to hand over your old appliance to
the applicable collection point for the recycling of electrical and electronic equipment. The
correct disposal of your old appliance will help prevent potential negative consequences
for the environment and human health.
This symbol indicates that it is important for the user to pay attention to the relevant
warning notices in this user guide.
The duration of the warranty for defects in parts or workmanship is two years from the date of
purchase. Any responsibility for incidental or consequential damages will be refused.
This warranty does not cover damage from improper handling or care, exposure to chemicals,
immersion in water or undue stress.
Damage caused by third parties or non-authorized service centers renders the warranty null
and void.
Hereby, Phonak Communications AG, Langgasse 17, CH-3280 Murten, declares that these
Phonak products are in compliance with the essential requirements and other relevant
provisions of Directive 2014/53/EU. To obtain a copy of the Declaration of conformity, please
contact the manufacturer or the local Phonak representative whose address can be taken from
the list on www.phonak.com (worldwide locations).
This device complies with Part 15 of the FCC Rules and with RSS210 of Industry Canada.
Operation is subject to the following two conditions: (1) This device may not cause harmful
interference, and (2) this device must accept any interference received, including interference
that may cause undesired operation. The device has been tested and found to comply with the
limits for a Class B digital device, pursuant to Part 15 of the FCC Rules. These limits are designed
to provide reasonable protection against harmful interference in a residential installation. The
device generates uses and can radiate radio frequency energy and, if not installed and used in
accordance with the instructions, may cause harmful interference to radio communications.
6 Warranty
7 Conformity declaration
8 Description of symbols
However, there is no guarantee that interference will not occur in a particular installation.
If the device does cause harmful interference to radio or television reception, which can be
determined by turning the device o and on, the user is encouraged to try to correct the
interference by one of the following measures:
– Reorient or relocate the receiving antenna.
– Increase the separation between the device and receiver.
– Connect the device into an outlet on a circuit dierent from that to which the receiver is
connected.
– Consult the dealer or an experienced radio/TV technician for help.
FCC Caution: Any changes or modications not expressly approved by the party
responsible for compliance could void the user’s authority to operate the device.
21
7 Conformity declaration

Gebrauchsanweisung
Seite 25 bis 37
Mode d’emploi
page 41 à 53
User Guide
page 9 to 21
EnglishDeutschFrançais

25
Schützen Sie das Gerät vor übermässiger Feuchtigkeit (Baden, Schwimmen), Hitze (Heizkörper,
Armaturenbrett im Auto) und direktem Hautkontakt, wenn Sie schwitzen.
Übermässiges Biegen (über 90 Grad oder über scharfe Kanten) oder die Einwirkung starker
Zugkräfte auf die Kabel können zu Kabeldefekten führen und damit zu Funktionsstörungen
des Geräts wie Kommunikationsverlust oder dem Dringen von Tönen aus dem Lautsprecher
des Funkgeräts.
Ihr Gerät darf nur von autorisierten Service-Centern repariert werden. Veränderungen
oder Modikationen an diesem Gerät, die nicht ausdrücklich von Phonak Communications
genehmigt wurden, führen zum Erlöschen der Garantie und können die korrekte Funktion des
Geräts beeinträchtigen.
Sicherheitshinweise
P
r
o
f
i
l
o
N
a
n
o
Verteilerbox
Abbildung 1
Funkgerätstecker

26 27
1 Das System im Überblick
Profilo WL-Verkabelung (DM oder AC) oder
Profilo LM-Verkabelung
1 Der Profilo Nano-Ohrhörer ist nicht in den Profilo-Sets enthalten.
2 Die drahtlose Sprechtaste ist nur im Profilo WL-Set (DM oder AC) enthalten.
3 Das Handfunkgerät ist nicht in den Profilo-Sets enthalten.
P
r
o
f
i
l
o
N
a
n
o
P
r
o
f
i
l
o
N
a
n
o
Drahtlose Sprechtaste 2Handfunkgerät 3
Abbildung 2
Profilo Nano-Ohrhörer 1
1 Das System im Überblick und Prolo-Verkabelungskomponenten 27
2 Verwendung des Prolo-Sets 29
2.1 Anschluss des Prolo-Sets an das Funkgerät
2.2 Sprechen
2.3 Hören
3 Tipps für die Fehlerbehebung 34
4 Ersatzteile 35
5 Technische Daten 35
6 Garantie 36
7 Deklaration der Konformität 36
8 Beschreibung der Symbole 37
Inhalt

28 29
2 Verwendung des Prolo-Sets
Anschluss des Prolo-Kabels an das Funkgerät
uVerbinden Sie das Profilo-Kabel über den Funkgerätstecker mit einem Funkgerät
(Abbildung 5). Informationen über den korrekten Anschluss des Steckers finden Sie in der
Gebrauchsanweisung des Funkgeräts.
Abbildung 5
Verteilerbox
Funkgerätstecker
P
r
o
f
i
l
o
N
a
n
o
1 Prolo-Verkabelungskomponenten
P
r
o
f
i
l
o
N
a
n
o
P
r
o
f
i
l
o
N
a
n
o
P
r
o
f
i
l
o
N
a
n
o
Funkgerätstecker
Funkgerätstecker
Verteilerbox
Verteilerbox
2-Tasten-Sprechtaste
Kabelgebundene
SprechtasteAbbildung 3
Abbildung 4
Schlaufen-box
Schlaufen-box
Mikrofon
Mikrofon
Hals-Induktionsschlaufe
Sicherheitsschnellverschlüsse
Prolo WL-Verkabelung
Prolo LM-Verkabelung

30 31
2 Verwendung des Prolo-Sets
Sprechen
uLegen Sie sich die Schlaufe um den Hals und achten Sie darauf, dass sich die Schlaufenbox
direkt unter Ihrem Mund befindet (Abbildung 6).
uDa sich das Mikrofon oben an der Schlaufenbox befindet (Abbildung 6), sollte sich die Box
möglichst nah am Mund befinden. Dafür sind Hals-Schlaufen in unterschiedlichen Längen
als Ersatzteile verfügbar.
uSchliessen Sie die Sicherheitsschnellverschlüsse korrekt (Abbildung 7).
P
r
o
f
i
l
o
N
a
n
o
Mikrofon
Schleifenbox
Ohrhörer
Übertragungsbereich
Hals-Schleife
Abbildung 7Abbildung 6
Sicherheitsschnellverschlüsse
2 Verwendung des Prolo-Sets
Warnhinweise
Wenden Sie sich für die korrekte Programmierung der Parameter des Funkgeräts bitte an
einen autorisierten Techniker. Phonak ist nicht für die Programmierung der Parameter des
Funkgeräts zuständig.
Achten Sie darauf, dass der Funkgerätstecker mit dem verwendeten Funkgerät kompatibel
ist. Informationen über die Kompatibilität von Funkgerät und Stecker erhalten Sie von Ihrem
örtlichen Vertreter.
Um zu verhindern, dass Töne aus dem Lautsprecher des Funkgeräts dringen, empfehlen
wir, Funkgerätstecker oder -adapter zu verwenden, die über eine Erkennungsfunktion für
Zubehörteile verfügen. So wird sichergestellt, dass das Funkgerät ein angeschlossenes
Zubehörteil erkennt und der Lautsprecher stummgeschaltet wird. Phonak haftet nicht für die
Folgen eines versehentlichen Einschaltens des Lautsprechers während einer Operation.
Manche Funkgeräte versorgen auch in ausgeschaltetem Zustand die Zubehörteile weiter mit
Strom. In diesem Fall entziehen die Prolo-Verkabelung der Batterie des Funkgeräts weiter
Energie. Ist die Prolo-Verkabelung nicht im Gebrauch, empfehlen wir, diese vom Funkgerät zu
trennen. Bitte wenden Sie sich für weitere Informationen an Ihren Funkgeräteanbieter.
Hinweise
Die Prolo-Verkabelung wird direkt von der Batterie des Funkgeräts mit Strom versorgt. Der
Stromverbrauch der Prolo-Verkabelung hat nur sehr geringen Einuss auf die Lebensdauer
der Batterie des Funkgeräts.

32 33
2 Verwendung des Prolo-Sets
Hören
uSetzen Sie einen Profilo Nano-Ohrhörer in Ihr Ohr ein (Abbildung 9). Wenden Sie sich
für weitere Informationen bitte an Ihren örtlichen Vertreter oder sehen Sie in der Profilo
Nano-Gebrauchsanweisung nach. Das Audiosignal des Funkgeräts wird über die Hals-
Induktionsschleife an den Ohrhörer übertragen (Abbildung 6).
Hinweise
Die Prolo WL- und die Prolo LM-Verkabelung können nur mit einem Prolo Nano-Ohrhörer
verwendet werden.
Der Übertragungsbereich ist sehr klein und umgibt knapp den Kopf des Endnutzers(keine
Gefahr, dass Nachrichten abgefangen werden) (Abbildung 6).
Die Sicherheitsschnellverschlüsse müssen korrekt geschlossen sein, damit das Signal übertragen
werden kann – sie sind lückenlos zu schliessen (Abbildung 7).
Kein Pairing zwischen dem Prolo-Induktionsschlaufe und dem Prolo Nano-Ohrhörer ist
notwendig (jeder Prolo Nano-Ohrhörer funktioniert mit jeder Prolo-Induktionsschlaufe).
P
r
o
f
i
l
o
N
a
n
o
Abbildung 9
2 Verwendung des Prolo-Sets
Aktivierung des Mikrofons
uDrücken Sie die kabelgebundene Sprechtaste, die 2-Tasten-Sprechtaste oder nutzen Sie die
Sprechtastenfunktion der drahtlosen Sprechtaste, die mit der Verteilerbox verbunden ist,
um das Mikrofon zu aktivieren (Abbildung 8).
Hinweise
uDie Verbindung der im Profilo WL-Set enthaltenen drahtlosen Sprechtaste mit der
Verteilerbox wird werkseitig vorgenommen. Sowohl beim Profilo WL-Set also auch beim
Profilo LM-Set ist eine Verbindung mit einer neuen drahtlosen Sprechtaste möglich (siehe
AC-Gebrauchsanweisung für getarnte drahtlose Sprechtasten).
uWenden Sie sich für weitere Informationen zur drahtlosen Sprechtaste bitte an Ihren
örtlichen Vertreter oder sehen Sie in der AC-Gebrauchsanweisung für getarnte drahtlose
Sprechtasten nach.
P
r
o
f
i
l
o
N
a
n
o
P
r
o
f
i
l
o
N
a
n
o
P
r
o
f
i
l
o
N
a
n
o
Drahtlose Sprechtaste Verteilerbox des Profilo
WL-Sets
Kabelgebundene SprechtasteSprechtaste
Tonboard oder Lautstärkeregelung
Abbildung 8
Verteilerbox des Profilo
LM-Sets
2-Tasten-Sprechtaste
Sprechtaste
Tonboard oder inaktiv

34 35
4 Ersatzteile
5 Technische Daten
uEs sind Hals-schlaufen in unterschiedlichen Längen als Ersatzteil verfügbar.
uWeitere Informationen erhalten Sie von Ihrem örtlichen Vertreter.
Prolo WL-Kabel
Versorgungsspannung Externe Stromversorgung notwendig
(niedrige Gleichspannung: 3.3V – 10V DC)
(hohe Gleichspannung: 10V – 28V DC)
Stromverbrauch Max. 30mA (Standby ~15mA) bei 5V
(abhängig von der Versorgungsspannung)
Mikrofon(TeilderInduktionsschlaufenbox)
Typ Elektretmikrofon mit Kugelcharakteristik
Frequenzgang 100 Hz –10 kHz
Empndlichkeit bei 1 kHz (dB re 1 V/Pa) -34.0 +/- 3dB
3 Tipps für die Fehlerbehebung
Ich höre nichts.
uÜberprüfen Sie, ob der Funkgerätstecker korrekt mit dem Funkgerät verbunden ist.
uÜberprüfen Sie den Ladezustand des Funkgeräts.
uÜberprüfen Sie, ob das Funkgerät stummgeschaltet oder die Lautstärke des Funkgeräts zu
niedrig eingestellt ist.
uÜberprüfen Sie die Batterie des Profilo Nano-Ohrhörers.
uÜberprüfen Sie, ob die Sicherheitsschnellverschlüsse korrekt geschlossen sind.
uErhöhenSiedieLautstärkedesProfiloNano-Ohrhörers,wenndieLautstärkeregelungsfunktion
uder drahtlosen Sprechtaste aktiviert ist.
uÜberprüfen Sie, ob der Funkgerätstecker mit dem verwendeten Funkgerät kompatibel ist.
uStellen Sie sicher, dass keine Sprechtaste gedrückt ist.Lassen Sie einen autorisierten
Techniker überprüfen, ob die Parameter des Funkgeräts korrekt programmiert sind.
Ich werde nicht gehört.
uÜberprüfen Sie, ob der Funkgerätstecker korrekt mit dem Funkgerät verbunden ist.
uÜberprüfen Sie den Ladezustand der des Funkgeräts.
uDrücken Sie eine Sprechtaste.
uVerwenden Sie die Sprechtaste der Verteilerbox, wenn die Batterie der drahtlosen
Sprechtaste leer ist oder einen niedrigen Ladezustand aufweist.
uDas Mikrofon könnte zu weit vom Mund entfernt sein. Passen Sie die Länge der Schlaufen an.
uÜberprüfen Sie, ob der Funkgerätstecker mit dem verwendeten Funkgerät kompatibel ist.
uLassen Sie einen autorisierten Techniker überprüfen, ob die Parameter des Funkgeräts
korrekt programmiert sind.

36
Dieses Symbol, das sich auf dem Produkt oder der Verpackung bendet, bedeutet, dass es
nicht über den normalen Hausmüll entsorgt werden darf. Sie sind dafür verantwortlich,
Ihr Altgerät bei der zuständigen Recycling-Sammelstelle für Elektro- und Elektronikge-
räte abzugeben. Durch die korrekte Entsorgung Ihres Altgeräts helfen Sie dabei, mögli-
che Umwelt- und Gesundheitsschäden zu verhindern.
Dieses Symbol weist Sie darauf hin, die entsprechenden Warnhinweise in dieser
Gebrauchsanweisung zu beachten.
Die Gewährleistungsfrist für Material- oder Verarbeitungsfehler beträgt zwei Jahre ab
Kaufdatum. Es wird keinerlei Haftung für indirekte oder Folgeschäden übernommen.
Die Garantie umfasst keine Schäden durch unsachgemässe Handhabung oder Pege, Kontakt
mit Chemikalien, Untertauchen in Wasser oder übermässige Belastungen.
Sollten Schäden von Dritten oder nicht autorisierten Service-Centern verursacht werden, so
erlischt jegliche Garantie.
Hiermit erklärt Phonak Communications AG, dass sich das Gerät in Übereinstimmung mit den
grundlegenden Anforderungen und den übrigen einschlägigen Bestimmungen der Richtlinie
2014/53/EU bendet.
6 Garantie 8 Beschreibung der Symbole
7 Deklaration der Konformität
37

Gebrauchsanweisung
Seite 25 bis 37
Mode d’emploi
page 41 à 53
User Guide
page 9 to 21
EnglishDeutschFrançais
This manual suits for next models
2
Table of contents
Languages:
Other Phonak Conference System manuals