manuals.online logo
Brands
  1. Home
  2. •
  3. Brands
  4. •
  5. Phonak
  6. •
  7. Headset
  8. •
  9. Phonak Primero DPC User manual

Phonak Primero DPC User manual

Product Overview
primero DPC is a communication headset with dynamic hearing protection that is designed for
use with professional radios.
An in-ear miniature microphone first captures the wearer‘s voice using intra-aural pick-up
technology. primero DPC‘s unique algorithm then separates this speech from background noise,
before sending it over the radio channel with excellent sound quality. Thanks to Phonak‘s VIP
technology, the primero DPC system offers excellent listening and speaking comfort and is
useable in the very noisiest of environments.
Headset functionality
primero DPC includes two miniature loudspeakers (one in each ear) and one in-ear microphone.
Medium-loud to very loud background noise (~70–115 dB) is recognizedusing a special algorithm
and filtered out of the speech signal for excellent understanding by the listener.
Hearing protection functionality
primero DPC users are continuously protected against harmful noise, both during and outside of
radio communication sessions. Level-dependent protection provides the user with full ambient
awareness in quiet environments and exactly the correct amount of attenuation (sound dampen-
ing) when the surrounding noise is above permitted exposure limits. Loud ‘impulse’ noises such
as gun shots, crashes, industrial machines etc. are instantaneously dampened to a comfortable
level. Immediately after these loud noises have dissipated, primero DPC then readjusts so that
normal sound, conversation or warning signals can once again be heard.
User’s Guide
Figure 1: primero DPC system overview 11. Press-To-Talk (PTT) button for radio
12. On-Off switch and battery door
13. Volume key - Up (ambient)
14. Volume key - Down (ambient)
15. Screw-on detachable fixing clip/band
16. Index mark for On, Off, and battery door opening
Figure 4: primero DPC earJackTM adapterOn the right side is a loudspeaker ,
and on the left side a loudspeaker combined with in-ear microphone (for picking up speech) .
Important User Information
For full protection, in noisy environments you must wear the hearing protection 100 % of the
time.
Neveruse the device without the earJackTM adapters correctly inserted into the custom-made
ear molds. Verify that these are fitted according to these instructions before use.
Make sure you always have one earJackTM adapter with loudspeaker and one earJackTM
adapter with loudspeaker and in-ear microphone in use.
Your ear-plug is provided with level-dependent attenuation. Check its correct operation
before use. If distortion or failure is detected, you should refer to Phonak’s advice for mainte-
nance and replacement of the battery.
Wear, adjust, clean, and maintain this hearing protection device in accordance with Phonak’s
instructions here. You may adversely impact the protection offered if you do not follow these
instructions.
primero DPC’s ear molds are fully re-usable. However they should be inspected regularly and
cleaned properly, according to these instructions. The ear mold material is long-lasting,
highly robust and made to withstand mechanical, thermal and chemical stress. However the
shape of a user’s ears can change over time, e.g. if the user significantly reduces his or her
body weight. This type of change can adversely affect the sealing of the ear molds and
thereby the attenuation (dampening) provided. Werecommend that you verify proper sealing
of the ear molds after 2–4 years.
The primero DPC system can be connected to portable radio devices. The user should review
proper operating procedure before use. In case of fault or malfunction, contact the manufac-
turer.
Hearing protection devices can block out warning sounds, alarms, and other important signals.
Always pay extra attention to your surroundings when wearing hearing protection.
Place the system in the pocket provided when not in use and store in a dry place at tempera-
tures not exceeding +60 °C. If primero DPC it is not used for a prolonged length of time,
remove the battery from the control box.
Dispose of defective systems properly or send back to the manufacturer for repair.
Warning: Performance may deteriorate with continued battery usage over time. The typical
period of continuous use that can be expected from the ear-plug battery is 200 hours, after
which the system may begin powering down (this is indicated via repetitive acoustic beeps).
Warning: The output of the electrical audio circuit of this hearing protector may exceed the
daily limit sound level.
Figure 5: For full protection, when in a
noisy environment you must wear the hearing
protection device 100% of the time.
Instructions for Use
Putting the system on
Figure 6: Click the earJackTM adapter with the
loudspeaker into either left or right ear mold
and the other earJackTM adapter (featuring the
loudspeaker and microphone ) into the other
ear mold.
Figure 7: Place the lanyard over your head.
The ear mold marked red is for your right ear,
the ear mold marked blue is for your left.
Figure 8: Insert the ear mold into your outer ear
with the opening pointing into your ear canal.
Figure 9: Twist the ear mold slightly to insert
it properly into your ear. Ensure that the mold
stays firmly put in your outer ear and forms
a good seal. (Until you become familiar with
the procedure, use a mirror to verify that
the ear mold is seated correctly in your ear.)
Switching the system on
primero DPC: Connect the control box with the radio connector to your portable radio system.
primero DPC is powered by the portable radio handset when this radio is connected and switched
on. At this point the internal primero DPC battery (if present) is disconnected and its On-Off
switch becomes redundant. If there is no power available from the radio, the primero DPC system
(ambient mode) can be operated using its battery.
To insert the primero DPC’s battery, open the battery door (see Figure 3) by switching the On-Off
switch counter-clockwise to the position indicated by the battery symbol. Take the On-Off
switch out of the control box. Insert the battery with its positive (+) end pointing outwards. Push
the On-Off switch back into the control box and turn it clockwise. In position 0 the battery door
is closed; in position 1 dynamic hearing protection is powered on.
When switching the system on – either via the On-Off switch or via a portable radio – a beep on
each shell side indicates correct operation.
When battery power is low, the system signals this with a beep every 30 seconds. Shortly before
the battery powers down completely, the frequency of the beeps is increased.
Figure 2: primero DPC ear mold with
earJackTM adapter
Figure 3: primero DPC control box
Product: primero DPC
Extreme noise, natural communication
Dynamic hearing protection with in-ear voice pick-up
over Voice Intra-aural Pick-up (VIP) technology
1
3
4
6/7 6 /7
2
8
5
9
1
Figures 1-4 show primero DPC in detail
1. Lanyard
2. Ear mold for left ear
3. Ear mold for right ear
4. Snap-on neck cord with safety break points
on each side
5. Connector with safety break point
6. earJackTMadapter with loudspeaker
7. earJackTM adapter with
loudspeaker and in-ear microphone
8. Connector for communication
system (e. g. radio)
9. Control box
10. Sound inlet for the ear microphone
(ambient). This can be covered with
a snap-on foam wind screen
10
6/7
5
8
9
5
7 6
4
2
12
11 14
13
15
3
16
6+7
Adjusting the ambient sound volume
Use the volume keys (see Figure 3) to adjust the sound level at which you can hear the ambient
environment. On powering up, the system amplifies soft ambient sounds to a sound level similar
to that heard if the ears were unprotected.
By pushing the volume up key, amplification can be increased by up to 6 dB (from the power up
setting) in 2 steps. By pushing the volume down key, amplification can be reduced by up to 15dB
(from the power up setting) in 5 steps. A beep indicates when you have reached either end of the
volume control range.
The sound level of the communication signal is adjusted independently, using the volume control
of the portable radio device.
To avoid wind noise in outdoor environments, you can cover the ear microphones with the
snap-on foam wind screen provided.
Taking the system off
Figure 10: Hold the ear mold by the earJackTM
adapter and remove it carefully from your ear.
Use a slight upward movement to avoid a rapid
pressure drop.
Maintaining the system
Figure 11: Remove the earJackTM adapter from
the ear mold by pressing the snap lock springs
together and gently pulling the adapter away,
starting with the top.
Figure 12: Clean and disinfect the ear molds
with soap and water. Never use water – or any
other liquid – to clean the earJackTM adapters.
Figure 13: Dry the ear molds using a fan or
compressed air before remounting the
earJackTM adapters.
Figure 14: Insert the earJackTM adapters into
the ear molds by first hooking the lower
hinge of the earJackTM adapter into the mold,
then pushing the upper part firmly into the
mold until it clicks. By correctly inserting the
adapter you will ensure a tight seal and
proper operation of the hearing protection.
You can test the tightness of the seal by
slightly blowing the ear mold at the open end
with your mouth.
Functions and Technical Data
Hearing Protection
Attenuation values for primero DPC hearing protection are shown in Table 1.
Table 1: Attenuation values (mean, standard deviation, and assumed protection)
for octave band frequencies, and SNR, L, M, and H attenuation values.
primero DPC
Frequency Mean Standard Assumed
Attenuation Deviation Protection
Hz dB dB dB
125 21.9 5.2 16.7
250 21.9 5.2 16.7
500 21.1 5.8 15.3
1000 26.7 4.0 22.7
2000 32.7 3.5 29.2
4000 29.8 3.4 26.4
8000 31.7 4.7 27.0
SNR = 24 L = 18 M = 20 H = 27
APV Assumed Protection Value
H High-frequency attenuation value
M Medium-frequency attenuation value
L Low-frequency attenuation value
SNR Single Number Rating attenuation value
The attenuation values in Table 1 characterise the passive attenuation provided by the ear molds
with the earJackTM adapters inserted, i. e. when the dynamic attenuation system is switched off.
When the system is switched on, ambient sounds are reproduced by the ear speakers with the
output level limited to 80 (+/-2) dB(A) (free field equivalent). The criteria levels listed in Table 2
represent the critical noise exposure at which the combined passive and dynamic attenuation
exceeds 85 dB(A).
Table 2: High frequency criteria level H, medium frequency criteria level M, and low frequency
criteria level L for level dependent attenuation
H 108 dB
M 105 dB
L 98 dB
Receiving External Communication
The output of portable radios is reproduced by primero DPC using an acoustic shock limiter,
which limits the sound exposure to 95 (+/-) 2 dB(A) (free field equivalent).
When using the communication system with high output volume settings, the sound level may
exceed 85 dB(A). At this volume, the daily sound level exposure limit may be reached after 30–60
minutes of cumulative signal reception (about 10% of receiving time over an 8-hour day).
The user is advised to adjust the system’s volume control to the minimum level required to under-
stand communications.
In-Ear Microphone
primero DPC is equipped with an in-ear microphone, which picks up the user’s voice for
communication. Thanks to Phonak’s specially developed algorithm, the background noise is
largely filtered out before the voice signal is sent to the radio. Medium-loud, loud and very loud
noise (~70dB – 115dB) is recognized and significantly filtered out of the speech signal. It is
important that one side (right or left) of the primero DPC (earJack) is equipped with the in-ear
microphone marked and the other side equipped only with a loudspeaker .
Power Supply
When powered by its battery, primero DPC typically draws 4mA of power. Either an LR03 (AAA)
battery or rechargeable battery rated between 1.2 V and 1.5 V can be used. The typical battery life
is 200 hours.
When powered by a radio system, primero DPC typically draws 9mA from this system. Supply
voltage
should be between 2.6 V and 28 V.
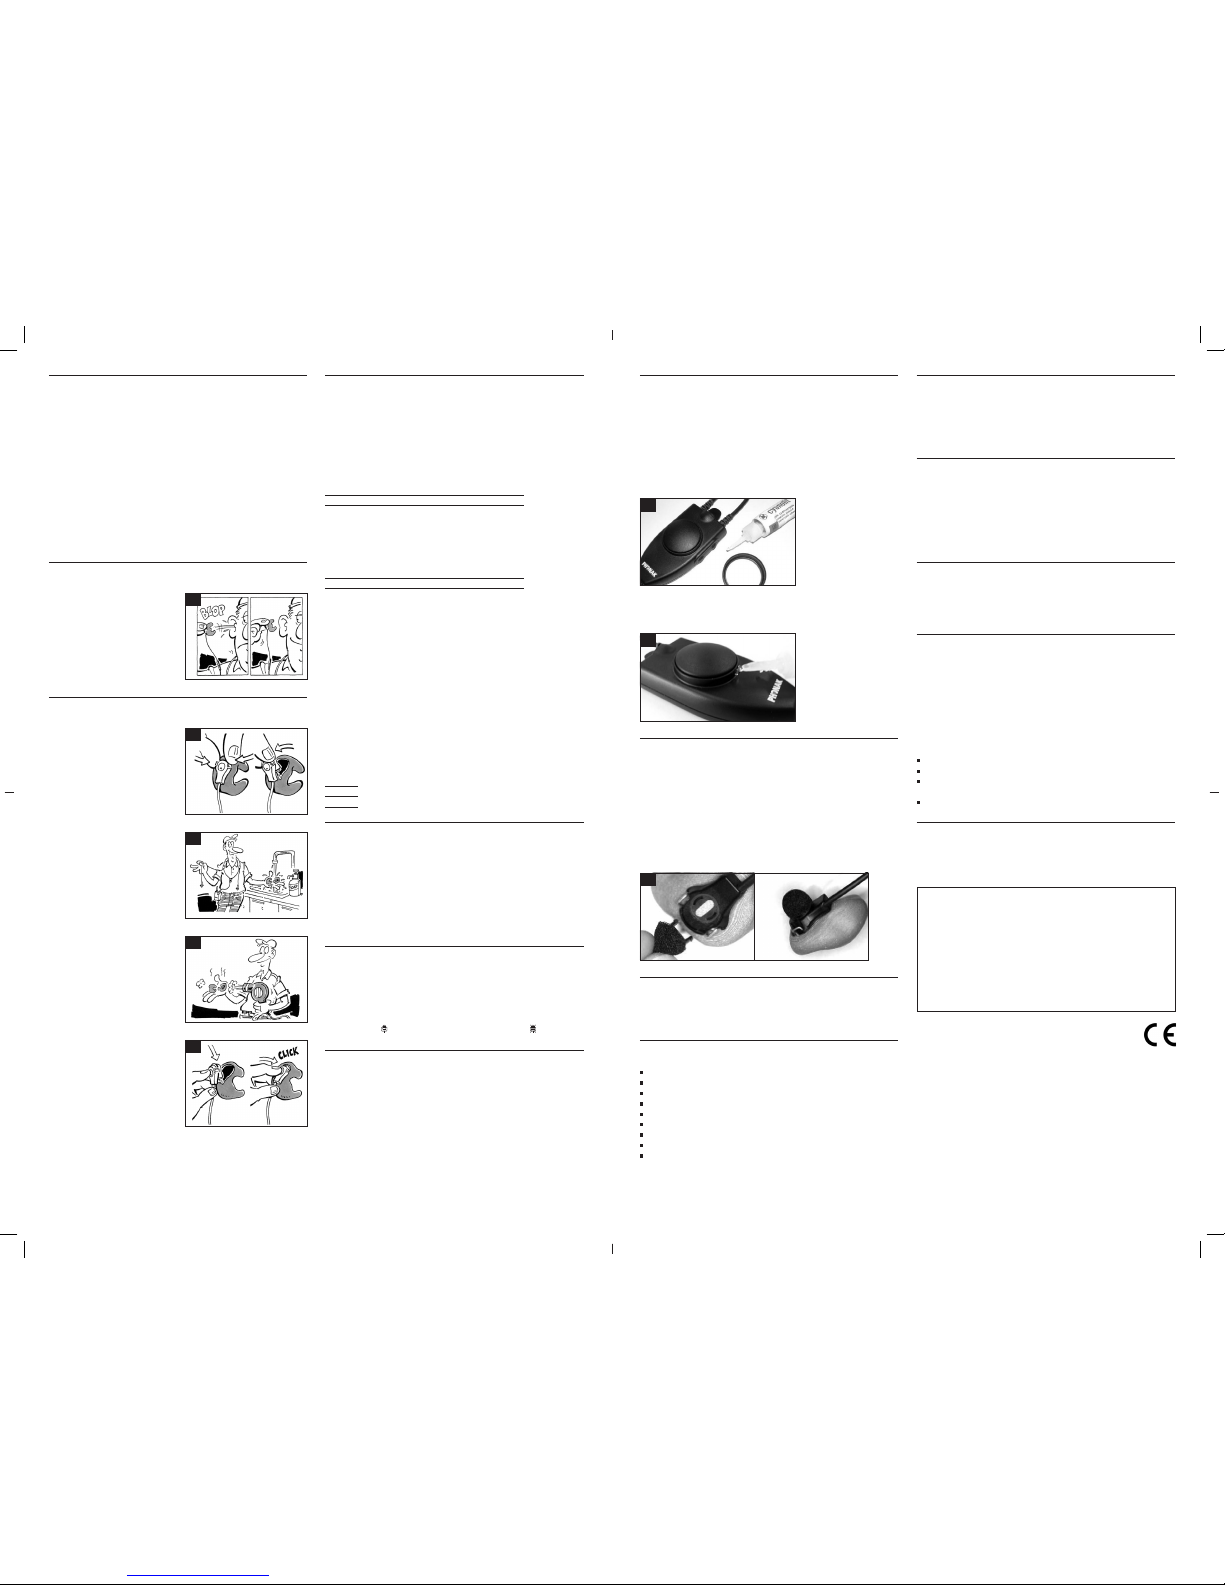
Fixing the PTT Cover Ring
On the primero DPC the PTT button may be surrounded by a cover ring, which protects the button
from unintended use. If required, it’s possible to attach the cover ring by placing three drops of
superglue (a cyanoacrylate adhesive such as Loctite 460) around the outer edge of the PTT but-
ton. Make sure that no glue penetrates the small gap surrounding the button (see Figures 15 and
16).
Figure 15: If required, use superglue to mount the PTT cover ring to protect against
unintended use.
Figure 16: Be sure not to get any adhesive in the gap between the PTT button
and the surrounding edge.
Attaching Wind Screens
When using primero DPC products in outdoor environments, wind screens significantly reduce
the wind noise generated by turbulence around the microphones.
Snap-on foam wind screens are supplied to shield the microphones located on each earJackTM
adapter. When attaching these, ensure that the snappers are inserted precisely into both slots on
the adapter, as outlined in Figure 17.
Figure 17: Mounting the snap-on foam wind screens on to the microphones
of the earJackTM adapters.
Attaching the Screw-on Clip
To attach the primero DPC control box to a belt or item of clothing, a rotatable clip, can be
screwed on. Use a standard screw driver and mount firmly.
Available Spare Parts and Options
Replacement ear molds
earJackTM adapter DPC with loudspeaker
earJackTM adapter DPC with both, loudspeaker and in-ear microphone
Snap-on foam wind screens (for the ear microphones)
Snap-on neck cord
Screw-on clip for mounting the control box to a belt or item of clothing
Cover ring for PTT button (to avoid unintended use)
Pocket for carrying and storing the system
Optional: Covert Wireless PTT and Tactical Wireless PTT
Optional: Wireless PTT units
Two optional wireless PTT units are available. One is designed primarily for covert applications,
called the covert wireless PTT AC. The second is for tactical applications, called the tactical wire-
less PTT AC. For more information on either PTT, please contact your local Phonak representative
or visit our website at www.phonak-communications.com
Conformity
Hearing Protection
Phonak primero DPC hearing protection complies with EU directive 89/686/EEC for personal
protective equipment and has been tested and approved according to EN 352-7:2002 for Hearing
Protectors – General Requirements – Part 7: Ear-plugs with level dependent attenuation.
EC type examination certificate is provided by notified body BSI Product Services (0086),
Maylands Avenue, Hemel Hempstead, HP2 4SQ, United Kingdom.
Electromagnetic Compatibility
primero DPC is in conformity with EN 55022:1998 + A1:2000 + A2:2003 class B and EN
55024:1998 + A1:2001 + A2:2003 in compliance with the specifications of the EMG Guideline
89/336/EEC.
Conformity declaration
This Class B digital apparatus complies with Canadian ICES-003 Note: This equipment has been
tested and found to comply with the limits for a class B digital device, pursuant to part 15 of the
FCC rules. These limits are designed to provide reasonable protection against harmful inter-
ference in a residential installation. This equipment generates, uses, and can radiate radio waves
and, if not installed and used according to the instructions, may interfere with other radio
communication. However, there is no guarantee that interference will not occur in a particular
set-up. If this equipment does cause harmful interference to radio or television reception, which
can be determined by turning the equipment off and on, the user is encouraged to try to correct
the interference by one or more of the following measures:
Reorient or relocate the receiving antenna
Increase the distance between the equipment and receiver
Connect the equipment into an outlet on a circuit different to that
to which the receiver is connected
Consult the dealer or an experienced radio/TV technician for help
Guarantee
The guarantee for primero DPC is valid for two years from the date of purchase. We accept no
liability
for indirect or consequential damages.
Manufactured by Phonak Communications AG
Laenggasse 17 | 3280 Murten | Switzerland
Phone +41 26 672 96 72 | Fax +41(0)26 672 3344
[email protected] | www.phonak-communications.com
029-3081-02
11
12
13
14
15
16
17
10

Other Phonak Headset manuals

Phonak Audeo User manual

Phonak

Phonak Audeo User manual

Phonak FreeCom 7100 User manual

Phonak

Phonak FreeCom 7100 User manual

Phonak FreeCom 7100 User manual

Phonak

Phonak FreeCom 7100 User manual

Popular Headset manuals by other brands

Radio Shack 2100183 user guide

Radio Shack

Radio Shack 2100183 user guide

Wildix W-AIR user guide

Wildix

Wildix W-AIR user guide

HiFiMAN Sundara user manual

HiFiMAN

HiFiMAN Sundara user manual

Unisar TV865 instruction manual

Unisar

Unisar TV865 instruction manual

Oticon Medical ConnectClip Instructions for use

Oticon Medical

Oticon Medical ConnectClip Instructions for use

LG TONE PLATINUM SE user manual

LG

LG TONE PLATINUM SE user manual

Creative GH0240 user guide

Creative

Creative GH0240 user guide

Sennheiser SC 638 quick guide

Sennheiser

Sennheiser SC 638 quick guide

Sennheiser SC 40 USB MS quick guide

Sennheiser

Sennheiser SC 40 USB MS quick guide

CSR BlueTunes2 Stereo Headset quick start guide

CSR

CSR BlueTunes2 Stereo Headset quick start guide

Sony MW1 Startup guide

Sony

Sony MW1 Startup guide

bitmore AURAL BUDS user guide

bitmore

bitmore AURAL BUDS user guide

Bellman & Symfon BE9233 Medical device information

Bellman & Symfon

Bellman & Symfon BE9233 Medical device information

Vocera B2000 user guide

Vocera

Vocera B2000 user guide

Monster ISPORT Manual and warranty

Monster

Monster ISPORT Manual and warranty

maxfun MX-BT30 operating instructions

maxfun

maxfun MX-BT30 operating instructions

Audio Technica ATH-BT03 instructions

Audio Technica

Audio Technica ATH-BT03 instructions

Plantronics M20 user manual

Plantronics

Plantronics M20 user manual

manuals.online logo
manuals.online logoBrands
  • About & Mission
  • Contact us
  • Privacy Policy
  • Terms and Conditions

Copyright 2025 Manuals.Online. All Rights Reserved.