Phonocell 6/821 User manual

6/821
KIT VIVA-VOCE PER AUTO
KIT MAIN-LIBRE POUR AUTO
FREE-HANDS-KIT FOR CAR-APPLICATION
TELEFON-FREISPRECHEINRICHTUNG FÜRS AUTO
SISTEMA DE MANOS LIBRES PARA AUTOMOVILES
BLUETOOTH TECHNOLOGY
Istruzioni di montaggio
Mounting Instructions
Instructions de montage
Montageanleitung
Instrucciones para el montaje

3 4 5
2
6 7
1
CAR RADIO
ISO AUTO
CONNECTOR
I
1- Connettore (bianco) alla centralina
2- Connettore ISO all’impianto di serie
3- Connettori ISO alimentazione e altoparlanti
4- Ingresso per aggiornamento software
5- Uscita per altoparlante supplementare
6- Ingresso microfono
7- Ingresso Remote control
GB
1- Connector (white) to the Central Box
2- ISO-Connector to the original Hifi-installation
3- ISO-Connectors for Power-Supply and
Speakers
4- Input for Software-updating
5- Output for additional Speaker
6- Input for Microphone
7- Input for Remote Control
F
1- Connecteur blanc à l’unité centrale
2- Connecteur ISO à l’installation de série
3- Connecteurs ISO pour alimentation et
haut-parleurs
4- Entrée pour ajournement software
5- Sortie pour haut-parleur supplémentaire
6- Entrée micro
7- Entrée Remote Control
D
1- Verbinder (weiss) an die Zentral-Einheit
2- ISO-Verbinder an die Original-Anlage
3- SO-Verbinder für Stromzufuhr und Lautsprecher
4- Eingang für Software-Erneuerung
5- Ausgang für Zusatz-Lautsprecher
6- Eingang für Mikrofon
7- Eingang für Fernsteuerung
E
1- Conector (blanco) a la centralita
2- Conector ISO a la instalación de origen
3- Conectores ISO alimentación y altavoces
4- Entrada para actualizar el software
5- Salida para altavoz suplementar
6- Entrada Microfono
7- Entrada Control Remoto
COLLEGAMENTI
CONNECTIONS • BRANCHEMENTS • VERBINDUNGEN • CONEXIONES

ICENTRALINA -
Al fine di evitare pro-
blemi di trasmissione o
ricezione del segnale
non installare la cen-
tralina in luoghi chiusi,
vicino ai condotti di
ventilazione (riscalda-
mento/climatizzatore)
o in zone circondate da
metallo.
1 - REMOTE CONTROL - Devono essere posizio-
nati in una zona di facile accesso.
2 - MICROFONO - Installare il microfono distante da
turbolenze di aria (es. finestrini o condotti di ventila-
zione) per non creare interferenze nella trasmissio-
ne.
GB CENTRAL BOX - To avoid possible transmis-
sion or reception problems, the Central Box MUST
NOT be installed in closed locations, NOT near to
ventilation conducts (heating/air-conditioner), NOT
in metal-surrounded locations.
1 - REMOTE CONTROL - To be placed in easily
accessible locations.
2 - MICROHPONE - To be installed far from air tur-
bulences (i.e. windows, ventilation-conducts), in
order to avoid transmission-interferences.
FUNITÉ CENTRALE - Afin d’éviter des problè-
mes de transmission ou de réception de signal, ne
pas installer l’unité centrale dans un lieu fermé,
près de conduits de ventilation (chauffage / climati-
sation ) et non plus dans des endroits entourés de
métal.
1 - REMOTE CONTROL - Ils doivent être positionnés dans un endroit facile à l’accès.
2 - MICRO - Installer le micro loin de turbulences d’air (ex. fenêtres ou conduits de ventilation) afin de ne
pas créer d’interférences.
DZENTRAL-EINHEIT. - Um Empfangs- bzw. Übertragungsprobleme zu vermeiden, suchen Sie für
die Zentral-Einheit eine relativ freie Montage-Position , NICHT in der Nähe von Luftröhren
(Heizung/Klima-Anlage), NICHT an Stellen montieren, die allseitig an Metallteilen eng angrenzen.
1 - FERNSTEUERUNG - Diese muss an einer leicht zugängigen Stelle positioniert sein.
2 - MIKROFON.Das Mikrofon fern von Luft-Turbolenzen (Fenster, Lüftungskanäle) installieren, um die
Übertragung nicht zu beeinträchtigen.
ECENTRALITA - Con el fin de evitar problemas de transmisión o recepción de la señal, no ubicar
la centralita en lugares cerrados o cerca de los conductos de ventilación de la calefacción /climatización
del aire, así como no encerrar la centralita entre paredes metálicas en tal caso se perjudicaría el opti-
mo funcionamiento del sistema .
1 - CONTROL REMOTO - Debe ser posicionado en un lugar de fácil acceso.
2 - MICROFONO - instalar el micro lejos de las turbulencias de aire (Ej. ventanillas o conductos de aire)
para no crear interferencias en la transmisión.
INSTALLAZIONE COMPONENTI • COMPONENTS INSTALLATION
INSTALLATION COMPOSANTS • INSTALLATION DER KOMPONENTEN • INSTALACION
2
1
2

FUNZIONI REMOTE CONTROL •
REMOTE-CONTROL FUNCTIONS • FONCTIONS REMOTE
CONTROL . FERNSTEUERUNGS-FUNKTIONEN • FUNCIONES DEL CONTROL REMOTO
IIl 6/821 in caso di chiamata silenzia l’audio dell’autoradio ed indirizza l’audio del telefono agli alto-
parlanti dell’impianto originale tramite le connessioni ISO.
Alla fine della chiamata riconnette l’impianto audio dell’autoradio dopo 5-20 secondi.
GB At every phone-call (in and out), the free-hands-kit 6/821 will mute the car-radio and forward the
phone-audio to the original car-speakers, by means of the ISO-connections.
Once the phone-call is over, the radio-sound will reconnect after 5 – 20 seconds.
FLe 6/821 en cas d’appel, réduit au silence l’audio de l’autoradio et oriente l’audio du téléphone aux
haut-parleurs de l’installation d’origine à travers les connexions ISO. A la fin de l’appel il reconnecte l’in-
stallation audio de l’autoradio après 5-20 secondes.
DBei jedem Telefonat sorgt das Freisprechgerät dafür, dass die Radio-Lautstärke abschaltet und die
Telefon-Stimme, mittels ISO-Verbindungen, über die Auto-Lautsprecher hörbar wird.
ca. 5 Sekunden nach Beendigung des Telefonats dagegen, kommt die Radio-Lautstärke wieder.
EEl 6/821 en caso de llamada, silencia el audio del autoradio y transfiere el audio del teléfono a los
altavoces del equipo de música de origen a través de las conexiones ISO.
Una vez terminada la llamada, vuelve a conectar después de 5/20 segundos el audio del autoradio.
FUNZIONAMENTO
FUNCTIONING . FONCTIONNEMENT • FUNKTION • FUNCIONAMIENTO
41
2
5
4 3
1- Attiva o interrompe la chiamata
Activates/interrupts the phone-call
Active et interrompt l’appel
Aktivieren / Deaktivieren des Telefonats
Activa o interrumpe la llamada
2-5 - Volume / programmazione
Volume / Programming
Volume / Programmation
Lautstärke / Programmierung
Volumen / Programación
3- Indicatore di accensione
Switch-on Indicator • Indicateur d’allumage
Einschalt-Leuchte • Indicador de encendido
4- Indicatore di avvenuto accoppiamento con
il cellulare
Indicator signalling the successful coupling
with the mobile phone.
Indicateur d’accouplement avec le portable
Leuchtzeichen für durchgeführte Handy-
Ankoppelung
Indicador de confirmación de acoplamiento
con el móvil.

PROGRAMMAZIONE SOFTWARE
SOFTWARE-PROGRAMMATION • PROGRAMMATION SOFTWARE
SOFTWARE-PROGRAMMIERUNG • PROGRAMACION SOFTWARE
Nella centralina é installato un software compatibile con la
maggioranza dei telefoni cellulari attualmente in commercio. La
centralina é predisposta per un eventuale aggiornamento del
software, che verrà fornito ai rivenditori qualora venga modificato
dai produttori di cellulari.
The Central-Box comes with a software which is compatible with most
of the currently available mobile phones.
The Central-Box is fit for possible software-updatings. Whenever the
phone-producers change their software, the related software-updating
will be available at the Retailers.
Dans l’unité centrale se trouve le software compatible avec la plu-
part des portables actuellement présents dans le commerce.
L’unité centrale est prédisposée pour un éventuel ajournement du
software, qui sera fourni aux revendeurs s’il devait être modifié
par les producteurs de téléphone portables.
Die Zentral-Einheit ist mit einer Software ausgestattet, die zu den meis-
ten, im Handel erhältlichen Handys, passt. Je nach Software-update
seitens des Handy-Produzenten, lässt sich auch die Software der
Zentral-Einheit updaten. Wenden Sie sich diesbezüglich
bitte jeweils an unseren Händler.
El software instalado en la centralita es compatible con la may-
oría de los teléfonos móviles actualmente en comercio.
La centralita esta predispuesta de todas forma para una eventual
actualización del software que será enviado a los instaladores, en
el caso de que el mismo venga modificado por los
fabricantes de telefonía móvil.

I
In dotazione é presente una guida semplificata per l’attivazione di alcuni telefoni cellulari.
Per i telefoni non citati, procedere all’attivazione rispettando le seguenti indicazioni:
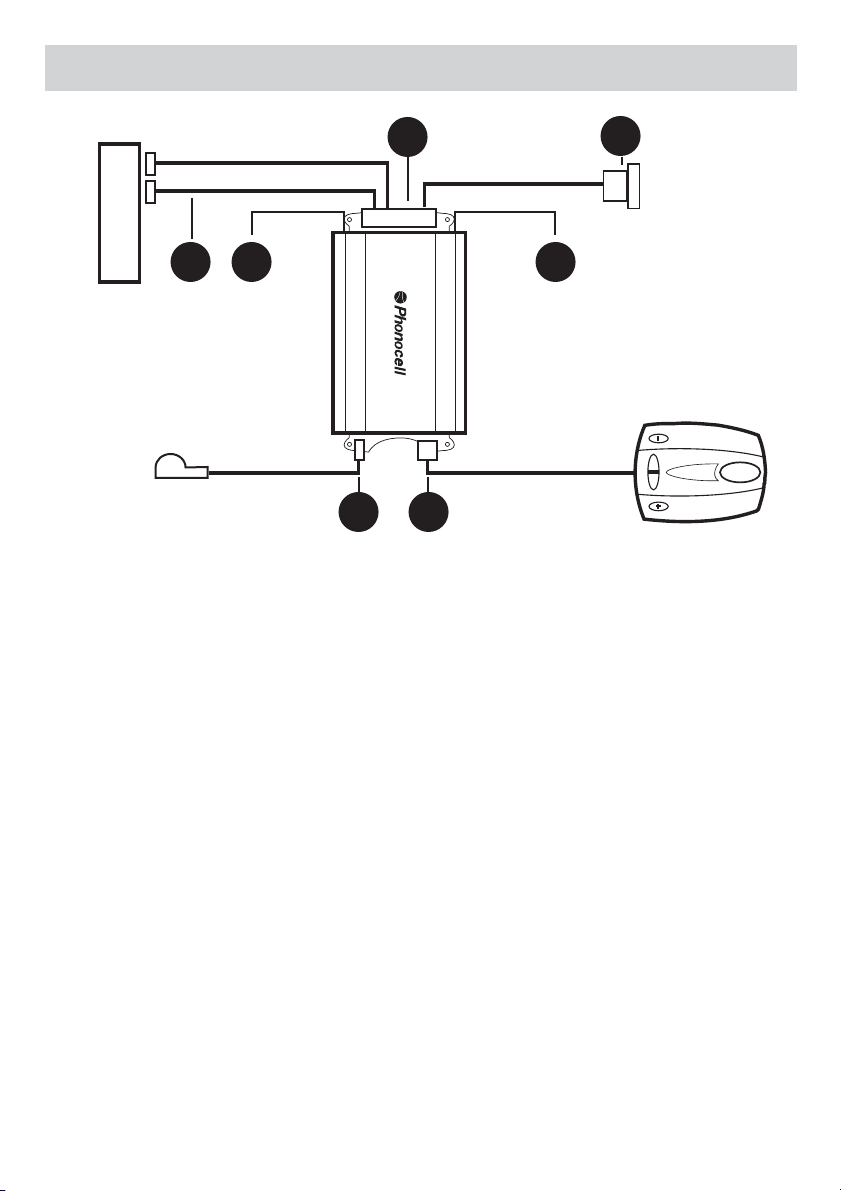
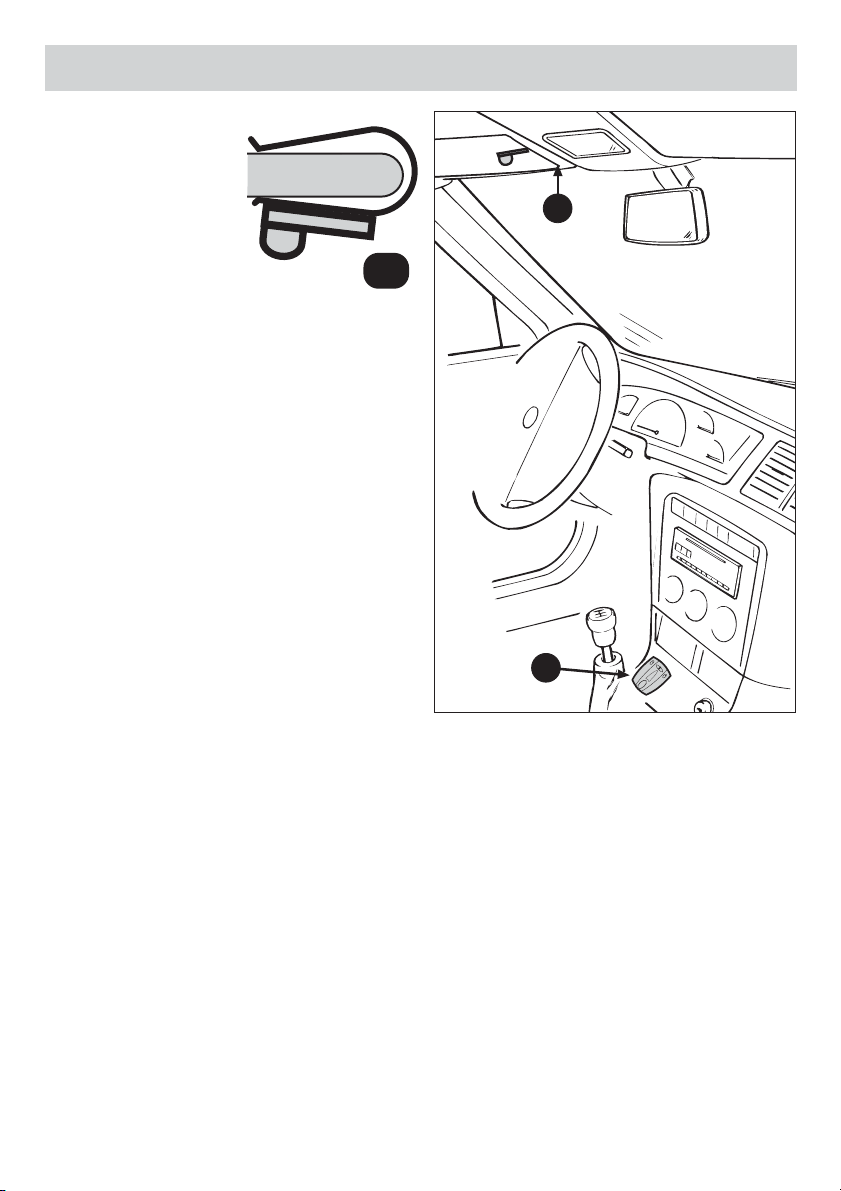
1) Verificare che siano state eseguite correttamente le connessioni elettriche; che la distanza fra il telefo-
no cellulare e la centralina non sia superiore a due metri.
2) Ruotare la chiave del quadro: il Led del remote control inizierà a lampeggiare.
Con l’autoradio accesa, l’audio si interromperà per circa 2 secondi.
3) Sul cellulare attivare la funzione Bluetooth consultando il manuale d’uso.
4) Per far riconoscere la centralina al cellulare seguire le indicazioni dettate dal telefono.
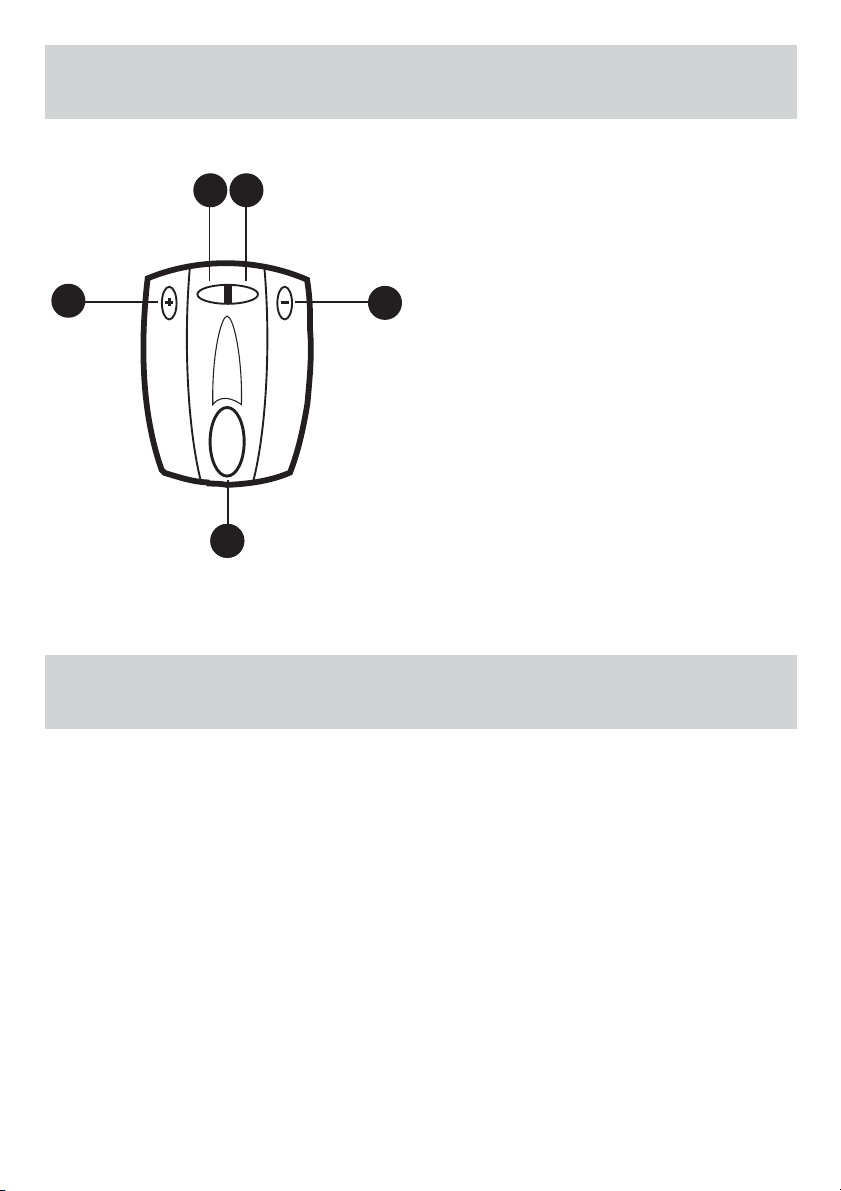
5) Premere il tasto del remote control (+/-) per alcuni secondi fino a quando si illumina il led verde che
indica l’inizio della procedura di attivazione della centralina.
6) Digitare, sul cellulare, il codice di accesso 0000 .
A riconoscimento avvenuto, il led del remote control lampeggerà lentamente.
7) Effettuare una telefonata di prova.
GB
The package contains a simplified Guide illustrating the activation of some mobile phones. For
the non-mentioned phone-models, the activation has to be carried out as follows:
1) Make sure that the electric connections are correct and that the distance between the mobile phone
and the central-box is not greater than two metres.
2) Turn the key in the panel. The Remote-Control-LED will start flashing. With the car-radio in switched-
on position, the audio will shut-down for about 2 seconds.
3) Activate the Bluetooth-function situated on the mobile phone, after having read the related Instructions.
4) To make sure that the mobile phone recognises the Central-Box, please observe the proce-
dures indicated by the phone-producer.
5) Press the Remote-Control-key (+/-) for a few seconds until the green LED illuminates, stating that the
Central-Box activation-procedure has started.
6) On the mobile phone, digit the access-code: 0000.
When the Remote-Control-LED starts flashing slowly, the Central-Box has been successfully recog-
nised.
7) Make a phone-call to check.
F
En dotation vous recevrez un guide simplifié pour l’activation de certains portables, pour les
téléphones qui ne sont pas cités, procéder à l’activation en respectant les indications suivantes:
1) Vérifier que les connexions électriques soient exécutées correctement, que la distance entre le
portable et l’unité centrale ne soit pas supérieure à 2 mètres et que le commutateur qui se trouve sous
l’unité centrale, soit en position “0”, comme prévu par le producteur.
2) Tourner la clé du cadre : le led du remote control commencera à clignoter.
Avec la radio allumée, l’audio sera coupé pendant environ 2 secondes.
3) Sur le portable, activer la fonction Bluetooth en consultant le manuel d’instructions.
4) Pour faire en sorte que l’unité centrale reconnaisse le portable, suivre les indications dictées
par le téléphone.
ATTIVAZIONE DELLA CENTRALINA CON IL TELEFONO
COUPLING BETWEEN CENTRAL-BOX AND MOBILE PHONE
ACTIVATION DE L’UNITE’ CENTRALE AVEC LE TÉLÉPHONE
KOPPELUNG ZWISCHEN ZENTRAL-EINHEIT UND TELEFON
ACTIVACION DE LA CENTRALITA CON EL TELEFONO

5) Appuyer sur la touche remote control (+/-) pour 4 secondes jusqu’à ce que un signal « bip » indiquera
le début de la procédure d’activation de l’unité centrale (le led du remote control clignotera rapide-
ment).
6) Taper, sur le portable, le code d’accès 0000.
Dès qu’il a été reconnu, le led du remote control clignotera lentement.
7) Faire un appel d’essai.
D
Eine Kurzübersicht über die Aktivierung einiger Handy-Modelle ist in der Packung enthalten. Bei
der Aktivierung der nicht genannten Handy-Modelle, bitte folgende Punkte beachten:
1) Sicherstellen, dass alle Elektroverbindungen richtig durchgeführt wurden und dass der Abstand zwis-
chen dem Handy und der Zentral-Einheit max. 2 m beträgt.
2) Den Zünd-Schlüssel drehen: danach beginnt das Fernsteuerungs-LED zu blinken. Bei eingeschal-
tetem Autoradio verschwindet der Ton ungefähr 2 Sekunden lang.
3) Lt. Betriebsanleitung, die Bluetooth-Funktion auf dem Handy aktivieren.
4) Um sicherzustellen, dass das Handy die Zentral-Einheit anerkennt, die diesbezüglichen Handy-
Anweisungen befolgen.
5) Die Fernsteuerungs-Taste (+/-) einige Sekunden lang drücken, bis das grüne LED sich einschaltet,
was bedeutet, dass die Aktivierung der Zentral-Einheit begonnen hat.
6) Auf dem Handy, die Zugangs-Codenummer 0000 wählen.
Bei erfolgter Anerkennung der Zentral-Einheit, beginnt das Fernsteuerungs-LED langsam zu blinken.
7) Probeweise ein Telefongespräch vornehmen.
E
En dotación al sistema se suministra una guía simplificada para activar algunos teléfonos móviles.
Para activar los móviles no mencionados, proceder a la activación respetando las siguientes
informaciones:
1) Verificar que hayan sido ejecutadas correctamente las conexiones eléctricas; que la distancia entre el
teléfono y la centralita no sea superior a 2 metros.
2) Girar la llave de contacto; el Led del control remoto empezará a parpadear.
Con la autoradio encendida, el audio se interrumpirá alrededor de 2 segundos.
3) Activar en el teléfono móvil la función de Bluetooth, consultando el manual del mismo.
4) Para que la centralita reconozca el móvil seguir las indicaciones del móvil.
5) Presionar la tecla del control remoto (+/-) unos segundos hasta que se ilumine el Led verde que indi-
ca el inicio de la configuración de activación de la centralita.
6) Digitar en el móvil el código de acceso 0000.
Una vez que el móvil haya sido reconocido, el Led del control remoto parpadeará lentamente.
7) Efectuar una llamada de prueba.

DISTRIBUITO DA
Phonocar S.p.A. - Via F.lli Cervi, 167/C - 42100 REGGIO EMILIA (Italy)
Tel. 0522 941621 - Fax 0522 942452
http: www.phonocar.it • e-mail:info@phonocar.it
CARATTERISTICHE TECNICHE
TECHNICAL FEATURES • CARACTÉRISTIQUES TECHNIQUES
TECHNISCHE EIGENSCHAFTEN • CARACTERISTICAS TECNICAS
Alimentazione . . . . . . . . . . . . . . . . . . . . . . . . . . . . . . . . . . . . . . . . . . . . . . . . . . . . . . . . 12Vdc
Power Supply • Alimentation • Stromversorgung • Alimentación
Potenza di trasmissione . . . . . . . . . . . . . . . . . . . . . . . . . . . . . . . . . . . . . . . . . . . . . . . . 450 mA
Transmission Power • Puissance de transmission • Übertragungsleistung • Potencia de transmisión
Temperatura di esercizio . . . . . . . . . . . . . . . . . . . . . . . . . . . . . . . . . . . . . . . . . . . . . . . -10° ~ 50°
Working Temperature • Température d’exercice • Betriebstemperatur • Temperatura de funcionamiento
Sensibilità microfono . . . . . . . . . . . . . . . . . . . . . . . . . . . . . . . . . . . . . . . . . . . . . . . . . . 56 dB
Microphone Sensitivity • Sensibilité micro • Mikrofon-Sensibilität • Sensibilidad microfono
NELLA CONFEZIONE
n° 1 - Unità Centrale
n° 1 - Remote Control
n° 1 - Staffa di fissaggio per microfono
n° 1 - Cavo di collegamento centralina all’im-
pianto originale
n° 1 - Set di accessori di fissaggio
THE PACKAGE CONTAINS
n° 1 - Central Unit/
n° 1 - Remote Control
n° 1 - Microphone Fixation-Bracket
n° 1 - Cable for connection of Central-Box to ori-
ginal Hifi-installation.
n° 1 - Kit of Fixation-Accessories
DANS L’EMBALLAGE
n° 1 - Unité centrale
n° 1 - Remote Control
n° 1 - Etrier de fixation pour micro
n° 1 - Câble de branchement de l’unité centrale à
l’installation d’origine.
n°1 - Set d’accessoires de fixage
LIEFERUMFANG
n° 1 - Zentral-Einheit
n° 1 - Fernsteuerung
n° 1 - Mikrofon-Befestigungsbügel
n° 1 - Verbindungskabel zwischen Zentral-Einheit
und Original-Hifi-Anlage.
n° 1 - Befestigungsteile
COMPOSICION
n° 1 - Unidad Central (Centralita)
n° 1 - Control Remoto
n° 1 - Regleta de fijación para el microfono
n° 1 - Cable de conexión entre centralita y equi-
po de música de origen.
n° 1 - kit completo de accesorios para la fijación.
Table of contents
Other Phonocell Automobile Accessories manuals
Popular Automobile Accessories manuals by other brands

Luverne
Luverne 431411 Installation instructions and parts list

LAS
LAS 105- 35PP Installation and operating instructions

AHB
AHB Battery-Booster Lithium 36000 mAh instruction manual

Witter
Witter F181AU FITTING INSTRUCTION

Cruz
Cruz Evo Rack Pro P44-158 Assembly instructions

HUSKY LINERS
HUSKY LINERS 2628 Care and use instructions