PICASO 3D Designer X PRO User manual

USER MANUAL

INTRODUCTION
Dear Customer,
We are happy to see you among the owners of Designer X PRO. Your 3D printer has
a user-friendly interface and up-to-date printing control functions. Therefore, it can
be used both by experienced engineers and those who are just discovering the
world of additive technology.
3D printing is a sophisticated process that involves many factors. We have prepared
a detailed User Manual to make your interaction with the printer as easy, intuitive,
and safe as possible. It describes all main units, 3D printer’s functions, and menu
settings; the principles and fundumentals of working with various materials, as well
as recommendations for using the device. Key information is highlighted with
frames:
!
This frame highlights important warnings about working with Designer X PRO.
i
This frame highlights notes and useful references for working with Designer X PRO.
This Manual uses hyperlinks for quick and easy access to sections.
Please, read the entire User Manual before using Designer X PRO. For any technical
issues, please contact us by e-mail [email protected].
We wish you success in the implementation of your ideas and projects!
PICASO 3D
The pictures used herein are part of the product’s graphical image and may differ from the actual appearance of
the device.
The description of the menu contents, the list of errors, and the device’s features may vary depending on the 3D
printer firmware version used.
The manufacturer is not responsible for any actions deviating from this Manual.
2

TABLE OF CONTENTS
INTRODUCTION
SAFETY AND PRECAUTIONS
HOW DESIGNER X PRO WORKS
X PLATFORM
EQUIPMENT SPECIFICATIONS
UNPACKING
WORKPLACE PREPARATION
STARTER KIT
Designer X PRO PARTS OVERVIEW
POWER CONNECTION
PRINTER CONTROL
Designer X PRO MENU
CONTROL DURING PRINTING
BASICS OF WORKING WITH DESIGNER X PRO
BUILD PLATE LEVELING
FILAMENT LOAD
PRINTING
FILAMENT UNLOAD
CONNECTION TO PC
SERVICE FUNCTIONS
NOZZLE REPLACEMENT
SET UP Z-OFFSET
SET UP X/Y OFFSET
CALIBRATION OF THE CLEANING SYSTEMS
PRINTER FIRMWARE UPDATE
ERROR LIST
PRINT SPEED MODES
REMOVING AND REPLACING THE HEATING UNIT
QUESTIONS AND ANSWERS
3

SAFETY AND PRECAUTIONS
Designer X PRO complies with European Parliament Directives 2014/35/EU on
low-voltage equipment and 2014/30/EU on electromagnetic compatibility, as well as
the Technical Regulations of the Customs Union TR TS 004/2011 “On the Safety of
Low-Voltage Equipment” and TR TS 020/2011 “Electromagnetic Compatibility of
Technical Means”.
Do not use Designer X PRO to store foreign objects. Foreign objects in the printer’s
working area can damage Designer X PRO’s components.
Do not use Designer X PRO to heat food or other items.
Do not expose Designer X PRO to foreign liquids, gases, electric and/or magnetic
fields, which may damage the device’s electronic or mechanical components.
Do not use the 3D printer in a humid or dusty environment. Follow the requirements
for the workplace.
During its operation, the device may produce a specific smell of molten filament.
This is a feature of the printing process. We recommend using the 3D printer in a
well-ventilated area. Do not leave the working printer unattended.
Designer X PRO is not intended for use by disabled persons, unless they are
supervised by a responsible for their safety person.
It is forbidden to use Designer X PRO by persons under the influence of alcohol,
drugs and/or other intoxicants.
Handle the 3D printer carefully — it includes electronic components and mechanical
parts that could be damaged if hit or dropped.
Some 3D printer’s parts operate at a high temperature. To avoid burns, be careful
not to touch heated surfaces while printing and servicing the device. Wait at least
10-15 minutes for the unit's heating elements to cool down before opening the lid.
4

Some 3D printer’s parts are movable. To avoid personal injury and device
malfunction, do not interfere with the movement of the 3D printer components
during its operation.
Do not install non-original spare parts on the 3D printer and do not attempt to repair
it on your own: this can lead to device failure.
Do not seek third party’s advice on the operation of the 3D printer. Our official
communication channels are:
[email protected] — technical support service
[email protected] — sales department
[email protected] — for media
[email protected] — for general issues
HOW DESIGNER X PRO WORKS
Designer X PRO is operating by using the FFF technology (fused filament
fabrication). The principle of the technology is to melt a thermoplastic polymer
filament and building a layer-by-layer model based on a previously prepared task.
5

Designer X PRO is a 3D printer making part of the X platform-based product lines.
Having mastered it, you will able to work with any devices based on the X platform.
To get started, you need a 3D model in one of the following formats: .stl, .obj, .3ds
or .amf. The model should be uploaded into the software on a personal computer
(PC) — Polygon X (supplied free of charge), which converts it to a printing task file in
.plgx format with a set of control commands for the operation of PICASO 3D
printers. To start printing on Designer X PRO, you should save the .plgx file to a USB
drive (supplied in the starter kit). File recording can be done remotely via Polygon X
using an Ethernet connection.
X PLATFORM
X Platform is a a set of software and hardware solutions used in 3D devices
manufactured by PICASO 3D for the successful implementation of additive
manufacturing tasks.
6

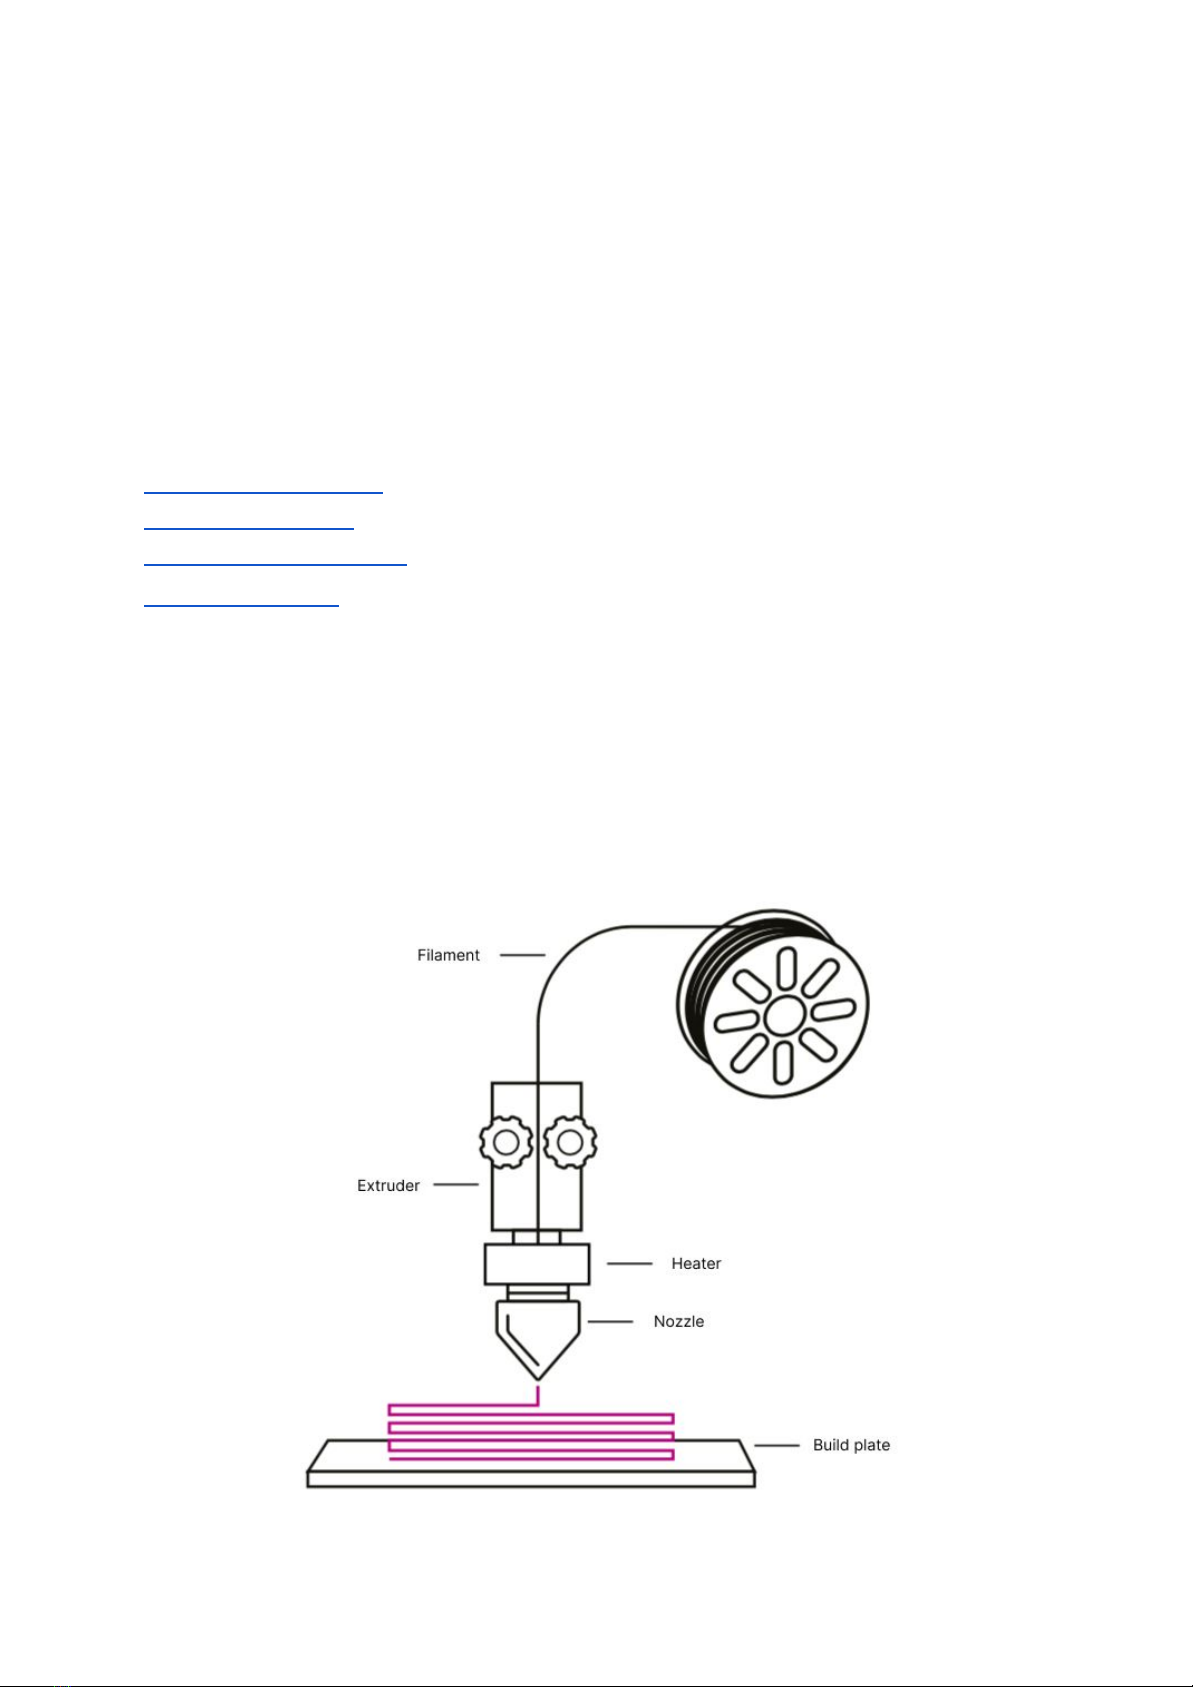
End-of-Filament and Filament Flow control systems detect the filament
availability and the flow by using built-in sensors. Based on the data obtained,
Designer X PRO carries out self-testing and, in case of an abnormal situation due to
the filament absence or uneven flow, automatically starts the problem-solving
algorithm. If the abnormal situation persists, the printing process is suspended and
the printer waits for user’s intervention.
Example: the filament ran short on the spool or broke off during the printing:
Designer X PRO will pause its operation, report the lack of material, and wait for the
filament to be re-loaded to continue printing.
If, during the printing, the nozzle is completely or partially clogged, the material flow
is stopped or impeded: Designer X PRO will detect a change in the uniform flow,
pause printing, and start an automatic high-temperature nozzle cleaning algorithm. If
the nozzle cleaning is successful, the printer will continue printing; otherwise,
printing will pause, and Designer X PRO will inform the user about the problem.
The Profile System stores parameters for working with materials in the printer
memory. The profile settings are used to control the layer time, which allows to
maintain high surface quality when printing small models; as well as to control the
temperature of heating elements, which avoids overheating of the filament above
the thermal barrier and protects the material against degradation in the flow channel.
When the printing starts, the user selects a material profile based on the filament
loaded. Due to the profile system, the same task in .plgx format can be printed using
any thermoplastic filament without re-preparing the printing task.
An adaptive air circulation system uses data from material profiles to create
optimal conditions for printing and to avoid the temperature gradient inside the 3D
printer chamber.
The printing surface control system allows in most cases to timely detect the
weakening of adhesion of the printed model to the platform or the presence of a
foreign object when printing the current layer. If an item comes unstuck or the
printed layer has a wrong shape, the printer will pause printing until the user’s
intervention.
Integrated high-speed print modes. When the printing starts, the user selects a
speed mode in accordance with the expected result. Due to this, the same task in
7

.plgx format can be printed at different speeds without re-preparing the printing
task.
The nozzles height control system (only for PRO-series printers) automatically
takes into account the difference in the height of nozzles relative to each other in
case of bi-material printing and makes an appropriate correction for the platform
height. This system allows to achieve high quality printing with two materials.
Printer status can be controlled and monitored both from the printer display and
through the local network— using an Ethernet network connection. One software is
used to control all devices on the X Platform — Polygon X. When connecting
several printers via a LAN router, you can monitor all connected printers and control
the printing process in one window of Polygon X.
The notification system allows to determine the device status remotely, including
from a PC screen when working via network.
8

EQUIPMENT SPECIFICATIONS
PRINTING
Printing technology
Fused Filament Fabrication
(FFF)
Nozzle-switching technology
Jet Switch (2 nozzles at 1
extruder)
Build Volume
200 x 200 x 210 mm
(7.9 x 7.9 x 8.3 inch)
Extruder maximum printing
temperature
410 ºC (770 F)
Heated bed maximum
temperature
150 ºC (302 F)
Print speed
up to 100 cm3/h
Minimum Layer Thickness
10 microns (0.01 mm)
Layer Resolution
0.01 – 0.8 mm (depending on
the
nozzle diameter)
Pozitioning Resolution
11 x 11 x 1.25 microns
Filament diameter
1.75 ± 0.1 mm
Nozzles diameter
0.2 – 0.8 mm (0.3 in startkit)
MECHANICS
Casing
Aluminium composite
Frame
Steel
Heated bed construction
Aluminium, glass
Guides
XY rail (steel)
Z cylindrical (steel)
ELECTRICITY
Networking
220 ± 15%, 50 Hz
(option 110 ± 15%, 60 Hz)
Maximum Power Consumption
400 W
Interfaces
Ethernet, USB 2.0 (Flashdrive
in start kit)
PHYSICAL
CHARASTERISTICS
in box (without box)
Printer dimensions
690 x 500 x 470 mm
(490 x 390 x 430 mm)
Weight
23 kg (17.5 kg)
PRINTING MATERIALS
Formax (ABS + CF), Ultrax (PA
+ CF), PEEK, PA, PC, TPU,
TPE, PP, ASA, SBS, PETG,
ABS, PLA, PVA, HIPS and
others
SOFTWARE
Software
Polygon X
File Types
*.stl, *.plgx
FEATURES
Primary systems
Filament Flow Control
End-of-Filament Sensor
First Layer Control
Built-in Profile System
Network Printing
Additional features
Filament drying mode
Printer status notification
system
Auto-control workability of
all systems
Surface print control system
Table Leveling
Active leveling
9

UNPACKING
WORKPLACE PREPARATION
The workplace for 3D printer installation shall meet the following requirements:
● Ambient temperature: 15 to 30 ºC.
● Relative humidity: 30 to 65%.
● Atmospheric pressure: 720 to 790 mm Hg.
● Ventilation available onsite and the possibility for ventilating the room.
● Firm horizontal surface withstanding a load of at least 30 kg.
● No exposure of the 3D printer to direct sunlight.
● Mains power supply 220 V ± 15% (50 Hz) with grounding.
Leave the unpacked 3D printer in the prepared workplace for at least 24 hours — do
not plug it into the mains outlet prematurely.
STARTER KIT
1
Review the contents of the starter set. The content shall match the following list:
The following is installed on Designer X PRO by default:
●0.3 mm brass nozzle (x 2)
●Temperature unit 400 (x 2)
●4 mm glass
Toolkit:
●Slotted screwdriver Torx TX-TR
●Nippers, box cutter, pliers
●Nozzle change key
●Hex keys 1.5, 2, 2.5
●USB drive
●0.3 mm brass nozzle (x 2)
Power cable
Filament spool
Adhesion glue
If you find a mismatch in the starter set or lack of a transportation part and ties, make
a photo evidence and send the picture to us by e-mail
[email protected]
including the serial number of your 3D printer.
1
The type and configuration may be changed by the manufacturer without the user’s consent, which shall not
affect the declared device characteristics.
10

DESIGNER X PRO PARTS OVERVIEW
Front view
11

Back/side view
12

Inside view
Printhead (PH)
13

POWER CONNECTION
Make sure all transport parts and ties are removed. Take the printhead (PH) with
your hand and make sure that it moves fspooly. Plug the power cable into the power
adapter socket against the stop then plug it into a power 220 V ± 15% (50 Hz).
!
Never plug the Designer X PRO into a power outlet without grounding.
Turn the power button to position 1 — the display and the interior light will turn on,
the printer will beep.
We recommend you to keep the original box and case for further possible
transportation of the printer.
14

PRINTER CONTROL
Designer X PRO MENU
The 3D printer is controlled via the display menu . To move through the menu items,
2
rotate the joystick clockwise or counterclockwise: the joystick has no end position.
To select a menu item, press the joystick.
PRINT
●Files
Shows the contents of the USB drive connected to the printer in the form of folders
and files with the extensions .plgx, .gcode . Allows you to select a file to start
3
printing.
●Printlists
Shows a list of tasks in the active printlist
with the possibility of viewing all printlists
4
uploaded to a USB drive, to start a sequential printing (contents of the printlists
folder).
●Ready to print
Switches Designer X PRO in the ready mode to start remote printing from the
Polygon X window.
FILAMENT
●Load filament
Starts the filament load algorithm in the PH using the flow motor along with the
heating of the nozzle to the operating temperature of the selected profile.
●Unload filament
Starts the algorithm for filament unload from the PH using the flow motor at the
removal temperature of the selected profile.
●Replace filament
Sequentially runs filament unload and load algorithms.
2
The Menu structure and view may vary depending on the firmware version.
3
.plgx is a print task file from Polygon X, adapted for printing on X Platform printers; .gcode is a print
task file from third-party slicers. When printing such tasks, some features of X Platform printers are
inactive.
4
Printlist is a set of tasks for sequential printing. It is created in the Polygon X software with .ppl
extension via a network connection.
15

●PH cleaning
Starts the filament load algorithm into the PH using the flow motor along with the
heating of the nozzle to the operating temperature of the selected profile. If, after
completing the algorithm, you select “Continue”, the temperature will be increased
by 10 degrees and the load algorithm will be repeated. You can repeat the algorithm
with an increase in temperature not more than 3 times. This function allows in some
cases to eliminate nozzle clogging during the printing.
●Low-temperature PH cleaning
Starts the algorithm for filament unload from the PH without using the flow motor at
the unload temperature of the selected profile. This function allows in some cases to
free the flow channel from residues of previously loaded materials. It is suitable for
PLA, PVA, and PA filaments.
●Profiles
○Select profile
Allows to select a material profile from the list of those uploaded into the 3D printer.
○Profiles list
Displays the entire list of profiles uploaded into the 3D printer.
○Edit profile
Allows to change the user profile settings.
○Export profile
Allows you to select a profile and save it to a USB drive.
○Delete profile
Removes the selected profile from the list.
○Import profile
Allows to select a profile in .ppf extension from the USB drive and to upload it into
5
the 3D printer.
SERVICE
●Nozzle service
Starts the nozzle service algorithm with heating the nozzle to the operating
temperature of the selected profile and moving the PH to the nozzle replacement
position.
●Build plate leveling
Starts the build plate leveling algorithm with heating the nozzle and the build plate to
the operating temperature of the selected profile.
●Set up z-offset
5
Material profiles created in Polygon X are always saved in extension
.ppf.
16

Allows to adjust the initial position of the nozzle relative to the build plate in the
vertical plane.
●Set up X/Y offset
Allows to adjust the position of the nozzle 2 relative to the nozzle 1 in the XY plane.
●PH cleaning system calibration
Allows to check and to adjust the nozzle position relative to the nozzle cleaner.
●Flap test
Allows to check the operation of the nozzle switching mechanism.
●Hot unloading
Starts the algorithm for filament unload from the PH using the flow motor with
heating the nozzle to the operating temperature of the selected profile.
●Errors list
Displays the last 10 errors recorded by the 3D printer.
●Reset errors
Clears the error list.
●Update software
Starts the printer firmware update algorithm.
●Build plate position
Allows to move the printing platform (build plate) in one of three positions: upper (10
mm from the nozzle), medium (105 mm from the nozzle), and lower (200 mm from
the nozzle).
●Filament drying
Starts the filament drying algorithm indicating the drying temperature and time. After
selecting the drying parameters, the platform will be moved to the middle position.
●Diagnostics
Configured by default. Use it in case of failure of the lighting or blower systems and
only upon consultation with the technical support service.
○Tapes checking
Alternately turns on lighting with main colors: red, green, and blue.
○Fans checking
Alternately starts the fans: for part cooling, printhead cooling, chamber circulation,
and chamber cooling.
○Set up tapes
Allows to select the main colors for lighting.
SETTINGS
●About
Displays the main printer data.
17

●Main settings
○Filament flow control
ON (by default): activates the filament flow control system.
○Check for uncritical errors
Check for non-critical errors: if ON, the 3D printer starts response algorithms for
non-critical errors during printing. If OFF, errors will be saved in the printer memory
without running algorithms.
○Error indication
ON (by default): if ON, the 3D printer displays the error code with a description.
○End-of-Filament control
ON (by default): activates the end-of-filament control system.
○Print surface control
ON (by default): activates the print surface monitoring control system. Upon
detecting any obstacles on the print surface, the task will be suspended with
displaying the message “Check the part”.
○Fast switching
OFF (by default): if ON, nozzle switching will be carried out without additional
cleaning.
● Encoders settings
○Tolerance
Sets the tolerance limits for the filament flow control coefficient as a percentage of
the value obtained during calibration. Calculated automatically after calibrating the
encoder. By default: 25.00%.
●Encoders calibration 6
Performed by default. Use it only in case of a factory reset when updating the
firmware. Starts the encoder calibration algorithm of the filament flow control system
with heating the nozzle to the operating temperature of the selected profile. For the
algorithm to work correctly, load a filament with a stable diameter of 1.75 ± 0.1 mm.
●Night mode settings
○Speed reduction
ON: reduces the print speed in the night mode.
○Travels slowdown
ON: reduces the PH travel speed between printing elements.
●Save settings to file
Saves the main printer settings to a file on the USB drive.
●Restore settings from file
Allows to restore the main printer settings from a file in the USB drive.
6
The required accuracy during calibration is achieved only when the feed channel and nozzle have no obstacles
for the filament passage.
18

●Network settings
Allows to enter settings for a network connection manually or get them automatically
via DHCP.
●Internet connection
Allows to connect the printer to the PICASO 3D servers to access the profile
database.
●Auto set up heat system
Performed by default. Use it only if the heating unit is replaced or if settings are reset
when updating the firmware. Starts the temperature calibration algorithm of the
heating element for stable operation of the heating system.
PREHEAT
Starts heating the nozzle to the standby temperature, and the printing platform, to
the operating temperature of the selected profile. This feature saves the heating time
before starting printing.
NIGHT MODE
Turns off the printer lighting and reduces the display brightness. Activates the night
mode settings.
DEBUG SCREEN
CONTROL DURING PRINTING
During printing, the menu changes its structural view, retaining only the necessary
items. Some menu items remain unchanged. To switch to the menu while printing,
press the joystick.
PAUSE / CONTINUE
Suspends printing with the possibility of resuming it from the same place
CHANGE PRINTING SETTINGS (available for printing .plgx files only)
●Change speed mode
Allows to change the printing speed mode.
●Change profile
Allows to change the printing profile. Use it if you have selected a wrong profile
when starting the printing.
19

●Change z-offset
Allows to change the nozzle z-offset while printing the first layer. Use if you notice
signs of poor z-offset.
SERVICE (available in pause mode only)
●Nozzle service
●Load filament
●Replace filament
●Hot unload
●Error list
●Reset errors
SETTINGS
STOP
Stops printing without the possibility of its further resumption.
NIGHT MODE
DEBUG screen
To switch to the debug screen while printing, turn the joystick clockwise.
20
Table of contents
Other PICASO 3D 3D Printer manuals