PIEPS DSP User manual


Main switch
OFF-SEND-SEARCH
Lock
LCD-Display (back light)
Button OPTIONS
Button SCAN
Button MARK
Richtungsanzeige
Number display
Battery level
Number of burials
Compass
Altimeter
Temperatur

Dear winter sports enthusiast,
DSP
DSP
Congratulations on having purchased a PIEPS avalanche rescue beacon !
100,000 skiers world-wide testify to the quality of this brand, which has been
on the market for nearly 30 years. During this time, PIEPS beacons have
undergone constant improvement. The device you have chosen is a state-of-
the-art piece of equipment. Enhanced by the latest technology (= signal
processing with a igital ignal rocessor) and a triple-antenna system, it not
only offers an exceptional range but also greatly simplifies the rescue
procedure, even in case of multiple victims.
IMPORTANT: Even the PIEPS-DSP beacon cannot protect you against
avalanches. A close study of avalanche prevention techniques is equally
essential, as is regular practising for the eventuality of an avalanche
rescue.


Carrying harness
The PIEPS DSP can be worn directly on your person using the supplied
carrying system. Pass the snap hook of the safety cord through the carry
pouch and attach it to the loop on the rear of the pouch (=safest option).
Alternatively, the PIEPS DSP can be attached to the belt of your ski trousers via
the belt loop, or can be carried in your trouser pocket with or without the
protective pouch. Always make sure, however, that the safety cord is suitably
attached to an eyelet on your clothing to avoid losing the detector.
IMPORTANT: The PIEPS DSP should be worn as close as possible to the
body, and under as many layers of clothing as possible !

1. PRESS
2. MOVE
LIGHT

Battery / switching on / SEND mode
IMPORTANT: Only use battery type LR03/AAA and always replace all 3
batteries with new ones of the same type. Never use rechargeable
batteries and always change all batteries at the same time!
Depress the main switch lock and push the main switch to the “SEND“ position.
In this mode, the PIEPS DSP will carry out a self-test lasting approx. 5 seconds.
You will then see the send symbol and the remaining % battery voltage in the
display. The LED will also flash synchronously with the transmitter bit timing.
In the event of a device error, a 5-second warning tone sounds. This means the
device is not fit for operation. In this case, contact our customer service
department.
When in the open, make sure the “SEND” mode is selected throughout. The
PIEPS DSP will then transmit continuously any signal it picks up from other
detectors.
IMPORTANT: When switched on, a complex self-testing is done by the
beacon itself, nevertheless a LVS-check stronlgy recommended in
preperation to each tour !
The battery compartment is located at the rear of the housing. The safety screw
connection can be easily opened and closed using a coin.

3 x PRESS
Degree +
Degree - End
End
Meter +
Meter - End
Temperature
Bearing compass Compass
Altimeter

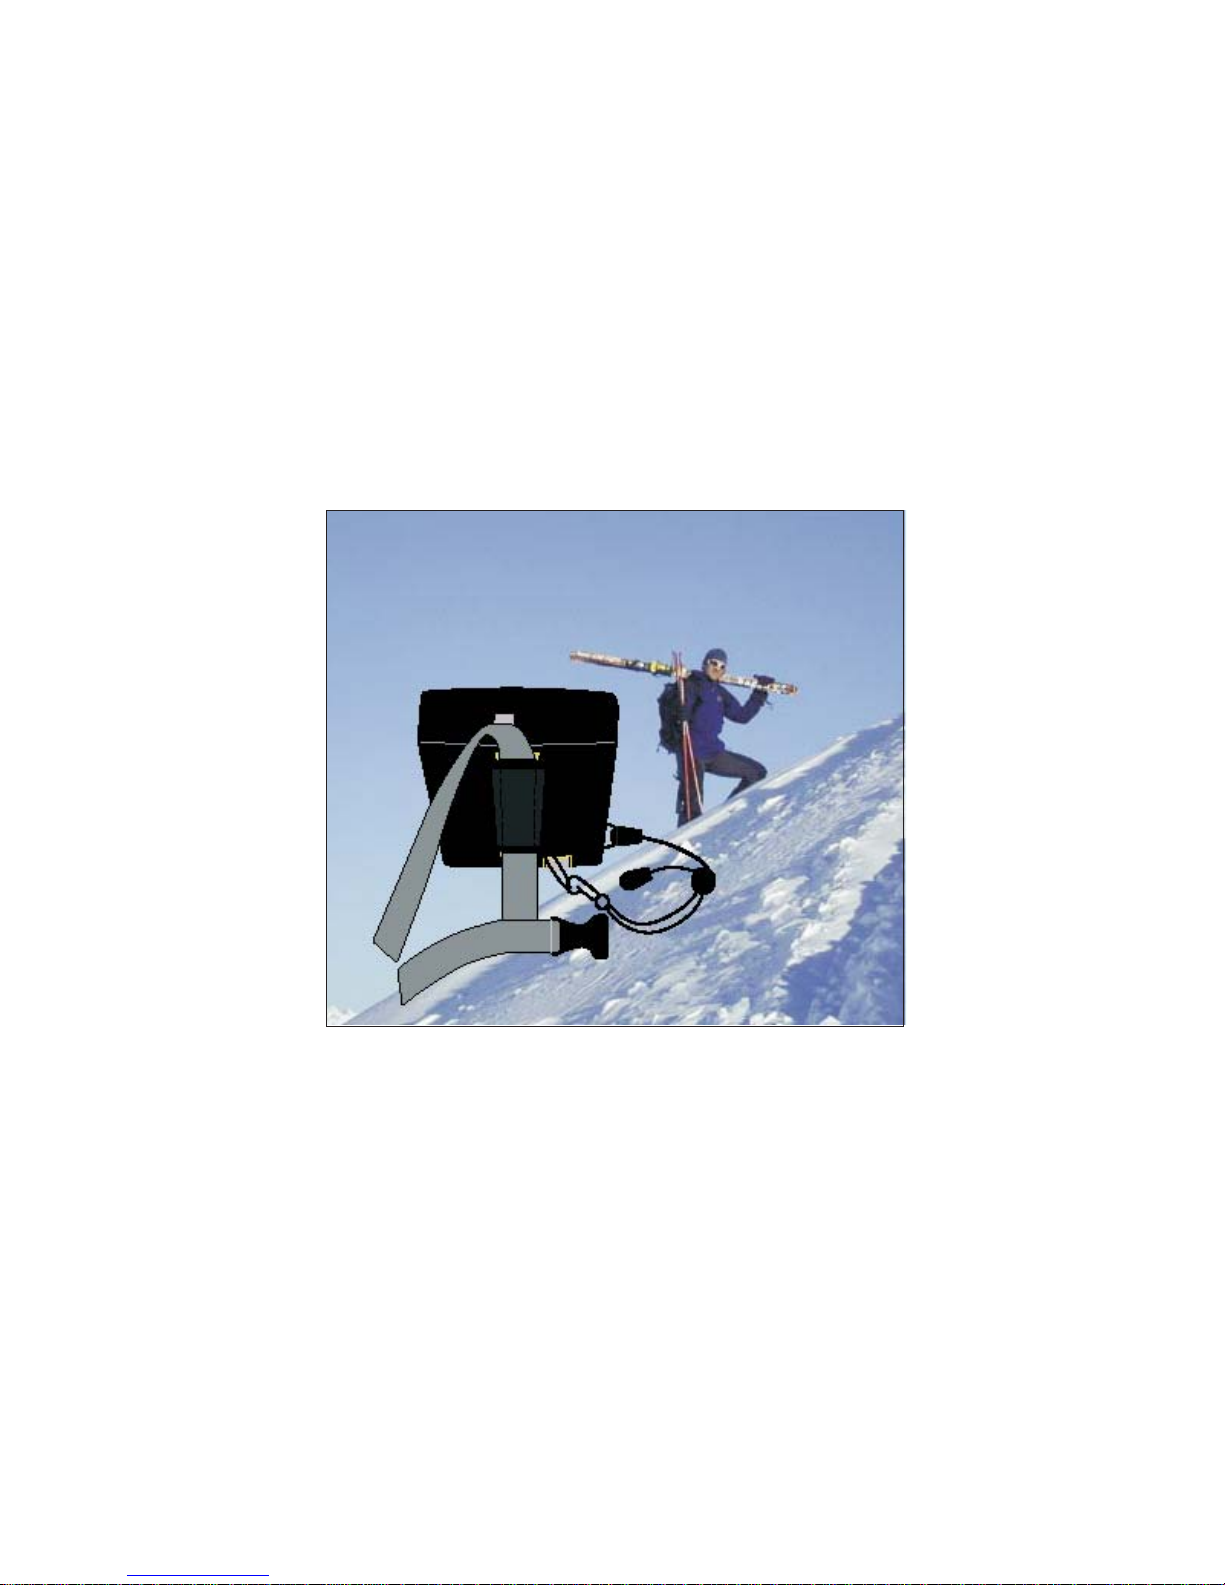
Beacon with OPTION PACK
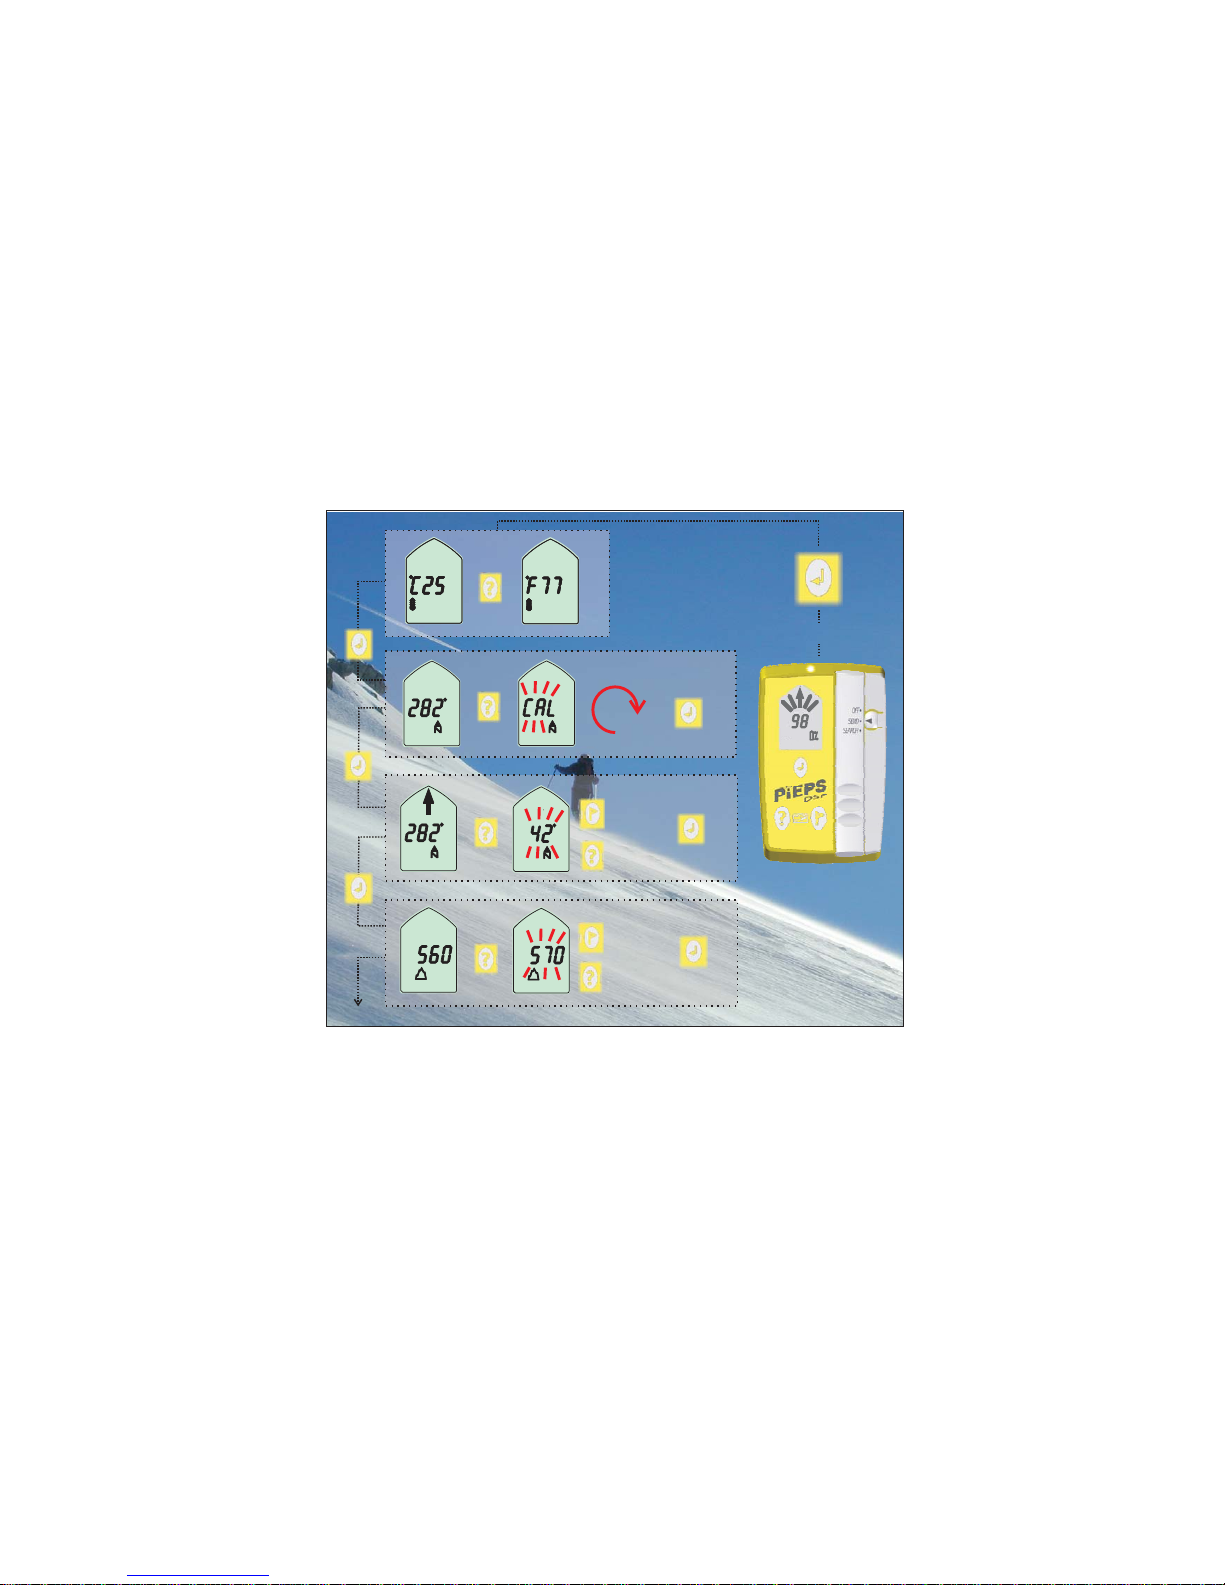
By pressing the OPTION switch three times, you can switch from the SEND mode to
the OPTION mode. This enables you to switch between the relevant functions:
Temperature display
Compass
Bearing compass (direction-finding compass with arrow display)
Altimeter
By holding down the OPTION key (min. 3 seconds), you can switch back to the SEND
mode. In the OPTION mode, the device does not transmit any signals, and therefore
switches back to the SEND mode automatically after two minutes. If the battery is low,
it switches back after just 30 seconds.
!
!
!
Press SCAN to switch between °C and °F.
When new batteries are inserted, the compass has to undergo an internal calibration. This is also
necessary if the device detects strong temperature variations. To start the calibration, press SCAN
(”CAL” flashes). Then rotate the device a full 360°. Finally, press OPTION.
You can change the bearing direction with SCAN. Select the flashing bearing by pressing MARK (+)
and SCAN (-). To exit, press OPTION.
!
You can adapt the altimeter reading to the prevailing air pressure by pressing SCAN. Adjust the
displayed altitude with MARK (+) and SCAN (-). To set the adjustment to zero, press MARK and
SCAN simultaneously. To exit, press OPTION.
IMPORTANT: Make sure the device stays connected to the harness via the
safety cord at all times !

Point of impact
ûPoint of disapearnce
Flow direction
50m
50m
Single rescue person
Multiple rescue persons

EMERGENCY / SEARCH mode
In case of an emergency, the key thing to remember is:
KEEP CALM, OBSERVE, RAISE THE ALARM
Observe the course of the avalanche and make an exact mental note of where the
victim
was hit by the avalanche (point of impact)
was last seen (point of disappearance)
The extension of these points indicates the flow direction of the avalanche !
The primary search area is to the left and right of this. When the avalanche stops, the
most experienced member of the group takes control of the search, issuing
instructions from the edge of the avalanche so that another person can mark the
above points (with sticks, etc.).
Depress the main switch lock and push the main switch to the SEARCH position. You
can now begin the PRIMARY SEARCH, in which the device will pick up any signals
from victims within its range. Now scan the primary search area according to the plan
on the left until a steady signal is reported.
!
!
IMPORTANT: All participants (including observers) must switch their beacons
to receiving (SEARCH) mode. Always make sure there are no electronic devices
(e.g. mobiles, radios,) or solid metal items in the direct vicinity of the search.


SEARCH mode / rough search
As soon as the PIEPS DSP picks up signals, the approximate distance and direction
appear in the display. The number of victims within the range of the device is
represented by matchstick men.
Using the arrow and distance reading, follow the strongest of the received signals
along the field lines. Move in the direction indicated by the PIEPS DSP:
The distance reading should become progressively smaller. If it gets larger, switch the
search direction by 180°, i.e. turn round and follow the opposite direction.
Number of burials: one two three four or more
turn LEFT move STRAIGHT AHEAD turn RIGHT
IMPORTANT: When working in the SEARCH mode, remain calm and
concentrated, and avoid hasty movements !


SEARCH mode / close search
Once you have approached the victim quickly with the rough search, the PIEPS DSP
really comes into its own thanks to its advanced triple-antenna system.
When you are closer than 3 m to the victim, you can start locating the position point by
point. To avoid confusion, the direction display is now suppressed (point 1). Continue
moving in the same direction and follow the plan on the left.
After a certain point, the distance reading will start to increase again (point 2). From
this point, move sideways (90°) without turning your body or the device. If the value
increases unexpectedly, move in the opposite direction (point 3).Along this theoretical
axis, you will find the minimum point of the distance reading (point 4). Mark this point in
the snow and continue at a right angle from here (90°) as already described.
You have now detected the absolute minimum point (point 5) and located the victim.
IMPORTANT: Throughout this procedure, keep the device horizontal in the
same position without rotating it, and keep it as close as possible to the surface
of the snow !

Locate
first victim
Suppress with
MARK
Locate
second victim
Suppress with
MARK
Locate
third victim
3 burials are
indicated

SEARCH mode / multiple search
highlightThe optimised multiple search, the absolute of the PIEPS DSP, is based on
a separation of signals via the digital signal processor (DSP).
If there are multiple victims, this is clearly indicated by the number of matchstick men.
By default, the PIEPS DSP will automatically search for the strongest signal.
Once the position of the first victim has been located, press the MARK key for approx.
3 seconds without moving away from this point.
This signal is now suppressed and the device will automatically search for the second
strongest signal. In unfavourable circumstances (temporary signal interference), you
may have to repeat this procedure several times. Once a signal has been successfully
suppressed, an outline appears around the matchstick man.
Now continue the search as described above and repeat the procedures until all
transmitters are located.
IMPORTANT: In case of multiple detections involving older analogue devices,
faults may at worst occur which impair the efficiency of the digital signal
separation. In such cases, you may find for a short time that more signals are
displayed than actually exist.

Anzeige:
1 Sender
innerhalb 5m
Anzeige:
2 Sender
innerhalb 20m
Anzeige:
4 od. Mehr Sender
innerhalb 50m
R
a
di
u
s
5
m
Ra
d
iu
s
2
0
m
R
a
di
u
s
5
0
m

SEARCH mode / SCAN function
Another highly useful feature of the PIEPS DSP is the SCAN function.
Press the SCAN key in the SEARCH mode and the device will begin scanning the
entire receiving range. During the scan, stand still and hold the device steady.
This will give you an overview of all the victims' devices within the detectable range,
classified according to three groups:
Reading 1: within a distance of approx. 5m
All information from previously suppressed signals is now reset and you can start the
suppression again (MARK).
!
!
IMPORTANT: Once you have located all victims, move away from their locations
in a star shape and use the SCAN function to check the scenario again. That way
you can make sure you haven't missed any other victims.
!Reading 2: within a distance of approx. 20m
Reading 3: within a distance of approx. 50m

Technical data
Certification / conformity
Device designation: PIEPS DSP
Transmission frequency: 457 kHz (internation standard frequency)
Battery lifetimer: Min. 200 h in SEND Mode
Maximum range: 60 Metres (digital evaluation)
Earphone socket: Stereo earphone 3,5 mm, min. 32 Ohm
Temperature range: -20°C bis +45°C
Weight: 198 g (incl. batteries)
Dimensions (L xWB X H) 116 x 75 x 27 mm
Temperature display -20°C bis +50°C, accuracy 3°C
Compass function Accuracy ± 8°
Altimeter Accuracy 10 m
Manufacturer: SEIDEL Elektronik GmbH
Country of manufacture: Österreich
Device Type: PIEPS DSP
The device conforms to standard ETS 300817
IC: 4710A-DSP01
FCC ID: REMDSP01
This device conforms to Paragraph 15 of the FCC regulations.
Operation is subject to the following two conditions:
1) This device may not cause harmful interference, and
2) this device must accept any interference received, including interfernce that may
cause undesired operation
Power supply; 3 batteries, Alkaline (AAA), IEC-LR03, 1,5V
±
±
Warning:Any changes or modifications not expressly approved by Seidel Elektronik,
responsible for compliance, could void the user´s authority to operate this device.
Option-Pack
Europa:
Canada:
USA:
Other manuals for DSP
8
Table of contents
Other PIEPS Accessories manuals
Popular Accessories manuals by other brands

Skandia Elevator
Skandia Elevator L Series Assembly instructions

Hudora
Hudora 74502 INSTRUCTIONS ON ASSEMBLY AND USE

OBH Nordica
OBH Nordica sharpX-treme 9967 Instructions of use

Batca
Batca AXIS Rotational Trainer owner's manual

MOBILE-ALERTS
MOBILE-ALERTS MA10650 quick reference

Homelite
Homelite 18493 instruction sheet