Pilot Communications PRO BA1000 User manual

Art. 70267
TESTER PRO
Manuale di istruzioni


3
IT
Avvertenze e precauzioni
Prima di utilizzare il tester, leggere il manuale e attenersi scrupolosamente alle istruzioni.
Non usare mai il dispositivo se è danneggiato o deformato, rotto o se qualche sua parte sia o appaia danneggiata
o rotta. Nel caso in cui il tester sia danneggiato, non funzioni in modo corretto o qualche parte sia mancante,
interrompere immediatamente l’uso del prodotto.
1 Il tester è progettato per batterie 12V.
2 Prima di utilizzare il tester, raccomandiamo di controllare sempre le speciche dei produttori di batterie.
3 Durante il collegamento, si possono vericare scintille. Garantire una ventilazione adeguata.
4 Per uso interno. Non esporre il caricatore a pioggia, neve o liquidi.
6 L’acido della batteria è corrosivo. Sciacquare immediatamente con acqua se l’acido entra in contatto con la
pelle o gli occhi.
7 Le batterie congelate non devono mai essere testate.
8 Le batterie che presentano danni visibili o rigonamenti non devono mai essere testate.
10 Massima prudenza per evitare di far cadere qualche attrezzo metallico sulla batteria. Si potrebbero generare
scintille o cortocircuiti della batteria o di altre parti elettriche con conseguente pericolo di esplosione.
11 Quando si interviene sulla batteria, togliere gli oggetti metallici personali quali anelli, braccialetti, collane,
orologi ecc...
12 Vietato fumare! Attenzione a non provocare scintille o avvicinare amme libere alla batteria o al motore.
14 Per ridurre il rischio di scosse elettriche, scollegare il tester dalla batteria prima di eettuare la manutenzione o
la pulizia.
15 Questo tester non è destinato all’uso da parte di persone (bambini compresi) non in grado di comprendere
il manuale, a meno che non siano sotto la sorveglianza di una persona responsabile che ne assicuri l’uso
corretto.

4
IT
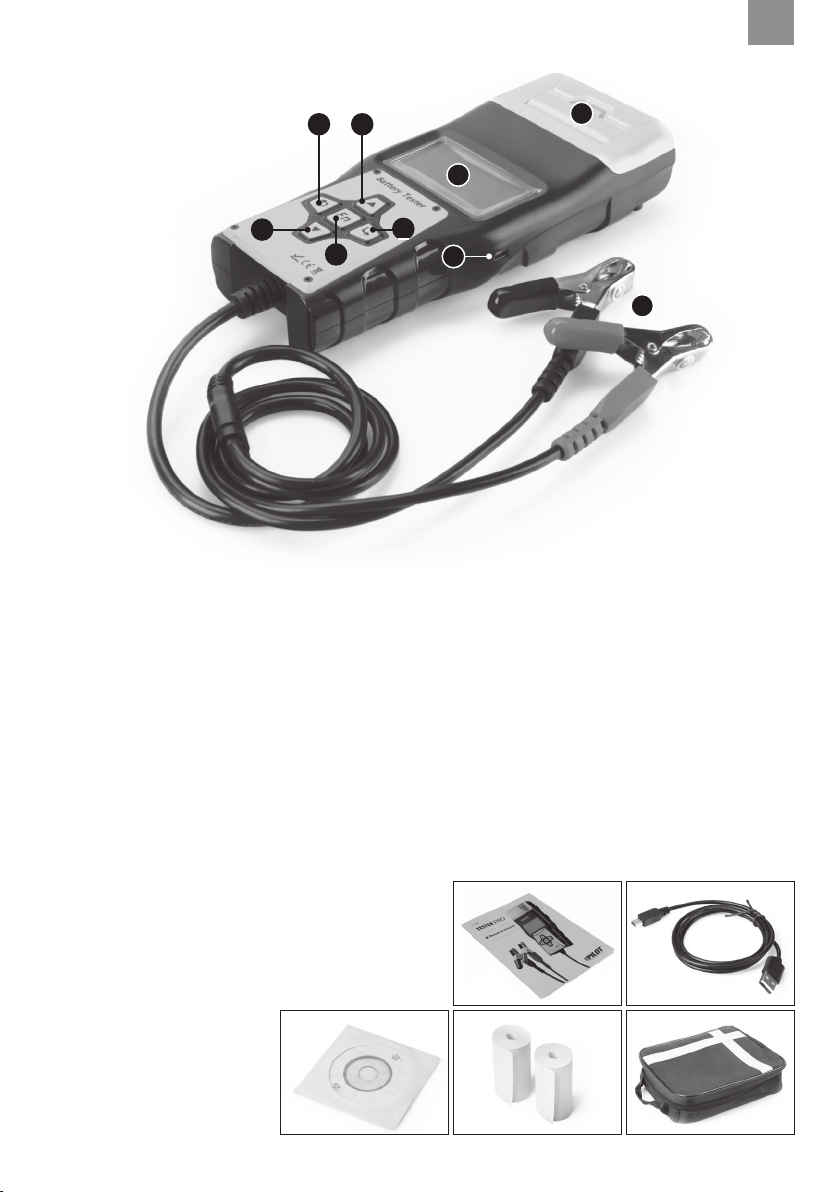
Descrizione prodotto
1) Caratteristiche
Il tester per batterie BA1000 adotta un’avanzata tecnologia di test della conduttanza per misurare in modo
semplice, rapido e preciso, lo spunto della batteria per avviamento a freddo del veicolo, lo stato di salute della
stessa ed eventuali guasti comuni del sistema di avviamento del veicolo e del sistema di ricarica. Indispensabile
per ocine, elettrauti e professionisti, permette agli operatori di individuare velocemente i problemi e intervenire
per una riparazione rapida e precisa del veicolo.
• Adatto per tutti i tipi di batterie automotive: piombo, AGM, GEL, EFB, ecc.
• Rileva direttamente le celle difettose della batteria.
• Protezione contro l’inversione di polarità, non danneggia né il tester né il veicolo né la batteria.
• Misura la capacità della batteria senza la necessità di ricaricarla prima del test.
• Compatibile con gli standard batteria: CCA, BCI, CA, MCA, JIS, DIN, IEC, EN, SAE, GB.
• Multilingue: sono selezionabili le seguenti lingue: inglese, italiano, spagnolo, francese, tedesco, olandese.
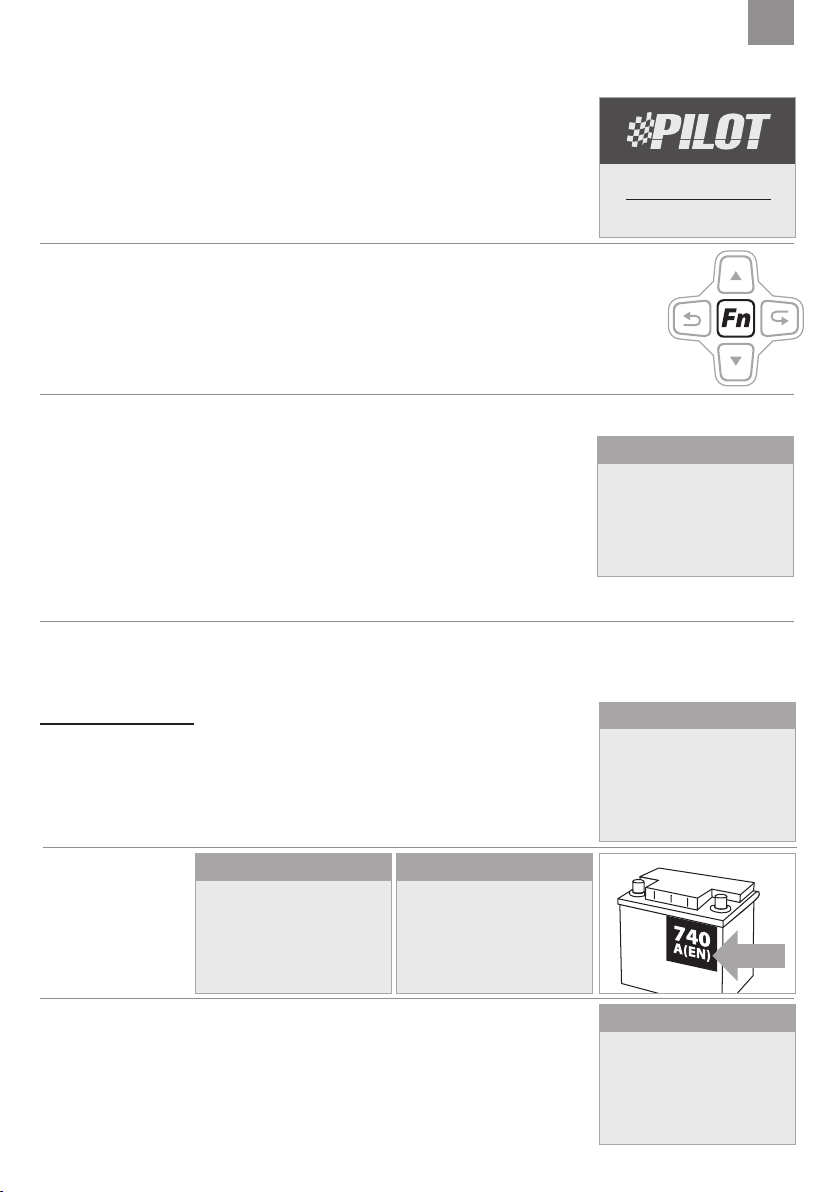
2) Funzioni principali
Le funzioni principali del tester per batterie BA1000 sono le seguenti:
• Test batteria: analizza lo stato di salute della batteria misurando la capacità reale di avviamento a freddo e
lo stato di usura. Fornisce un’analisi adabile indicando la manutenzione da eettuare alla batteria. Avverte
inoltre in anticipo quando è necessario sostituire la batteria perché giunta a ne vita.
• Test avviamento: analizza il motorino di avviamento. Attraverso la misura reale della corrente e della
tensione di avviamento, riesce a determinare se il motorino di avviamento funziona bene. Se il test non viene
superato il problema potrebbe essere del motorino stesso ormai poco performante oppure potrebbe essere
un’indicazione di un problema più serio al motore del veicolo.
• Test ricarica: analizza tutto il sistema di ricarica del veicolo, incluso l’alternatore, per scoprire se tutti i
componenti funzionano correttamente e la corrente di carica della batteria è corretta. Una ricarica non
corretta può danneggiarla o ridurne la vita utile della batteria e danneggiare altre componenti del veicolo
(centraline, accessori elettrice, ecc.)
• Funzioni aggiuntive: impostazione della lingua, voltmetro e regolazione della luminosità dello schermo.
3) Speciche prodotto
Il tester è adatto per batterie che impiegano i seguenti
standard e gamme di capacità
(questa informazione di solito è indicata sulla batteria):
• Alimentazione (tramite la batteria del veicolo): 8-30Vdc
• Temperatura di funzionamento: 0 – 50°C
• Temperatura di stoccaggio: da -20 a 70°C
• Dimensioni: 210 mm - 90 mm - 40 mm
• Peso: 700g
• Indicato per ocine, riparatori, ricambisti, elettrauti,
distributori, aree di servizio, garage, ecc.
Standard di misurazione Capacità
CCA 100-2000 A
BCI 100-2000 A
CA 100-2000 A
MCA 100-2000 A
JIS 26A17--245H52
DIN 100-1400 A
IEC 100-1400 A
EN 100-2000 A
SAE 100-2000 A
GB 30-220 A

5
IT
4) Informazioni sul prodotto
Descrizione dello strumento
1 Display LCD - Display retroilluminato, 128 x 64 pixel con regolazione del contrasto.
2 Tasto OK - Conferma una selezione (o azione) da menu.
3 Tasto ESC - Annulla una selezione (o azione) da menu o ritorna al menu precedente.
4 Tasto SU - Si sposta verso l’alto attraverso le voci di menu e sottomenu. Quando viene visualizzata più di una
schermata di dati, ci si sposta attraverso le schermate.
5 Tasto GIU - Si sposta verso il basso attraverso le voci di menu e sottomenu. Quando viene visualizzata più di
una schermata di dati, ci si sposta attraverso le schermate.
6 Tasto FN - Premerlo per entrare nella funzione per il test rapido personalizzato
7 Stampante - Scegliere la funzione di STAMPA DATI e confermarla, poi stampare il risultato del test.
8 Clip della batteria - Collegare ai poli positivi e negativi della batteria auto.
9 Presa Mini-USB (sul lato del prodotto) - Collegare al computer per la stampa tramite cavo USB.
Accessori inclusi
• Manuale d’uso
• Cavo USB per il collegamento dello strumento
al computer per la stampa
• CD con software per la stampa
• Carta termica: 2 rotoli
• Custodia
1
7
8
9
52
4
6
3

6
IT
5) Impostazione del prodotto
Per entrare nel menu IMPOSTAZIONI, dal menu principale, selezionare
IMPOSTAZIONI e premere OK.
Le impostazioni disponibili sono le seguenti:
Lingua:
Dal menu IMPOSTAZIONI selezionare LINGUA e premere OK.
Selezionare la lingua desiderata e premere OK per salvare e tornare al menu
precedente.
Tasto FN:
Dal menu IMPOSTAZIONI selezionare TASTO FN e premere OK.
Selezionare la funzione rapida desiderata e premere OK per salvare e tornare
al menu precedente.
Se viene impostato il TEST RAPIDO verranno utilizzati come standard i
parametri utilizzati nell’ultimo test batteria.
Contrasto
Dal menu IMPOSTAZIONI selezionare CONTRASTO e premere OK.
Regolare il contrasto dello schermo desiderato tramite i tasti SU e GIU e
premere OK per salvare e tornare al menu precedente.
Data e ora
Dal menu IMPOSTAZIONI selezionare DATA E ORA e premere OK.
Regolare la data e l’orario utilizzando i tasti SU e GIU e premendo OK per
passare al campo successivo.
Premere il tasto EXIT per tornare al menu precedente.
Info versione
Dal menu IMPOSTAZIONI selezionare INFO VERSIONE e premere OK.
Premere il tasto EXIT per tornare al menu precedente.
1 Lingua
2 Tasto FN
3 Contrasto
4 Data e ora
5 Info versione
IMPOSTAZIONI
1 Inglese
2 Tedesco
3 Spagnolo
4 Francese
5 Italiano
6 Olandese
1 English
2 Deutsch
3 Español
4 Français
5 Italiano
6 Nederlandse
LINGUA
1 Voltmetro
2 Test rapido
TASTO FN
Test rapido per batterie
con gli stessi parametri.
Eseguire prima un test
batteria.
Ok per confermare
TEST RAPIDO
CONTRASTO
11
2021/08/12
10:28:31
DATA E ORA
Software version 1.04
Hardware version 1.01
INFO VERSIONE

7
IT
Funzionamento e test
Dopo aver collegato lo strumento alla batteria del veicolo, il tester
visualizza il modello del tester e la tensione della batteria
Tasto FN
La funzione One-Click-Key permette, una volta premuto il tasto, di eseguire rapidamente
uno dei seguenti test (a seconda delle impostazioni salvate in precedenza):
• Voltmetro
• Test della batteria come ultimo test eseguito.
Voltmetro
12.43V
1 Standard
2 AGM piatta
3 AGM spirale
4 GEL
5 EFB
TIPO BATTERIA
Test in corso
************************
TEST BATTERIA
In alternativa pemere uno degli altri tasti per accedere al menu
ed eseguire uno dei test disponibili.
1. Test batteria
Spegnere il veicolo e tutti i dispositivi collegati. Premere ok per iniziare il test.
Selezionare il TIPO BATTERIA e premere OK per confermare.
760 A EN
VALORE NOMINALE
Selezionare
lo standard di
riferimento e il
valore nominale
indicato sulla
batteria.
Premendo ok il test inizia.
Ci vogliono circa 3secondi per visualizzare il risultato.
EN
BATTERIA STANDARD
Menu principale
1 Test batteria
2 Test avviamento
3 Test ricarica
4 Visualizza risultato
5 Stampa dati
6 Impostazioni

8
IT
Capacità: 64% 611A
Carica: 70% 12.42V
Resistenza: 4.40mΩ
Nominale: 760A EN
BATTERIA OK
TEST BATTERIA
Capacità: 78% 590A
Carica: 30% 12.20V
Resistenza: 4.40mΩ
Nominale: 760A EN
RICARICARE
TEST BATTERIA
Capacità: 46% 350A
Carica: 30% 12.68V
Resistenza: 18.1mΩ
Nominale: 760A EN
ESAURITA
TEST BATTERIA
Capacità: 0% 0A
Carica: 0% 10.64V
Resistenza: 45.2mΩ
Nominale: 760A EN
DIFETTOSA
TEST BATTERIA
Capacità: 39% 350A
Carica: 20% 10.64V
Resistenza: 30.1mΩ
Nominale: 760A EN
CARICA-RIPROVA
TEST BATTERIA
Risultati test
Dopo il test della batteria viene mostrato uno dei seguenti risultati:
1 - Batteria OK
Batteria in ottimo stato e perfettamente funzionante.
2 - Ricaricare
Batteria buona ma occorre ricaricarla prima di utilizzarla.
3 - Esaurita - sostituire
La batteria ha raggiunto la ne del suo ciclo di utilizzo. Sostituirla.
4 - Difettosa, sostituire
La batteria è danneggia internamente a causa di una cella difettosa o
di un corto circuito. Sostituirla.
5 - Carica e riprova
La batteria è instabile deve essere ricaricata e ritestata per evitare errori.
Se appare lo stesso risultato dopo la ricarica, la batteria è da considerarsi
danneggiata. Sostituirla.
Stampa risultato
Dopo ogni test, premendo il Tasto OK compare
la schermata per stampare risultato. Premere il
tasto Esc per tornare al menu principale.
Note: Il valore Capacità indicato nel test (es. 611A EN)
è relativo alla potenza disponibile nella batteria in relazione allo specico valore riportato sulla batteria (es 760A EN).
Dall’esempio fatto sopra, per una batteria da 760A EN su cui si rileva una potenza disponibile pari a 590EN, non signica che la
batteria passerebbe un test del EN a 590A EN. La lettura della potenza disponibile dimostra che la batteria non è in grado di dare
prestazioni no ai suoi parametri di riferimento (760A EN). Se confrontata con un’altra batteria completamente carica, la batteria
da 760A EN con 590A EN misurati, non è più potente di una batteria completamente carica da 550A EN con 550A EN misurati.
La potenza disponibile deve essere confrontata con il suo parametro di riferimento. Infatti, in questo esempio la batteria da 760A
EN non raggiunge il suo standard di riferimento, mentre la batteria da 550A EN lo raggiunge. Lo stesso discorso vale per DIN, IEC,
JIS, CCA a seconda dei parametri.
STAMPA
Stampa in corso
************************
OK per stampare

9
IT
2. Test avviamento
Procedura
Far partire il test
premendo OK.
Avviare poi il motore
e il test continuerà
automaticamente.
Premere OK per avviare
il test.
Premere ESC per tornare
al menu principale
TEST AVVIAMENTO
Al termine del test verrà mostrato il risultato. Normalmente, un valore della
tensione di avviamento inferiore a 9.6V indica un malfunzionamento della
batteria che va sostituita, mentre valori superiori a 9.6V sono corretti.
Il risultato del test del tester include la tensione di avviamento eettiva e il
tempo di avviamento eettivo.
Quando l’avviamento presenta dei problemi, il risultato del test verrà
comunque mostrato.
3. Test carica
Procedura
Accendere il motore. Spegnere climatizzazione,
luci e tutti gli altri dispositivi/accessori collegati
al veicolo. Attendere 10 secondi. Continuare
premendo OK.
Il test leggerà la tensione di ricarica per circa 10
secondi.
Premere OK e aumentare i giri no a
2500-3000 r/min mantenendoli per circa
10 secondi.
Il test leggerà la tensione di ricarica per circa
10 secondi.
Rilasciare il pedale dell’acceleratore e
accendere le luci, il clima e tutti gli altri
dispositivi e accessori collegati.
Premere OK per continuare. Il test leggerà la
tensione di ricarica per circa 10secondi.
TEST AVVIAMENTO
Avviare motore
TEST AVVIAMENTO
Motore avviato
TEST AVVIAMENTO
Tempo: 20ms
Avvio: OK
Tensione: 10.07V
TEST AVVIAMENTO
Tempo: 1020ms
Avvio: BASSO
Tensione: 8.57V
TEST RICARICA
Spegnere fari, clima e
altri dispositivi.
Attendere 10 secondi
e premere OK
TEST RICARICA
Attendere 10 secondi
8S
TEST RICARICA
Premere OK e
aumentare i giri no
a 2500/3000 r/min
mantenendo per circa
10 secondi
TEST RICARICA
Accelerare per 10 sec
8S
TEST RICARICA
Rilasciare il pedale
dell’acceleratore e
accendere fari clima e
sbrinatore post.
OK per continuare.
TEST RICARICA
Attendere 10 secondi
8S

10
IT
Alla ne del test verrà visualizzato uno dei seguenti risultati:
Voltaggio OK
Il sistema di ricarica del veicolo funziona correttamente.
Voltaggio BASSO
Il sistema di ricarica non carica a sucienza la batteria oppure controllare
il consumo degli accessori collegati. Far controllare il veicolo da un centro
riparazione.
Voltaggio ALTO
Il sistema di ricarica del veicolo produce una tensione di carica troppo alta.
Far controllare il veicolo presso un centro riparazione.
NOTA BENE: Per i veicoli Star&Stop una tensione di ricarica più alta intorno ai
15V±0,5V è normale. Controllate le speciche del costruttore per il limite corretto,
dato che varierà in base al tipo di veicolo e costruttore.
Controllare DIODO
Durante il test viene controllata l’ondulazione del diodo raggrinzatole presente
nell’alternatore. Quando l’ondulazione è troppo elevata vuol dire che il diodo è
danneggiato. Far controllare il veicolo presso un centro riparazione.
NOTA BENE:
In caso l’alternato sia completamente guasto o non connesso alla batteria, il test
verrà ripetuto 3volte dopo di che segnerà Nessun voltaggio.
Controllare l’alternatore o la connessione con la batteria e ripetere il test.
TEST RICARICA
Con il carico: 13.06V
Senza carico: 13.32V
Ondulazione: 15mV
TENSIONE BASSA
TEST RICARICA
Con il carico: 14.84V
Senza carico: 14.92V
Ondulazione: 15mV
TENSIONE ALTA
TEST RICARICA
Con il carico: 13.74V
Senza carico: 13.98V
Ondulazione: 375mV
CONTROL.DIODO
TEST RICARICA
Con il carico: 12.42V
Senza carico: 12.42V
Ondulazione: 0mV
NESSUNA USCITA
TEST RICARICA
Con il carico: 14.16V
Senza carico: 14.39V
Ondulazione: 15mV
TENSIONE OK

11
IT
4. Visualizza risultati
Scegliere VISUALIZZA RISULT. dal menu per rivedere il risultato
degli ultimi test eettuati.
Usare le frecce SU
e GIU per spostarsi
tra i test eettuati.
5. Stampa dati
Scegliere STAMPA DATI per stampare il gli ultmi test:
Scegliere quale test stampare e premere OK.
La stampa uscirà nel giro di pochi secondi.
Press ESC per tornare al menu principale.
Menu principale
1 Test batteria
2 Test avviamento
3 Test ricarica
4 Visualizza risult.
5 Stampa dati
6 Impostazioni
TEST BATTERIA
Capacità: 64% 611A
Carica: 70% 12.42V
Resistenza: 4.40mΩ
Nominale 760A EN
BATTERIA OK
TEST AVVIAMENTO
Tempo: 20ms
Avviamento: OK
Tensione: 10.07V
TEST RICARICA
Con il carico: 14.16V
Senza carico: 14.39V
Ondulazione: 15mV
VOLTAGGIO OK
Menu principale
1 Test batteria
2 Test avviamento
3 Test ricarica
4 Visualizza risult.
5 Stampa dati
6 Impostazioni
STAMPA DATI
1 Test batteria
2 Test avviamento
3 Test ricarica
4 Stampa tutti
STAMPA DATI
Stampa in corso
************************

12
IT
GARANZIA E SERVIZIO
Garanzia limitata di un anno.
Garantiamo ai suoi clienti che questo prodotto sarà esente da tutti i difetti nei materiali e nella lavorazione per un
periodo di un (1) anno dalla data di acquisto originale, soggetto ai seguenti termini e condizioni:
1 La nostra esclusiva responsabilità ai sensi della garanzia è limitata alla riparazione o, a nostra discrezione, alla
sostituzione gratuita dello strumento di scansione con la prova di acquisto. La ricevuta di vendita può essere
utilizzata per questo scopo.
2 La presente garanzia non si applica ai danni causati da uso improprio, incidenti, allagamenti, fulmini o se il
prodotto è stato alterato o riparato da persone diverse dall’assistenza del produttore.
3 Non saremo responsabili per eventuali danni accidentali o consequenziali derivati , dall’uso improprio o dal
montaggio dello strumento di scansione.
Procedure di servizio
Per supporto tecnico, contatta il tuo rivenditore locale o distributore.
INSTALLAZIONE DEL ROTOLO
Stampare dati tramite stampante PC
1 Prima di scegliere la funzione di stampa è necessario collegare lo strumento al computer tramite cavo USB.
2 Installare prima il driver USB, (il driver si trova nel CD fornito.)
3 Installare il software di stampa.
4 Scegliere la porta del computer.
5 Scegliere le informazioni che devono ess ere stampate dal tester.
1 Alzare la levetta per aprire il vano del rotolo
2 Estrarre la parte iniziale del rotolo e posizionarlo all'interno del
vano con il lato di stampa (lato esterno del rotolo) verso l'alto.
3 Richiudere la levetta e strappare la parte di rotolo in eccesso.
1 32

Art. 70267
TESTER PRO
User manual
LAMPA S.p.A. - Via G. Rossa, 53/55 - 46019Viadana (MN) ITALY - Tel. +39 0375 820700 - UNI EN ISO 9001:2015 Certied Compan
www.lampa.it Made in China


3
EN
WARNINGS AND PRECAUTIONS
Before using the tester, read the manual and strictly follow the instructions.
Never use the device if it is damaged or deformed, broken or if any part of it is or appears damaged or broken. In
the event that the tester is damaged, does not work properly or some part is missing, immediately stop using the
product.
1 The tester is designed for 12V batteries.
2 Before using the tester, we recommend that you always check the specications of the battery manufacturers.
3 During connection, sparks may occur. Ensure adequate ventilation.
4 For internal use. Do not expose the charger to rain, snow or liquids.
6 Battery acid is corrosive. Rinse immediately with water if the acid comes into contact with the skin or eyes.
7 Frozen batteries should never be tested.
8 Batteries that show visible damage or bulges should never be tested.
10 Use extreme caution to avoid dropping any metal tools on the battery. Sparking or shorting of the battery or
other electrical parts could result in an explosion hazard.
11 When working on the battery, remove personal metal objects such as rings, bracelets, necklaces, watches, etc..
12 No smoking! Be careful not to cause sparks or bring open ames to the battery or engine.
14 To reduce the risk of electric shock, disconnect the tester from the battery before performing maintenance or
cleaning.
15 This tester is not intended for use by people (including children) who are unable to understand the manual,
unless they are under the supervision of a responsible person who ensures proper use.

4
EN
PRODUCT DESCRIPTION
1) FEATURES
The BA1000 battery tester adopts advanced conductance testing technology to easily, quickly and accurately
measure the vehicle's cold start battery, its health and any common failures of the vehicle's starting system.
vehicle and charging system. Indispensable for workshops, electricians and professionals, it allows operators to
quickly identify problems and intervene for a quick and precise repair of the vehicle.
• Suitable for all types of automotive batteries: lead, AGM, GEL, EFB, etc.
• Detects faulty battery cells directly.
• Protection against polarity inversion, it does not damage either the tester or the vehicle or the battery.
• Measures battery capacity without needing to recharge it prior to testing.
• Compatible with battery standards: CCA, BCI, CA, MCA, JIS, DIN, IEC, EN, SAE, GB.
• Multilingual: the following languages can be selected: English, Italian, Spanish, French, German, Dutch.
2) MAIN FUNCTIONS
The main functions of the BA1000 battery tester are as follows:
• Battery test: analyzes the health of the battery by measuring the real cold starting capacity and the state of
wear. It provides a reliable analysis indicating the maintenance to be carried out on the battery. It also warns
in advance when it is necessary to replace the battery because it has reached the end of its life.
• Starter test: analyzes the starter motor. Through the real measurement of the starting current and voltage, it
can determine if the starter motor is working well. If the test is not passed, the problem could be the motor
itself which is now underperforming or it could be an indication of a more serious problem with the vehicle's
engine.
• Charging test: analyzes the entire vehicle charging system, including the alternator, to nd out if all
components are working correctly and the battery charging current is correct. Incorrect charging can damage
it or reduce the useful life of the battery and damage other components of the vehicle (control units, electrical
accessories, etc.)
• Additional functions: language setting, voltmeter and screen brightness adjustment.
3) PRODUCT SPECIFICATIONS
The tester is suitable for batteries using the following
standards and capacity ranges.
(this information is usually indicated on the battery):
• Power supply (via the vehicle battery): 8-30Vdc
• Operating temperature: 0 - 50 ° C
• Storage temperature: -20 to 70 ° C
• Dimensions: 210 mm - 90 mm - 40 mm
• Weight: 700g
• Suitable for workshops, repairers, spare parts dealers,
electricians, distributors, service areas, garages, etc.
Measurement standard Capacity
CCA 100-2000 A
BCI 100-2000 A
CA 100-2000 A
MCA 100-2000 A
JIS 26A17--245H52
DIN 100-1400 A
IEC 100-1400 A
EN 100-2000 A
SAE 100-2000 A
GB 30-220 A

5
EN
4) PRODUCT INFORMATION
4) DESCRIPTION OF THE TOOL
1 LCD display - Backlit display, 128 x 64 pixels with contrast adjustment.
2 OK key - Conrms a selection (or action) from the menu.
3 ESC key - Cancels a selection (or action) from the menu or returns to the previous menu.
4 UP key - Moves up through the menu and submenu items. When more than one screen of data is displayed, it
moves through the screens.
5 DOWN key - Moves down through menu and submenu items. When more than one screen of data is
displayed, it moves through the screens.
6 FN key - Press to enter the custom quick test function
7 Printer - Choose the PRINT DATA function and conrm it, then print the test result.
8 Battery clip - Connect to the positive and negative poles of the car battery.
9 Mini-USB socket (on the side of the product) - Connect to the computer for printing via USB cable.
ACCESSORIES INCLUDED
• User manual
• USB cable for connecting the instrument to the computer
for printing
• CD with printing software
• Thermal paper: 2 rolls
• Custody
1
7
8
9
52
4
6
3

6
EN
CONTRAST
5) PRODUCT SETUP
To enter the SETTINGS menu, from the main menu, select SETTINGS and press
OK.
The available settings are as follows:
LANGUAGE:
From the SETTINGS menu select LANGUAGE and press OK.
Select the desired language and press OK to save and return to the previous
menu.
FN KEY:
From the SETTINGS menu select FN KEY and press OK.
Select the desired quick function and press OK to save and return to the
previous menu.
If the QUICK TEST is set, the parameters used in the last battery test will be
used as standard.
CONTRAST
From the SETTINGS menu select CONTRAST and press OK.
Adjust the desired screen contrast using the UP and DOWN keys and press OK
to save and return to the previous menu.
DATE AND TIME
From the SETTINGS menu select DATE AND TIME and press OK.
Adjust the date and time using the UP and DOWN keys and pressing OK to
move to the next eld.
Press the EXIT button to return to the previous menu.
VERSION INFO
From the SETTINGS menu select VERSION INFO and press OK. Press the EXIT
button to return to the previous menu.
Test rapido per batterie
con gli stessi parametri.
Eseguire prima un test
batteria.
Ok per confermare
TEST RAPIDO
CONTRASTO
11
System Setup
Language
Fn settings
Contrast
Tool Information
Language
English
French
German
Spanish
Italian
Dutch
FN setting
Voltmeter
Quick Test
DATE AND TIME
2021/08/12
10:28:31
VERSION INFO
Software version 1.04
Hardware version 1.01

7
EN
OPERATION AND TEST:
After connecting the tester to the vehicle battery, the display will show
the tester model and battery voltage
FN KEY
The One-Click-Key function allows, once the key has been pressed, to quickly perform
one of the following tests (depending on the previously saved settings):
• Voltmeter
• Battery test as the last test performed.
Alternatively, press one of the other keys to access the menu
and run one of the available tests.
1. BATTERY TEST:
Turn o the vehicle and all connected devices. Press ok to start the test. Select
the BATTERY TYPE and press OK to conrm.
Select the
reference
standard and
the nominal
value indicated
on the battery.
By pressing ok the test starts.
It takes about 3 seconds to display the result.
Voltmeter
12.43V
MAIN MENU
1 Battery Test
2 Cranking Test
3 Charging Test
4 Review Data
5 Print Data
6 System Setup
BATTERY TYPE
1 Regular Flooded.
2 AGM Flat Plate.
3 AGM spiral
4 GEL
5 EFB
SELECT INPUT
EN
SETTING RATE
760 A EN
BATTERY TEST
TESTING
**************************

8
EN
TEST RESULTS
After the battery test one of the following results is shown:
1 - Battery OK
Battery in excellent condition and fully functional.
2 - Reload
Good battery but it needs to be recharged before using it.
3 - Exhausted - Replace
The battery has reached the end of its life cycle.
Replace it.
4 - Defective, Replace
The battery is internally damaged due to a faulty cell or short circuit.
Replace it.
5 - Upload and try again
The battery is unstable must be recharged and retested to avoid errors. If
the same result appears after charging, the battery is considered damaged.
Replace it.
PRINT RESULT:
After each test, pressing the OK key displays the
screen to print the result. Press the Esc key to return
to the main menu.
Notes: The Capacity value indicated in the test
(e.g. 611A EN) relates to the power available in the battery
in relation to the specic value shown on the battery
(e.g. 760A EN).
From the example given above, for a 760A EN battery on which an available power of 590EN is detected, it does not mean that
the battery would pass an EN test at 590A EN. The reading of the available power shows that the battery is not able to perform
up to its reference parameters (760A EN). When compared to another fully charged battery, the 760A EN battery with 590A EN
measured is no more powerful than a fully charged 550A EN battery with 550A EN measured.
The available power must be compared with its benchmark. In fact, in this example the 760A EN battery does not reach its
reference standard, while the 550A EN battery reaches it. The same goes for DIN, IEC, JIS, CCA depending on the parameters.
BATTERY TEST
Health: 64% 611A
Charge: 70% 12.42V
Internal R: 4.40mΩ
Rated: 760A EN
BATTERY OK
BATTERY TEST
Health: 78% 590A
Charge: 30% 12.42V
Internal R: 4.40mΩ
Rated: 760A EN
RELOAD
BATTERY TEST
Health: 46% 350A
Charge: 30% 12.68V
Internal R: 18.1mΩ
Rated: 760A EN
EXAUSTED - REPLACE
BATTERY TEST
Health: 0% 0A
Charge: 0% 12.64V
Internal R: 45.2mΩ
Rated: 760A EN
DEFECTIVE - REPLACE
BATTERY TEST
Health: 39% 350A
Charge: 20% 10.64V
Internal R: 30.1mΩ
Rated: 760A EN
UPLOAD AND TRAY AGAIN
PRINT DATA
Print the results?
PRINT DATA
Print - Wait
This manual suits for next models
1
Table of contents
Languages:
Other Pilot Communications Test Equipment manuals
Popular Test Equipment manuals by other brands

Bms Bulut Makina
Bms Bulut Makina DIGIROCK-RMC Operation manual

Regal Electro
Regal Electro RE856 instruction manual

YOKOGAWA
YOKOGAWA AQ1210D user manual

PAS Systems International
PAS Systems International PAS V instruction manual

Laversab
Laversab 6300-M3 Rev C3 user manual

Gossen MetraWatt
Gossen MetraWatt METRAHit 28C light operating instructions