Pine Research MSR Series User manual

DRU10002 (REV 004 / JAN 2017)
Modulated Speed Rotator (MSR)
User Guide
Pine Research Instrumentation, Inc.
2741 Campus Walk Avenue, Building 100
Durham, NC 27705
USA
http://www.pineresearch.com
Phone: +1(919) 782-8320 Fax: +1 (919) 782-8323
Copyright © 2013-2017 Pine Research Instrumentation, Inc. All Rights Reserved.


iii
DRU10002 (REV 004 / JAN 2017)
Table of Contents
1Preface 1
1.1 Scope 1
1.2 Copyright 1
1.3 Trademarks 1
1.4 Use Limitation 1
1.5 Service and Warranty Information 2
1.6 Instrument Markings 3
1.6.1 Certifications and Listings 3
1.6.2 Serial Number 3
1.6.3 Model Numbers 3
1.7 Specifications 4
1.8 Icons (Icônes) 5
1.9 Safety Labels (Étiquettes de sécurité) 8
1.10 General Safety Warnings (Avertissements de sécurité généraux) 8
1.11 Hazardous Material Disclosures 14
2Description 16
2.1 Major System Components 19
2.2 Enclosure Variations 21
2.3 Control Unit Components 22
2.4 Motor Unit Components 24
2.5 Typical Rotating Disk Electrode Design 26
2.6 Typical Rotating Ring-Disk Electrode Design 27
3Installation 28
3.1 Site Preparation 28
3.2 Unpacking and Setting Up the Rotator 28
4Operation 33
4.1 The Rotating Shaft 33
4.1.1 Installing a Shaft 35
4.1.2 Changing the Tip on a Shaft 40
4.2 Mounting the Cell 44
4.3 The Enclosure 46
4.4 Cell Connections 47
4.4.1 RDE and RCE Wiring 48
4.4.2 RRDE Wiring 49
4.4.3 Routing Cables and Tubing 51
4.5 Proper Grounding 52
4.5.1 Terminology 52
4.5.2 The Earth Ground Connection 52
4.5.3 A Typical Grounding Strategy 53
4.6 Using the Rotator in a Glove Box 56
4.7 Rotation Rate Control 57
4.7.1 Manual Control of Rotation 57
4.7.2 Monitoring the Rotation Rate 57
4.7.3 External Control of the Rotation Rate 58

iv
DRU10002 (REV 004 / JAN 2017)
4.7.4 External Motor Stop Control 59
4.8 Circuit Protection 60
5Electrodes 61
5.1 Electrode Handling Precautions 61
5.2 Shafts 65
5.3 RDE Tips 68
5.4 Single-Piece RDE Designs 74
5.5 RRDE Tips 76
5.6 15 mm OD RCE Tips 80
5.7 12 mm OD RCE Tips 81
6Maintenance 82
6.1 Routine Cleaning 82
6.2 Brush Replacement 82
6.2.1 Internal Brush Replacement 82
6.2.2 Complete Brush Assembly Replacement 85
6.3 Lower Bearing Replacement 86
6.4 Removing the Motor-Coupling Assembly 87
6.5 Installing a New Motor-Coupling Assembly 91
Motor Control Cable Wiring 94
6.6 Rotation Rate Calibration 96
6.7 Changing the Input Rotation Rate Ratio 106
6.8 Changing the Motor Stop Signal Logic 108
7Parts and Accessories 112
7.1 Mechanical Parts and Hardware 112
7.2 Power Cords 115
7.3 Power Supplies 118
8Troubleshooting 121
9Storage and Shipment 125
10 Theory 126
10.1 Forced Convection 126
10.2 Half Reactions 127
10.3 Voltammetry 128
10.3.1 Voltammogram Plotting Conventions 131
10.3.2 Measuring Limiting Currents 133
10.4 Rotating Disk Electrode (RDE) Theory 135
10.4.1 Levich Study 136
10.4.2 Koutecky-Levich Analysis 138
10.5 Rotating Ring-Disk Electrode (RRDE) Theory 140
10.5.1 Theoretical Computation of the Collection Efficiency 140
10.5.2 Empirical Measurement of the Collection Efficiency 142
10.5.3 Generator/Collector Experiments 143
10.5.4 Comparing Two Competing Pathways 144
10.6 Rotating Cylinder Electrode (RCE) Theory 145
10.7 References 146
11 Glossary 150

v
DRU10002 (REV 004 / JAN 2017)
Table of Figures
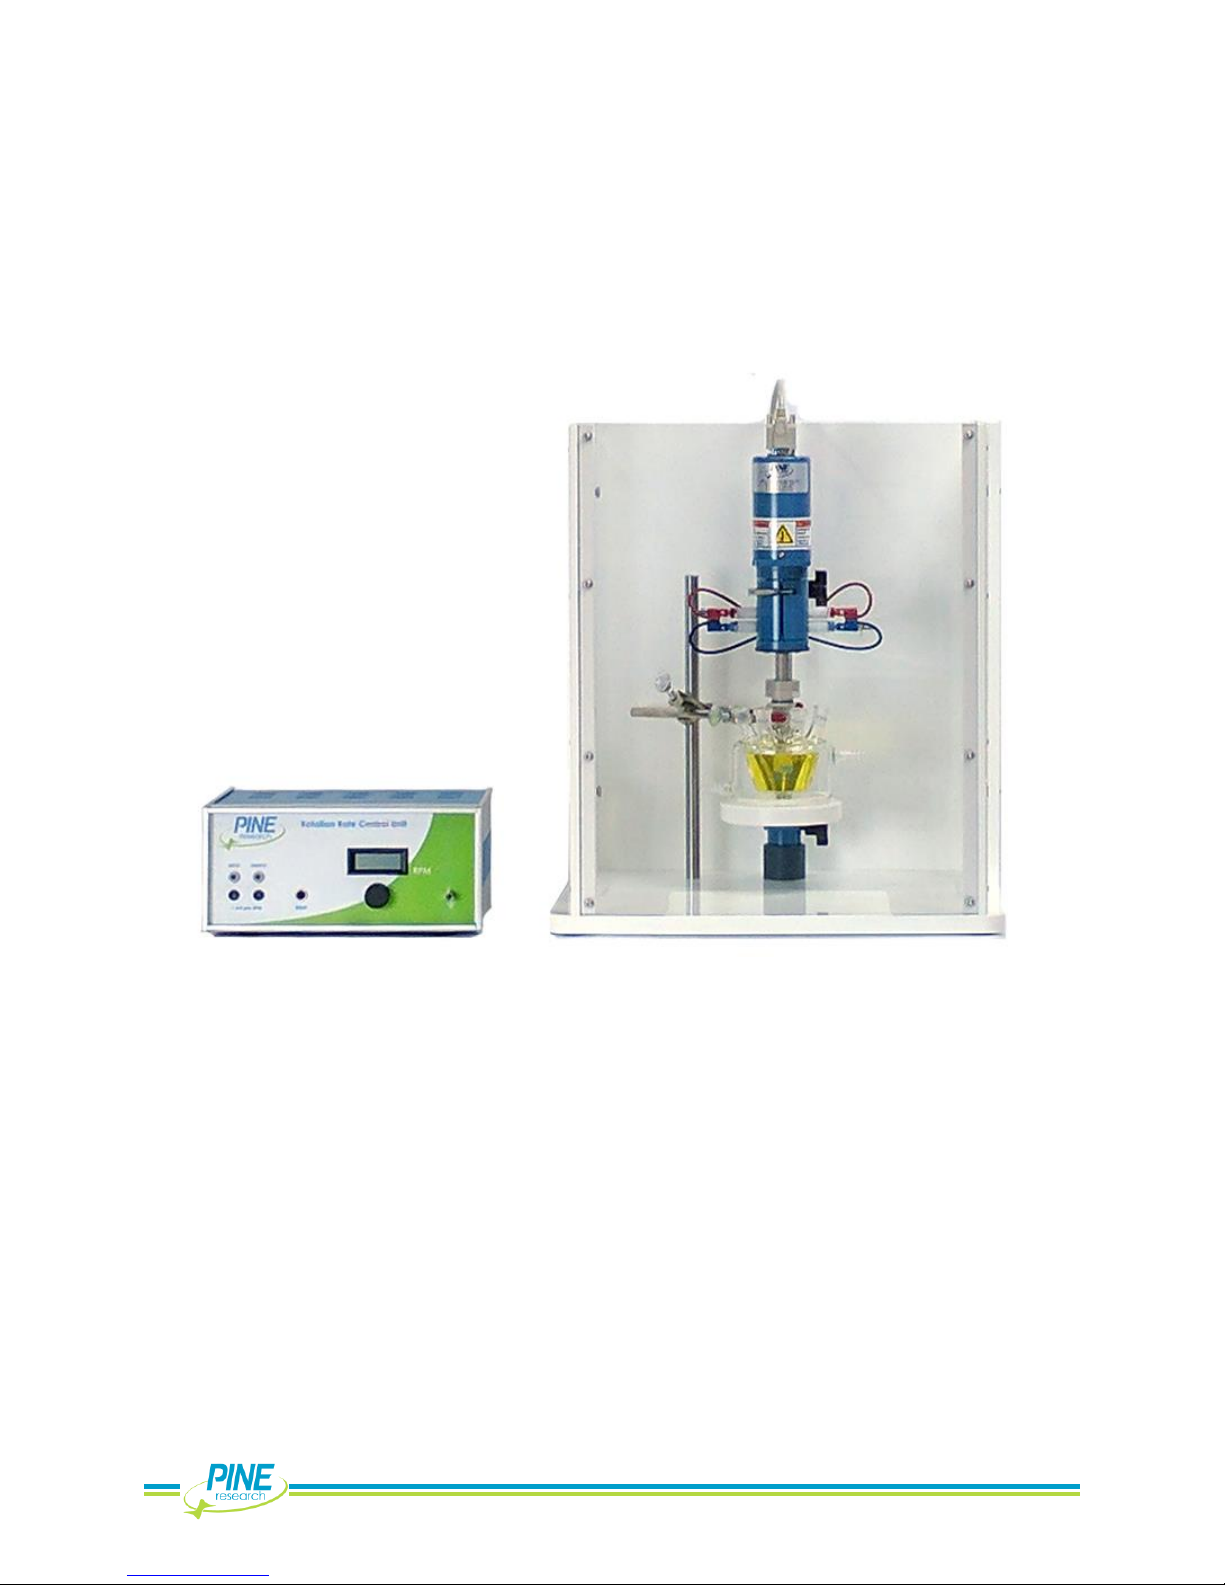
Figure 2.1: Major Components of the MSR Rotator System ..............................................19
Figure 2.2: Two Styles of Enclosure Window......................................................................... 21
Figure 2.3: Three Styles of Anchor Pins .................................................................................. 21
Figure 2.4: Control Unit Front and Back Panels ................................................................... 23
Figure 2.5: Motor Unit Components ......................................................................................25
Figure 2.6: Typical Rotating Disk Electrode (RDE) Tip with Shaft....................................... 26
Figure 2.7: Typical Rotating Ring-Disk Electrode (RRDE) Tip with Shaft ...........................27
Figure 4.1: Contact Areas at Top of Rotating Electrode Shafts ....................................... 33
Figure 4.2: The Brush Chamber (side view) .......................................................................... 34
Figure 4.3: Proper (left) and Improper (right) Shaft Insertion Positions ............................ 38
Figure 4.4: Installing a Tip on to a Shaft ................................................................................ 39
Figure 4.5: Properly Supported and Clamped Electrochemical Cells............................43
Figure 4.6: Enclosure Properly Mounted on All Four Pins ................................................... 46
Figure 4.7: Connection of Counter and Reference Electrodes....................................... 47
Figure 4.8: Brush Connections for a Rotating Disk Electrode (RDE) or a Rotating
Cylinder Electrode (RCE) ..................................................................................... 48
Figure 4.9: Brush Connections for a Rotating Ring-Disk Electrode (RRDE)...................... 50
Figure 4.10: Stackable Banana Connector with Optional Stud Connector.................... 51
Figure 4.11: Routing Cables out of the Enclosure................................................................. 51
Figure 4.12: Connect Metal Objects to Earth Ground on Control Box Front Panel........ 54
Figure 4.13: Connect Potentiostat to Earth Ground on Control Box Front Panel............55
Figure 4.14: Glove Box Configuration ..................................................................................... 56
Figure 4.15: Connecting the Rotation Rate Control Cable ................................................58
Figure 6.1: Rotator Calibration Toolkit (including simple handheld tachometer) ........ 95
Figure 6.2: Professional Optical Tachometer with Traceable Calibration...................... 95
Figure 6.3: Use of Optical Tachometer with Reflective Target......................................... 95
Figure 7.1: Standard C18 Connection on Power Entry Module .....................................115
Figure 7.2: Location of High Voltage Power Entry and Internal Power Supplies .........118
Figure 7.3: Replacement Internal Power Supplies ............................................................119
Figure 10.1: Response to a Potential Sweep (Cathodic) from a Solution Initially
Containing only the Oxidized Form (O) with no Reduced Form (R)..........130
Figure 10.2: Response to a Potential Sweep (Anodic) from a Solution Initially
Containing only the Reduced Form (R) with no Oxidized Form (O)..........131
Figure 10.3: A Voltammogram is a Plot of Current versus Potential ................................132
Figure 10.4: Two Popular Voltammogram Plotting Conventions .....................................132
Figure 10.5: Sloping Backgrounds in Voltammograms ......................................................134
Figure 10.6: Voltammogram for a Solution Containing Both Oand R............................134
Figure 10.7: Levich Study –Voltammograms at Various Rotation Rates ........................137
Figure 10.8: Levich Study –Limiting Current versus Rotation Rate ...................................137
Figure 10.9: Koutecky Levich Study –Voltammograms with Sluggish Kinetics ..............138
Figure 10.10: Rotating Ring-Disk Voltammograms at Various Rotation Rates .................141

vi
DRU10002 (REV 004 / JAN 2017)

1
DRU10002 (REV 004 / JAN 2017)
1Preface
1.1 Scope
The MSR rotator is a solid-state-controlled servo-system designed to rotate an
electrode in an electrochemical cell. This manual describes the proper use of the
MSR rotator and covers routine operating procedures, periodic maintenance and
calibration, and safety issues.
The reader of this manual is assumed to have some basic knowledge of
electronics, electrochemistry, and the modern practice of voltammetry. While
some background information is presented in this manual, the reader is referred
to the appropriate scientific literature for more detail regarding the theory and
practice of hydrodynamic voltammetry.
Pine Research Instrumentation provides online support for the rotator at the
following URL: www.pineresearch.com/shop/rotators/standard/msr/
1.2 Copyright
This publication may not be reproduced or transmitted in any form, electronic or
mechanical, including photocopying, recording, storing in an information
retrieval system, or translating, in whole or in part, without the prior consent of Pine
Research Instrumentation, Inc. in writing.
1.3 Trademarks
WaveDriver®, WaveNow®, WaveNano® and AfterMath® are registered
trademarks of Pine Research Instrumentation, Inc. (Durham, NC). All other
trademarks are the property of their respective owners.
1.4 Use Limitation
The MSR rotator is not designed for use in experiments involving human subjects
and/or the use of electrodes inside or on the surface of the human body.
Any use of this instrument other than its intended purpose is prohibited.

2
1.5 Service and Warranty Information
For questions about proper operation of the MSR rotator or other technical issues,
please use the contact information below to contact Pine directly.
TECHNICAL SERVICE CONTACT
Pine Research Instrumentation, Inc.
www.pineresearch.com
Phone: +1 (919) 782-8320
FAX: +1 (919) 782-8323
If the MSR rotator or one of its components or accessories must be returned to the
factory for service, please contact Technical Service (see above) to obtain a
Return Material Authorization (RMA) form. Include a copy of this RMA form in
each carton and ship to the Factory Return Service Address (below).
FACTORY RETURN SERVICE ADDRESS
Pine Instrument Company
ATTN: RMA #: <RMA number>
104 Industrial Drive
Grove City PA 16127
USA
Phone: +1 (724) 458-6391
Return Material Authorization Required!
Do not ship equipment to the factory without first obtaining a
Return Material Authorization (RMA) form from Pine Research
Instrumentation, Inc.
LIMITED WARRANTY
The Pine MSR Rotator (Pine part number AFMSRCE, hereafter referred to as “WARRANTED
INSTRUMENT”) offered by Pine Research Instrumentation, Inc. (hereafter referred to as “SUPPLIER”) is
warranted to be free from defects in material and workmanship for a one (1) year period from the
date of shipment to the original purchaser (hereafter referred to as the "CUSTOMER") if used under
normal laboratory conditions. SUPPLIER’s obligation under this warranty is limited to replacing or
repairing parts which shall upon examination by SUPPLIER personnel disclose to SUPPLIER’s satisfaction
to have been defective. The CUSTOMER may be obligated to assist SUPPLIER personnel in servicing
the WARRANTED INSTRUMENT. SUPPLIER will provide remote support (via telephone or internet) to
guide the CUSTOMER to diagnose and effect any needed repairs. In the event that remote support
is unsuccessful in resolving the defect, SUPPLIER may recommend that the WARRANTED INSTRUMENT
be returned to SUPPLIER for repair. This warranty is expressly in lieu of all other warranties, expressed or
implied and all other liabilities. All specifications are subject to change without notice. The CUSTOMER
is responsible for charges associated with non-warranted repairs, such charges including but not
limited to travel expenses, tariffs, labor, parts and freight charges.
This warranty does not apply to shafts, electrodes, glassware or other accessories that are used in
conjunction with the WARRANTED INSTRUMENT.

3
DRU10002 (REV 004 / JAN 2017)
1.6 Instrument Markings
Labels on the control unit and motor unit bear information to identify the MSR
rotator and to indicate any certifications or independent testing agency marks
which pertain to the instrument (see Figure 2.4).
1.6.1 Certifications and Listings
The MSR rotator complies with one or more EU directives and bears the CE
marking. See the "CE Declaration of Conformity" attached to the end of this
manual for more details.
The MSR rotator is listed by Intertek to UL 61010-1 (issued 11-MAY-2012; Ed. 3),
CSA C22.2 #61010-1 (issued 11-MAY-2012; Ed. 3), and IEC 61010-1 (issued 10-
JUN-2010; Corrigendum 1: 11-MAY-2011). Intertek is a Nationally Recognized
Testing Laboratory (NRTL) recognized by the United States Occupational Safety
and Health Administration (OSHA).
1.6.2 Serial Number
For purposes of uniquely identifying a particular instrument, there is a label on the
back panel of the control unit which indicates the model number and the serial
number. A matching serial number is also found on a similar label located on the
motor unit. In laboratories with multiple MSR rotators, it is important to keep the
control unit together with the matching motor unit because the two components
are calibrated together as a system (see Section 6.6).
1.6.3 Model Numbers
Pine MSR rotator model numbers have the format 'AFMSRWXYZ' where W, X, Yand
Z are each single characters used to indicate the particular configuration of the
rotator (see Table 1.1). The final characters (X, Yand Z) may be blank. Part
numbers for electrodes and other accessories compatible with the MSR rotator
are described in more detail later (see Section 5 and Section 7).
Model
Number:
A
F
M
S
R
W
X
Y
Z
Model Name
A
F
M
S
R
C
E
Pine MSR Rotator
A
F
M
S
R
6
3
6
A
Model 636A Rotator
A
F
M
S
R
7
1
0
A
Model 710A Rotator
Table 1.1: Pine Rotator Part Numbering

4
1.7 Specifications
All specifications are subject to change without notice.
Power
100 - 240 VAC, +/-10%; 50/60 Hz; 2A
Shipping Information
shipping weight: 60 pounds (27 kg)
shipping dimensions: 24.0 x 24.0 x 24.0 in (61 x 61 x 61 cm)
Dimensions
(L x W x H)
control unit: 11.4 x 10.1 x 5.75 in (29 x 26 x 15 cm)
rotator enclosure: 18.8 x 15.5 x 21.0 in (48 x 40 x 54 cm)
Operating Temperature
10 ºC to 40 ºC (50 ºF to 104 ºF)
Motor
motor power: 15 W
supply voltages: +30 VDC, –24 VDC
motor type: permanent magnet
Motor Protection
2 Amp thermal-type circuit breaker
current limited power supplies
Maximum Continuous
Torque
28.3 millinewton-meters
Rate Control
closed loop servo-system
temperature compensated tachometer mounted on motor shaft
Rate Display
4 ½ digit display indicates rotation rate (RPM)
Rate Accuracy
100 to 200 RPM: accurate to within ± 2 counts of display reading
200 to 10,000 RPM: accurate to within ± 1% of display reading
Controls
front panel: 10-turn rotation rate control knob
button to reset circuit breaker
back panel: power switch
Rotation Rate Input
allows optional external signal to control rotation rate (banana
jack)
selectable control ratio: 1 RPM/mV (default)
2 RPM/mV
4 RPM/mV
Rotation Rate Output
allows optional external monitoring of rotation rate (banana jack)
output signal ratio: 1 mV/RPM (±1.0%)
Rotator Motor Stop
back panel input optional digital motor stop signal (banana jack)
Earth Ground
metal binding post (banana jack) connects to ground lead of
power cord and to control unit chassis
Common Jacks
DC common (3 black banana jacks), isolated from earth ground
Slew Rate of Motor
approximately 300,000 RPM/sec maximum (no load)
Bandwidth
> 50 Hz, -1 dB
(at 1000 RPM peak to peak modulation on a 2000 RPM base rate)

5
DRU10002 (REV 004 / JAN 2017)
1.8 Icons (Icônes)
Special icons (see Tables 1.2, 1.3, and 1.4) are used to call attention to safety
warnings and other useful information found in this document.
Des icônes spéciales (voir tableau 1.2, 1.3 et 1.4) sont utilisées pour attirer
l’attention sur des avertissements de sécurité et autres renseignements utiles
disponibles dans ce document.
STOP:
For a procedure involving user action or activity, this icon indicates
a point in the procedure where the user must stop the procedure.
ARRÊT:
Dans une opération impliquant l’action ou l’activité d’un
utilisateur, cette icône indique une partie de l’opération où
l’utilisateur doit arrêter l’opération.
Note:
Important or supplemental information.
Remarque:
Renseignements importants ou complémentaires.
Tip:
Useful hint or advice.
Conseil:
Astuce ou conseil utile.
Wait Time:
Describes an operation or process which requires an unusually
long time to complete.
Temps d’attente:
Décrit une opération ou un processus prenant un temps
anormalement long à s’effectuer.
Table 1.2: Special Icons Used in this Document
(Tableau 1.2: Icônes spéciales utilisées dans ce document)

6
WARNING:
Indicates information needed to prevent injury or death to a
person or to prevent damage to equipment.
AVERTISSEMENT:
Indique les informations nécessaires à la prévention de blessures
corporelles ou de mort d’un individu ou à la prévention des
dommages aux équipements.
ROTATING SHAFT HAZARD:
Indicates information needed to prevent injury or death to a
person due to a high speed rotating shaft.
DANGER LIÉ À LA ROTATION DE L’ARBRE:
Indique les informations nécessaires à la prévention de blessures
corporelles ou de mort d’un individu à cause de la vitesse élevée
de rotation de l’arbre.
RISK OF ELECTRICAL SHOCK:
Indicates information needed to prevent injury or death to a
person due to electrical shock.
RISQUE DE DÉCHARGE ÉLECTRIQUE:
Indique les informations nécessaires à la prévention des blessures
ou la mort d’une personne à cause d’une décharge électrique.
RISK FROM LASER LIGHT:
Indicates information needed to prevent eye injury due to laser
beam light.
RISQUE LIÉ À LA LUMIÈRE LASER:
Indique les informations nécessaires à la prévention des
dommages oculaires à cause de la lumière d’un faisceau laser.
Table 1.3: Safety Warning Icons used in this Document
(Tableau 1.3: Icônes d'avertissement de sécurité utilisées dans ce document)

7
DRU10002 (REV 004 / JAN 2017)
CAUTION:
Indicates information needed to prevent damage to equipment.
ATTENTION:
Indique les informations nécessaires à la prévention des
dommages aux équipements.
RISK OF ELECTROSTATIC DAMAGE:
Indicates information needed to prevent damage to equipment
due to electrostatic discharge.
RISQUE DE DOMMAGES ÉLECTROSTATIQUES:
Indique les informations nécessaires à la prévention des
dommages à l’équipement à cause d’une décharge
électrostatique.
CHEMICAL INCOMPATIBILTY:
Indicates chemical incompatibility information needed to
prevent damage to equipment.
INCOMPATIBILITÉ CHIMIQUE:
Indique un renseignement relatif à l’incompatibilité chimique
requis pour prévenir des dommages à l’équipement.
TEMPERATURE CONSTRAINT:
Indicates when an operation or use of equipment is limited to a
specified temperature range.
CONTRAINTES DE TEMPÉRATURE :
Indique lorsqu’une opération ou l’usage de matériel est limité à
une plage de températures spécifique.
Table 1.4: Other Safety Warning Icons used in this Document
(Tableau 1.4: Autres Icônes d'avertissement de sécurité utilisées dans ce document)

8
1.9 Safety Labels (Étiquettes de sécurité)
The following specific safety warnings are found on labels attached to the motor
unit and on the back panel of the control unit.
Les avertissements de sécurité spécifiques suivants se trouvent sur les étiquettes
apposées sur le bloc moteur et sur le panneau arrière de l’unité de commande.
1.10 General Safety Warnings (Avertissements de sécurité généraux)
The following safety warnings pertain to general use of the rotator. More specific
safety warnings are found in later sections of this document which pertain to
particular operations and procedures involving the rotator.
Des avertissements de sécurité plus spécifiques se trouvent dans les sections
suivantes de ce document, concernant les opérations et procédures particulières
relatives à le rotateur.
WARNING:
Failure to connect the third prong of the power cord to a proper
earth ground may impair the protection provided by the system.
AVERTISSEMENT:
L’absence de connexion de la troisième broche du cordon d’alimentation à une
prise de terre appropriée peut altérer la protection fournie par le système.

9
DRU10002 (REV 004 / JAN 2017)
WARNING:
Risk of electric shock.
Disconnect all power before servicing the rotator.
AVERTISSEMENT:
Risque de décharge électrique.
Déconnectez toutes les sources d’alimentation avant de procéder à l’entretien
du rotateur.
WARNING:
Rotating shaft.
Do not turn on the rotator or rotate the electrode shaft unless the
enclosure window is secured to all four pins as shown below.
Use extreme caution when operating the rotator at rotation rates
above 2000 RPM.
AVERTISSEMENT:
Arbre en rotation.
Ne mettez pas le rotateur en marche et ne marche ni l’arbre de l’électrode en
rotation si la fenêtre du boîtier n’est pas fermée à l’aide des quatre broches tel
qu’indiqué ci-dessous.
Soyez extrêmement prudent lorsque vous utilisez le rotateur à des vitesses de
rotation supérieures à 2000 tr/min.

10
CAUTION:
Do not exceed the maximum rotation rate for an electrode.
Each type of rotating electrode has a specific maximum rotation
rate limitation. Consult the documentation for the specific
electrode being used in order to learn the maximum rotation rate
for that electrode.
ATTENTION:
Ne dépassez pas la vitesse de rotation maximum pour une électrode.
Chaque type d’électrode rotative possède une vitesse de rotation maximum
spécifique.
Consultez la documentation pour l’électrode spécifique à utiliser pour connaître
la vitesse de rotation maximum de l’électrode.
CAUTION:
Always turn the rotation rate control knob completely
counterclockwise (towards the zero rotation rate position) before
turning on the rotator.
ATTENTION:
Tournez toujours le bouton de commande de la vitesse de rotation
complètement dans le sens inverse des aiguilles d’une montre (vers la position
vitesse de rotation égale à zéro) avant de mettre le rotateur en marche.
WARNING:
Rotating shaft. Entanglement hazard.
Turn off the power to the rotator and disconnect the power cord
from the power source before installing or removing the electrode
shaft or before installing or removing an electrode tip on the end of
the shaft.
AVERTISSEMENT:
Arbre en rotation. Danger d’enchevêtrement.
Éteignez le rotateur et débranchez le cordon d’alimentation de la source
d’alimentation avant d’installer ou d’enlever l’arbre de l’électrode ou avant
d’installer ou d’enlever un embout d’électrode à l’extrémité de l’arbre.

11
DRU10002 (REV 004 / JAN 2017)
WARNING:
Do not turn on the rotator or rotate the electrode shaft if the shaft is
not securely mounted in the motor coupling.
Inspect the shaft to be certain that it is securely mounted.
AVERTISSEMENT:
Ne mettez pas le rotateur en marche ni l’arbre de l’électrode en rotation si l’arbre
n’est pas correctement raccordé au moteur.
Inspectez l’arbre pour vous assurer qu’il est bien fixé.
WARNING:
Do not turn on the rotator or rotate an electrode tip if the electrode
tip is not securely mounted in the electrode shaft.
Inspect the electrode tip to be certain that it is securely mounted.
AVERTISSEMENT:
Ne mettez pas le rotateur en marche ni un embout d’électrode en rotation si
l’embout d’électrode n’est pas correctement fixée sur l’arbre de l’électrode.
Inspectez l’embout d’électrode pour vous assurer qu’elle est bien fixée.
WARNING:
Do not use or attempt to rotate an electrode shaft that has been
dropped, bent or otherwise physically damaged.
Inspect the shaft to be certain that it is not damaged.
AVERTISSEMENT:
N’utilisez pas et ne tentez pas de mettre en rotation un arbre d’électrode qui est
tombé, a été tordu ou a été endommagé physiquement d’une autre manière ou
d’une autre.
Inspectez l’arbre pour vous assurer qu’il n’a pas été endommagé.
WARNING:
Do not use or attempt to rotate an electrode tip that has been
dropped or otherwise physically damaged.
Inspect the electrode tip to be certain that it is not damaged.
AVERTISSEMENT:
N’utilisez pas et ne tentez pas de mettre en rotation un embout d’électrode qui
est tombée ou a été endommagée physiquement d’une autre manière ou d’une
autre.
Inspectez l’embout d’électrode pour vous assurer qu’elle n’a pas été
endommagée.

12
WARNING:
Do not use an electrode shaft which appears to wobble, vibrate, or
tilt away from the axis of rotation while rotating. Such a shaft is
either improperly installed or physically damaged. Turn off the
rotator, disconnect electrical power, and remove the shaft
immediately.
AVERTISSEMENT:
N’utilisez pas un arbre d’électrode qui semble osciller, vibrer ou dévier de l’axe
de rotation pendant la rotation. Cet arbre est soit installé de manière incorrecte
soit endommagé physiquement. Éteignez le rotateur, déconnectez
l’alimentation électrique et retirez l’arbre immédiatement.
WARNING:
Do not use an electrode tip which appears to wobble, vibrate, or
tilt away from the axis of rotation while rotating. Such an electrode
tip is either improperly installed or physically damaged. Turn off the
rotator, disconnect electrical power, and remove the electrode tip
immediately.
AVERTISSEMENT:
N’utilisez pas un embout d’électrode qui semble osciller, vibrer ou dévier de
l’axe de rotation pendant la rotation. Cet embout d’électrode est soit installée
de manière incorrecte soit endommagée physiquement. Éteignez le rotateur,
déconnectez l’alimentation électrique et retirez l’embout d’électrode
immédiatement.
WARNING:
Laser radiation.
Many optical tachometers use a laser beam as a light source. Do
not look directly at the laser beam. Do not point the laser beam
into the eye.
AVERTISSEMENT:
Rayonnement laser.
Un grand nombre de tachymètres optiques utilisent un faisceau laser comme
source de lumière. Ne regardez pas directement le faisceau laser. Ne pointez
pas le faisceau laser dans l’œil.

13
DRU10002 (REV 004 / JAN 2017)
CAUTION:
When raising or lowering the motor unit along the main support rod,
be sure to hold the motor unit carefully so that it does not
unexpectedly fall and break the glass cell located below the motor
unit.
ATTENTION:
Lorsque vous montez ou descendez le bloc moteur le long de la barre principale,
veillez à bien le tenir pour éviter qu’il ne chute brutalement et ne casse la cellule
de verre située sous le bloc moteur.
CAUTION:
A detachable main power cord is provided with the rotator. Do not
replace this cord with an inadequately rated cord.
ATTENTION:
Un cordon d'alimentation amovible est fourni avec le rotateur. Ne remplace pas
ce cordon par un cordon de calibre inadéquat.

14
1.11 Hazardous Material Disclosures
The information provided in Table 1.5 and Table 1.6 is provided in accordance
with Chinese Standard SJ/T 11364, Marking for the Restricted Use of Hazardous
Substances in Electronic and Electrical Products.
Hazardous Material Disclosure Table
AFMSRwxyz
Part Name
Hazardous Substances
Lead
Mercury
Cadmium
Hexavalent
Chromium
Polybrominated
biphenyls
Polybrominated
diphenyl ethers
(Pb)
(Hg)
(Cd)
(Cr (VI))
(PBB)
(PBDE)
PCB: Main
X
O
O
O
O
O
PCB: Power
Amp
X
O
O
O
O
O
Display
O
X
O
O
O
O
This table is prepared in accordance with the provisions of SJ/T 11364.
O: indicates that said hazardous substance contained in all of the homogeneous
materials for this part is below the limit requirements of GB/T 26572.
X: indicates that said hazardous substance contained in at least one of the
homogeneous materials for this part is above the limit requirements of GB/T 26572.
Note: the date of manufacture for this item may be coded in the serial number as
follows:
wwyynn: ww indicates week; yy indicates year; and nn is the number of the item,
starting with 01 each week.
Note: The unit meets EU RoHS requirements; China does not have the exemptions for
hazardous materials in components as does the EU; therfore, there may be the above
noted materials present in the unit.
Table 1.5: Hazardous Material Disclosure Table - English
(Tableau 1.5: Le tableau de la divulgation des matières dangereuses –en anglais)
This manual suits for next models
2
Table of contents
Popular Industrial Equipment manuals by other brands

SAMES KREMLIN
SAMES KREMLIN Cyclomix Evo instruction manual

PCB Piezotronics
PCB Piezotronics 355B04 Installation and operating manual

Pegasolift
Pegasolift OP20 Instruction manual for use and maintenance

WIFO
WIFO K53a Manual and safety instructions

GSi
GSi PNEG-1393 Assembly instructions

Taco
Taco 00e Series instruction sheet