Triminator BuckMaster Series User manual

®
buckmaster Series
OWNER'SMANUALv1

CONTENTS
INTRODUCTION ............................................................2
SAFETY MESSAGES....................................................... 2
BUCKER SAFETY............................................................3
IMPORTANT SAFETY INFORMATION ......................... 3
SAFETY LABEL LOCATIONS ......................................... 4
SETUP AND ASSEMBLY ................................................5
COMPONENTS............................................................... 6
OPERATION.................................................................... 8
CONTROLS .....................................................................9
STARTING THE BUCKER .............................................10
BUCKING TIPS .............................................................11
MAINTENANCE SAFETY .............................................12
DISASSEMBLE FOR CLEANING AND SERVICE........13
CLEANING AND REASSEMBLY ..................................15
TAKING CARE OF UNEXPECTED PROBLEMS..........17
CUSTOMER SERVICE ..................................................18
LIMITED WARRANTY ..................................................19
EXCLUSIONS FROM WARRANTY COVERAGE.........20

INTRODUCTION
Congratulations on your selection of the Triminator commercial bucker. We want to
help you to get the best results from your new bucker and to operate it safely. This man-
ual contains the information on how to do that; please read it carefully before you set
up and use your bucker. This manual reects the instructions for both the BuckMaster
and BuckMaster Pro machines.
We suggest you read the LIMITED WARRANTY (page 19) to fully understand coverage
and your responsibilities of ownership. Keep this owner’s manual handy, so you can
refer to it at any time. This owner’s manual is considered a permanent part of the bucker
and should remain with the bucker if resold. The information and specications includ-
ed in this publication are those that were in eect at the time of approval for printing.
Mosman Machinery Company, Inc. reserves the right, however, to discontinue or change
specications or design at any time without notice and without incurring any obligation
whatever. No part of this publication may be reproduced without written permission.
SAFETY MESSAGES
Your safety and the safety of others are very important. We have provided important
safety messages in this manual and on the Triminator. This information alerts you to
potential hazards that could hurt you or others. Please read these messages carefully. Of
course, it is not practical or possible to warn you about all the hazards associated with
operating or maintaining a bucker. You must use your own good judgment.
You will nd important safety information in a variety of forms:
Safety Labels - located on the bucker.
Instructions - how to use this bucker correctly and safely.
Safety Messages - preceded by a safety alert.
A symbol and one of two signal words: DANGER, CAUTION. These signal words mean:
Each message tells you what the hazard is, what can happen, and what you can do to
avoid injury.
Damage Prevention Messages - You will also see other important messages that are
preceded by the word NOTICE. This word means:
2
DANGER
!CAUTION
You WILL be KILLED or SERIOUSLY
HURT if you don’t follow instructions.
You CAN be KILLED or SERIOUSLY
HURT if you don’t follow instructions.
NOTICE Your bucker or other property can be dam-
aged if you don’t follow instructions.

BUCKER SAFETY
IMPORTANT SAFETY INFORMATION
Triminator commercial buckers are designed to remove owers from stems on a variety
of herbal material. Other uses could result in injury to the operator or damage to the
bucker and other property. Injuries and property damage from buckers can be prevent-
ed by following all instructions in this manual and on the bucker. The most common
hazards are discussed below, along with the best way to protect yourself and others.
Avoid Rotating Rubber Rollers
The Triminator’s rubber rollers can cause serious damage, cuts and even amputate
ngers or hands. Keep hands, arms, and body away from the rubber rollers whenever
the drum drive motor is running. Keep hair, clothing, and jewelry away from the rollers.
If you need to work around the bucker to clear or clean plant material for any reason,
always shut o the electric motor and disconnect the bucker’s power cord from the AC
outlet. Never put your hand in contact with the rubber rollers while the machine is run-
ning; serious personal injury could result.
Clear Operation Area
Before operating the bucker, carefully inspect the surrounding area and remove all obvi-
ous hazards that could cause you to trip, slip, or fall into the bucker.
Keep Guards and Shields in Place
Guards and shields are designed to protect you from touching moving components. For
your safety and the safety of others, keep all shields in place when the bucker is run-
ning.
Turn Electric Motor O When Not Operating the Bucker
If you need to leave the bucker for any reason, always turn the electric motor o.
Operate on Flat Surface
To avoid overturning, only operate the bucker on at surfaces. Control the bucker care-
fully when transporting it across uneven ground or slopes. Do not push the bucker down
or across steep slopes: the bucker could overturn, causing injury to the operator or
bystanders.
Operator Responsibility
Know how to stop the bucker quickly in case of emergency. Understand the use of all
bucker controls. Never permit anyone to operate the bucker without proper instruction.
Do not let children operate the bucker.
3

SAFETY LABEL LOCATIONS
43
!CAUTION
Read user guide
before operating

SETUP AND ASSEMBLY
5
UNPACKING and INSPECTION
Triminator BuckMaster comes in shipping boxes disassembled. Upon receipt
please check the boxes for damage and mark any damage on the shipping BOL and
follow the shipper’s instructions.
1. To begin, disassemble the shipping boxes. Make note of any damage, which is
identied on either the machine parts or the shipping crate. Notify the shipper,
your dealer and MMC immediately, should damage be identied.
2. Remove the components from the packaging and place them on a at and level
surface.
ASSEMBLY:
Required tools
Standard hex wrench set
Personnel
Two people are recommended to help with the assembly of the BuckMaster Ma-
chines. It can be completed with one person, however assembly may take longer
and be more dicult.
Instructions
Follow the video instructions at the link below:
BUCKMASTER SERIES
http://bit.ly/buckmasterproassembly
65
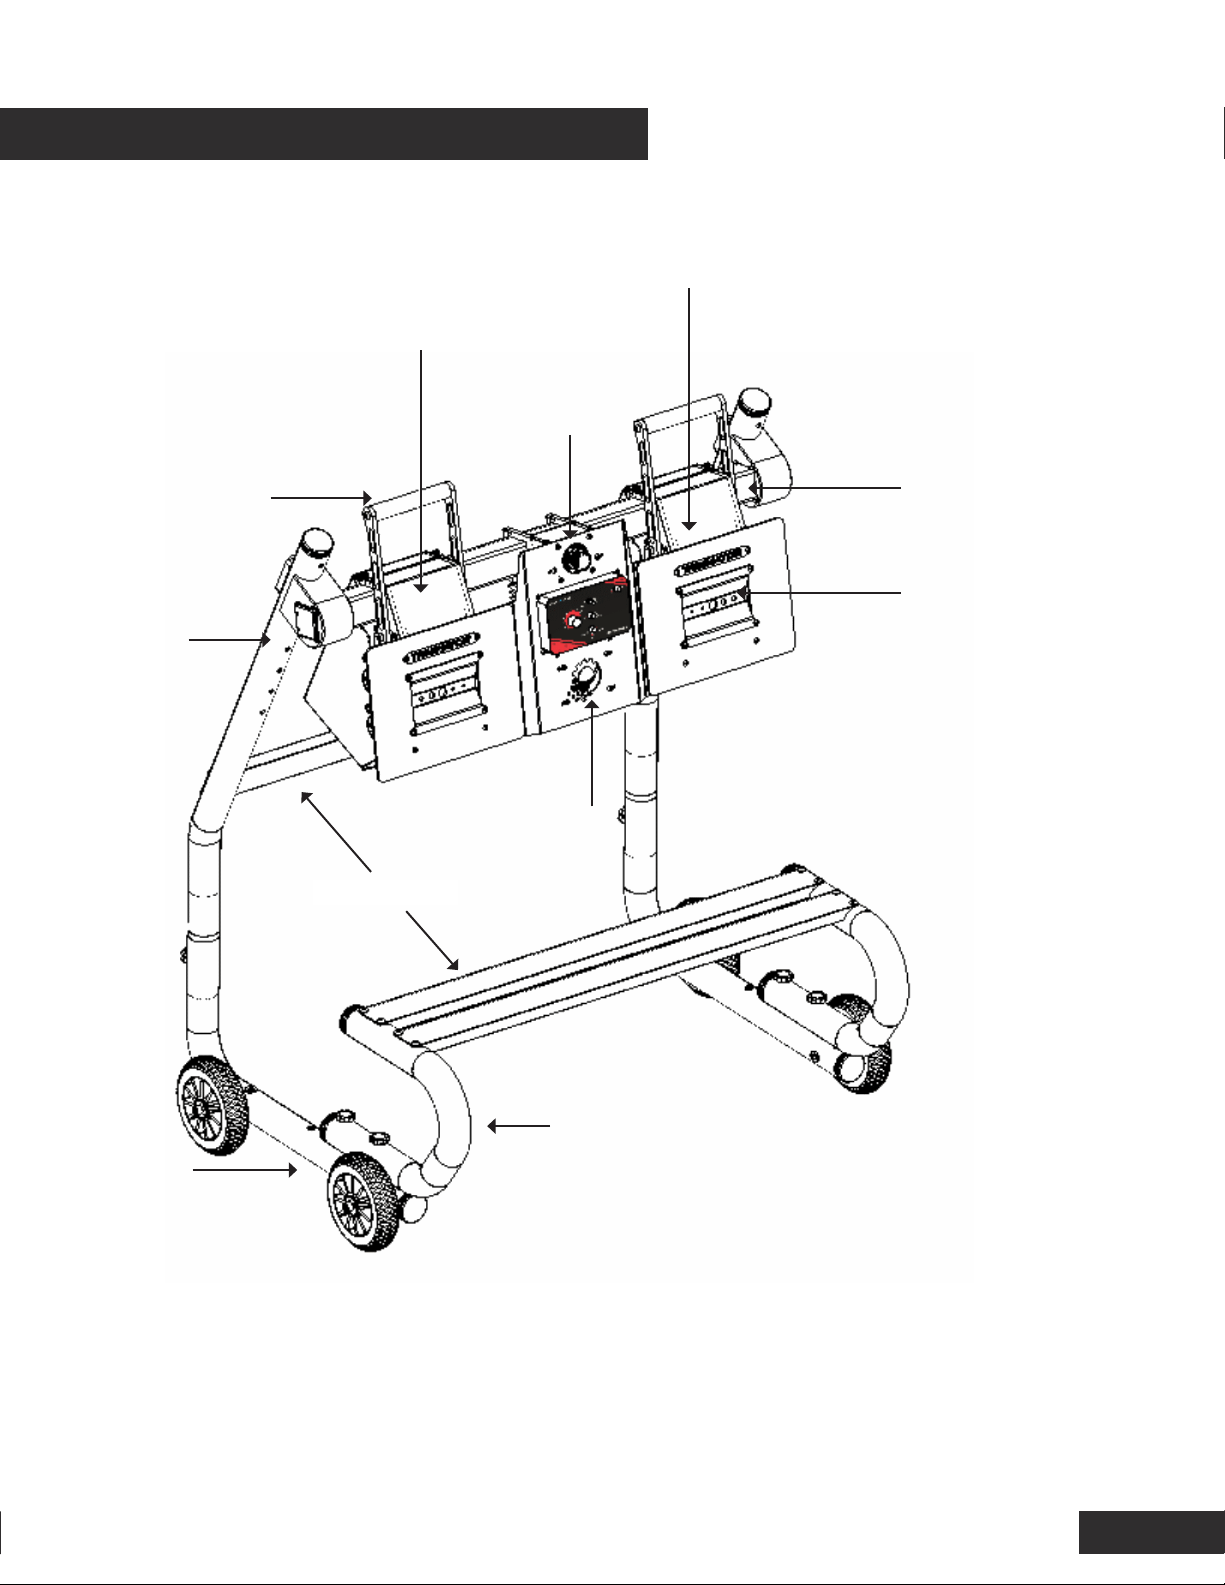
ROLLER ASSEMBLY
Contains rubber rollers, roller
guard, and bucking plates
ROLLER HANDLE
Releases tension
on rubber roller
wheels
COMPONENTS
MOTOR ASSEMBLY and CONTROLS
Contains motor, speed controller, power
and on/o switches
CROSS BARS
MATERIAL HOLDER
Used for ergonomic placement
of material collection bins
ADDITIONAL ROLLER ASSEMBLY
(PRO MODELS)
Contains rubber rollers, roller guard,
and bucking plates. Available only on
Pro models or as a Pro upgrade
BUCKING PLATE
Change from wet
to dry bucking by
changing this plate
UPPER
STAND LEG
LOWER
STAND
LEG
CROSS TUBE
EMERGENCY STOP

BEFORE OPERATION
Read and understand this manual. Know what the controls do and how to operate
them. Familiarize yourself with the bucker and its operation before you begin using
it. Know how to quickly shut o the machine in case of an emergency.
Your safety is your responsibility.
IS YOUR BUCKER READY FOR OPERATION?
For your safety, and to maximize the service life of your equipment, it is very im-
portant to take a few moments each time before you operate the bucker to check
its condition. Be sure to take care of any problem you nd before you operate the
bucker.
Improperly maintaining this bucker, or failing to correct a problem before opera-
tion, could cause a malfunction which could cause you to be seriously injured.
Always perform a pre-operation inspection before each operation, and correct any
problem.
Before beginning your pre-operation checks, be sure the bucker is on a level sur-
face, the motor timer switch is in the OFF position, and all power cords are un-
plugged.
Check the General Condition of the Bucker
Clean the rubber rollers, bucking plates, and tension system. Look for signs of
damage.
Check each control for proper operation.
Check parts for wear. Replace if necessary.
Check that all nuts, bolts, and clamps are tightened appropriately.
KEEP ALL SHIELDS, GUARDS AND COVERS IN PLACE WHILE OPERATING THE BUCKER.
BEFORE OPERATION
7

OPERATION
8
CHECK YOUR WORK AREA
For your safety and the safety of others, always inspect the area before operating
the bucker.
Objects: Anything which can be grabbed by the rotating rubber rollers is a poten-
tial hazard to you and others. Look for hazards and remove them from the work
area. Tie back loose clothing and long, loose hair. Remove any jewelry.
SAFE OPERATING PRECAUTIONS
Before operating the bucker for the rst time, please review both the Bucker SAFE-
TY section (page 3) and the BEFORE OPERATION section (page 7).
Even if you have operated other buckers, take time to become familiar with how
the Triminator works.
Never tamper with or alter any of the controls or safety devices on the bucker.
Do not operate on slopes.
Never operate Triminator while under the inuence of drugs, alcohol or prescrip-
tions, including over-the-counter cold/u medications and allergy medications.
Protective clothing and eye and/or hearing protection should be worn during oper-
ation.
For your safety, do not operate while wearing loose-tting clothing, jewelry, etc..
Long hair should be secured in a manner that keeps it away from mechanical parts.
Rotating machinery parts can entangle loose clothing, long hair or dangling jewelry
resulting in serious injury or death.

CONTROLS
9
NOTICE: The BuckMaster series oers redundancy controls for safe operation. In
order to operate all controls must be in an active position and the emergency stop
must be in an operating position.
FORWARD/REVERSE SWITCH
Controls the direction of the
rollers.
SPEED CONTROL DIAL
Adjusts roller speed
POWER SWITCH
Activates power to the unit.
START STOP
Activates the forward/reverse
switch.

STARTING THE BUCKER
10
CONNECT POWER CORDS
1. Connect the Triminator BuckMaster power cord to a 15 amp 120 vac AC circuit.
Do not connect and disconnect the power cord with wet hands. Do not operate in
the rain.
The Triminator machine draws a max of 7 amps.
STARTING THE MACHINE
1. Align the Triminator BuckMaster power switch to the ON
position.
2. Press the start/stop switch to the START position.
3. Press the forward/reverse switch to the FORWARD position.
4. Adjust the speed control dial to the desired speed.
STOPPING THE MACHINE DURING NORMAL OPERATION
To stop the Triminator during normal operation, press the start/stop switch to the
STOP position.
STOPPING THE MACHINE DURING AN EMERGENCY
To stop the Triminator in an emergency, press the emergency stop button. The
emergency stop button will remain depressed until it is reset.
RESETTING THE MACHINE FOLLOWING AN EMERGENCY STOP
For the safety of the operator the machine must be reset following an emergency
stop.
1. Return Emergency Stop to the Active Position by rotating the red
button clockwise until it returns to it the fully extended position.
2. Align the Power Switch to the O position
3. Push the start/stop switch to the STOP
4. Forward/Reverse - Neutral (centered)
5. Start the machine as you would under normal operation conditions
DISCONNECT POWER CORDS
Disconnect the bucker’s power cord by pulling on the power cord plug.
NOTICE: Be sure to hold the plug when disconnecting the power cord from the elec-
trical outlet. Do not disconnect by pulling on the power cord.

BUCKING TIPS
11
For best eciency, run batches of similar sized material through the machine. In
general dry product should be run at a slower speed than wet product to achieve
similar results. Use the smallest hole or tube dia available to avoid losses.
WET BUCKING
For greatest eciency bucking wet product use the holes bucking plate. Set the
speed to the fastest setting allowable without excessively breaking apart the buds.
If the buds are being broken down to a point that is unacceptable slow the speed
until the desired result is achieved.
DRY BUCKING
For greatest eciency bucking dry product use the tubes bucking plate. Set the
speed to the fastest setting allowable without excessively breaking apart the buds.
If the buds are being broken down to a point that is unacceptable slow the speed
until the desired result is achieved.
REMOVING OBSTRUCTIONS
If the rotating rollers becomes restricted or clogged:
1. Stop the motor and verify all switches are in the stop or o position.
2. Make sure that all rotating parts have come to a complete stop.
3. Disconnect the bucker’s power cord.
4. Release the tension on the rollers by pulling the handle down and towards the
operator.
5. Remove the obstruction.
SERVICING YOUR BUCKER
Proper maintenance is essential for safe, economical, and trouble-free operation.
To help you properly care for your bucker, the following pages include a mainte-
nance schedule. Other service tasks that are more dicult, or require special tools,
are best handled by professionals and are normally performed by a Triminator
technician or other qualied mechanic.
The maintenance schedule applies to normal operating conditions. If you operate
your bucker under severe conditions, such as sustained high-load or high-tempera-
ture operation, or use it in unusually wet or dusty conditions, consult your servicing
dealer for recommendations applicable to your individual needs and use.
Remember that an authorized Triminator servicing dealer knows your bucker best
and is fully equipped to maintain and repair it. To ensure the best quality and reli-
ability, use only new, Triminator Genuine parts or their equivalents for repair and
replacement.
NOTICE: Improper maintenance, or failure to correct a problem before operation,
can cause a malfunction in which you can be seriously hurt or killed.
Always follow the inspection and maintenance recommendations and schedules in
this owner’s manual.

MAINTENANCE SAFETY
12
Some of the most important safety precautions follow. However, we cannot warn
you of every conceivable hazard that can arise in performing maintenance. Only
you can decide whether or not you should perform a given task. Failure to proper-
ly follow maintenance instructions and precautions can cause you to be seriously
hurt or killed. Always follow the procedures and precautions in this owner’s manu-
al.
Safety Precautions
Make sure all motors are o and power cords are unplugged before you begin any
maintenance or repairs.
Read the instructions before you begin, and make sure you have the tools and skills
required.
MAINTENANCE SCHEDULE
INTERVAL ITEM
Before each use
Insure the rollers are in the tensioned position with the roller handle
in the vertical upwards position.
Check that machine is free of excessive debris.
Ensure that machine is clean.
After each use
For best performance and longevity, release the tension on the roll-
ers by pulling the roller handle down to a horizontal position. This
reduces tension on the rollers and prevents them from attening
over time.
After each use
For best performance and longevity, clean bucker after every use or
if plant material is visibly aecting the quality or speed of the buck-
er.
After cleaning Grease metal to metal interfaces on roller assembly with food safe
grease after pressure washing.
Every 80 hours of
operation
Check the rubber roller wheels. To do this remove the rear guard (lo-
cated on the out-feed side of the roller assembly) for signs of wear,
cracks or breaks. Replace as needed.

DISASSEMBLE FOR CLEANING AND SERVICE
13
CLEANING
When to Clean:
Depending on the material being processed and the frequency of use, the holes
and tubes of the bucking plates may need to be cleaned. Additionally resin may
build up on the rollers over time requiring cleaning.
Indications that machine requires cleaning
1. Reduced bucking quality.
2. Visible build-up of material on the bucking plate which obscure the holes or
tubes. Visible evidence of material on the rubber rollers.
4. Excessive noise (machine should run quietly so that you may converse normally
when it is running)
Disassemble for Cleaning:
1. Shut o motor. Unplug power cords.
2. Release tension on the rubber rollers:
a. Pull roller handle down into the horizontal position
3. Remove roller guard:
a. With motor o, power cords unplugged loosen and remove the two thumb
screw on top of the roller assembly.
b. Pull roller guard up and away from roller assembly.

DISASSEMBLE FOR CLEANING AND SERVICE (CONT)
14
Roller Guard
Roller Guard Thumb Screws

CLEANING AND REASSEMBLY
15
NOTICE: For best results use hot water whenever possible. The rubber rollers are
rated for up to 150 degrees Fahrenheit. When using a hot water pressure washer
do not exceed 150 degrees Fahrenheit.
NOTICE: To clean the rubber rollers use either a standard household dish soap or
denatured alcohol. Immediately following the use of either cleaning agent, rinse
rollers throughly with water to remove cleaner.
Do Not select any other degreaser or cleaner as it that it may damage the rubber
rollers or any painted or anodized components of the bucker. Always follow the
operating instructions provided with the pressure washer.
NOTICE: If you choose to use a pressure washer take care not to damage the buck-
er’s nish by holding the nozzle excessively close to the machine or by focusing
the spray onto the motor or controller. A distance of 3 feet or greater is recom-
mended.
Pressure Washer Cleaning
1. Using a pressure washer, spray the bucking plates of the machine until they are
clean and clear of debris.
2. From a distance of at least three feet, pressure wash the roller assembly from the
back. Getting closer than three feet with the pressure washer nozzle may result in
damage to the rollers. If nicking or marking is occurs on the rollers, increase dis-
tance from nozzle to rollers.
Hand Cleaning
1. Using warm/hot water, concentrated dish soap and a non-metallic dish scrubber,
clean the bucker plate, rollers, and other machine components by hand.

CLEANING AND REASSEMBLY (CONT)
16
Re-assembly:
1. Verify motor is in the O position and power cord is unplugged.
2. Install roller guard.
1. Place roller guard on lower thumb screws on the bottom of the roller as
assembly.
2. Align holes on top of roller assembly and install thumb screws on top of
roller assembly.

TAKING CARE OF UNEXPECTED PROBLEMS
17
ELECTRIC MOTORS WILL NOT START OR HAVE LOW POWER
POSSIBLE CAUSE CORRECTION
Emergency Stop is
Depressed
If emergency stop button has been activated follow the reset
instruction on page 9.
No electric power
from the outlet Plug bucker into a functional electrical outlet.
Rollers experiencing
excess friction
Rollers may be dirty or jammed. Clean roller assembly and check
for jams.
Outlet is overloaded Check that breaker is not overloaded and has not tripped. If
tripped, switch plug to a dierent circuit.
Extension cord is
faulty
Check that extension cord, if used, is rated appropriately for
the distance and current. Do NOT use a longer cord unless the
wire size is larger. Undersized extension cords may cause an
under-voltage, over-current condition which could damage or
destroy the drive motor and void the motor warranty.
Over-current circuit
has been exceeded
Determine the cause of the excessive circuit resistance which
may include: overloaded outlet, faulty extension cord, bad out-
let, underrated generator, excessively dirty machine, incorrectly
tensioned shear band or an obstruction between the drum or reel
and another part of the machine.
Once the source of the resistance has been identied and re-
solved, reset the circuit by pressing the small button on the con-
trol panel for 3 seconds then operate the machine normally.
MATERIAL OBSTRUCTION/JAMS IN MACHINE
POSSIBLE CAUSE CORRECTION
Roller Wheels are
slipping
Reverse roller speed direction and eject plant material. If this
fails to correct the problem, turn o and unplug the machine.
Pull down the roller handle to release tension on the rollers.
Manually remove the plant material.
Material is not being
pulled through ma-
chine.
Verify that the Roller handel is in the vertical position and that
the roller wheels are engaged with one and other.

TAKING CARE OF UNEXPECTED PROBLEMS (cont)
18
CUSTOMER SERVICE
For all customer service inquiries or to help you diagnose any issues with
your machine contact Triminator directly:
Phone: 530.265.4277
Email: info@thetriminator.com
Web: www.theTriminator.com
BUCKING QUALITY HAS DECREASED
POSSIBLE CAUSE CORRECTION
Rollers or bucking plates
are excessively dirty Clean rollers and bucking plates.
MACHINE MAKES A LOUD SCRAPING, CLICKING, OR THUMPING SOUND
POSSIBLE CAUSE CORRECTION
Rollers or bucking plates
are excessively dirty Clean rollers and bucking plates.
Rollers have a at spot
Rubber rollers can become at over time if pressure is not re-
leased. If this occurs the rollers will make a thumping and slight
banging sound. To correct run machine at a low speed until
thumping dissipates. Do not buck any product until rollers have
returned to round.
ROLLERS DO NOT PULL
POSSIBLE CAUSE CORRECTION
Drum and Shear Band
are excessively dirty
Clean Drum and Shear band; excessive plant material has built up
on these surfaces and is causing excess friction.

LIMITED WARRANTY
19
TRIMINATOR EQUIPMENT
This warranty is limited to the Triminator Trimming Machine distributed by Mosman
Machinery Company, Inc., Nevada City, California 95959. The following warranty
applies to all Triminator products purchased directly or from retail outlets after
January 1, 2013.
LENGTH OF WARRANTY
All Triminator products are covered under this warranty for a length of 24 months
from the date of original purchase.
TO QUALIFY FOR THIS WARRANTY:
The product must be purchased in the United States, directly from Mosman Ma-
chinery Company, Inc. or from a dealer authorized by Mosman Machinery Company,
Inc. to sell those products. This warranty applies to the rst retail purchaser during
the applicable warranty time period.
WHAT WILL BE REPAIRED OR REPLACED UNDER WARRANTY:
Mosman Machinery Company, Inc. will repair or replace, at its option, any part that
is proven to be defective in material or workmanship under normal use and proper
maintenance as prescribed in this Manual during the applicable warranty time pe-
riod. Warranty repairs and replacements will be made without charge for parts or
labor. Any part replaced under warranty becomes the property of Mosman Machin-
ery Company, Inc. All new parts replaced under warranty will be considered as part
of the original product, and any warranty on those parts will expire coincident with
the original product warranty.
TO OBTAIN WARRANTY SERVICE:
You must call Triminator/Mosman Machinery Company, Inc. to discuss the warranty
issue.
Phone: 530.265.4277
Following the qualifying phone conversation Mosman Machinery Company, Inc.
may direct you to do one of the following:
At your expense, take the Triminator product, part to be replaced, or the equipment
on which the part to be replaced is installed, and a proof of purchase to the Trimi-
nator dealer from whom you originally purchased the product, during the dealer’s
normal business hours.
Alternatively, Mosman Machinery Company, Inc. may direct you in writing (email)
to deliver your product to a dierent location at a distance less than or equal to the
distance from your current location to the dealer from which you originally pur-
chased the product.
Table of contents
Other Triminator Industrial Equipment manuals


Popular Industrial Equipment manuals by other brands

Nordson
Nordson PatternJet 1065924 Customer product manual

GUS
GUS GGW Assembly instructions

EHC
EHC NT Handling and installation guide

PRM NEWAGE
PRM NEWAGE 415 Series Workshop manual

Xylem
Xylem McDonnell & Miller PSE-800-M Application, Installation, Operation, and Maintenance Manual

MICRO-EPSILON
MICRO-EPSILON interferoMETER operating instructions


