AS-WL300<ARH7110>
●Microsoft®,Windows®7,Windows®VistaandWindows®XPtheregisteredtrademarksortrademarksofMicrosoft®Corporationinthe
U.S.andothercountries.
●Otherproductnames,technologynames,andcompanynamesmentionedinthismanualmaybetrademarksorregisteredtrademarksof
theirrespectiveownersandareherebyacknowledged.
●Note:PleasesuretoreadtheproductUSER'SMANUALthoroughlybeforeusingthisproducttoensuresafeandcorrectusage.
Connectiontothebaseiscomplete.ContinuetoStep3.
①ClickWireless.
②ClickSiteSurvey.
4
①
SelectthesameSSIDin
SiteSurveythatyou
wrotein1.Searchfor
aNetworkConnection
,
above.
*
ClicktheSelectbutton.
②Click[Connect].
5
Checkthedetailsandclick[OK].
7
Configuretheunitusingthesettingsyouwrotein1.Searchfor
aNetworkConnection,above.
6
When(2)inthetableisOPENorSHARED
*ConfiguretheunitreferringtothelistyouwroteunderWhen
usingWEPsecuritysettings.
①When(2)inthetableisOpen
→SelectOPENinSecurityMode.
When(2)inthetableisSHARED
→SelectSHAREDinSecurityMode.
②When(5)inthetableisa10-digitor5-digitencryptionkey
→
Select64bit(10hexdigits/5asciikeys)inWEPKeyLength.
When(5)inthetableisa26-digitor13-digitencryptionkey
→
Select128bit(26hexdigits/13asciikeys)inWEPKeyLength.
③When(3)inthetableisHexadecimal
→SelectHexadecimalinWEPKeyEntryMethod.
When(3)inthetableisASCII
→SelectASCIITextinWEPKeyEntryMethod.
④Entertheencryptionkeyin(5)inthetableinthefieldthat
correspondstotheWEPkeycheckedin(4)inthetable.
*Forexample,If(4)inthetableisKey1,enterthesame
encryptionkeyin(5)inthetableintheWEPKey1field.
⑤Selectthesamedefaultkeyasin(4)inthetable.
⑥Click[Apply].
When(2)inthetableisWPA-PersonalorWPA2-Personal
*RefertoWhenusingWPA/WPA2securitysettingsonthefront
tocompletethesettings.
①Enterthesameencryptionkeyasin(5)inthetable.
②Click[Apply].
DisconnecttheLAN/USBfeedercableconnectedtotheunit.
9
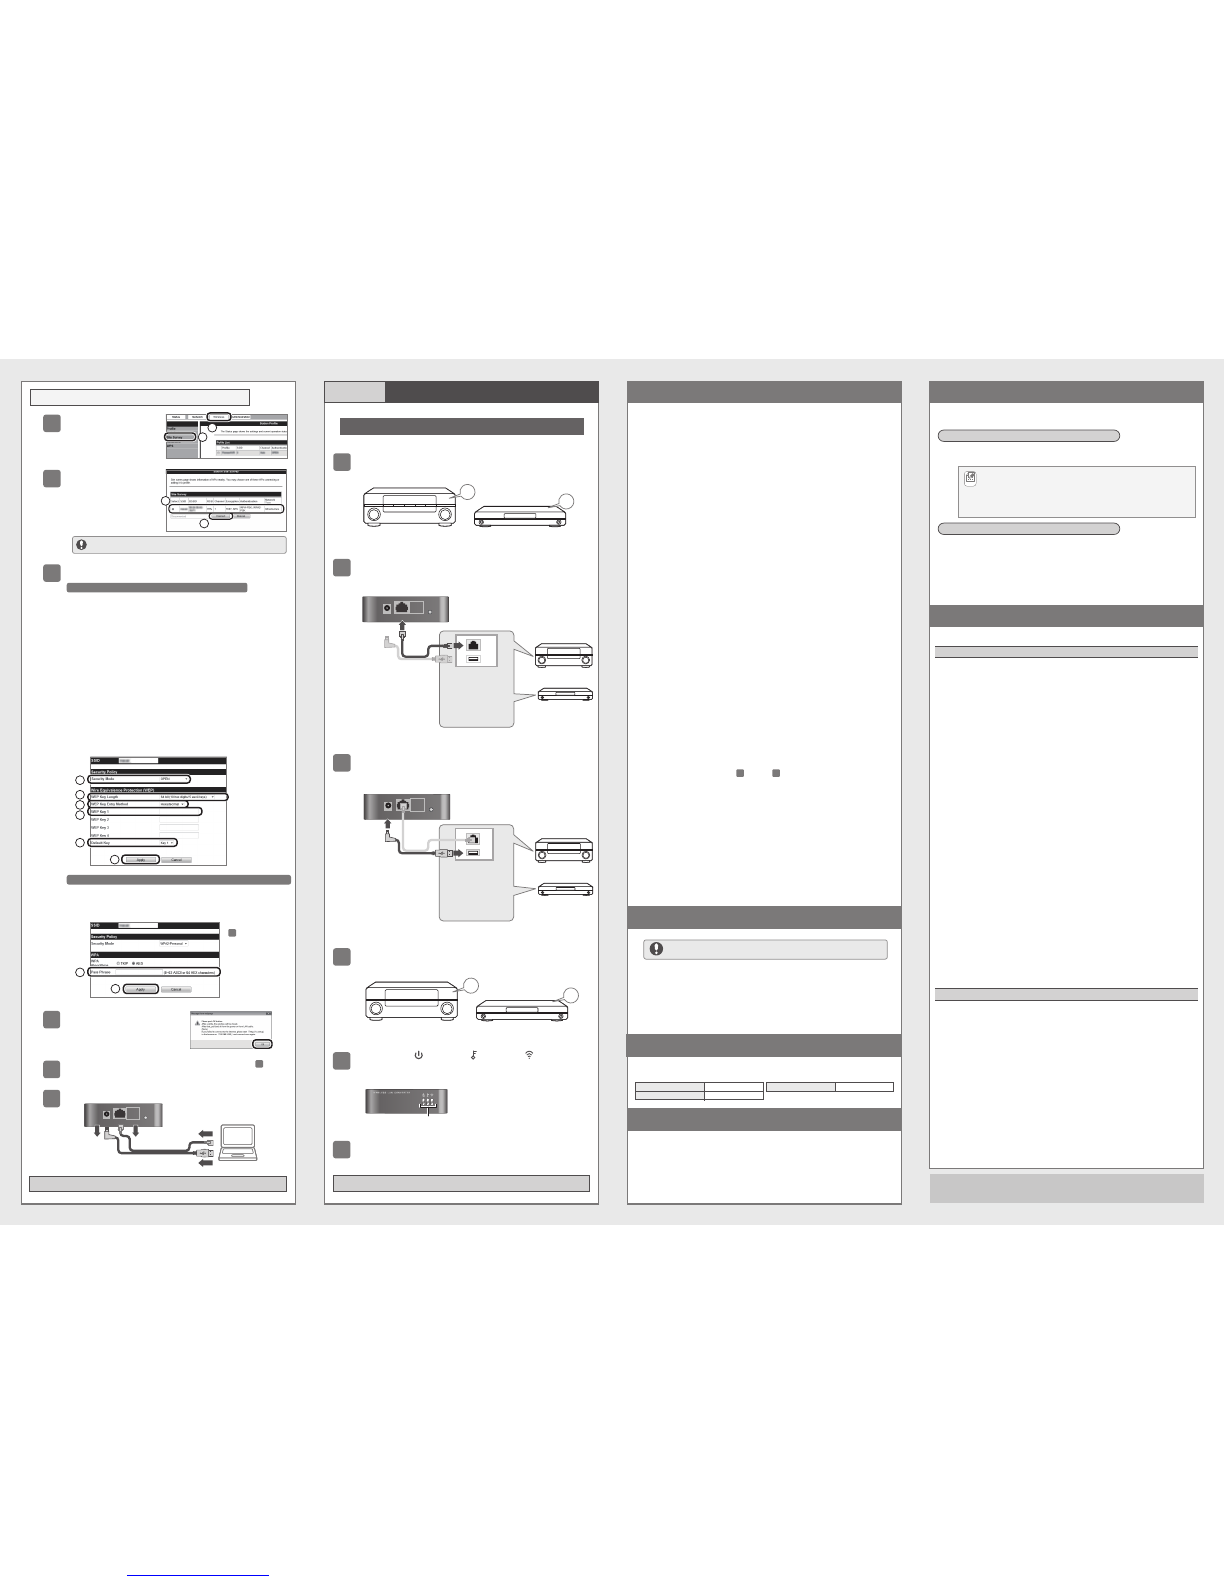
STEP2 ConnecttheUnit(Manual)contd ConnectAVDevices
STEP 3
Configurationiscomplete.
Onceconfigurationiscomplete,connecttheunittotheAVdevice.
ConnecttheETHERNETportontheunittotheLANportontheAVdevice
usingtheLANendofthesuppliedfeedercable.
2
*ThelocationoftheLAN
portanditsnamemay
varydependingonthe
computer.Ifyoucannot
locateaLANport,refer
tothecomputeruser's
manualforhelp.
ConnectthePOWERconnectorontheunittotheUSBportontheAVdevice
usingtheUSBendofthesuppliedfeedercable.
3
*ThelocationoftheUSB
portanditsnamemay
varydependingonthe
device.Ifyoucannot
locateaUSBport,refer
tothedeviceuser's
manualforhelp.
5Checkthatthe(POWER),(WPS)and(WIRELESS)
indicatorsontheunitarelit.
*Oncetheindicatorslightup,wait
2minutesbeforeproceeding.
SwitchofftheAVdevice.
1
SwitchontheAVdevice.
4
LAN
USB
AVRECEIVER
OFF
OFF
AVRECEIVER
ON
ON
*
Thebaseselectedin
isdisplayedin
SecurityModeand
WPAAlgorithms.
6
ETHERNETDC 5 V WPS
ETHERNETDC 5 V WPS
TheLANportisthe
largeportthatis
slightlylargerthan
atelephonemodular
jack.
*Somebaseshave
LANwrittenonthem.
Lit
6
CheckthatthenetworkfunctionoftheconnectedAVdeviceisoperating
properly.Refertothedeviceuser'smanualformoredetails.
1
2
AVRECEIVER
Blu-rayDiscplayer
Blu-rayDiscplayer
Blu-rayDiscplayer
Thebrowserwillclose10secondsafteryouclicked[OK]in,above.
8
7
●IftheSSIDisnotdisplayed,click[Rescan].
1
2
1
2
3
4
5
6
1
2
Troubleshooting TheUSER'SMANUAL
RefertotheUSER'SMANUALonthesuppliedCD-ROMorontheInternetfor
advancedsettings.
TheUSER'SMANUALwillautomaticallylaunchwhenyouinsertthesupplied
CD-ROMinyourcomputerCDorDVDdrive.
Accessthefollowingwebsite.
<U.S.> http://www.pioneerelectronics.com
<Canada> http://www.pioneerelectronics.ca
<U.K.> http://www.pioneer.co.uk
<EU> http://www.pioneer.eu
<Asia> http://www.pioneer.com.sg
<Australia> http://www.pioneer.com.au
ViewingtheManualontheSuppliedCD-ROM
ViewingtheManualontheWeb
Thissectioncontainshelpfultipsandsolutionstoproblemsyoumayhavewhen
configuringtheunit.
ReadtheunitUSER'SMANUALforexplanationsontheadvancedsettings.RefertoThe
USER'SMANUAL,below,fordetailsonhowtoviewit.
Theunitwillnotturnon.
●CheckthattheUSBfeedercableisproperlyconnectedtotheunitandthe
AVdevice.
TheunitwillnotconnecttotheInternet.
●RefertoStep3ConnectAVDevicesandcheckthatthedeviceandthe
cablesareproperlyconnected.
●Switchtheunitoffandon.
●Iftheunitandthebase(WirelessLANrouter)aretoofarapartorhavean
obstaclebetweenthem,movethebaseclosertowherethereareno
obstructionsandtryagain.
●Theelectromagneticwavesfrommicrowaveovensmayinterferewith
WirelessTransmission.Connectawayfrommicrowaveovens.
●ChecktheAVdeviceIPaddresssettings(automaticandfixedsettings).
Ifitisafixedsetting,youwillneedtosettheIPaddresstomatchthe
WirelessLANrouternetworksettings.
Forexample,ifWirelessLANrouterIPaddressis192.168.1.1,settheAV
deviceIPaddressto192.168.1.XXX*,theSubnetMaskto255.255.255.0
andtheGatewayorDNSto192.168.1.1.
*SettheXXXin192.168.1.XXXtoavaluebetween2and248thatwill
notconflictwithotherdevices.
●Iftheabovesettingsdonotwork,resettheunit.RefertoResettheUnit
forinstructions.
WhenusingmultipleunitsofthisproductortheIPaddressofanotherdevice
is192.168.XXX.249*.
*TheXXXin192.168.XXX.249mayvarydependingontheenvironment.
●TheunitcannotconnectwiththebaseiftheunitIPaddressoverlaps.
ChangetheIPaddressusingthefollowingprocedure.
1)Resettheunit.RefertoResettheUnitforinstructions.
2)RefertoStep2ConnecttheUnit(Manual)→2.Connecttothe
Computeronthefrontfordetailsonhowtoconnecttheunittoa
computer.
3)RefertoStep2ConnecttheUnit(Manual)→3.ConfiguretheUnit
onthefrontandfollowthroughtoconfiguretheunit.
4)ClickNetworkinthetopmenu.
5)ClickLANInterfaceSetupintheleftmenu.
6)SettheIPaddressto192.168.1.XXX
*intheLocalAreaNetwork
(LAN)Settingswindow.
*SettheXXXin192.168.1.XXXtoavaluebetween2and248that
willnotconflictwithotherdevices.
7)Click[Apply].
8)FollowtheprocedureineitherStep2ConnecttheUnit(WPS)orStep
2ConnecttheUnit(Manual)onthefronttoreconfiguretheunit.
Anerroroccurswhenenteringcv.setupor192.168.1.249intheAddress
barofthebrowser.
●Resettheunit.RefertoResettheUnitforinstructions.
13
ResettheUnit
FactorySettings
Resettingtheunitwilleraseallexistingsettings.Besuretonoteall
importantinformationbeforeresettingit.
1. Checkthattheunitisswitchedon.
2. PresstheRESETbuttonontheunitforover3seconds.
3.
ReleasetheRESETbuttonwhenthePOWERindicatorturnsoffthenflashes.
4. Wait.Resetiscompletewhentheunitrestarts.
Oncetheunitisreset,followtheprocedureineitherStep2ConnecttheUnit(WPS)
orStep2ConnecttheUnit(Manual)onthefronttoconfiguretheunit.
Thefactorysettingsareasfollows.
Username(loginID)
Password
admin
password
IPaddress 192.168.1.249
GNUGENERALPUBLICLICENSEandGNULIBRARYGENERALPUBLICLICENSE
ThisproductincludesthefollowingsoftwarelicensedforuseunderthetermsofGNUGeneralPublicLicense
Version2orGNULibraryGeneralPublicLicenseVersion2.0.
-Linuxkernel-2.6.21Copyright©1991LinusTorvalds.LicensedunderGPLv2.
-BusyBox-1.12.1multi-callbinaryCopyright©1998-2008ErikAndersen,RobLandley,DenysVlasenkoand
others.LicensedunderGPLv2.
-HostAPdriverCopyright©2001-2002SSHCommunicationsSecurityCorpandJouniMalinen.Copyright©
2002-2007JouniMalinenandcontributors.LicensedunderGPLv2.
-Dnsmasq-2.40Copyright©SimonKelley.LicensedunderGPLv2.
-OpenWrt-1.1.2.2Copyright©2005WaldemarBrodkorb,FelixFietkau.LicensedunderGPLv2.
-ntpclientCopyright©1997,1999,2000,2003,2006,2007LarryDoolittle.LicensedunderGPLv2.
-WirelessToolsforLinux-29Copyright©1996-2008JeanTourrilhes.LicensedunderGPLv2.
-libuClibc-0.9.28Copyright©2000-2005ErikAndersen.LicensedunderLGPLv2.0.
NOWARRANTY
BECAUSETHEABOVEPROGRAMSARELICENSEDFREEOFCHARGE,THEREISNOWARRANTYFORTHE
PROGRAMS,TOTHEEXTENTPERMITTEDBYAPPLICABLELAW.
EXCEPTWHENOTHERWISESTATEDINWRITING,THECOPYRIGHTHOLDERSAND/OROTHERPARTIES
PROVIDETHEPROGRAMSASISWITHOUTWARRANTYOFANYKIND,EITHEREXPRESSEDORIMPLIED,
INCLUDING,BUTNOTLIMITEDTO,THEIMPLIEDWARRANTIESOFMERCHANTABILITYANDFITNESSFORA
PARTICULARPURPOSE.
THEENTIRERISKASTOTHEQUALITYANDPERFORMANCEOFTHEPROGRAMSISWITHYOU.
SHOULDTHEPROGRAMSPROVEDEFECTIVE,YOUASSUMETHECOSTOFALLNECESSARYSERVICING,
REPAIRORCORRECTION.
INNOEVENTUNLESSREQUIREDBYAPPLICABLELAWORAGREEDTOINWRITINGWILLANYCOPYRIGHT
HOLDER,ORANYOTHERPARTYWHOMAYMODIFYAND/ORREDISTRIBUTETHEPROGRAMSAS
PERMITTEDABOVE,BELIABLETOYOUFORDAMAGES,INCLUDINGANYGENERAL,SPECIAL,INCIDENTAL
ORCONSEQUENTIALDAMAGESARISINGOUTOFTHEUSEORINABILITYTOUSETHEPROGRAMS
(INCLUDINGBUTNOTLIMITEDTOLOSSOFDATAORDATABEINGRENDEREDINACCURATEORLOSSES
SUSTAINEDBYYOUORTHIRDPARTIESORAFAILUREOFTHEPROGRAMSTOOPERATEWITHANY
OTHERPROGRAMS),EVENIFSUCHHOLDEROROTHERPARTYHASBEENADVISEDOFTHEPOSSIBILITY
OFSUCHDAMAGES.
YoucangetcorrespondingopensourcecodefromthefollowingURL.
http://www.oss-pioneer.com/homeav/accessory
Weareunabletoansweranyquestionsaboutthesourcecodefortheopensourcesoftware.
PleaserefertofollowingURLforfurtherinformationofGNUGeneralPublicLicenseVersion2.
http://www.gnu.org/licenses/gpl-2.0.html
PleaserefertofollowingURLforfurtherinformationofGNULibraryGeneralPublicLicenseVersion2.0.
http://www.gnu.org/licenses/old-licenses/lgpl-2.0.html
BSD-STYLELICENSE
ThisproductincludesthefollowingsoftwarelicensedforuseunderthetermsofBSD-StyleLicense.
-libupnp-1.3.1Copyright©2000-2003IntelCorporation,Allrightsreserved.
Redistributionanduseinsourceandbinaryforms,withorwithoutmodification,arepermittedprovidedthatthe
followingconditionsaremet:
*Redistributionsofsourcecodemustretaintheabovecopyrightnotice,thislistofconditionsandthe
followingdisclaimer.
*Redistributionsinbinaryformmustreproducetheabovecopyrightnotice,thislistofconditionsandthe
followingdisclaimerinthedocumentationand/orothermaterialsprovidedwiththedistribution.
*NeithernameofIntelCorporationnorthenamesofitscontributorsmaybeusedtoendorseorpromote
productsderivedfromthissoftwarewithoutspecificpriorwrittenpermission.
THISSOFTWAREISPROVIDEDBYTHECOPYRIGHTHOLDERSANDCONTRIBUTORSASISANDANY
EXPRESSORIMPLIEDWARRANTIES,INCLUDING,BUTNOTLIMITEDTO,THEIMPLIEDWARRANTIESOF
MERCHANTABILITYANDFITNESSFORAPARTICULARPURPOSEAREDISCLAIMED.
INNOEVENTSHALLTHECOPYRIGHTHOLDERORCONTRIBUTORSBELIABLEFORANYDIRECT,
INDIRECT,INCIDENTAL,SPECIAL,EXEMPLARY,ORCONSEQUENTIALDAMAGES(INCLUDING,BUTNOT
LIMITEDTO,PROCUREMENTOFSUBSTITUTEGOODSORSERVICES;LOSSOFUSE,DATA,ORPROFITS;
ORBUSINESSINTERRUPTION)HOWEVERCAUSEDANDONANYTHEORYOFLIABILITY,WHETHERIN
CONTRACT,STRICTLIABILITY,ORTORT(INCLUDINGNEGLIGENCEOROTHERWISE)ARISINGINANYWAY
OUTOFTHEUSEOFTHISSOFTWARE,EVENIFADVISEDOFTHEPOSSIBILITYOFSUCHDAMAGE.
SoftwareLicenseNotice
Thelicensesfortheopensourcesoftwareusedonthisproductareshownbelow.
ETHERNETDC 5 V WPS
AUSBportisthe
horizontally(or
vertically)longport
(asshownabove).
*Onsomedevices,itis
labelledDCOUTPUT
forWIRELESSLAN.
AVRECEIVER
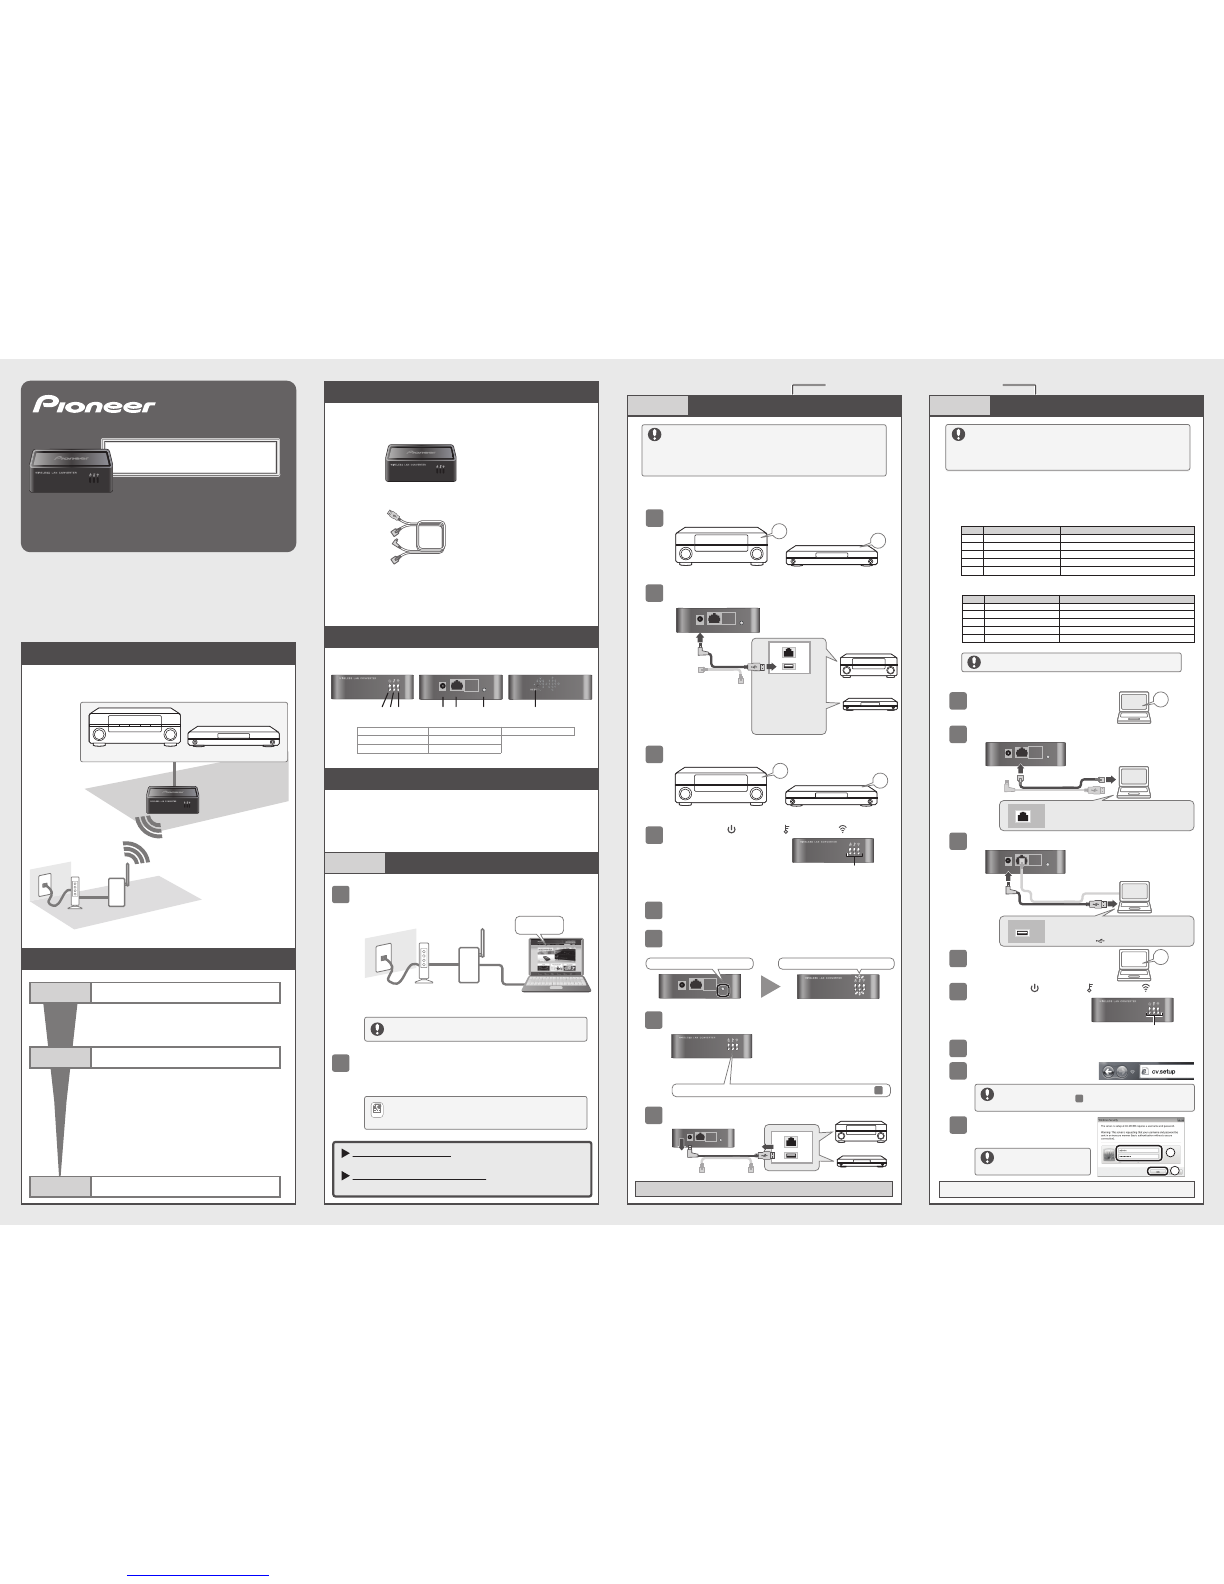
PackageContents
Checkthatthefollowingitemsaresuppliedinthepackage.
□AS-WL300(thisunit) □LAN/USBfeedercable
□CD-ROM(USER'SMANUAL) □GettingStarted(thisguide)
□PleaseReadFirst
*Ifthecontentsofthepackagearedamagedormissing,pleasecontactusorthestore.
Blu-rayDiscplayer
●Clickrunrundll32.exeontheAutorunwindow.
●Click[Yes]ontheActivecontentcan...window.
●IftheUSER'SMANUALdoesnotopen,opentheCD-ROMfromComputeror
MyComputeranddoubleclickindex.html.
●IfusingaMac,doubleclickontheCD-ROMicononthedesktop,thendouble
clickindex.html.
Notes