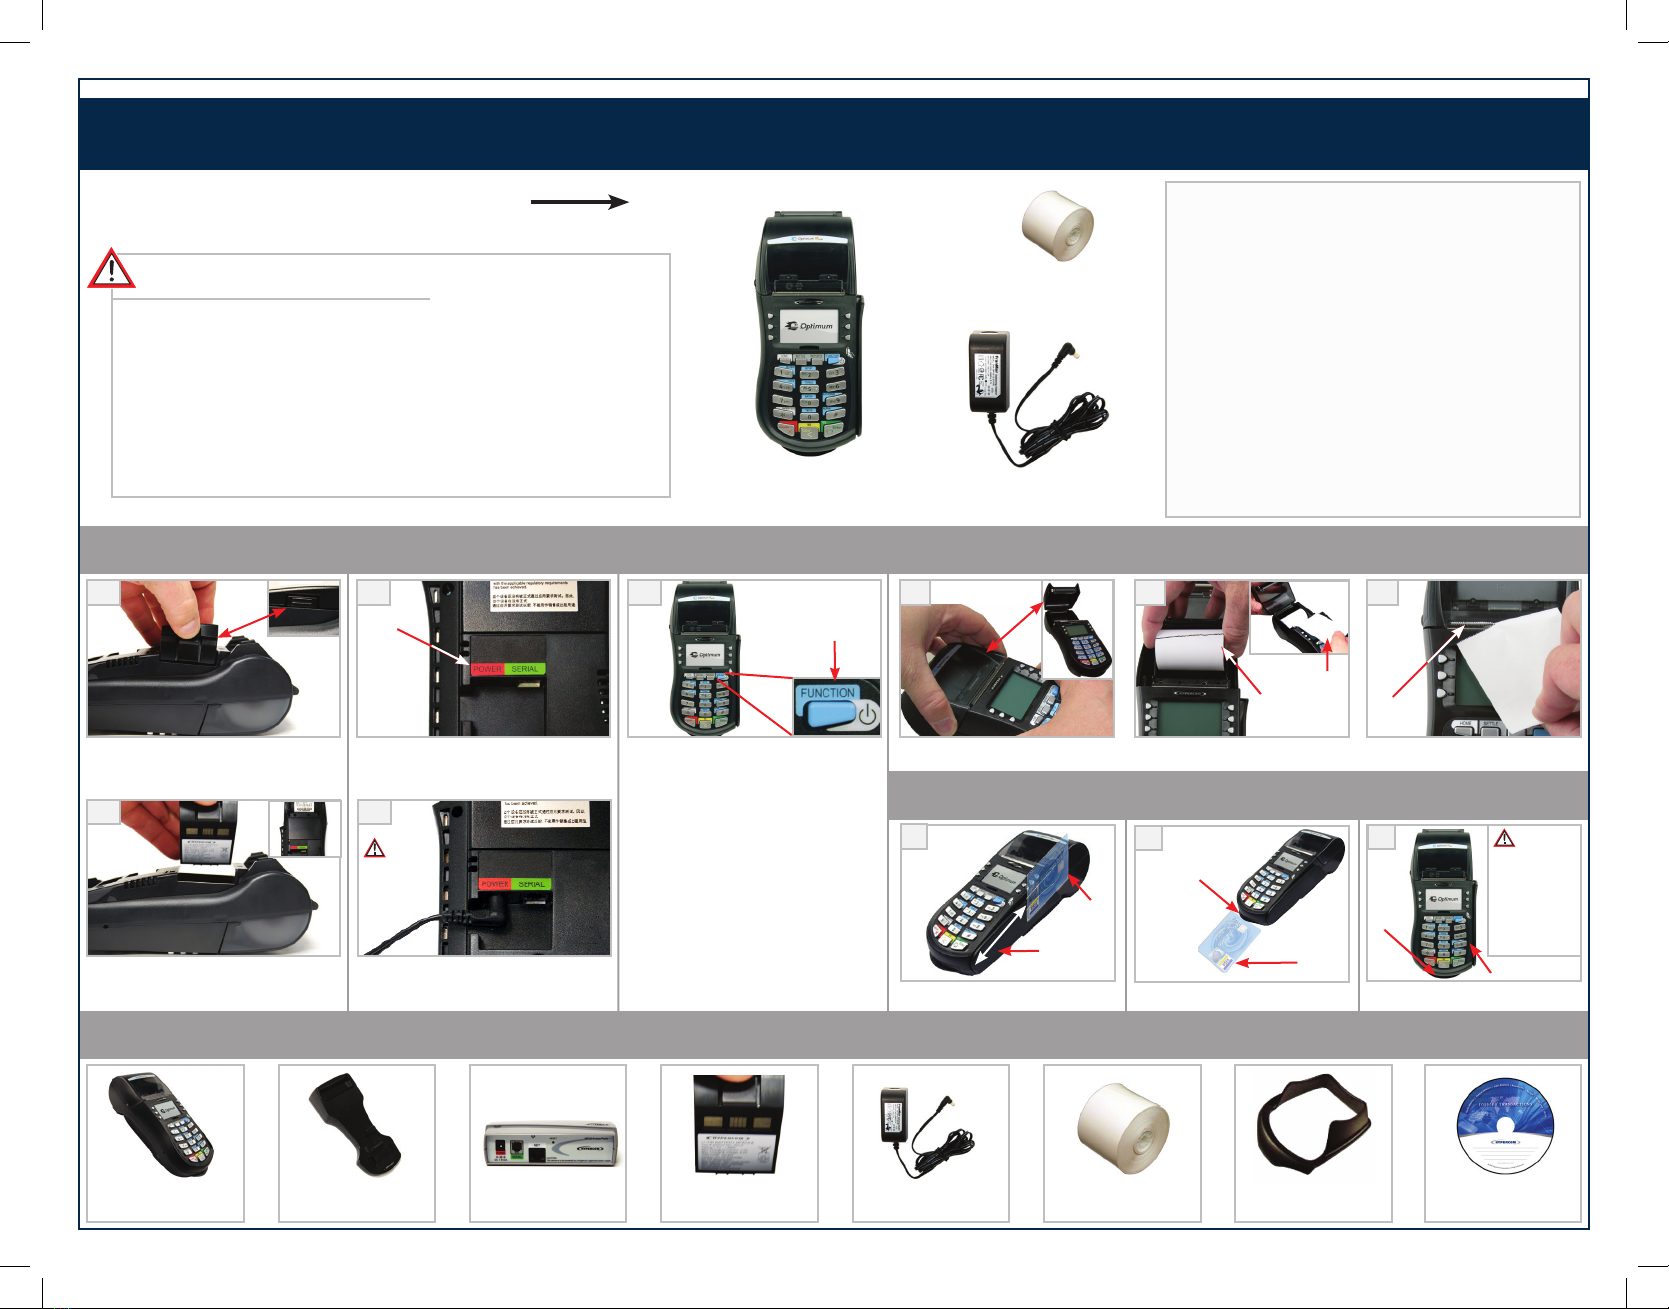
Optimum M4240
BLUETOOTH TERMINAL INSTALLATION GUIDE
© 2011 Pivotal Payments Direct, all rights reserved. Hypercom and Optimum and Design are registered trademarks of Hypercom Corporation. The Hypercom logo is a trademark of Hypercom
Corporation. All other products or services mentioned in this document are trademarks, service marks, registered trademarks or registered service marks of their respective owners.
www.pivotalpaymentsdirect.comwww.pivotalpaymentsdirect.com
COMPLIANCE
Changes or modifications not expressly approved by the party responsible for compliance could void the user’s authority to operate the equipment.
• FCC Part 15
This device complies with Part 15 of the FCC Rules. Operation is subject to the following two conditions: (1) this device may not cause harmful interference, and (2) this
device must accept any interference received, including interference that may cause undesired operation. The user is cautioned that changes or modifications to the
product(s) identified in this manual unless expressly approved by Hypercom could void the user’s authority to operate these product(s).
• ICES-003
This Class A digital apparatus complies with Canadian ICES-003. CET appareil Numerique de la classe A est conforme a la norme NMB-003 du Canada.
• PCI-PED
Legal Terms and Conditions
PCI SSC’s approval only applies to PEDs that are identical to the PED tested by a PCI Security Standards Council recognized laboratory. If any aspect of the PED is different
from that which was tested by the laboratory — even if the PED conforms to the basic product description contained in the letter, then the PED model should not be
considered approved, nor promoted as approved. For example, if a PED contains firmware, software, or physical construction that has the same name or model number as
those tested by the laboratory, but in fact are not identical to those PED samples tested by the laboratory, then the PED should not be considered or promoted as approved.
No vendor or other third party may refer to a PED as “PCI Approved,” nor otherwise state or imply that PCI SSC has, in whole or part, approved any aspect of a vendor or
its PEDs, except to the extent and subject to the terms and restrictions expressly set forth in a written agreement with PCI SSC, or in an approval letter. All other references
to PCI SSC’s approval are strictly and actively prohibited by PCI SSC.
When granted, an approval is provided by PCI SSC to ensure certain security and operational characteristics important to the achievement of PCI SSC’s goals, but the approval
does not under any circumstances include any endorsement or warranty regarding the functionality, quality, or performance of any particular product or service. PCI SSC does not
warrant any products or services provided by third parties. Approval does not, under any circumstances, include or imply any product warranties from PCI SSC, including, without
limitation, any implied warranties of merchantability, fitness for purpose or noninfringement, all of which are expressly disclaimed by PCI SSC. All rights and remedies regarding
products and services, which have received an approval, shall be provided by the party providing such products or services, and not by PCI SSC or the payment brand participants.
• CE (Select Models)
- IEC 60950-1
- EN 55022
- EN 55024
- EN 60950
• A-tick (Future Planned)
• RoHS
• UL/cUL Listed (UL 60950)
• WEEE
Note: This equipment has been tested and found to comply with the limits for a Class A digital device, pursuant to Part 15 of the FCC Rules. These limits are designed to
provide reasonable protection against harmful interference when the equipment is operated in a commercial environment. This equipment generates, uses and can radiate
radio frequency energy and, if not installed and used in accordance with the instruction manual, may cause harmful interference to radio communications. Operation of this
equipment in a residential area is likely to cause harmful interference in which case the user will be required to correct the interference at his own expense.
Information About Bluetooth Access Point
Bluetooth wireless technology is a short-range communications technology intended to replace the cables connecting portable and/or fixed devices while maintaining high levels of security.
Hypercom’s Bluetooth access points provide centralized communications for the Optimum M4240 terminal. Each access point has a wireless range support of up to 500-1000 meters
(1640.42-3280.80 feet), in a direct line of sight & can communicate simultaneously with up to seven Optimum M4240 terminals.
500-1000 meters (1640.42-3280.80 feet)
in direct line of sight
For more information, see the
Optimum M4240 Bluetooth Access Point Installation Guide.
Access Point Optimum M4240
Information About Docking Station
An optional docking station (Standard) is available for the Optimum M4240 terminal. The docking station provides a convenient and stable place to store and re-charge your
terminal. When the terminal is placed on the docking station, normal operation can continue while the battery is being charged, with no interruption of service. It can also be
used to pair one terminal to a Bluetooth access point. Note: All power and communication cables must be removed from a terminal before placing it on a docking station.
For more information, see the
Optimum M4240 Bluetooth Access Point Installation Guide.
Optimum M4240
Docking
Station
Pivotal Payments Direct, 14 Commerce Place,
St. Catharines, Ontario, Canada, L2R 6P7
PIVOTAL_Optimum_M4240_Installation_Guide.indd 1 11-04-28 15:44