Pixbee resti User manual

USER MANUAL
resti
PXB-101L
Smart Sleep Helper
with Dynamic Lighting and Soothing Sounds


3
CONTENTS
1.0 IMPORTANT SAFETY PRECAUTIONS................4
2.0 WHAT'S IN THE BOX .......................................... 6
3.0 OVERVIEW ......................................................... 6
4.0 SPECIFICATIONS ............................................... 7
5.0 OPERATION........................................................ 8
5.1 Control and Functions...........................8
5.2 Smart Control via the App...................10
5.3 Controlling Resti via the App ..............11
5.4 Scheduling ..........................................14
6.0 VOICE COMMANDS..........................................16
7.0 TROUBLESHOOTING ........................................17
8.0 WARRANTY TERMS AND CONDITIONS..........19
9.0 NOTES............................................................... 25

4
1.0 IMPORTANT SAFETY PRECAUTIONS
Please read these instructions carefully before
installing and using the product. Please retain
these instructions for future reference.
1. Use only the supplied USB Type-C cable
and AC power adaptor.
2. The LED light cannot be replaced. Please
do not dismantle or modify the device by
yourself as it will void the warranty.
3. Do not place or operate the product near
extreme heat sources, damp surroundings
or corrosive materials.
4. Always unplug the power cord prior to
installation or performing any maintenance
or repair work.
5. This product is not waterproof or designed
for rugged use.
6. Use only a dry cloth to clean and remove dust.

5
7. Please follow local regulations when
disposing of or recycling this product and
its components.
8. If this product is not in use for prolonged
periods, please disconnect the power
supply and store it in a clean and dry place.

6
2.0 WHAT'S IN THE BOX
• Pixbee Resti Smart Sleep Helper x1
• Power Adaptor x 1
• USB Type-C Charging Cable x1
• User Manual x 1
3.0 OVERVIEW
1. Light Control
2. Sound Control
3. Auto Off Timer
4. Wi-Fi On/Off/
Pairing
5. USB-C Power
Input
1
2 3

7
4.0 SPECIFICATIONS
Model PXB-101L
Input 100-240V ~50/60Hz
DC 5V ⎓l.5A
Power Light 3.8W, Speaker 3W
Supported Wi-Fi
Protocol
IEEE 802.11 b/g/n 2.4GHz
Supported OS Android 5.0, iOS 9.0 or higher
Lumens 125Im±10%
Colour Temperature 2700K
CRI ≥80
Operating
Temperature
-10°C ~ 40°C
4
5

8
5.0 OPERATION
5.1 CONTROL AND FUNCTIONS
Repeatedly press to cycle
through 3 Sound Modes:
Nature -> Animal -> Sleep.
Repeatedly press to cycle
through sounds: 10 nature
sounds / 7 animal sounds / 8
sleep sounds.
Short press to play or pause.
Short press to control the
volume level (16 levels) step
by step.
Press and hold to control
the volume level without
any steps.
>1s
Sound
Mode
Sound
Selection
Play /
Pause
Volume
Up/Down
Press Once Long Press

9
To Turn On:
Repeatedly press to cycle
through 30 mins - 60 mins -
120 mins - 240 mins - Off.
When time is up, all sounds,
night light and indicators will
turn off.
>1s To Cancel:
Press and hold to cancel
Auto Off Timer. The timer
indicator will turn off.
To Turn On/Off:
Short press to turn the
night light On/Off.
Brightness:
Press and hoId to adjust the
brightness.
>1s
To Turn On/Off:
Short press to turn
Wi-Fi On/Off.
>1s Pairing:
Once on, press and hold
until the indicator flashes
blue to begin pairing.
Solid Red - Connection
Failed / Offline
Solid Blue - Connected
Light
Control
Auto Off
Timer
Wi-Fi
Connection

10
5.2 SMART CONTROL VIA THE APP
Pairing your smart device:
1. Make sure your device is connected to a
secure 2.4GHz Wi-Fi network.
2. Scan the QR code below to download the
"Pixbee SmartLife" App, or visit the Apple
App Store or Google Play Store to search
for and download the App.
3. Open the App and create a new account or
log in to your existing account.
4. Turn on Bluetooth on your smart device
(smartphone or tablet)
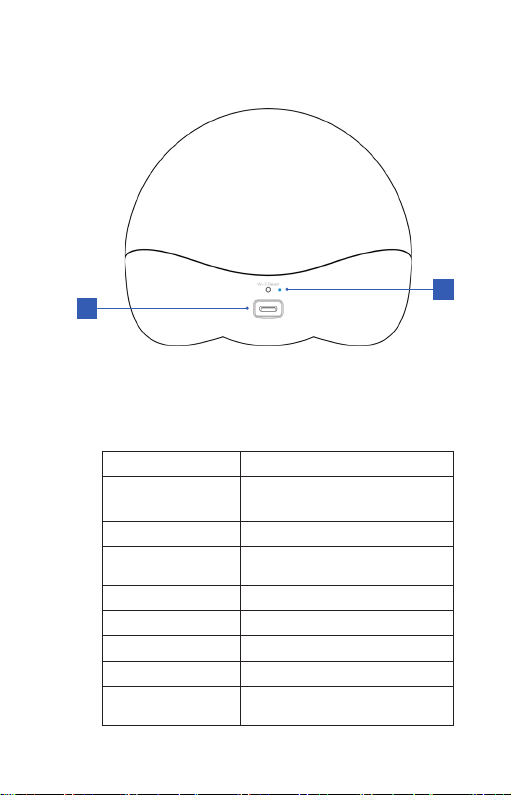
5. Plug in the USB Type-C cable into the
product and the power adaptor into a
power outlet. It will enter Pairing Mode
automatically. If the indicator does not
flash in blue, refer to Troubleshooting for
solutions.
6. Select "+" or "Add Device" in the top right
corner and follow the prompts to add the
product to the app.
7. Select the 2.4GHz Wi-Fi network and enter
your Wi-Fi password to complete connection.

11
5.3 CONTROLLING RESTI VIA THE APP
The Pixbee SmartLife App enables you to control
and customise the operations of the Resti Smart
Sleep Helper using your smart device.
01
Default Modes
Select from the 7
modes with default
settings for light and
sound.
02
Customised Modes
Add your customised
settings for light and
sound (up to 5 modes).
01
02

12
03
Sound Control
Play/pause, Previous/
Next Track, Volume
Adjustment
04
Sound Modes
10 nature sounds /
7 animal sounds/
8 soothing sounds
03
04

13
05
Colour and Brightness
Slide to adjust colour
and brightness.
07
Set Schedules
06
Timer
08
Child Lock
On/Off
05
06
08
07

14
5.4 SCHEDULING
You can schedule an alarm for your child to wake
up or go to bed. The process is the same for both.
01
To set up the alarm, click
on the Schedule button.
Schedule button
02
On the Schedule page,
press the Add button.
Add button

15
03
Name the alarm and use
the various parameters
to schedule the alarm.
04
After entering the
details, press Save to
return to the Schedule
page. The alarm will
be shown on the
scheduling chart.
NOTE: The same process
can be used to schedule
other activities such as
afternoon naps or
meal times.
Save Schedule button

16
6.0 VOICE COMMANDS
Listed below are some of the more common voice
commands for use with the Pixbee resti (pronounced:
res-tee) smart sleep helper.
AMAZON ALEXA
Power
• "Alexa, turn on resti."
• "Alexa, turn off resti."
Brightness
• "Alexa, set/make the resti to (1-100) percent."
Colour
• "Alexa, set/make the resti to (colour)."
• Colours include red, green, blue, orange, yellow, etc.
Sound Volume
• "Alexa, set the volume of the resti to (1-100)."
GOOGLE ASSISTANT
Power
• "Hey Google, turn on resti."
• "Hey Google, turn off resti."
Brightness
• "Hey Google, set/make the resti to (1-100) percent."
Colour
• "Hey Google, set/make the resti to (colour)."
• Colours include red, green, blue, orange, yellow, etc.

17
7.0 TROUBLESHOOTING
PROBLEM POSSIBLE SOLUTIONS
Cannot enter
Pairing Mode (Wi-Fi
indicator does not
flash blue).
Indicator in Red:
Press and hold the Wi-Fi button
until it flashes to blue and then
manually enter the pairing mode.
Indicator Off:
Short press the Wi-Fi button to
turn on indicator. The product
will enter into pairing mode
automatically.
Cannot receive the
verification code?
1. Make sure you have entered
a correct email address when
signing up.
2. Check if the email is blocked or
sent to another folder.
3. If you still cannot receive the
code after several attempts,
please contact our Customer
Support.
Cannot connect to
Wi-Fi network or
Wi-Fi connection is
unstable.
1. Make sure the product is
connected to a 2.4GHz Wi-Fi
network.
2. Make sure you have entered
the correct Wi-Fi password.
3. Place the product within the
signal coverage of the router.
4. Avoid placing the product near
metal objects or windows,
and behind multiple walls that
could block the signal.
Cannot connect to
the app?
1. Make sure the product is
connected to a 2.4GHz Wi-Fi
network.
2. Follow the steps in "Pairing
your smart device" to try again.

18
TROUBLESHOOTING CONTINUED
PROBLEM POSSIBLE SOLUTIONS
Failed to light up
after plugging in to
power supply.
1. Make sure the light is
connected to an appropriate
electrical outlet.
2. Check if the light is turned on.
Control panel is not
responsive.
1. Operate with dry hands.
2. Disconnect the power adaptor
to restart the light.
LED is not working
or a bad smell is
detected.
1. Please contact our Customer
Support.

19
8.0 WARRANTY TERMS AND CONDITIONS
Our goods come with guarantees that cannot
be excluded under the Australian Consumer
Law. You are entitled to a replacement or refund
for a major failure and for compensation for any
other reasonably foreseeable loss or damage.
You are also entitled to have the goods repaired
or replaced if the goods fail to be of acceptable
quality and the failure does not amount to a
major failure.
This warranty is provided in addition to your
rights under the Australian Consumer Law.
Directed Electronics Australia Pty Ltd (Directed
Electronics) warrants that this product is free
from defects in material and workmanship for a
period of 12 months from the date of purchase
or for the period stated on the packaging.
This warranty is only valid where you have
used the product in accordance with any
recommendations or instructions provided by
Directed Electronics.
This warranty excludes defects resulting from
alterations of the product, accident, misuse,
abuse or neglect. In order to claim the warranty,
you must return the product to the retailer from
which it was purchased or if that retailer is part
of a national network, a store within that chain,
along with satisfactory proof of purchase. The
retailer will then return the goods to Directed
Electronics.

20
Directed Electronics will repair, replace or
refurbish the product at its discretion. The
retailer will contact you when the product is
ready for collection. All costs involved in claiming
this warranty, including the cost of the retailer
sending the product to Directed Electronics, will
be borne by you.
Email: [email protected]
Phone: +61 03 8331 4800
INDEMNITY
You agree to defend, indemnify and hold
harmless Pixbee and its subsidiaries and affiliates
from and against any and all claims, proceedings,
injuries, liabilities, losses, costs and expenses
(including reasonable legal fees), including
but not limited to, claims alleging negligence,
invasion of privacy, copyright infringement and/
or trademark infringement against Pixbee and its
subsidiaries and affiliates, relating to or arising
out of your breach of any provision of these
terms, your misuse of Pixbee products or its
services, or your unauthorised modification or
alteration of products or software.
This manual suits for next models
1
Table of contents
Popular Personal Care Product manuals by other brands

HealthyLine
HealthyLine PLATINUM Series user guide

Planmeca
Planmeca Proline CC Technical manual

Remington
Remington Tight Curls H-21SP Use and care guide

Kleine Wolke
Kleine Wolke LADY MIRROR operating instructions

Madeli
Madeli IMAGE Slique IM-IM2036-00 Specifications, Installation and User’s Guide

microbeau
microbeau Spektra Xion S user manual