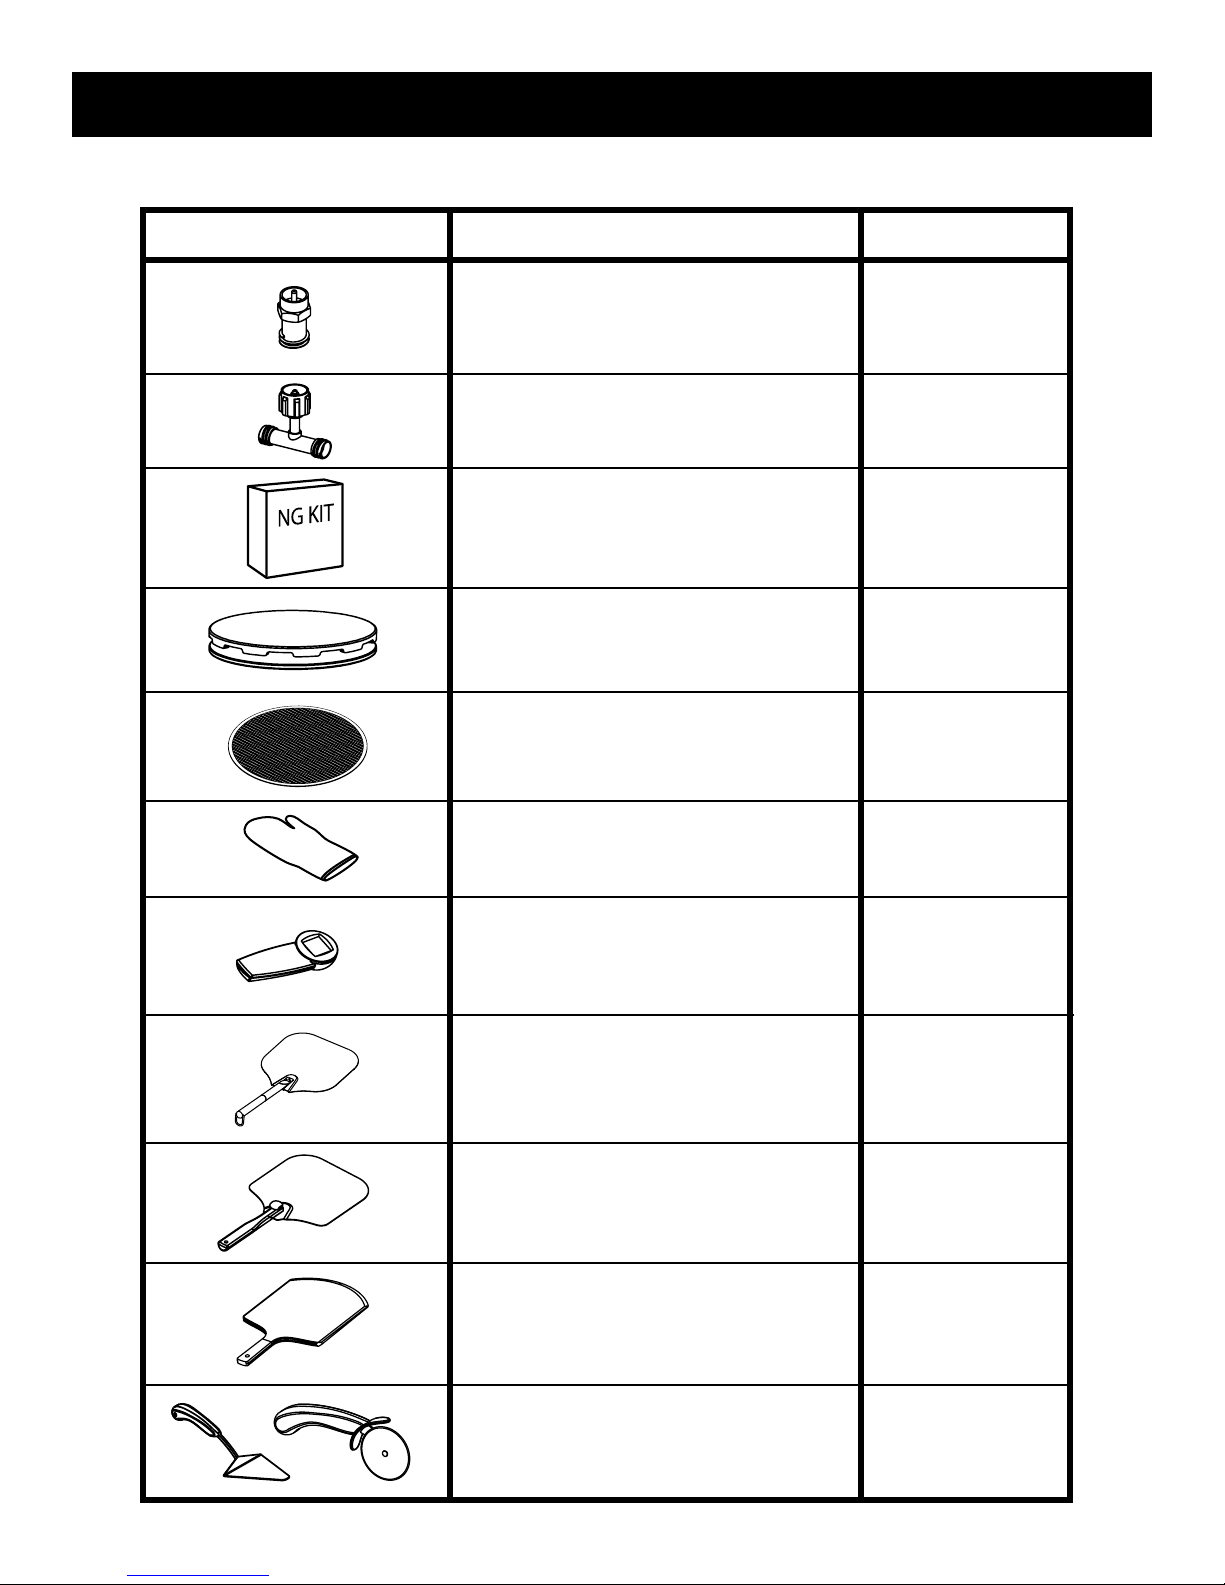
Pizzacraft 6000 series User manual

Workstation
for use with Leg Kit
Pizza Oven
OWNER’S MANUAL
Pizzeria Pronto®
PizzaQue®
Pizzacraft®
PC6026
JS0817
©The Companion Group 2015
1250 9th Street, Berkeley, CA 94710
1.800.521.0505
IMPORTANT: This instruction manual contains important information necessary for the proper
assembly and safe use of the appliance.
Read and follow all warnings and instructions before assembling and using the appliance. Keep this
manual for future reference.
FOR 6000 SERIES
PORTABLE OVENS

CALIFORNIA PROPOSITION 65 WARNING:
The burning of gas cooking fuel generates some by-products, which are on the list of substances
known by the State of California to cause cancer, reproductive harm, or other birth defects. This
product may contain chemicals known to the State of California to cause cancer, reproductive
harm, or birth defects. To reduce exposure to these substances, always operate this unit according
to the use and care manual, ensuring you provide good ventilation when cooking with gas.
TABLE OF CONTENTS
Warranty and Registration.........................2
Assembly Instructions ...............................3
Care and Maintenance................................9
WARRANTY AND REGISTRATION
We guarantee our products for one year from date of purchase for defects in manufacture or materials.
We will repair or replace at our option. Proof of purchase is required.

3
ASSEMBLY INSTRUCTIONS
PACKAGE CONTENTS:
1. Bamboo Tabletop
2. Top Support Tube
3. Interior Support Bar
4. Rear Support Bar
5. Wire Shelf
6. Exterior Legs
7. Hardware Pack
HARDWARE PACKAGE CONTENTS:
1. (6) M6x8 Phillips Screw - to secure Top Support Bar and attach/secure Wire Shelf
2. (3) M4x14 Pan Head Wood Screw - to secure Tabletop to Top Support Bar
3. (2) M6x12 Hex Screw - to secure Exterior Legs to Top Support Bar
4. (2) M6x12 Carriage Bolt - to secure Interior Support Bar
5. (2) M6 Hex Flange Nut - to secure Interior Support Bar
6. (6) Plastic Foot Insert - press t into base of all Legs
7. (6) M8x40 Elevator Bolt - screw into Plastic Foot Insert
8. (2) M5x15 Phillips Screw - to secure Rear Support Bar
9. (1) Gas Hose Bracket - to secure gas hose to underside of Bamboo Tabletop
Before beginning assembly of product, make sure all parts are present. Compare parts with package
contents and hardware contents list. Do not discard packing materials before assembly is complete.
If any part is missing or damaged, do not attempt to assemble the product. Call customer service at 800-
521-0505.
To watch assembly video, go to: www.pizzacraft.com/manuals-use-care/
Estimated assembly time: 20 minutes
Tools Required: #2 Phillips screwdriver, 10mm wrench, 5mm hex wrench and
rubber mallet/wood block. TOOLS NOT INCLUDED.
1.
2.
3.
5.
4.
6.
7.
3. 4. 5. 6. 7.2. 8.1. 9.

4
1. Remove hood and stones. Then disconnect hose from propane tank and carefully set tank aside.
3. Unscrew the 2 hex screws that secure the legs to the body on the gas hose side of the oven. Then
CAREFULLY ip your oven over.

5
4. Remove the legs from the oven body on the gas hose side. Then align the U-channel end tubes with
the legs on the side of the gas hose, making sure the tab on the U-channel end tube is facing away
from the oven body, as shown below. Slide legs through U-channel end tubes and re-attach legs to
oven body and secure with existing hex screws (you will need to turn oven onto its side to access body
screw holes on interior of oven.
Tab on U-channel
end tube
5. Insert exterior legs into the corresponding brackets just inside the U-channel, making sure the brack-
ets extend away from the oven body and the tabs on the legs are facing inward toward the oven.
Align the screw holes where the legs and brackets overlap and secure with M6x12 hex screws.

6
6. Detach the lower half of the legs on the side of the gas hose and slide the wire shelf end tubes over
them, making sure the wire shelf is in the proper orientation. Replace the lower half of the leg kit legs
and secure wire shelf to exterior leg tabs with M6x8 phillips head screws.
7. Using pliers, remove the plastic feet at the base of the leg kit legs. Replace feet with new plastic feet
that came with your workstation. You should have 6 total: 4 for the existing leg kit legs and 2 for the
exterior legs that came with your workstation. Now screw an elevator bolt into each foot and care-
fully ip the entire unit back over (You’re almost done!)
Exterior Leg Tab

7
8. Attach interior and rear support bars. Align holes in tabs on wire shelf and U-channel with holes in
interior support bar and use M6 carriage nuts and M6x12 carriage bolts to attach interior support bar.
Then align holes in rear exterior leg and rear middle leg with rear support bar holes and secure with
M5x15 screws.
9. Insert M6x8 phillips head screws to lock U-channel and wire shelf into place. Make sure your U-
channel and wire shelf are level, then insert M6x8 screws into the M6 nuts welded to the end tubes of
the U-channel and wire shelf that capture the middle legs from the leg kit. Secure tightly to prevent
U-channel and wire shelf from sliding during use.
Interior Support Bar
Rear Support Bar
U-Channel Set Screw
Wire Shelf Set Screw

8
10. Attach Bamboo Tabletop. Align pilot holes in bottom of tabletop surface with tabs welded to the
interior side of the U-channel and secure with M4x14 pan head wood screws. Make sure to attach
Gas Hose Bracket to the rear-most M4x14 pan head wood screw and capture hose in its proper
conguration, as shown below. Make sure gas hose is safely routed away from hot surfaces of oven
body.
11. Replace tank, pizza stones, oven hood, and S-hooks. Then make sure oven is stable. We recommend
adjusting elevator bolts up or down to stabilize oven on an uneven surface.
Adjust elevator bolts
to level oven
Gas Hose Bracket
Proper Gas Hose Conguration
Gas Hose

9
12. Now you are ready to use your Pizza Oven Workstation. Enjoy!
CARE AND MAINTENANCE
CLEANING
Coated Steel Finish
To clean, wipe the outside surfaces with a cloth damp-
ened with water and a mild dish washing detergent;
dry immediately. Do not use abrasive scrubbers or the
nish may become scratched or damaged. Never clean
the oven when it is hot. We recommend cleaning twice
yearly or as needed.
Bamboo Tabletop
Wipe down your Bamboo Tabletop surface with a
damp cloth and dry immediately. Do NOT soak,
emerse, or wash your Bamboo Tabletop surface in the
dishwasher. Do NOT use surface for cutting, as you
could damage the wood surface.
STORAGE
Storing your Pizza Oven Workstation
To maximize the lifespan of your Pizza Oven Work-
station we recommend storing it inside or in a protect-
ed covered area away from weather. Always remember
to re-cover the Bamboo Tabletop, after use with the
protective nylon cover provided.

10
ACCESSORIES
For these and more visit pizzacraft.com/accessories.html
ACCESSORY DESCRIPTION ITEM NUMBER
Folding Pizza Peel: Aluminum peel sized
perfect for pizza oven and storage. PC0216
Infrared Thermometer: Accurately reads
stone surface temperatures. 32°-800° F range. PC 0 413
Pizza Screen: Aluminum screen helps even
cooking for frozen pizzas. PC0306
PC6013
1 Pound Disposable Tank Adapter:
Allows small portable propane bottle to be
used with the pizza oven. Great for tailgating
and camping.
Stone Replacement Set: Designed
specically for the oven to ensure even heat and
a crisp crust. (identical to original stone set)
PC6015
PC0407
Pizza Mitt: Aramid bers with silicone grips
which protects against surfaces up to 475° F.
PC6 017
All-Purpose Wood Pizza Peel: Wood peel
sized perfect for pizza oven with xed handle.
Ideal for building pizza and placing into oven.
Pizza Peel: Aluminum peel sized perfect for
pizza oven with xed handle. PC0202
NG Conversion Kit: Kit includes everything
you need to convert your pizza oven to run on
standard household natural gas.
PC6018
Tee Valve: Allows you to use only one or two
cooking units for a 20 lb. portable propane tank. PC6 014
Tool Set: Comes with both pizza wheel and
server. Constructed from stainless steel with
TPR handles.
PC0215

11
PC0218
Stone Brush: Long handle brush with natural
ber bristles. Keeps stone clean between pizzas.
ACCESSORY DESCRIPTION ITEM NUMBER
Pizza Oven Tote: Allows you to transport
oven one-handed while securing oven com-
ponents in place for travel. Durable nylon
construction.
Deluxe Rain Cover: Nylon rain cover oers
additional protection for outdoor storage.
Leg Kit: Creates a stable, independent plat-
form for the pizza oven. Oven and tank not
included.
Pizza Warming Stand and Tray: 12 inch
pan is held above the hot oven, keeping the
cooked pizza warm.
PC6 016
PC6012
PC6011
PC6020
Flexible Dough Rolling Mat: Easy to
measure and roll perfectly sized pizza crust. PC0408
Organic ‘00’ Pizza Flour: A premium
blend of organic domestic wheat, milled to the
nest grind for perfect pizza crust. Made in the
USA.
PC0503
Pizza: From Everyday to Gourmet:
Learn how to condently prepare pizza from
start to nish. Includes over 30 pizza recipes.
PC0599
PIZZA
FROM EVERYDAYTO GOURMET
Pizza Herb Blends: Made from premium
dried herbs to provide maximum avor on
pizzas made at home. Comes in Neopolatin,
Tuscan and Spicy Calabrese. Made in the USA.
PC0500-0502
Other manuals for 6000 series
1
Table of contents
Other Pizzacraft Kitchen Appliance manuals