manuals.online logo
Brands
  1. Home
  2. •
  3. Brands
  4. •
  5. Placid Industries
  6. •
  7. Power Supply
  8. •
  9. Placid Industries PS-12-M User manual

Placid Industries PS-12-M User manual

Ø.375 2.690
1.312
2.83
1.41
A. INPUT CONNECTOR - A.C. input
B. GROUND LUG
C. OUTPUT CONNECTOR - DC out, 0-10 input, %Rated Current
Potentiometer, or Follower Arm Potentiometer
D. OUTPUT FUSE - 2 amp, 5 x 20 mm.
E. PLUG, 3 prong, for a remote Span Max. pot, (for tension
adjustments when using the Follower Arm Potentiometer)
F. PLUG, 4 prong, for the digital ammeter
1. SWITCH SW1 - 12 or 24 volt ouput selector switch.
Slide switch towards 12 when using a 12 volt brake or clutch.
Slide switch towards 24 when using a 24 volt brake or clutch.
2. SWITCH SW2 - to select the method of controlling the output current:
Position (1) - Potentiometer, or
Position (2) - The 0-10 volt D.C. input signal.
3. SWITCH SW3 - to select a remote Span Max. potentiometer (for
tension adjustments when using the Follower Arm Potentiometer
or Ultrasonic Sensor)
4. SPAN MAX. potentiometer
5. SPAN MIN. potentiometer.
110 Volts AC Models:
220 Volts AC Models:
PS-12-M,
PS-12-M2,
PS-24-M
PS-24-M2
MOUNTING HOLES
Also used as a remote
Span Max. pot with the
Follower Arm
Potentiometer
% Rated Current
Potentiometer
Mounting Hole
For Ammeter
Ammeter
Wires
4 contact
receptacle
Put wires toward
top of ammeter
L.C.D. Digital
Ammeter
POWER SUPPLY - PS-M
LOCATION OF COMPONENTS
Hole
Starting Serial # 07-xxx 7/13
P1/4
Placid Industries, Inc.
Phone 518 523-2422 Fax 518 523-2746
www.placidindustries.com
4 threaded mounting studs: (on underside of sheet
metal base) 2.92" x 6.96" #6-32 threads
D
A1
B7-7/8
5.9
1.2
.43
Overall height: 3.1"
C
F
4 3 5
1 2
12 24
SW1
SW2
SW3
2
REMOTE
SPAN
MAX
E
Ø.37
Use
both
nuts
SPAN
MIN
SPAN
MAX
N/C LN
110
Neutral (0 Volts)
Line 1
230
220
0
1/2 Amp
Input Fuses
1 Amp
Input Fuse
A.C. Input Connector
A.C. INPUT, 110 VOLTS -- Models PS-12-M & PS-24-M
A.C. INPUT, 220 / 230 VOLTS -- Models PS-12-M2 & PS-24-M2
Unplug the top portion
of the Input Connector
to attach wires.
Line
Line 2
220 Volts
A.C. Input
(50 / 60 Hz.)
110 Volts
A.C. Input

Line 1
230
220
0
1/2 Amp
Input Fuses
Line 2
230 Volts
A.C. Input
(50 / 60 Hz.)
Unplug the top portion of the Input Connector to attach wires.
For most foreign installations: Omit the fuse on the 0 input when Line1 is grounded at the service entrance.
120 Volts A.C. input
PS-12-M : 0-12 VDC output
PS-24-M : 0-24 VDC output
220 Volts A.C. input
PS-12-M2 : 0-12 VDC output
PS-24-M2 : 0-24 VDC output
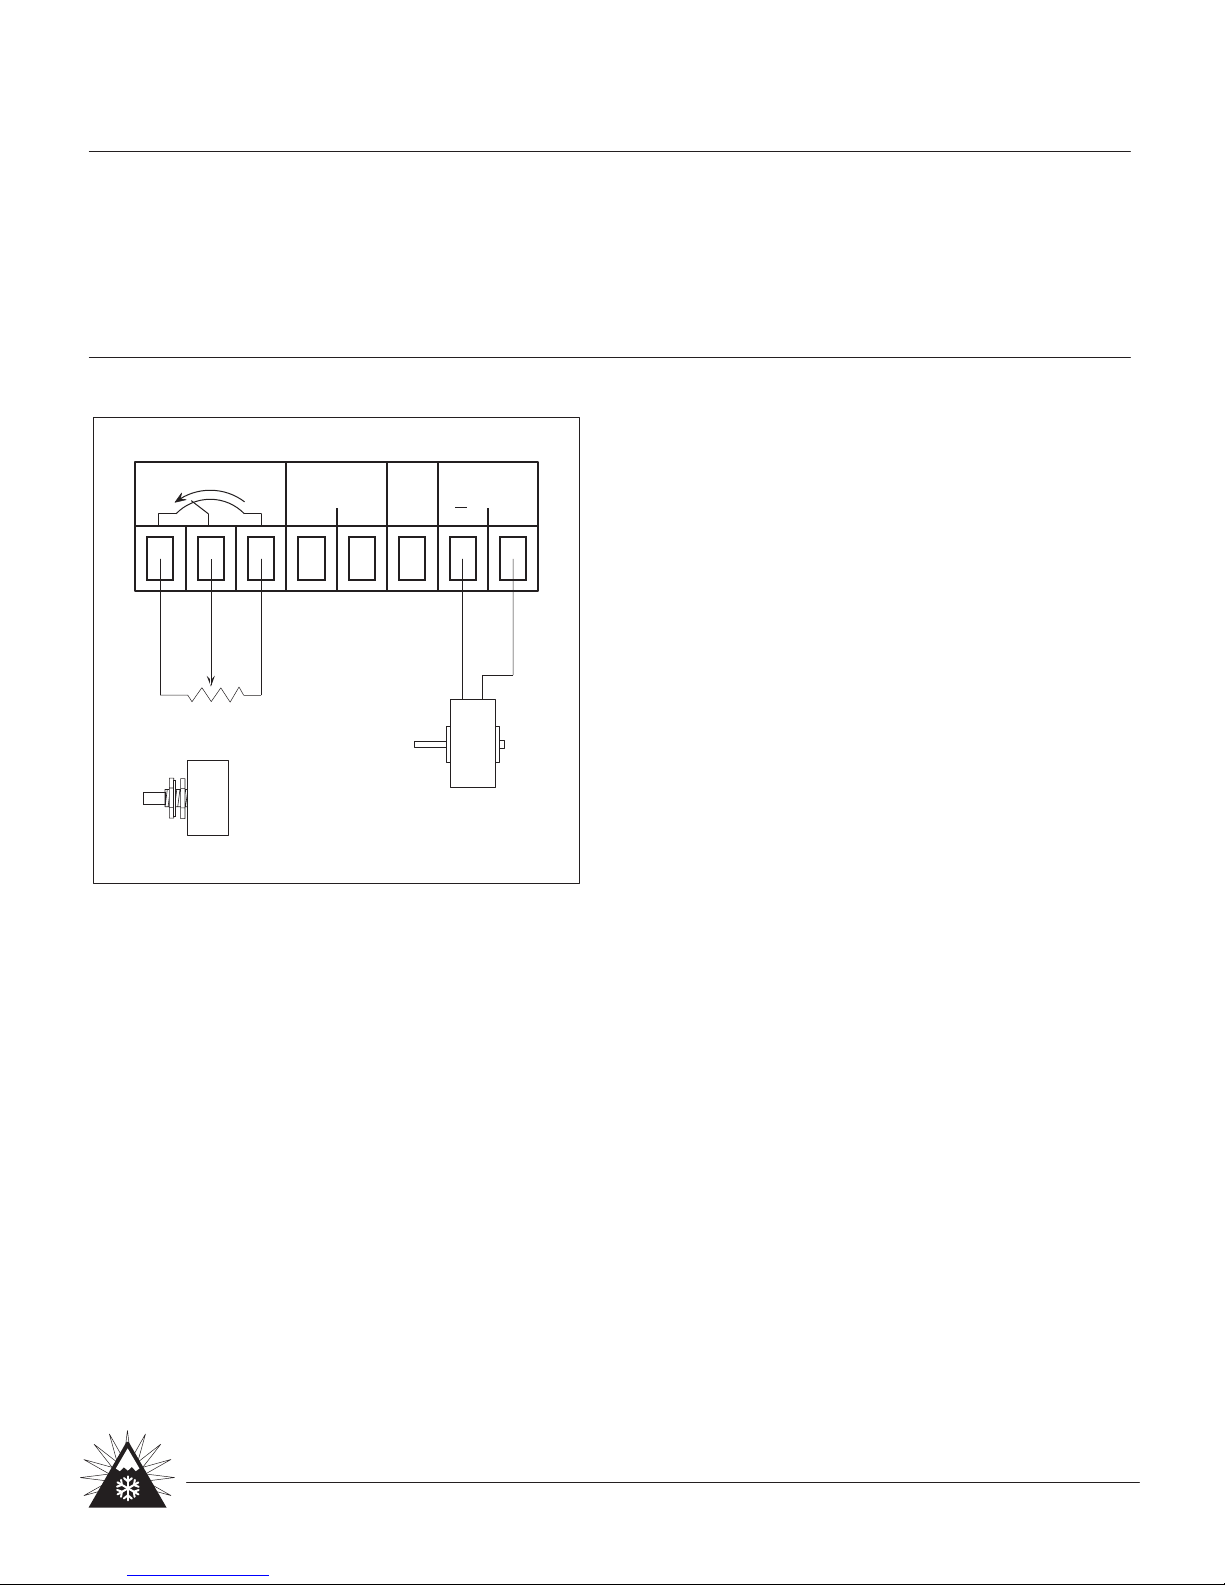
INITIAL SET UP - When Using Manual (Potentiometer) Control:
1) Determine the 100% rated current of the brake (or clutch) from the data sheet, or calculate it from the formula:
100% rated current = (rated voltage) / (coil resistance, ohms)
The rated voltage is listed on the label of the brake or clutch.
2) For safety, disconnect the A.C. power.
3) Set SWITCH SW2 to position 1, so the output current is controlled by the % Rated Current Potentiometer.
Set SWITCH SW3 towards the edge of the circuit board to select the on-board Span Max. Potentiometer.
4) Set the SPAN MAX. potentiometer fully counter-clockwise (for minimum output current).
5) Connect the digital L.C.D. ammeter. (See wiring diagram on page 1.)
6) Connect the % Rated Current Potentiometer and brake (or clutch) as shown above.
7) Connect A.C. power. (See wiring diagram on page 1.)
8) Set the % RATED CURRENT potentiometer to 100% (for maximum output current).
9) SPAN MAX. - Turn the SPAN MAX. potentiometer clockwise until the ammeter displays the current level
corresponding to the 100% rated current of the brake (or clutch).
10) SPAN MIN. - Set the % RATED CURRENT potentiometer to 10%. Adjust the SPAN MIN. potentiometer until the
ammeter shows the power supply output current is at 10% of rated current.
11) Recheck Steps 9 & 10.
ADJUSTMENTS - When Using Manual
(Potentiometer) Control:
% RATED CURRENT POTENTIOMETER - The
remotely mountable potentiometer controls the
desired output current, and is adjustable from 0%
to 100%. This is used to control output torque.
SPAN MAX. - Sets the maximum output current.
The 10 turn potentiometer is mounted on the
circuit board. Use the miniature plastic
screwdriver provided to make adjustments.
SPAN MIN. - Sets the output current to zero
when the % RATED CURRENT potentiometer is set
to zero. The 10 turn potentiometer is mounted
on the circuit board. Use the miniature plastic
screwdriver provided to make adjustments.
POWER SUPPLY - PS-M
SPECIFICATIONS
Output Current: D.C., constant current type,
12 volt: 1.25 amps
24 volt: 0.75 amps
Output Fuse: 2 amperes, located on circuit board.
0-10 Volt Input Resistance: 2000 ohms
INSTRUCTIONS - MANUAL (Potentiometer) CONTROL
P2/4
Placid Industries, Inc.
Phone 518 523-2422 Fax 518 523-2746
www.placidindustries.com Starting Serial # 07-xxx 1/07
YELLOW
ORANGE
Unplug the top portion of the
Output Connector to attach wires.
WHITE
% RATED CURRENT
POTENTIOMETER
BRAKE OR
CLUTCH
OUTPUT CONNECTOR
+
OUTPUT
0v 0-10v
0-10 INPUT
NC
% CURRENT POT
+
120 Volts A.C. input
PS-12-M : 0-12 VDC output
PS-24-M : 0-24 VDC output
MODELS
220 Volts A.C. input
PS-12-M2 : 0-12 VDC output
PS-24-M2 : 0-24 VDC output
INITIAL SET UP - When Using 0-10 Volt Control:
1) Determine the 100% rated current of the brake (or clutch) from the data sheet, or calculate it from the formula:
100% rated current = (rated voltage ) / (coil resistance, ohms)
The rated voltage is listed on the label of the brake (or clutch).
2) For safety, disconnect the A.C. power.
3) Set SWITCH SW2 to position 2 so the output current is controlled by the 0-10 volt D.C. input signal.
Set SWITCH SW3 towards the edge of the circuit board to select the on-board Span Max. Potentiometer.
4) Set the SPAN MAX. potentiometer fully counter-clockwise (for minimum output current).
5) Connect the digital L.C.D. ammeter. (See wiring diagram on page 1.)
6) Connect your 0-10 volt input and brake (or clutch) as shown above.
7) Connect A.C. power. (See wiring diagram on page 1.)
8) Set your 0-10 volt signal to 10 volts. (for maximum output current).
9) SPAN MAX. ADJ. - Turn the SPAN MAX. potentiometer clockwise until the output current equals the 100% rated
current of the brake (or clutch).
10) SPAN MIN. - Set your 0-10 volt signal to 1 volt. Adjust the SPAN MIN. potentiometer until your ammeter indicates
the power supply output current is 10% of rated current.
11) Recheck Steps 9 & 10.
ADJUSTMENTS - When Using 0-10 Volt Control:
0-10 VOLT INPUT SIGNAL - Output current is
proportional to the user's 0-10 volt input signal.
At 0 volts, output current is 0. At 10 volts, output
current is maximum.
SPAN MAX. - This potentiometer sets the
maximum output current level, when the 0-10
volt signal is 10 volts.
SPAN MIN. - This potentiometer sets the output
current to zero when the 0-10 volt signal is zero
volts.
POWER SUPPLY - PS-M
INSTRUCTIONS - 0-10 VOLT CONTROL
P3/4
Placid Industries, Inc.
Phone 518 523-2422 Fax 518 523-2746
www.placidindustries.com Starting Serial # 07-xxx 1/07
0 - 10 VOLT
SIGNAL
Unplug the top portion of the
Output Connector to attach wires.
BRAKE OR
CLUTCH
OUTPUT CONNECTOR
+
OUTPUT
0v 0-10v
0-10 INPUT
NC
% CURRENT POT
+
+
D.C.
OUT
POWER SUPPLY PS-M
Output Connector On Circuit Board
Brake or
Clutch
% Rated Current
Potentiometer
CW
WHITE
YELLOW
ORANGE
CW (0v 10+)
Cycling Between 0 Amps & Any Current Level When Using Manual (Potentiometer) Control
Switch or Relay
Contacts
DO NOT power up & power down the AC input repeatedly.
DO NOT- interrupt & connect the D.C. OUT wires repeatedly.
Correct method, when using MANUAL (Potentiometer) control:
Use a switch or relay to interrupt the yellow wire to the % Rated
Current Potentiometer (the wire to the wiper).
When the wire is connected, output current is controlled by the
% Rated Current Potentiometer.
When the relay interrupts (disconnects) the wiper, power supply
output current is zero.
Enclosed Models:
Remove case cover
for access to circuit
board & output
connector.
+
D.C.
OUT
Output Connector On Circuit Board
Brake or
Clutch
CW (0v 10+)
Cycling Between 0 Amps & Any Current Level When Using 0 - 10 volt Control
Switch or Relay
Contacts
DO NOT power up & power down the AC input repeatedly.
DO NOT- interrupt & connect the D.C. OUT wires repeatedly.
Correct method, when using 0 - 10 volt control:
If the signal voltage cannot be brought to 0, then use a switch or
relay to interrupt the 10 volt signal.
When the wire is connected, output current is controlled by the
0-10v signal.
When the relay interrupts (disconnects), power supply output
current is zero.
Connect 110 volts AC to 110 volt models, only.
Connect 220 volts AC or 230 AC to 220 volt models only. 220V Models: PS-12-2, PS-24-2, PS-12-M2, PS-24-M2
0v
0-10v
P4/4
Placid Industries, Inc.
Phone 518 523-2422 Fax 518 523-2746
www.placidindustries.com
Ammeters
L.C.D. Digital
Ammeter
Model PS-M
2.83
1.41
Ammeter
Connector
Ammeters are not interchangeable between older power supplies without
first altering solder pads on ammeter. Consult factory for details.
Ammeters may only be used without alteration with power supplies of the
same series serial number . (Example: 97-16xxx, 97-15xxx, 96-14xxx are
from 3 different series--- series 1600, 1500, and 1400)
For best accuracy after replacing ammeters, adjust the potentiometer on the
rear of the ammeter so readings equal a reference ammeter.

This manual suits for next models

3

Other Placid Industries Power Supply manuals

Placid Industries PS-12-MC User manual

Placid Industries

Placid Industries PS-12-MC User manual

Placid Industries PS-12 User manual

Placid Industries

Placid Industries PS-12 User manual

Popular Power Supply manuals by other brands

Landoll EHP Operator's manual

Landoll

Landoll EHP Operator's manual

Wibre IP65 installation manual

Wibre

Wibre IP65 installation manual

Huawei TP48200A-DT19D1 Telecom Power user manual

Huawei

Huawei TP48200A-DT19D1 Telecom Power user manual

VOSS.farming HELOS 4 instruction manual

VOSS.farming

VOSS.farming HELOS 4 instruction manual

Pyramid PS-14K instruction manual

Pyramid

Pyramid PS-14K instruction manual

Honeywell Notifier ACPS-610/E manual

Honeywell

Honeywell Notifier ACPS-610/E manual

ELCART Victory 13/00432-00 user manual

ELCART

ELCART Victory 13/00432-00 user manual

Cooper DLVP installation instructions

Cooper

Cooper DLVP installation instructions

Thermaltake Toughpower XT Series manual

Thermaltake

Thermaltake Toughpower XT Series manual

Allen-Bradley FLEX Ex 1797-PS1E installation instructions

Allen-Bradley

Allen-Bradley FLEX Ex 1797-PS1E installation instructions

SmartSafe iSmartEV DP750 user manual

SmartSafe

SmartSafe iSmartEV DP750 user manual

PDi PDI-772HE installation instructions

PDi

PDi PDI-772HE installation instructions

Kerbl BA-1406 instruction manual

Kerbl

Kerbl BA-1406 instruction manual

ZALMAN ZM600-GVM user manual

ZALMAN

ZALMAN ZM600-GVM user manual

LAN Power Systems LP2521 Installation and user guide

LAN Power Systems

LAN Power Systems LP2521 Installation and user guide

PORT CONNECT 900090B-EU user guide

PORT CONNECT

PORT CONNECT 900090B-EU user guide

Altronix LPS3C12X installation manual

Altronix

Altronix LPS3C12X installation manual

Manson Engineering Industrial NTP-6521 user manual

Manson Engineering Industrial

Manson Engineering Industrial NTP-6521 user manual

manuals.online logo
manuals.online logoBrands
  • About & Mission
  • Contact us
  • Privacy Policy
  • Terms and Conditions

Copyright 2025 Manuals.Online. All Rights Reserved.