Platinum Ultimate User manual

USERGUIDE MODELS
STANDARD DUTY • HEAVY DUTY
POWER SWIVEL• MANUAL SWIVEL
Please retain this guide for future reference

CONTENTS
Controls......................................................... 3
Charging points & remote controls......... 4
How to use your stairlift............................ 5
Getting on the chair ...........................................................5
Travelling up or down the stairs ......................................5
Getting off the chair ...........................................................5
Remote control ...................................................................5
Cleaning & maintaining your stairlift........ 6
Problems, troubleshooting & system
status codes................................................... 6
System status codes .................................... 7
To pair a controller to the lift ................... 8
Example of a certifi cate for test and
examination after installation .................... 9
Problems & troubleshooting....................11
Mains power, battery power and power cuts ............11
Battery replacement.........................................................11
To change batteries in remote controls.......................11
Releasing a trapped user and calling
out an engineer...........................................12
Releasing a trapped user..................................................12
Calling out an engineer ....................................................12
Technical information................................13
Weight limits ......................................................................13
Operating periods/excessive use...................................13
Maintenance........................................................................13
Upholstery..........................................................................13
Sound pressure levels.......................................................13
ORIGINAL DOCUMENT
Read user manual before use
WARNING
The safe working load is one
person only at a maximum
weight of 160kg (25 stone)
Rated speed: 0.12 m/s (24ft/min)
Support: Rack and pinion
UPHOLSTERY SAFETY WARNING
Carelessness causes re
Upholstery material has been tested
for compliance with BS 5852
Platinum Stairlifts Ltd
Unit 10, The Crossings
Crosshills Business Park
Crosshills, Keighley
West Yorkshire
BD20 7BW
Tel: 01535 631177
Model Name: Ultimate
Serial number:
Year of Manufacture:
UK patent pending number 1611478.7
Int Pat App WO 2018/002573
Read user manual before use
WARNING
The safe working load is one
person only at a maximum
weight of 120kg (19 stone)
Rated speed: 0.12 m/s (24ft/min)
Support: Rack and pinion
Upholstery safety warning
Carelessness causes re
Upholstery material has been tested
for compliance with BS 5852
Platinum Stairlifts Ltd
Unit 10, The Crossings
Crosshills Business Park
Crosshills, Keighley
West Yorkshire
BD20 7BW
Tel: 01535 631177
Model Name: Ultimate
Serial number:
Year of Manufacture:
UK patent pending number 1611478.7
Int Pat App WO 2018/002573
Example of carriage stickers

INTRODUCTION
THANK YOU FOR CHOOSING PLATINUM STAIRLIFTS
We have designed our range of Platinum stairlifts so you can
continue to live in the comfort of your own home.
To help you to get the very best from your stairlift, please
take a few minutes to study this guide. Also, please show it
to anyone else who might need to use the lift. Any other
regular visitors, such as cleaners or helpers should also
familiarise themselves with this guide.
For future reference, please keep this guide in a safe place.
It is important that this stairlift is kept plugged in and
switched on at all times, never allow the mains socket
used by this equipment to be used for any other purpose.
Keep the area underneath and around your stairlift free
from obstructions, failure to do this could result in the
stairlift malfunctioning.
1

ABOUT THE LIFT
No. Meaning
1 Arm rests (fold up and down)
2 Direction controller (see note)
3 Retractable safety belt
4 Manual swivel lever
5 Seat (folds up and down)
6 Safety limit covers
7 Footplate (folds with seat)
8 Key switch
9 Status display
10 Mains power/charger connection
11 Charging point
12 Remote control
1
4
5
6
7
8
9
Note
Controller can be joystick
or rocker switch
3
2
10
11
12
2

CONTROLS
CONTROLS
Mains Power/Charger Connection (10)
The stairlift should be plugged in at the nearest mains
socket.This could be at the top or bottom of the stairs.The
lift needs to be plugged in and switched on at all times.
Status Display (9)
The status display displays the current status of the stairlift.
If any faults develop with the operation of the stairlift
they will be displayed here. For a list of codes, along with
their meanings see the System Status Codes section of
this manual.
Key Switch (8)
The key switch is used to lock the stairlift.The key switch is
located just underneath the diagnostic/status display. If the lift
is parked on a charging point and the key switch is turned
off the stairlift will still charge normally.
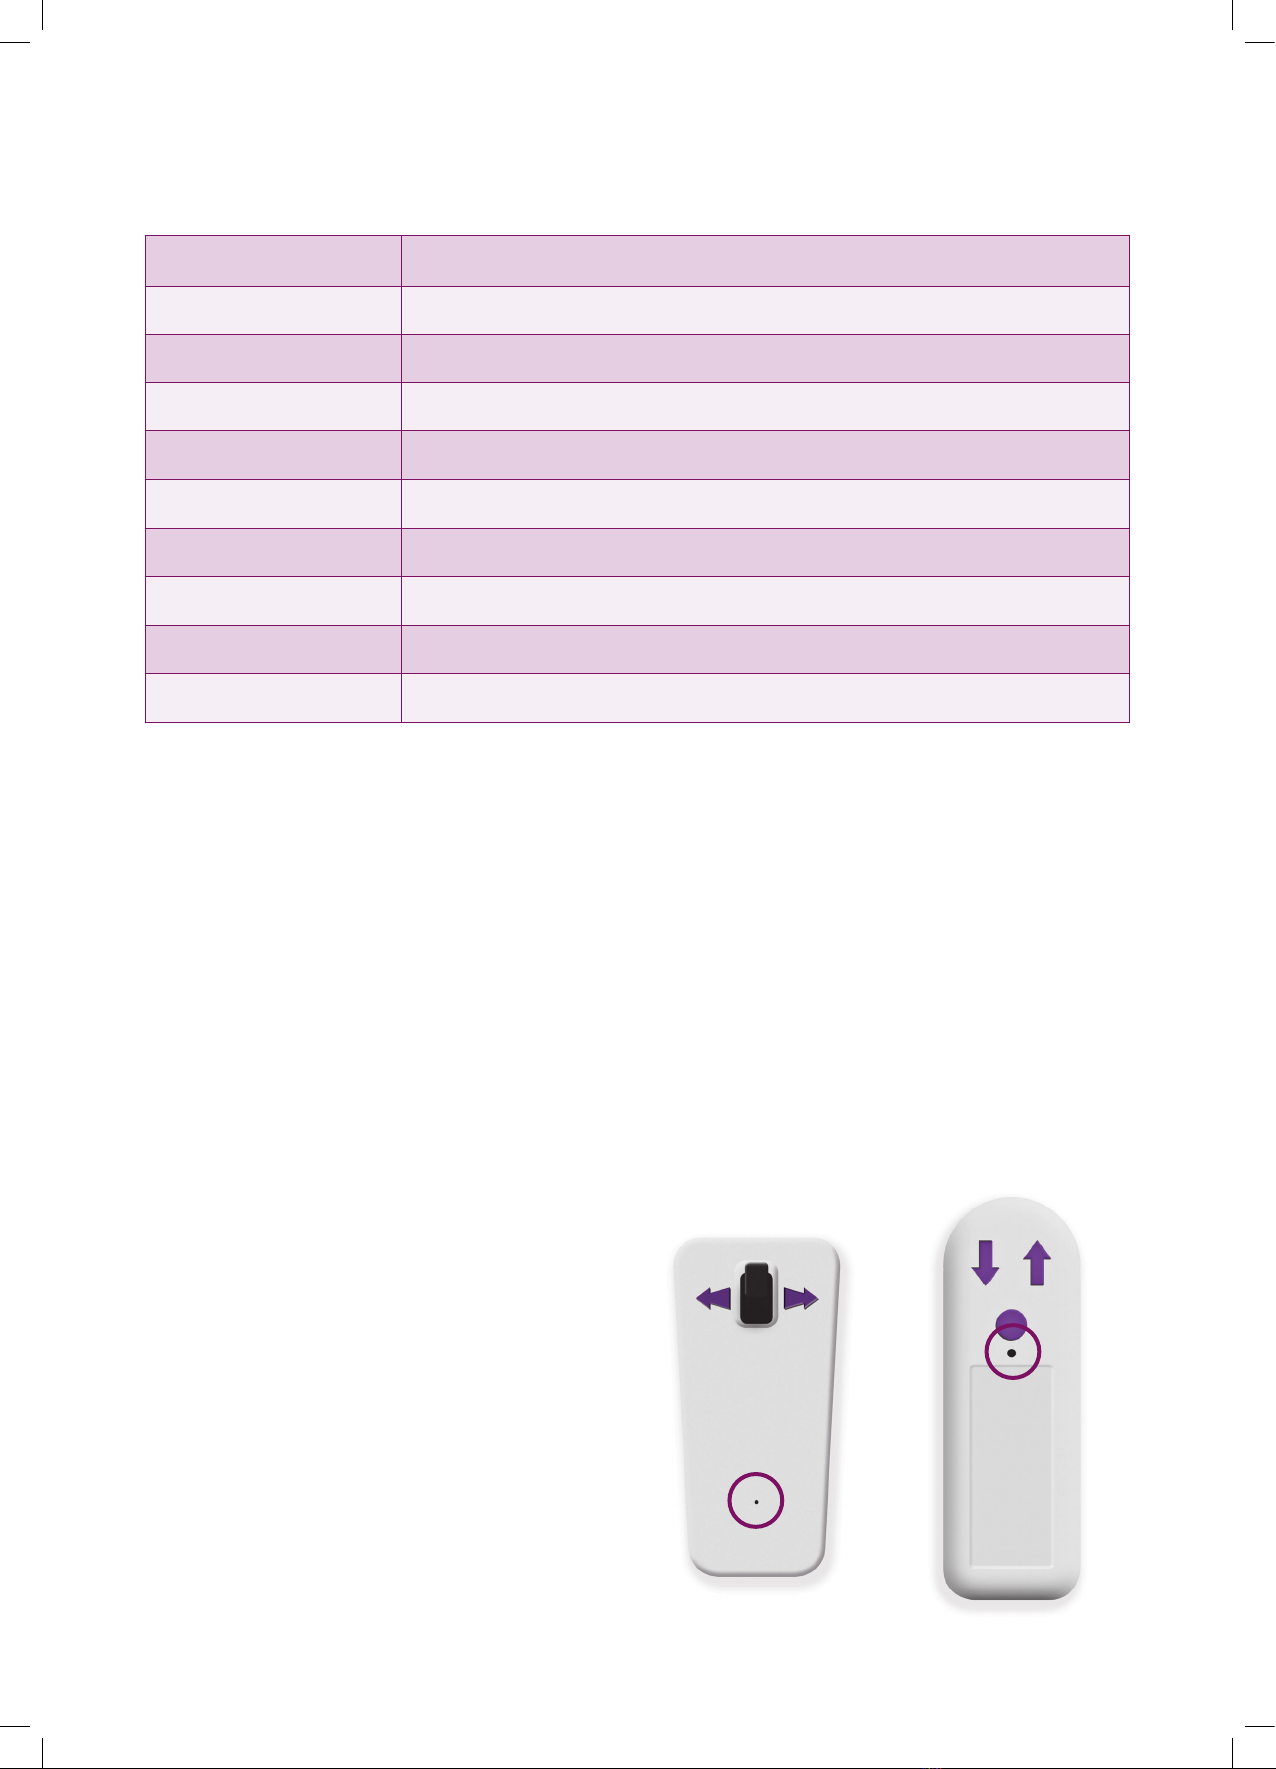
Direction Controller (2)
The direction controller is located in one of the arms (can
be either) and can be a push button controller or a joystick
type controller.To move the chair either press the button
corresponding to the desired travel direction or move the
joystick in the desired direction of travel. If the controller is
released during travel the chair will stop moving.
The direction controller is battery powered and the status
display indicates when the batteries need to be replaced.
There is a short delay before the stairlift will start or
change direction.
Footplate (7)
The footplate is tted with safety switches that will stop the
lift if either of the sides are pressed. In addition to this there
is a safety switch directly beneath the footplate that will stop
the lift in the event of it making contact with the ground. For
this reason it is important that the area around the stairlift is
kept clear of any obstructions.
The footplate automatically folds up and down if the seat is
either lifted or lowered.
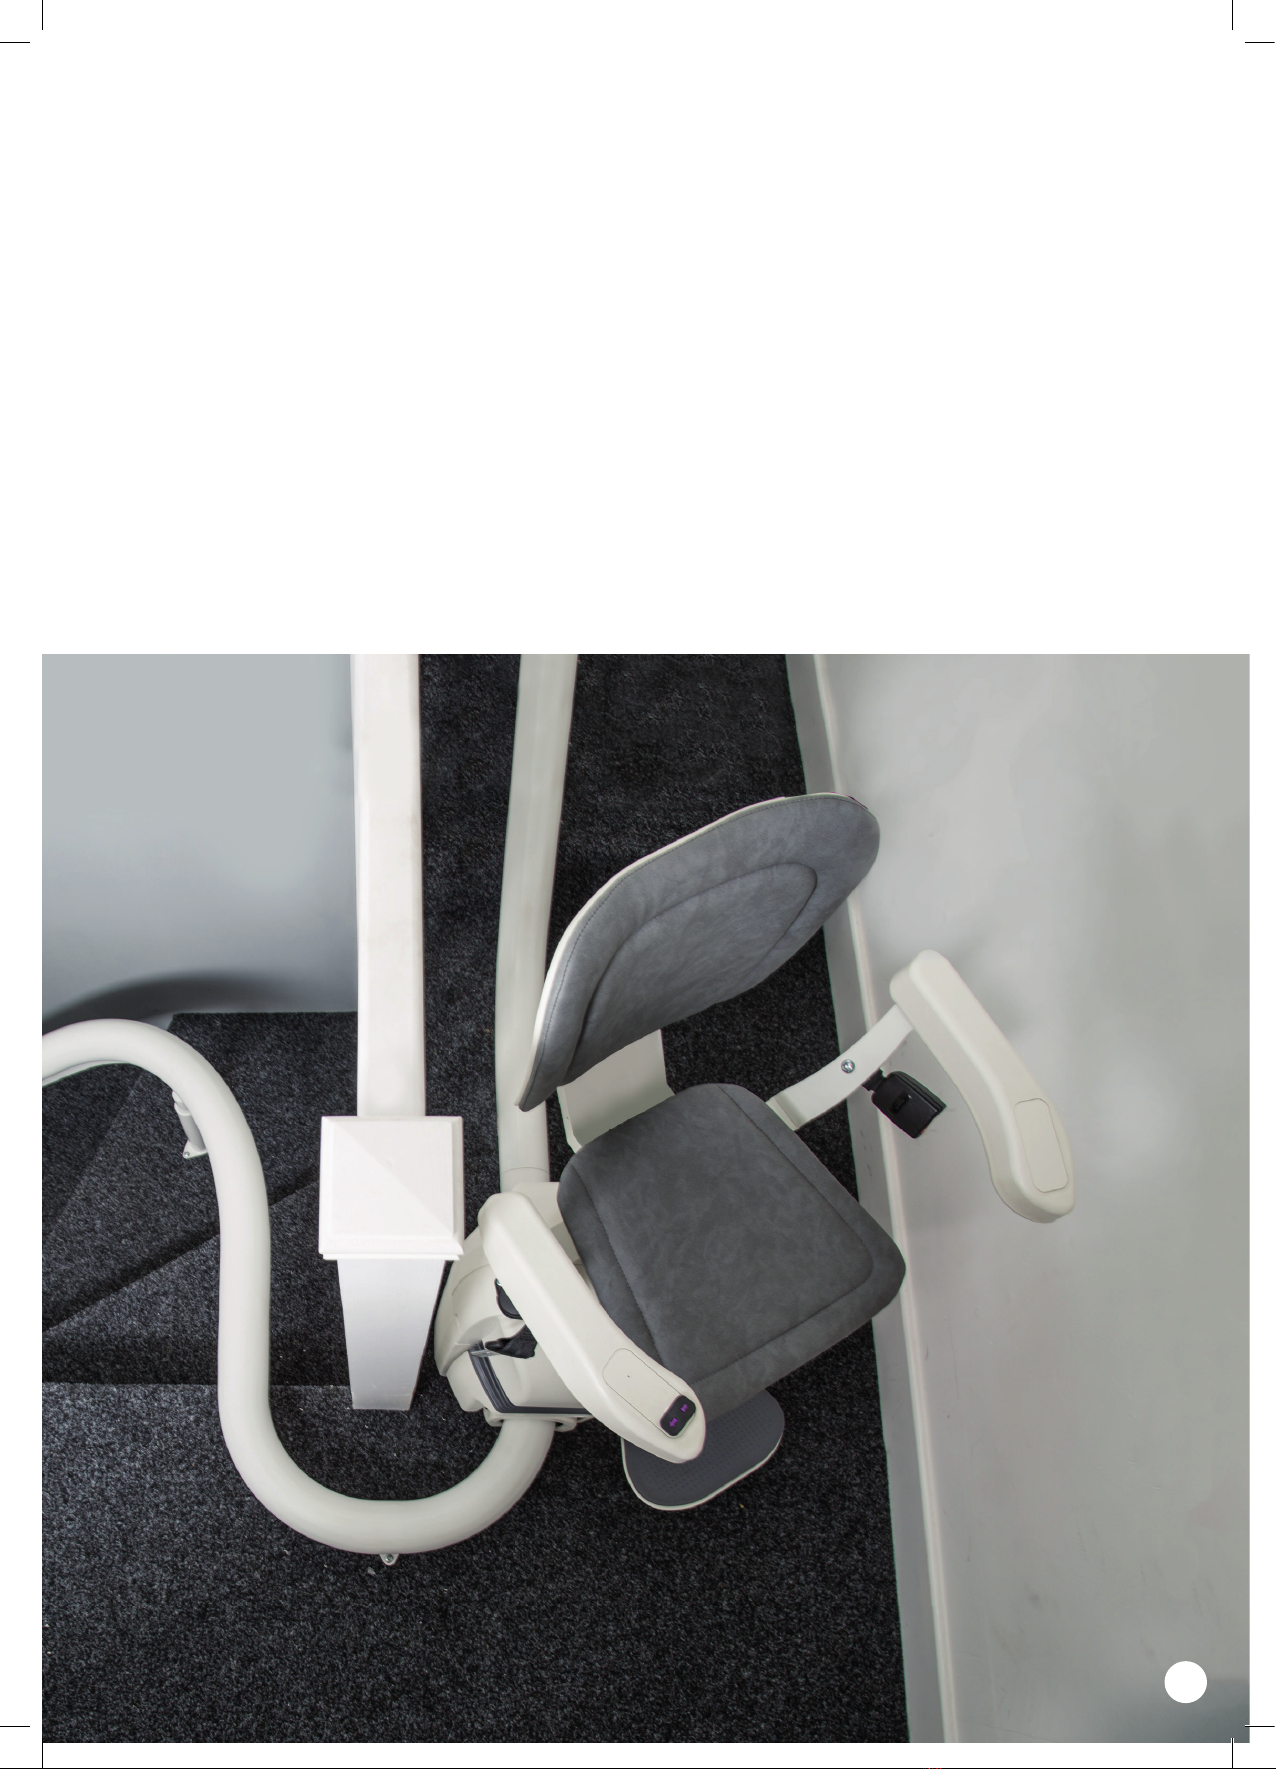
Swivel Seat
For safety, the seat (5) is locked into one of two positions. In
the normal travel position with the manual swivel option, the
seat will be locked into position with the passengers back
parallel to the track.This is to avoid the passenger catching
their feet on the steps during travel.The lift will not move
unless the seat is in this position.
The seat can be swivelled to allow easy access when the
lift is at the top of the stairs.To rotate the seat, press one of
the manual swivel levers (4) and swivel towards the landing
until the seat comes to a stop.When the seat has stopped
release the lever to lock the seat in place. Be sure the seat is
locked before you try to sit down or get up from it.
To return the seat to the normal travel position, press one
of the manual swivel levers (4) and swivel away from the
landing until the seat comes to a stop, then release the lever
to lock the seat in place.The seat should only be swivelled at
the top of the stairs - if the seat is swivelled whilst the lift is
moving, the chair will stop.
Powered Swivel Option
There is an option of an automatic powered swivel. If this
option is tted, when reaching the top of the stairs the seat
may swivel into a more convenient position to allow the
user to get up from it. In this case when reaching the top
of the stairs, keep the direction controller pressed in the
upwards direction and after a short pause the carriage will
swivel to the desired position.
To return the carriage to the normal travel position, press
the direction controller in the downwards direction and the
chair will swivel back to its normal travelling position before
moving down the stairs.
Safety Edges (6)
The footplate and motor unit are tted with safety edges,
these are pressure pads that will stop the lift if they come
into contact with an obstruction. If the lift stops because
it has encountered an obstruction a fault message will be
displayed in the diagnostic display. Release the direction
controller and wait for approximately three seconds, then
reverse away from the blockage.
Retractable safety belt (3)
The lap belt holds you safely on the seat as you ascend
or descend the stairs. Like a car seat belt it extends from
the holder to clip into a socket.The lap belt must be used
every time the stairlift is used and it must not be unclipped
until the stairlift has reached the end of its track and has
completely stopped - this includes any automatic or manual
swivelling that may be required to enable the passenger to
get up from it safely.
3

CHARGING POINTS & REMOTE CONTROLS
Charging Points (11)
The charging points are located at the top and bottom of
the rail.The lift must be parked on a charging point when
it is not in use.The stairlift will sound an audible beep and
display “OFF CHARGE” in the status display if it is not
parked on a charging point or if it is parked on a charging
point but the power supply to the lift is not switched on.
Remote Controls (12)
The remote controls work in a similar way to the arm
controls. Pressing the up arrow will make the stairlift travel in
the up direction and pressing the down arrow will make the
stairlift travel in the down direction. In most cases these will
be the only buttons you will need to use. If your lift is tted
with an optional intermediate charging point (for instance
to reduce clutter at the top or bottom of the staircase)
then on pressing the round button the lift will travel in the
up direction until it reaches the next charging point, where
it will come to a stop.This button is referred to as the
park button.
If your lift is a powered swivel model and the park button is
used, it can behave in 2 different ways;
1. If the footrest and seat are in their normal ‘down’
positions the lift will carry out any swivel required for the
safe navigation of the staircase before moving off.
2. If the footrest and seat are in their folded away ‘up’
positions the lift will move the footrest and seat unit until
they are perpendicular to the carriage before navigating
the staircase. When the lift is subsequently called to the
top or bottom of the staircase, as long as the seat and
foot plate are still in their ‘up’ positions they will remain
perpendicular to the carriage. In the event that they
have been lowered while the lift was on its parking point
the lift will carry out any swivel required for the safe
navigation of the staircase before moving off.
If the arrow buttons on the remotes make the lift
move in the opposite direction to what is indicated,
then the ‘hand’ of the lift is probably set wrong.
Up & Down Arrows
Park Button
4

HOW TO USE YOUR STAIRLIFT
Before you use your stairlift, please read all of these
instructions carefully.This stairlift has been designed to carry
one person in a seated position. Do not allow children to
play on or near the stairlift.
• The boarding/exit area of the stairlift must be kept well lit,
to a level of at least 50 Lux.
• The stairlift chair must be isolated with the key switch (8)
while getting on and off the lift.
• If you are not able to safely get on or off this lift, seek
assistance from a competent person.
Getting On The Chair
1. If it is raised, fold down the seat (5).The footplate (7) will
automatically lower as the seat is lowered.
2. Ensure that the seat is swivelled into the correct position
so you can sit on it safely, if not then push either of the
seat swivel levers (4) and move the seat into the correct
position taking note that the manual swivel seat locks into
3 positions.When the seat stops in the correct position,
release the swivel lever and ensure that the seat locks
in place.
3. The arms (1) fold up and down to increase accessibility
when getting onto the chair should this be required.
Please ensure the arms are in the down position before
attempting to travel on the chair.
4. Sit on the seat and fasten the retractable safety belt (3)
around your waist.
5. If it is necessary, swivel the seat back into the correct
travel position and place your feet rmly on the footplate.
Travelling Up Or Down The Stairs
1. Keep your feet on the footplate (7) and your arms on
the arm rests (1).
2. Press and hold the direction controller (2) in the
direction you wish to travel.There will be a short delay
and then the stairlift will slowly move off.The stairlift will
automatically adjust its speed as it travels along the rail.
This is to ensure a smooth and comfortable journey.
3. Keep the direction controller pressed in the direction of
travel until the stairlift comes to a complete stop. If your
lift is tted with the powered swivel option, keep the
direction controller pressed and the lift will automatically
swivel into the correct position for safely getting out of
the chair. If you stop the lift during travel or if you wish
to change direction, release the controller, wait for a few
seconds and then operate the controller in the direction
you wish to travel. After a short delay, the lift will move off.
Getting Off The Chair
1. The chair MUST be in a position for you to get off safely.
Please bear in mind that this may mean swivelling the
seat. If this is required, push down on either of the seat
swivel levers (4) and swivel the seat around into the
correct position for you to get off it safely - release the
lever once this has been achieved and ensure that it locks
into this position.
2. Once the lift has come to a complete stop, including
any manual swivelling that may be required, unfasten the
retractable safety belt (3) from around your waist and get
out of the stairlift seat.
3. If it is required, fold up the seat (5) and arm rests (1),
the footplate (7) will automatically fold up as the seat
is raised.
4. In the event that the stairlift needs to be moved without
a passenger, the seat needs to be in the normal travelling
position, i.e. not swivelled.
Remote Control
To move the stairlift without a passenger, or to assist a
seated passenger, press and hold down the appropriate
direction button on the remote control (12).
5

CLEANING & MAINTAINING YOUR STAIRLIFT
PROBLEMS, TROUBLESHOOTING &
SYSTEM STATUS CODES
PROBLEMS, TROUBLESHOOTING & SYSTEM STATUS CODES
If used correctly, your stairlift should give you trouble free
operation. If you experience a problem, please make a note
of the system status code on the diagnostic/status display,
before requesting a visit from an engineer.
As a general guideline, before requesting an engineer
visit please carry out the following:
1. Check that the lift charger is plugged into the wall socket
and the socket is turned on. If the lift is not charging, the
message “OFF CHARGE” will be reported by the display.
2. Check there is no physical obstruction stopping the lift
from moving. If there is, a message will be reported in the
display to reect this.
3. Ensure the seat is in the proper travelling position – the
chair will not move if the seat is swivelled.
4. Check the chair by using a different controller – if it now
works there is a possibility that a battery has failed in one
of the controllers, either in one of he remote controls or
in the controller tted to the arm rest (1). If a battery is
at fault the diagnostic display (9) will report this. Always
replace ALL 1.5v batteries at the same time.
5. Check that there is no obstruction underneath the
footplate. If there is this will be reported by the
diagnostic display
6. Check the key switch (8) is turned to the ON position.
If you request an engineer visit and there is not a technical
problem with the lift the engineer will make a charge – this
will apply even during the warranty period of the lift.
CLEANING & MAINTAINING YOUR STAIRLIFT
To maintain safe and reliable operation, your stairlift
needs to be regularly serviced and safety inspected.
Your local stairlift servicing centre will be pleased
to discuss servicing your stairlift and any warranty
arrangements.
Before cleaning your stairlift, ensure it is switched off
by using the key switch (8).
The rail must be kept clean to ensure the continued, reliable
operation of the stairlift.The rail can be cleaned using soapy
water or any mild, non-abrasive household cleaner.
The plastic, metal and painted metal areas of your stairlift
can be cleaned using a small quantity of any mild kitchen
surface cleaner. If you use a spray cleaner, apply a small
amount of spray to a soft cloth and use the cloth to wipe
the surface.
The upholstery is resistant to most household stains, many
of which can be wiped off fairly easily. Regular cleaning with
a damp soapy cloth or sponge, followed by a wipe with a
damp clean cloth will help the upholstery maintain a fresh
appearance.
To maintain safe and reliable operation, your stairlift needs a
regular safety inspection and service.This should take place
every 12 months.
Important Information
Solvent based cleaners, bleaches, abrasives, synthetic
detergents, wax or silicon based polishes and aerosol sprays
must not be used on any part of the stairlift. Do not attempt
to clean the interior of the motor housing, the chair or the
racking. If specialist cleaning is required, please contact your
local service centre.
6

SYSTEM STATUS CODES
SYSTEM STATUS CODES
These messages are displayed on the diagnostic display panel.
MESSAGE MEANING
PLATINUM STAIRLIFTS OK. Stairlift is on charge and everything is ok. Lift should operate normally.
NO DISPLAY No Power. Check key is in key switch and it is turned to the ON position. Check batteries are in good working order
and are connected correctly. Check charger is working.
OFF CHARGE Chair is not charging. Chair has been stopped between charging points. Charger is switched off at wall socket.
<<<<< MOVING RIGHT Lift travel direction Right.
MOVING LEFT >>>>> Lift travel direction Left.
||<<RIGHT FOOT Lift stopped by safety edge on footplate in direction of travel. Ensure that the footrest moves freely from side to side.
LEFT FOOT>>|| Lift stopped by safety edge on footplate in direction of travel. Ensure that the footrest moves freely from side to side.
SEAT SWIVEL Seat in swivelled position. Seat is in a swivelled position (automatic swivel).
MANUAL SEAT SWIVEL Seat in swivelled position. Seat is in a swivelled position (manual swivel).
||<<RIGHT YOKE Lift stopped by safety edge on yoke in direction of travel. Check plastic cover on right yoke moves freely.
LEFT YOKE>>|| Lift stopped by safety edge on yoke in direction of travel. Check plastic cover on left yoke moves freely.
||<<RIGHT SIDE Lift stopped by safety edge on side panel in direction of travel. Ensure that right hand side panel moves freely.
LEFT SIDE>>|| Lift stopped by safety edge on side panel in direction of travel. Ensure that left hand side panel moves freely.
||<<RIGHT TERMINAL Lift is parked at end of track.The lift is parked at the end of the track in the RIGHT direction.This could be the top or
bottom of the rail depending on the side of the staircase the lift is installed on.
LEFT TERMINAL>>|| Lift is parked at end of track.The lift is parked at the end of the track in the LEFT direction.This could be the top or
bottom of the rail depending on the side of the staircase the lift is installed on.
BOTTOM FOOTREST Lift stopped by safety edge on underside of footrest. Ensure that both the staircase and track are clear of obstructions,
move lift up away from obstruction. Ensure bottom of foot rest moves up & down freely.
FINAL LIMIT Final limit safety circuit has activated. Check nal limit circuit and switch,tted to the underside of the carriage.
OUT OF LEVEL ERROR Seat is not level. Seat moved too far out of level.
MAIN OVERLOAD
The main motor is overloading.This may be because the lift has been used too many times without a suitable break.
Leave the lift switched OFF for approximately 15 minutes then turn back on. If the problem persists contact your local
stairlift service centre. Normally this is the company that carried out the installation.
LEVEL OVERLOAD
This may be because the lift has been used too many times without a suitable break. Leave the lift switched OFF for
approximately 15 minutes then turn back on. If the problem persists contact your local stairlift service centre. Normal-
ly this is the company that carried out the installation.
CONNECT BRAKE Control board cannot detect the brake solenoid. Check connections on control board, check brake solenoid.
MAIN RELAY FAULT Relay on control board failed. Check batteries –if problem persists, main board may be at fault.
MAIN MOTOR STALL Main motor has failed to start, motor is not where it should be. Possible faulty motor, check cables to motor and check
main control board.
LEVEL MOTOR STALL Level motor has failed to start. On initial power up this message may be displayed, in this event go to ROTATE on
MANUAL MOVE OPTIONS and rotate the chair left and right by a very small amount. Setup can now be resumed.
CRITICAL BATT Battery level is too low. Possible faulty / old batteries, check charger is ok.
UP CALL Up arrow pressed on remote control. Lift will move in UP direction until it reaches the top charging strip.
Display may say MOVING LEFT or MOVING RIGHT, this is dependent on the side of the staircase the lift is installed in.
7

SYSTEM STATUS CODES
TO PAIR A CONTROLLER TO THE LIFT
DOWN CALL Down arrow pressed on remote control. Lift will move in DOWN direction until it reaches the bottom charging strip.
Display may say MOVING LEFT or MOVING RIGHT, this is dependent on the side of the staircase the lift is installed in.
PARK CALL Park button pressed on remote control. Lift will move in UP direction until it hits a charging strip.
CALL CONFLICT Conicting instructions received. Eg – UP pressed on one remote control while DOWN pressed on the other.
LOW BATTERY REMOTE Batteries in a remote control are running low. Change batteries in remote controls.
LOW BATTERY JOYSTICK Batteries in armrest control pod are running low. Change batteries in armrest control pod.
LOW BATTERY REM & JOY Batteries in armrest control pod and at least one remote control are running low. Change batteries in armrest control pod and in
both remote controls.
REPLACE AA BATTERIES All batteries in all controllers are running low. Change batteries in armrest control pod and in both remote controls.
****GYRO ERROR**** Gyroscope is out of tolerance. Contact your local stairlift service centre for guidance. Normally this is the company that carried
out the installation.
ARM TILTED: Arm is lifted while pod direction controller is being used.
OVERSPEED GOVERNOR OSG safety circuit has activated. Contact your local stairlift service centre for guidance. Normally this is the company that carried
out the installation.
TO PAIR A CONTROLLER TO THE LIFT
Pairing the controllers to the carriage (This may be
necessary after replacing the batteries in the remote
controls)
• Ensure the lift batteries are connected but the lift is
turned OFF with the key switch.
• Fit all batteries (normally 6 batteries, 2 in the control pod
and two in each of the remote controls).
• Switch lift ON with key switch.You now have 1 minute to
carry out the below procedure, switching the lift OFF and
back ON will reset this minute.
• Using a paperclip or something similar, press the button
behind the hole in the housing on the rst remote
control. Release it and then press the UP and DOWN
arrows, in turn, on the remote. Press them again to verify
the lift operates normally.This remote is now paired to
the lift.
• Using a paperclip or something similar, press the button
behind the hole in the housing on the second remote
control. Release it and then press the UP and DOWN
arrows, in turn, on the remote. Press them again to verify
the lift operates normally.This remote is now paired to
the lift. If more than the standard 2 remote controls have
been supplied this procedure needs to be carried out
with them.
• Using a paperclip or something similar, press the button
behind the hole in the housing on the direction control
pod. Release it and then press the controller in the UP
and DOWN directions on the pod, press them again
to verify that the lift operates normally.The direction
controller is now paired to the lift.
Pairing button located behind hole
in housing (circled images below).
8

EXAMPLE OF A CERTIFICATE FOR TEST AND
EXAMINATION AFTER INSTALLATION
EXAMPLE OF A CERTIFICATE FOR TEST AND EXAMINATION
AFTER INSTALLATION
CERTIFICATION
Example of a certificate for test and examination after installation
56
9

Left blank intentionally
EXAMPLE OF A CERTIFICATE FOR TEST AND
EXAMINATION AFTER INSTALLATION
10

PROBLEMS & TROUBLESHOOTING
Mains Power, Battery Power And
Power Cuts
The mains power supplies power to a set of large internal
batteries.These batteries then power the motor, which
moves you up and down the stairs.
In the event of mains power failure, you can continue to use
the stairlift for a short while as the batteries store enough
energy to allow the lift to travel up and down the stairs a
few times.
If the battery power runs low (for example, following a
power cut), a ‘Low Battery’ message will be reported on the
diagnostic/status display.
At this point, the stairlift batteries should be recharged as
a matter of urgency. Do not use the stairlift if the ‘Low
Battery’ message is reported in the diagnostic / status display.
Battery Replacement
The large internal batteries will need to be replaced
periodically by your service engineer.
The batteries will be checked and replaced if necessary
during a service visit by the engineer.
The batteries in the direction controller (2) and in the
wall mounted remote control units (12) will also need
to be replaced periodically, when this is required a
message indicating this will be reported in the diagnostic/
status display.
To change batteries in remote controls
• Open the cover of the remote control and remove
the old batteries.
• Replace them with 2 new AA batteries, ensuring
polarity is correct.
• Replace cover.
To change batteries in direction controller
Remove direction module from arm.
All parts are available from manufacturer
1
Press on the circled
clips (image on the
left) and module will
lift out.
3
The module will
simply slot back into
the arm.
2
Replace the AA
batteries as shown.
11

RELEASING A TRAPPED USER AND CALLING OUT
AN ENGINEER
RELEASING A TRAPPED USER AND CALLING OUT AN ENGINEER
Releasing A Trapped User
If a user becomes trapped on the stairlift for any reason,
they should be assisted from the chair in the following
manner:
MANUAL SWIVEL
1. Operate one of the manual swivel levers and rotate the
chair towards the staircase until the seat locks into a
swivelled position with the user facing up the stairs.
2. Release the lap belt in order for the user to leave the
stairlift.The user should always exit upwards.
Never exit seat without fi rst turning towards staircase
and ensuring it locks into position.
Always exit upwards.
POWER SWIVEL
1. Ensure the chair is facing in the upward direction, if it is
not it will be necessary to ‘hand wind’ it with a 4mm hex
key until it is in a suitable position.
a. Turn the lift off by using the key and then remove the
key. Remove the three screws holding the front cover
in position and remove the front cover, being careful
not to damage the wires going to the key switch.
b. Disconnect the cable running to the key switch so
the front cover can be removed from the immediate
area. Continued on the next page
c. Using a 4mm hex driver where indicated move the
seat so the user is facing towards the staircase in the
up direction.Turning the driver clockwise will rotate
the seat anti-clockwise and turning the driver anti-
clockwise will rotate the seat in a clockwise direction.
2. Release the lap belt in order for the user to leave the
stairlift.The user should always exit upwards.
Never exit seat without fi rst turning towards staircase
and ensuring seat is held fi rmly.
Always exit upwards.
Calling Out An Engineer
If you are unable to remedy a problem with your stairlift,
please call your local service engineer (this will usually be
the company you bought the stairlift from). As previously
stated, ensure that you have a list of the messages that the
display has reported available as this will assist the engineer
in quickly diagnosing your problem.
12

TECHNICAL INFORMATION
Weight Limits
This stairlift has been designed to carry one person only,
and has a maximum weight limit of 120Kg (19 stone) for
the standard duty or 160Kg (25 stone) for the heavy duty
model.
Operating Periods/Excessive Use
Your stairlift has been designed to run continuously for
no longer than 15 minutes in any three hour period. If the
stairlift is used too often without taking a break, the motor
will not cool down properly between journeys and may
become damaged.
Maintenance
To maintain safe and reliable operation, your stairlift needs a
regular safety inspection and service which should take place
once every 12 months.
Your local stairlift servicing centre will be pleased to discuss
servicing your stairlift, along with any warranty arrangements.
CAUTION
Any modi cations which have not been expressly approved
by the manufacturer may void the warranty and may cause
damage.Your stairlift should be inspected and maintained by
a Platinum approved service engineer.
Upholstery
Carelessness with matches, cigarettes and so on can cause
re. The upholstery material used on your stairlift has been
tested for compliance with BS5852.
CAUTION
In the event of a re, DO NOT use the stairlift.
Sound Pressure Levels
The emission sound pressure level at the operators position
is expected not to exceed 70dB(A)
13

WIRING DIAGRAM
M
E
B
M
OSG SAFETY LOOM
LEVEL MOTOR AND ENCODER
26
8
MOTOR NEG
MOTOR POS
POWER PICK UP/CHARGE CONTACTS
FINAL >>
30A FUSE
OSG >>
FINAL LIMIT SAFETY LOOM
POSITION LOOM
MULTI-CORE CABLE
ROLLER CARRIER
SAFETY LOOMS
RED
BATT
POS
BATT
NEG
MAIN MOTOR ENCODER
BLACK
POWER AND DATA LOOM
TO/FROM DISPLAY BOARDS
KEY SWITCH
(CABLES MAY NOT BE
COLOUR MATCHED)
BRAKE
MAIN MOTOR
BLUE
BLUE
GREY
GREY
RED
RED
POWER SWITCH
Messages relating
to level pot
Final limit Overspeed governor Out of level error
Off charge
Main motor stall
Main motor stall
Connect Brake
Right yoke
Right side
Left side
Left yoke
YELLOW / BLACK
ORANGE / BLACK
ORANGE / BLUE
ORANGE / WHITE
YELLOW / RED
YELLOW / BLUE
BLACK
2
8
SWIVEL MOTOR
BLACK
POWER SWIVEL LOOM
MULTI-CORE CABLE
FOOT PLATE SAFETY LOOM
POWER AND DATA LOOM TO/FROM MAIN BOARD
FOOT PLATE SAFETY LOOM
MANUAL SWIVEL
SAFETY LOOM BOTTOM SAFETY EDGE
R/H FOOTPLATE
SAFETY EDGE
L/H FOOTPLATE
SAFETY EDGE
M
MENU BUTTONS X6
LCD DISPLAY
SEAT SENSOR
Note 2 – All references to
‘hand’ are from the
perspective of the user,
sat on the lift.
Note 1 – The manual and
power swivel safety looms
are mutually exclusive.
Seat Swivel Magnet
Manual seat
swivel
RED
ORANGE / BLACK
ORANGE / BLACK
GREEN / BLACK
YELLOW / BLACK
Left foot
Bottom Foot Rest
Right foot
14

NOTES
15

NOTE
16

NOTES
17

PREPARING THE LIFT
Setting the hand of the lift
If necessary, refer to the “MENU STRUCTURE” section of
this manual for further guidance.
The ‘top level’ menu may now look like the picture above;
if you are not in the top level menu, navigate to it by
repeatedly pressing either the top left or top right hand
button. If the hand of the lift has already been set, the
message “SET INSTALL HAND” will not be displayed. It
is still necessary to check it is correct by carrying out the
below procedure.
Once you can see the screen above, press the right hand
top button until you can see the message “LIFT SETUP
OPTIONS” (4 presses). If you go beyond this option you
can cycle back by using the top left hand button or simply
carry on pressing the top right hand button until the option
is displayed again.
Next press the bottom left or bottom right (they both
do the same thing) button until the message “HANDING
ERROR” is displayed.This is only one press but if you go past
it simply keep pressing the same button until this option is
shown again (6 more presses). It is possible that this option
might display “LEFT HAND” or “RIGHT HAND” instead of
“HANDING ERROR”.
Now press the middle left or middle right hand button to
select the hand of the chair.
Levelling the seat
Next the seat needs to be set level; it will be necessary to
use a spirit level or similar positioned on a level piece of
metalwork on the seat unit while carrying out the below
instructions.
If the ‘HAND’ of the chair has just been set then pressing
the top right hand button once will take you to the top
level menu item “MANUAL MOVE OPTIONS”. Again, if you
scroll past this option just cycle around until it is available
again.
Once you are at the top level menu item “MANUAL MOVE
OPTIONS”, then pressing either the bottom left or bottom
right hand button will take you to the “ROTATE” option (2
presses on either button).
Once you are in the “ROTATE” option, pressing either the
left hand or the right hand middle button will rotate the
chair in that direction. Rotate the chair by using this method
until it is level.
When you are satis ed the chair is level press the top left
hand button once and this will take you to the “LIFT SETUP
OPTIONS” again.
Once you can see the display above, press the bottom
left or bottom right hand button until “RESET LEVEL
POSITION” is displayed. Next press one of the middle
buttons to save this setting to the chair.
Platinum Stairlifts Ltd
Unit 10,The Crossings, Crosshills Business Park, Crosshills, Keighley, BD20 7BW, West Yorkshire, United Kingdom.
+44(0)1535 631 177 • www.platinumstairlifts.com
DATE INSTALLED BY SIGNED 1st SERVICE DUE
DATE SERVICED BY SIGNED NEXT SERVICE DUE
Table of contents