manuals.online logo
Brands
  1. Home
  2. •
  3. Brands
  4. •
  5. PLG
  6. •
  7. Lighting Equipment
  8. •
  9. PLG LINEA A 3 User manual

PLG LINEA A 3 User manual

This manual suits for next models

7

Other PLG Lighting Equipment manuals

PLG FOXY RT User manual

PLG

PLG FOXY RT User manual

PLG MINI NEXUS User manual

PLG

PLG MINI NEXUS User manual

PLG ROTOR LAMP 6 User manual

PLG

PLG ROTOR LAMP 6 User manual

PLG ARGO ARG18 User manual

PLG

PLG ARGO ARG18 User manual

PLG SIRIO PR User manual

PLG

PLG SIRIO PR User manual

PLG KOALA L 1 User manual

PLG

PLG KOALA L 1 User manual

PLG SWIVEL User manual

PLG

PLG SWIVEL User manual

PLG JUNCUS User manual

PLG

PLG JUNCUS User manual

PLG DELTA 9 User manual

PLG

PLG DELTA 9 User manual

PLG KOALA 1 User manual

PLG

PLG KOALA 1 User manual

PLG APE User manual

PLG

PLG APE User manual

PLG ICON 2 User manual

PLG

PLG ICON 2 User manual

PLG LILIUM 6 User manual

PLG

PLG LILIUM 6 User manual

PLG FIREFLY User manual

PLG

PLG FIREFLY User manual

PLG KOALA 3 User manual

PLG

PLG KOALA 3 User manual

PLG MIRA 9 TRIMLESS User manual

PLG

PLG MIRA 9 TRIMLESS User manual

PLG PICTOR 5 User manual

PLG

PLG PICTOR 5 User manual

PLG JOLLY INOX User manual

PLG

PLG JOLLY INOX User manual

PLG APOLLO ADJ User manual

PLG

PLG APOLLO ADJ User manual

PLG ASY R User manual

PLG

PLG ASY R User manual

PLG APOLLO DEEP User manual

PLG

PLG APOLLO DEEP User manual

PLG VENUS R User manual

PLG

PLG VENUS R User manual

PLG DOT User manual

PLG

PLG DOT User manual

PLG MOON User manual

PLG

PLG MOON User manual

Popular Lighting Equipment manuals by other brands

Life 39.9F70020C quick start guide

Life

Life 39.9F70020C quick start guide

EuroLite LED ML-20 user manual

EuroLite

EuroLite LED ML-20 user manual

LIGMAN OD-50141 installation manual

LIGMAN

LIGMAN OD-50141 installation manual

Home Accents Holiday 1002461144 instructions

Home Accents Holiday

Home Accents Holiday 1002461144 instructions

Experia IRiS Ripple Light instruction manual

Experia

Experia IRiS Ripple Light instruction manual

Erco Gecko Mounting instructions

Erco

Erco Gecko Mounting instructions

Inter-lux ZTA.100.Surface Installation and maintenance instructions

Inter-lux

Inter-lux ZTA.100.Surface Installation and maintenance instructions

Whelen Engineering Company TN Series installation guide

Whelen Engineering Company

Whelen Engineering Company TN Series installation guide

IKEA BJÖRKSPIREA manual

IKEA

IKEA BJÖRKSPIREA manual

Toolland PM 6640 instruction manual

Toolland

Toolland PM 6640 instruction manual

GTD GTD-LP200 user manual

GTD

GTD GTD-LP200 user manual

LIVARNO home 1105-W-UK manual

LIVARNO home

LIVARNO home 1105-W-UK manual

ProLights EclPar IPMFC user manual

ProLights

ProLights EclPar IPMFC user manual

Velvet EVO Series user manual

Velvet

Velvet EVO Series user manual

IDTOLIGHT GENT installation instructions

IDTOLIGHT

IDTOLIGHT GENT installation instructions

MAYTONI S35 installation manual

MAYTONI

MAYTONI S35 installation manual

MaxLite MLFP14DP4535 user manual

MaxLite

MaxLite MLFP14DP4535 user manual

SLV Elektronik 550621 instruction manual

SLV Elektronik

SLV Elektronik 550621 instruction manual

manuals.online logo
manuals.online logoBrands
  • About & Mission
  • Contact us
  • Privacy Policy
  • Terms and Conditions

Copyright 2025 Manuals.Online. All Rights Reserved.

LINEA A
MANUALE D’USO | USER MANUAL
JEWELLERY & MUSEUM - LINEAR LIGHT
2Professional Lighting Genius s.r.l - Ex Strada Statale 96, NC - 70020 Toritto (Ba) - Phone: (+39) 080 603244 - [email protected] - www.plgenius.com
110
34
500
34
205
34
34
33
300
34
110
34
500
34
205
34
34
33
300
34
110
34
500
34
205
34
34
33
300
34
110
34
500
34
205
34
34
33
300
34
110
34
500
34
205
34
34
33
300
34
LINEA A
MANUALE D’USO USER MANUAL
ATTENZIONE | WARNING
DIMENSIONI | DIMENSIONS
Tutte le operazioni di installazione o di manutenzione
devono essere e󰀨ettuate da personale tecnico
specializzato;
•All installation or maintenance must be performed by
qualied personnel;
•
Modiche o manomissioni del prodotto possono rendere
l’apparecchio pericoloso e annullano ogni condizione di
garanzia;
•Modications or tampering of the product can make
the device dangerous and will invalidate any warranty
condition;
•
In nessun caso l’apparecchio deve essere ricoperto da
materiali termoisolanti o simili;
•Under no circumstance must this product be covered •
La ditta Professional Lighting Genius declina ogni
responsabilità qualora l’installazione non avvenga
secondo le norme vigenti;
•The company Professional Lighting Genius disclaims
any liability if the installation is not done according to
applicable regulations;
•
La ditta Professional Lighting Genius declina ogni
responsabilità per danni causati da un proprio prodotto
montato in modo non conforme alle istruzioni.
•The company Professional Lighting Genius assumes
no responsability for damages caused by its own
product installed not in accordance to instructions.
•
•Prima di procedere alla installazione o alla manutenzione
del presente dispositivo è necessario disattivare sempre
l’energia elettrica;
•Before proceeding with the installation or maintenance
of this device, you must always turn o the electricity;
L’impianto va alimentato solo dopo il collegamento;•The plant should be operated only after connecting;•
Leggere e conservare le seguenti istruzioni Read and store following instructions
LINEA A 3
( LIA03 )
LINEA A 6
( LIA06 )
LINEA A 9
( LIA09 )
LINEA A 15
( LIA15 )
180gr
320gr
460gr
750gr
3
Professional Lighting Genius s.r.l - Ex Strada Statale 96, NC - 70020 Toritto (Ba) - Phone: (+39) 080 603244 - [email protected] - www.plgenius.com
L
N
GND +
-
+
-
+
-
+
-
DATI TECNICI | TECHNICAL DATA
POTENZA MASSIMA / POWER MAX :
3W - 350mA( LIA03 )
9W - 350mA( LIA09 )
6W - 350mA ( LIA06 )
15W - 350mA( LIA15 )
3 power LEDs ( LIA03 )
9 power LEDs ( LIA09 )
6 power LEDs ( LIA06 )
15 power LEDs ( LIA15 )
NUMERO DI LED / LED QUANTITY :
70 - 80 - 90 - >90
INDICE RESA CROMATICA / CRI :
10° , 25° , 40° , 60° , 30° x 65°
OTTICHE DISPONIBILI
AVAILABLE OPTICS :
-20°C +40°C
TEMPERATURA DI UTILIZZO
WORKING TEMPERATURE :
Con molle / with springs
FISSAGGIO / FIXING :
III
CLASSE / CLASS :
180g ( LIA03 )
460g ( LIA09 )
320g ( LIA06 )
750g ( LIA15 )
PESO / WEIGHT :
IP40
GRADO DI PROTEZIONE IP / IP RATE :
Non incluso / Not included
ALIMENTATORE / DRIVER :
COLORE DEL LED (K)
LED COLOUR (K) :5500 - 4000 - 3000 - 3000 CRI 90 - 2700 -AMBER
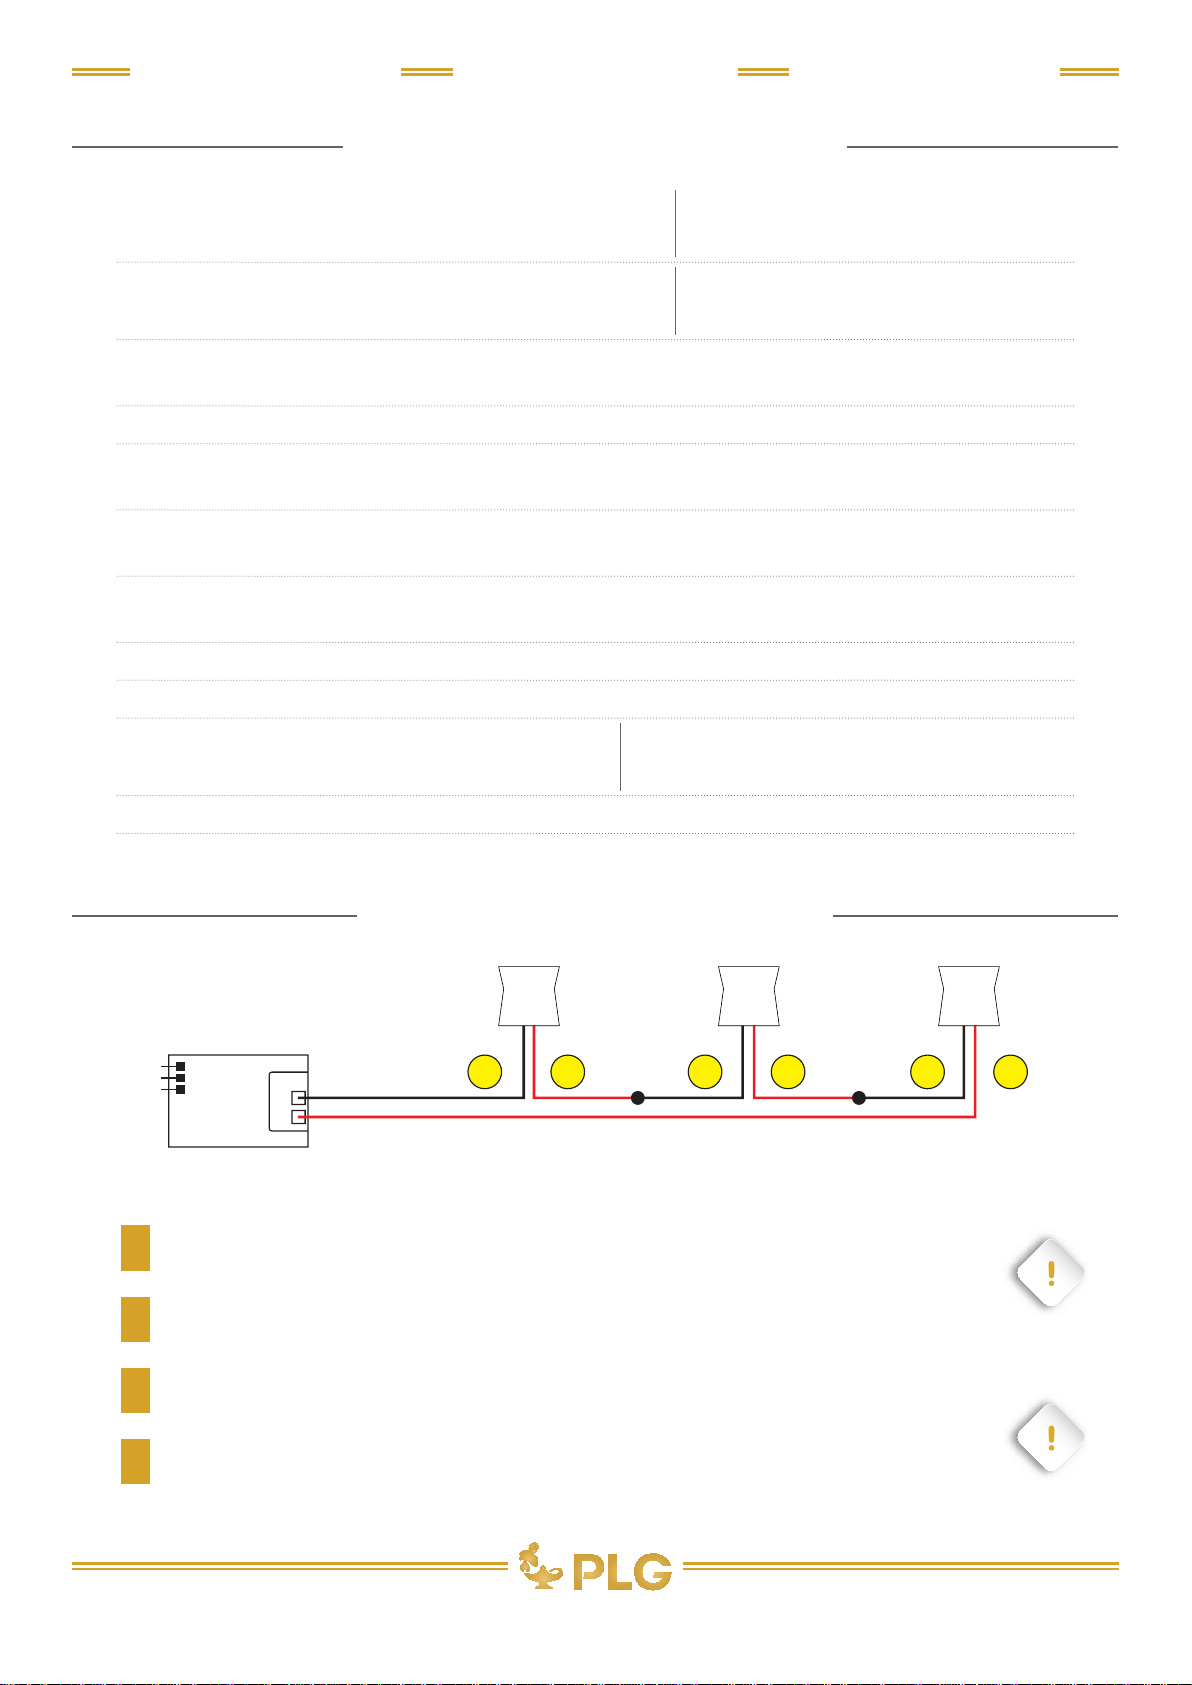
ATTENZIONE
I singoli faretti LED vanno collegati in serie,
rispettando la polarità.
Alimentare l’impianto solo dopo il collegamento di
tutti i faretti.
WARNING
LED lights must be connected in series,
respecting polarities.
The system must be fed only after all the spots
have been connected.
Schema di connessione in serie per versione 350mA / Connection diagram for 350mA version
CONNESSIONI | CONNECTIONS
LINEA A
MANUALE D’USO USER MANUAL
Bianco , Grigio , Nero , altri RALsu richiesta / White , Grey , Black , other RAL on request
MATERIALE E FINITURA
MATERIAL AND FINISH :
Alluminio anodizzato o verniciato /Anodized or painted aluminium
1Realizzare il cablaggio in assenza di tensione di rete.
Make the wiring in complete absence of line voltage.
2Collegare l’apparecchio all’alimentatore.
Connect the device to the driver.
3Collegare il driver alla rete.
Connect the driver to the electric network.
4Porre la rete sotto tensione.
Energize the network.
4Professional Lighting Genius s.r.l - Ex Strada Statale 96, NC - 70020 Toritto (Ba) - Phone: (+39) 080 603244 - [email protected] - www.plgenius.com
ISTRUZIONI DI MONTAGGIO | ASSEMBLY INSTRUCTIONS
LINEA A
MANUALE D’USO USER MANUAL
1LATO MAGNETICO
MAGNETIC SIDE
FERRO
IRON
2
Never connect or disconnect the xture when the
driver is energized. Do not cover the device
Non collegare o scollegare l’apparecchio con
l’alimentatore sotto tensione. Non coprire l’apparecchio.
ATTENZIONE - WARNING ATTENZIONE - WARNING
3 4
Fissare la basetta di ferro al so󰀩tto o nella parete nella
posizione prescelta.
Posizionare il dispositivo nella posizione prescelta
con il lato magnetico a contatto con la basetta in ferro
precedentemente ssata.
I magneti creeranno la resistenza necessaria affinchè
il dispositivo rimanga ben fissato senza l’ausilio di
viteria. Il dispositivo in questo modo è pronto, una
volta aver dato corrente all’impianto, per l’utilizzo.
Linea A può essere installato sia a so󰀩tto sia a parete.
Fix the iron base to the ceiling or to the wall in the
chosen position.
Place the device in the chosen position with the magnetic
side in contact with the iron base previously xed .
The magnets will create the necessary resistance
so that the device will remain well xed without
screws. In this way the device is ready, once
having given current to the system, for use.
Linea A can be installed either on the ceiling or on the wall.
1
3
2
4