PLG ROTOR LAMP 6 User manual

ROTOR LAMP 6
MANUALE D’USO | USER MANUAL
JEWELLERY & MUSEUM - ROTATING LAMPS
950gr
Ø132mm

2
Professional Lighting Genius s.r.l - Ex Strada Statale 96, NC - 70020 Toritto (Ba) - Phone: (+39) 080 603244 - [email protected] - www.plgenius.com
ROTOR LAMP 6
MANUALE D’USO USER MANUAL
ATTENZIONE | WARNING
DIMENSIONI | DIMENSIONS
Tutte le operazioni di installazione o di manutenzione
devono essere eettuate da personale tecnico
specializzato;
•All installation or maintenance must be performed by
qualied personnel;
•
Modiche o manomissioni del prodotto possono rendere
l’apparecchio pericoloso e annullano ogni condizione di
garanzia;
•Modications or tampering of the product can make
the device dangerous and will invalidate any warranty
condition;
•
In nessun caso l’apparecchio deve essere ricoperto da
materiali termoisolanti o simili;
•Under no circumstance must this product be covered •
La ditta Professional Lighting Genius declina ogni
responsabilità qualora l’installazione non avvenga
secondo le norme vigenti;
•The company Professional Lighting Genius disclaims
any liability if the installation is not done according to
applicable regulations;
•
La ditta Professional Lighting Genius declina ogni
responsabilità per danni causati da un proprio prodotto
montato in modo non conforme alle istruzioni.
•The company Professional Lighting Genius assumes
no responsability for damages caused by its own
product installed not in accordance to instructions.
•
•Prima di procedere alla installazione o alla manutenzione
del presente dispositivo è necessario disattivare sempre
l’energia elettrica;
•Before proceeding with the installation or maintenance
of this device, you must always turn o the electricity;
L’impianto va alimentato solo dopo il collegamento;•The plant should be operated only after connecting;•
Leggere e conservare le seguenti istruzioni Read and store following instructions
Rotor Lamp necessita di spazio libero,
areato e non completamente chiuso
(almeno 15cm per lato e 50mm in altezza)
Rotor Lamp needs free space, ventilated
and not completely closed (at least 15cm on
each side and 50mm in height)
131
13
2
74
Ø150
Ø143
Distanza minima
Minimum distance
50mm*
Code: RTL06 6 leds
Ø3,2
Ø3,2
Ø3,2

3
Professional Lighting Genius s.r.l - Ex Strada Statale 96, NC - 70020 Toritto (Ba) - Phone: (+39) 080 603244 - [email protected] - www.plgenius.com
ROTOR LAMP 6
MANUALE D’USO USER MANUAL
DATI TECNICI | TECHNICAL DATA
APPLICAZIONE: controsotti, vetrine e teche
AMBIENTAZIONE: negozi di gioielleria e di accessori
d’alta moda
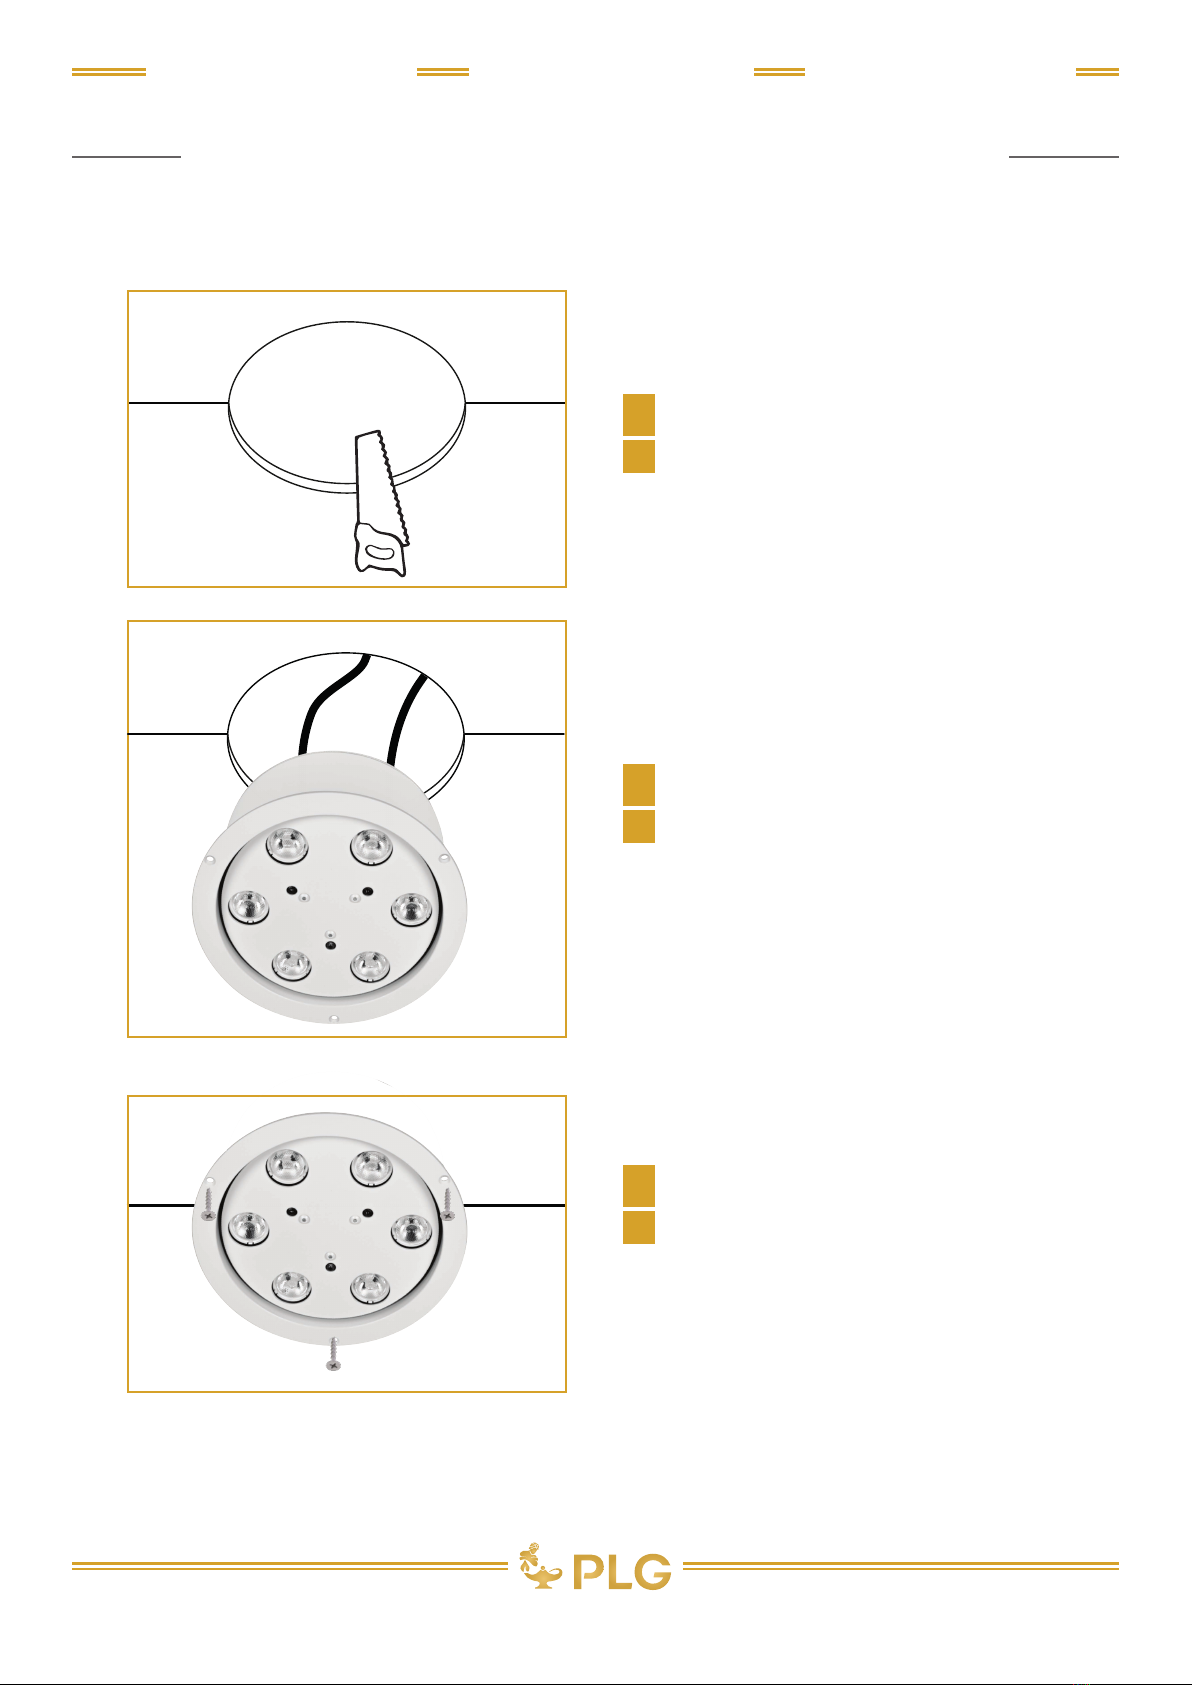
INSTALLAZIONE: a incasso
FINITURE: nero opaco, bianco, grigio. RAL su richiesta
SORGENTE: 6 LED ad alta potenza
OTTICHE: 10° / 25° / 40° / 60°
FUNZIONAMENTO: accensione ON - OFF. Possibilità di
scelta fra due intensità luminose
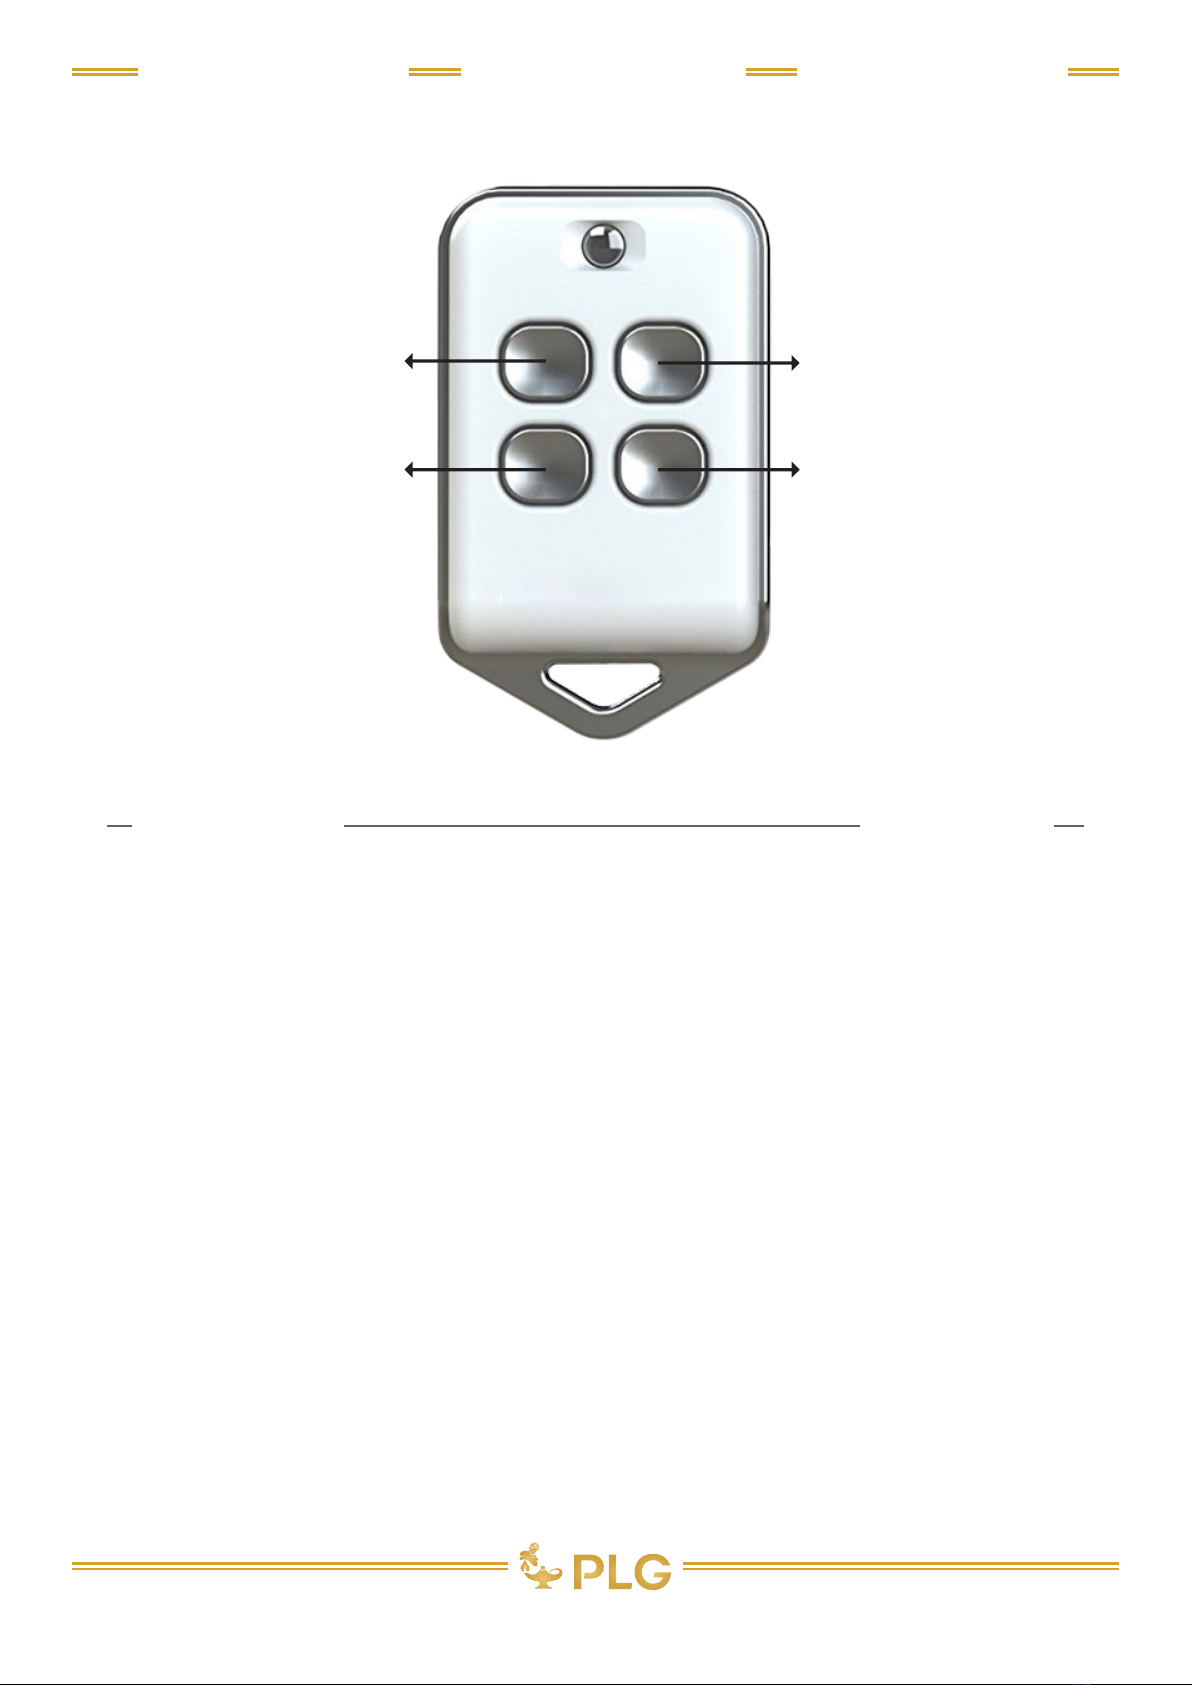
CARATTERISTICHE: velocità di rotazione regolabile
0/40 RPM. Telecomando per la regolazione della
velocità, dell’intensità luminosa e per miscelare i colori.
Dieci velocità. Rotor Lamp rimane acceso da fermo.
ALIMENTAZIONE: 110V Ac / 240V Ac. Il dispositivo è
provvisto di 60 cm di cavi
FISSAGGIO: tramite viti dal diametro massimo di 4 mm
CAVO CONTROLLO DI VELOCITÀ DI ROTAZIONE:
incluso 2 mt di cavo 3x0,5 mm²
POTENZA MASSIMA ASSORBITA: 27 W
TEMPERATURA DI UTILIZZO: -10°C ÷ 50°C
PESO: 950 gr
GRADO DI PROTEZIONE: IP20
APPLICATIONS: false ceilings, showcases and shop
windows
SETTINGS: jewellery stores and high fashion accessories
stores
INSTALLATION: recessed
FINISHES: matt black, white, gray. RAL on request
LIGHT SOURCE: 6 high power LEDS
OPTICS: 10° / 25° / 40° / 60°
FUNCTIONS: ignition ON - OFF. Possibiliy to choose two
dierent light intensities.
FEATURES: adjustable rotation speed 0/40 RPM. Remote
control to calibrate the rotation speed and the brightness
and to mix colours. Ten speed available. Rotor Lamp is
lighted on even when it’s not rotating.
POWER SUPPLY: voltage 110V Ac / 240V Ac. Included 60
cm of cables
FIXING: stainless steel screws with max. external diameter
5 mm
CHECK ROTATION SPEED CABLE: included 20 cm of
cable 3x0,5 mm²
MAXIMUM ABSORBED POWER: 27 W
WORKING TEMPERATURE: -10°C ÷ 50°C
WEIGHT: 950 gr
PROTECTION DEGREE: IP20
IMPORTANTE! IMPORTANT!
Leggere attentamente le seguenti disposizioni Read carefully the following instructions
Il corretto funzionamento dell’apparecchio
è garantito solo se rispettate le istruzioni
di sicurezza e di montaggio contenute in
questa scheda.
The right operation of this device is
guaranteed only if the safety/assembly
istructions listed here are respected.
Rotor Lamp necessita di spazio libero, areato e non
completamente chiuso (almeno 15 cm per lato e 50 mm in
altezza).
La garanzia del prodotto è valida solo se questo non è
stato aperto e/o manomesso. In caso contrario la garanzia
decade automaticamente. L’apertura dell’apparecchio,
infatti, potrebbe causare danni o potrebbe rovinare le
componenti elettroniche in esso contenuti.
Per la pulizia dell’apparecchio è suciente utilizzare un
panno asciutto, evitando solventi o abrasivi che potrebbero
opacizzare le lenti. Inoltre si conisglia la pulizia ad
apparecchio spento.
Prima di procedere all’installazione del dispositivo, togliere
la tensione dalla linea di rete.
Si consiglia di avere a disposizione un cavo di rete 220/240
V che abbia un proprio interruttore ON/OFF.
Rotor Lamp needs free space, ventilated and not completely
closed (at least 15 cm on each side e 50 mm in altezza).
Device’s guarantee is valid only if the appliance is not
open or tampered. Otherwise the guarantee will expire
automatically. Opening the device, infact, could damage it
or could wreck the electronic components inside.
For cleaning this article it is sucient to use a dry cloth,
avoiding the use of solvents or abrasives that might opacify
the lenses.
Before installation, remove the voltage from the power line.
It is advisable to have a AC 110/240V cable with its own ON/
OFF switch.

4
Professional Lighting Genius s.r.l - Ex Strada Statale 96, NC - 70020 Toritto (Ba) - Phone: (+39) 080 603244 - [email protected] - www.plgenius.com
ROTOR LAMP 6
MANUALE D’USO USER MANUAL
ISTRUZIONI DI MONTAGGIO | ASSEMBLY INSTRUCTIONS
Ø132
Praticare un foro nella zona prescelta.
Disattivare la linea elettrica; collegare
l’apparecchio.
Inserire l’apparecchio nel foro.
Fissarlo con viti dal diametro massimo di 4mm.
Drill a hole in the chosen area.
Turn o the mains; connect the device;
Insert the unit in the hole.
Fix it with screws with a maximum diameter 4mm.
1
2
3

5
Professional Lighting Genius s.r.l - Ex Strada Statale 96, NC - 70020 Toritto (Ba) - Phone: (+39) 080 603244 - [email protected] - www.plgenius.com
ROTOR LAMP 6
MANUALE D’USO USER MANUAL
ROTOR LAMP
SPEED
DIMMER
-WWW +
-+
IMPORTANTE! IMPORTANT!
Leggere attentamente le seguenti disposizioni Read carefully the following instructions
Prima di procedere all’installazione del dispositivo, togliere
la tensione dalla linea di rete. Una volta installato, accendere
l’apparecchio.
L’apparecchio è tarato alla massima luminosità.
Per diminuirla è necessario premere il pulsante in basso a
sinistra.
Per aumentarla premere il pulanste in basso a destra.
Per memorizzare l’impostazione prescelta, tenere il
dispositivo acceso per almeno 20 secondi.
Con i pulsanti in alto si agisce sulla velocità.
Sono disponibili 10 velocità dierenti.
All’accensione il dispositivo è fermo. Ad ogni pressione del
tasto in alto a destra, aumenta la velocità di rotazione. Per
diminuirla, premere il pulsante in alto a sinistra.
Per raggiungere direttamente la velocità massima di
rotazione, tenere premuto il tasto in alto a destra; quello
di sinistra per diminuire la velocità o fermare l’apparecchio.
Per memorizzare l’impostazione prescelta, tenere il
dispositivo acceso per almeno 20 secondi. Alla successiva
accensione l’apparecchio avrà in memoria l’ultima
impostazione scelta.
Before installation, disconnect from the power line.
Once installed, turn on the device.
The unit is given with brightness at maximum value.
To decrease the brightness, press the press the bottom left
button.
To increase the brightness, press the bottom right button.
To memorize the setting you have chosen, keep the unit on
for at least 20 seconds.
With the buttons on the top you act on the speed.
There are 10 dierent speeds. When lit the unit is static.
At each top right button pressure the rotation speed
increases. To decreas it, press the top left one.
To get the maximum speed all at once, keep che top right
key pressed; the left one to decrease or to stop the rotation.
To memorize the setting you have chosen, keep the unit on
for at least 20 seconds. At the following lighting the unit will
have in memory the last setting selected.
Aumenta la velocità di
rotazione
Dimmera la luminosità del
bianco freddo
Dimmera la luminosità del
bianco caldo
Diminuisce la velocità di
rotazione
It increases rotation speed
It dimmers cool white
brightness
It dimmers warm white
brightness
It decreases rotation speed

6
Professional Lighting Genius s.r.l - Ex Strada Statale 96, NC - 70020 Toritto (Ba) - Phone: (+39) 080 603244 - [email protected] - www.plgenius.com
ROTOR LAMP 6
MANUALE D’USO USER MANUAL
IMPORTANTE! IMPORTANT!
Leggere attentamente le seguenti disposizioni Read carefully the following instructions
Rotor Lamp necessita di spazio libero, areato e non
completamente chiuso, almeno 15 cm per lato e 50 mm in
altezza.
In questo modo si garantiscono all’apparecchio le condizioni
ottimali per un adeguato rareddamento.
Rotor Lamp needs free space, ventilated and not completely
closed, al least 15 cm on each side and 50 mm in height.
In this way the unit will have the best conditions for a correct
cooling.
Table of contents
Other PLG Lighting Equipment manuals
Popular Lighting Equipment manuals by other brands

DOTLUX
DOTLUX CIRCLEugr-eco user manual

Welch Allyn
Welch Allyn LS-135 Service manual

ML Accessories
ML Accessories LSPIKEA Installation & maintenance manual

Inspire
Inspire Poria instruction manual

Stoane Lighting
Stoane Lighting Penguin Type X Installation and maintenance instructions

Martin
Martin Xciter user manual