Plugz Electric Bike User manual

1
CONTENTS
General Instructions
Assembly
Charging Instructions
Safe Riding Requirements
Riding Instructions
Maintenance
Troubleshooting

2
GENERAL INSTRUCTIONS
WELCOME TO PLUGZ…. AS EASY AS RIDING A BIKE BUT EASIER
FUN
We would like to thank you for buying a PLUGZ Electric Bike. You are one step closer
to a brand new way of commuting that is fast, fun and environmental friendly. Enjoy
it......
ENVIRONMENTAL FRIENDLY
PLUGZ Electric Bikes offer all the advantages of traditional bicycles combined with
cutting edge technology to ease the transition from carbon emission dependency into
a cleaner and healthier lifestyle.
SAFETY
We are committed to offering quality products with reliable components. Devices
mounted on the bikes should be used correctly for safe operation. It is up to you to
understand how the bike functions and the possible risks of cycling. In order to ensure
your safety during riding, please read this manual carefully. Safe operation is also very
important and should not be overlooked. Always wear a properly fitted helmet and
remember that your Plugz bike is intended for on-road use only
Special Instruction
This manual is to be used for general information on the product and it’s
operation, it cannot define the final standard of the product.
Please understand that your bike may be equipped with slightly different
components, due to technical improvements or change in specifications.
We do not recommend modifying any of the technical characteristics of
your Plugz bike.
We encourage you to register your bike on line at
http://www.plugz-bikes.com/bike-registration.php
BE SAFE – HAVE FUN

3
ASSEMBLY
General Assembly Instructions:
The front wheel; fenders; handlebar; pedals; seat post and saddle; front basket are
not assembled for shipping. They can be easily mounted as follows
:
Tools required: Spanner; Allen key; Screwdriver
Front wheel: Set the front wheel hub stem in the
fork ends and then tighten the wheel, make sure
it’s perfectly aligned and secure. The quick
release mechanism must be seated squarely and
firmly tightened to ensure safety.
Front Fender:The fender supports attach to the bottom of the front fork, tighten
the Allen nuts on both sides. The bracket attaches to the Allen nut at the top of the
front fork. Tighten until all nuts are secured. The fenders are made of
polycarbonate and should not rattle when they’re securely fastened. They can be
adjusted by moving the position of the supports on the fender to avoid any
rubbing on the tire.

4
Handlebar / Stem / Headset:Stem and headset come pre-assembled. Loosen
the bolts on the stem, place the handlebar, center it and turn it until it is in your
preferred position, tighten the stem bolts simultaneously. Align the handlebar
perpendicularly to the front wheel, tighten the top stem bolt with a 6mm Allen key.
Pedals: The right-hand pedal (marked “R” on the pedal shaft) should be screwed
clockwise on the right-hand crank. The left pedal (marked “L”) should be screwed
counter-clockwise on the left-hand crank. Pedals should not be tightened firmly
but not excessively, as the crank threads are made of aluminum alloy. Use the
15mm spanner.
Seat post : Insert the seat post and saddle into
the seat tube, align set the hight and tighten the
quick release clamp.
Note! Do not adjust the seat post beyond its
maximum extension mark.
Basket:
Mount the bottom bracket on the fork with
the hex nut provided.
•Note the left and right of the pedal.
[L] Left [R] right
Attention: The threads will be stripped if
you attempt to mount the left pedal on the
right crank or the right pedal on the left
crank.

5
Assemble bottom of basket, front light (2)
and bracket (3) with 2 rectangular plates
(1 & 4) and 2 nuts and bolts (5). Attach
Attach side basket plate to head stem
mounting bracket with 2 hex nut and bolts
Brakes: The brakes are the most important safety features on the bicycle. To
minimize the risk of injury, it’s vital to ensure they are corrected adjusted. Ensure
that the V-brake blocks are parallel to the rim, and that the distance between them
do not exceed 2mm, and then tighten the brake mounting bolts. Check that the
wheels rotate freely without touching the pads.
.
TEST BOTH FRONT AND REAR BRAKES BEFORE RIDING YOUR BIKE
If you have little experience with bicycle maintenance we recommend you get this
done with your local bike shop.

6
CHARGING INSTRUCTIONS
ONLY use the charger provided with your bike to charge the battery (never use a
charger from a different model)
THE BATTERY MUST BE FULLY CHARGED BEFORE THE FIRST USAGE OR
IF THE BIKE HAS NOT BEEN USED FOR MORE THAN 30 DAYS
STEP 1: Turn the power switch to “OFF”
and remove the battery key. NEVER
CHARGE the battery while it’s installed
and connected to your Plugz bike
STEP 2: Proper connection: (1)
Connect the metal socket (charger
output) to the battery and (2)
connect the input plug into an AC
wall outlet. The charger red
indicator light will come on indicating that that battery is charging
STEP 3: When the light turns from Red to Green, it means that the battery is fully
charged. It usually takes about 4-6 hours to recharge the battery depend on its
remaining charge. If you have the time, we recommend to charge the battery for
an additional 2 hours after the light turn greens, it is good for the service life of the
battery
STEP 4: After charging, disconnect the charger from the wall outlet first, and then
disconnect it from the battery. Do not leave the charger plugged into the electrical
outlet, as it may damage the charger and cause a fire
If you wish to remove the battery from the bike to charge it (1) Press and turn the
key all the way to the right to unlock the battery from the frame; (2) press the lever
under the saddle to lift the saddle; (3) pull the battery out
After charging, set the battery on the slide and drop it down, lock the battery on
the frame with the ignition key

7
CAUTION
If you notice a strange smell, or smoke or unusually high temperature, stop the
charging procedure immediately. Bring the battery and the charge to a Plugz
authorized dealer for service or replacement
Charge the battery in a dry, well ventilated area with a temperature between
32-100 degrees Fahrenheit.
The charger is designed for indoor use only. Keep the charger away from water to
avoid short circuit. Don’t use it in a damp room, or in an area with combustible or
explosive materials. Do not remove the wall plug by pulling on the cord. Always
hold the metal socket when plugging/unplugging the cord into/from the battery
DO NOT CHARGE THE BATTERY FOR MORE THAN 10 hours, especially in hot
weather, to avoid overcharging and damaging the battery. After the light turns
green, the charger is in “trickle” mode and will charge slowly to maintain the
charge. Do not leave the battery under charge if you are going to be away for
more than the expected charge time.
The charger will become warm during charging, so keep it away from any heat
source. Please always keep the charger dry and clean.
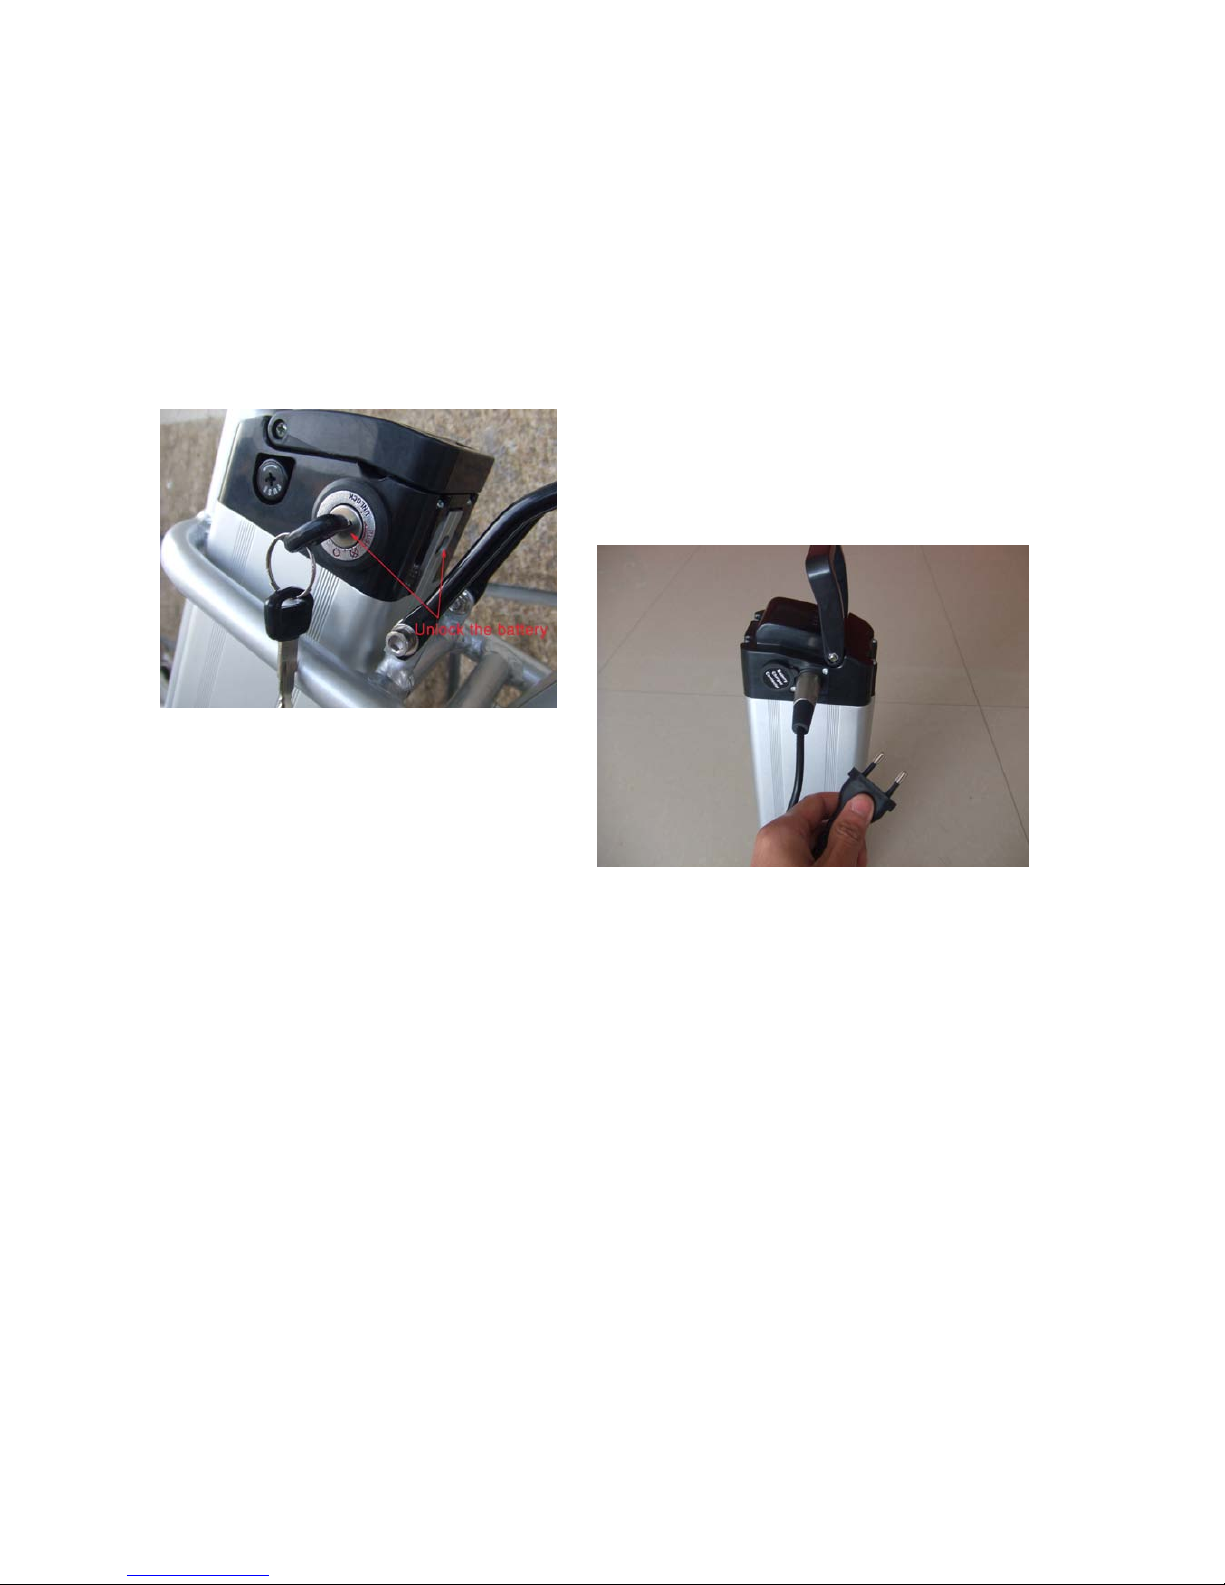
DO NOT OPEN THE BATTERY CASE, as it contains high voltage electronic parts,
and it will void your warranty
While charging, please keep it out of the reach of children. Do not put anything on
top of the charger. Prevent any liquid, metal or metal fillings from infiltrating the
charger
DO NOT TOUCH the two battery poles with your hands when handling the battery.
DO NOT TOUCH the battery charging connector poles with any metal or any
other material that conducts electricity, as it may cause a short circuit
The battery should be charged at least once per month if used or not. This will
ensure the battery life. DO NOT use the battery with a very low charge. Do not
leave your battery fully discharged for extended periods of time
Avoid any contact with water when charging your battery. If a plug or socket gets
wet, dry it completely before using it
Do not use sockets, connectors or other wiring devices providing power supplies
other than the standardAC 110V

8
SAFE RIDING REQUIREMENTS
WEAR A HELMET at all times while riding your bike
Obey the local traffic regulations specific to this type of equipment
Read this Owner’s Manual carefully before you ride your Plugz electric
bike for the first time
Regularly check the tire pressure to facilitate pedaling and minimize
battery consumption
Always check the brakes to make sure they are working correctly before
each ride. Adjust them if necessary. Please pay particular attention and
brake early in wet conditions.
Hold the handlebar with both hands except to notify a turn
Always brake with both front and rear brakes simultaneously
Turn on your lights, front and rear, in dark or low-visibility conditions
Make sure your clothes or other objects do not come into contact with the
chain or the wheels
Do not touch the battery charging connector with your wet hands, key or
other metals objects
Wear bright color clothingto help make you more visible to other motor
vehicles
The rear cargo rack is not designed to carry another person
Never ride your Plugz electric bike under the influence of drugs or alcohol.
Avoid riding on uneven ,wet or loose surface
If possible, do not ride in adverse weather conditions, low visibility or if you
are very tired for the sake of safety.
Your Plugz electric bicycle can be used in the rain; however, if totally
submerged in water or puddles, the controller (under the bottom bracket),
motor and other electrical devices may short-circuit, causing irreparable
damages and possibly hazardous conditons
Never use sprayed water to flush your E-bike, don’t get the electrical
components wet (battery connector, motor, controller, cables, handlebar
controls, etc)
Don’t let children under the age of 10 ride your Plugz bike

9
RIDING INSTRUCTIONS
Check List before your first ride:
•Check that the battery is fully charged and locked onto the frame
•Check the air pressure of the tires
•Make sure that the front and rear brakes are working properly
•Check the tightness of the front and rear wheels
•Make sure the handlebar and saddle are fastened tightly. Make sure the quick
releases are locked and all locknuts and screws are tightened.
Riding:
Turn on the power switch (turn the ignition key to" ON” position), the power
display indicator will light up, meaning the power is connected
Just like riding a normal bicycle. After checking ALL is OK, get on your bike and
either (a) start pedaling, the automatic pedal assist will start the motor, it will push
you along until you reach the maximum motor speed, or stop pedaling or put on
the brakes; (b) turn the throttle, start pedaling whenever you want.
Squeezing either the left or right brake levers will cut off the power the motor will
no longer work
Battery level Gauge:
The battery meter is located on handlebar, the 5 red lights will gradually turn off as the
battery power is getting lower, the lights will then start blinking when the power is
about to go out. If you are not back, it is time to turn OFF the power and to pedal back
on your own power, just like regular bicycle. Charge the battery when you get to an
electrical outlet, and enjoy the electric power after it’s fully charged.
Parking:
Shut the power “OFF” and pull out the battery key. You should turn “OFF” the
power when pushing your bike to prevent any accidental triggering of the motor.
Use a chain or U-Lock lock to further secure your bicycle when necessary.
Notes: Don’t expose your Plugz bike to sunlight or rain unnecessarily, to avoid
early deterioration of the frame, components and electrical system

10
Special Note:
Using the brakes frequently, causing the motor to switch on and off
continuously, riding against the wind, riding uphill, riding in cold weather and
carrying heavy weight will influence the performance of the battery and reduce
the expected travel range.
MAINTENANCE
ATTENTION
Before carrying out any sort of maintenance, switch off the power and remove
the ignition key
Do some physical riding and safety check as you would do with a non
powered bicycle
Always clean your bike before wipe working on it.
Make sure the battery poles are clean as dirt can reduce the efficiency or
burn the poles.
Your Plugz bike should undergo at least an annual check-up
Adjust chain tension:
Your chain will lengthen over time, it should be adjusted as follows:
loosen the bolts on the rear shaft
if the chain is too loose, turn the chain bolt clockwise
if the chain is too tight, turn chain bolt counter-clockwise
keep the chain ring and rear wheel gear aligned
Adjusting the brakes:
Correct brake adjustment will easier brake control and offer greater safety:
The brakes are adjusted just as on regular bikes. Make sure to check that the
electric cut-off is working properly
Lubrications:
For long –life service the following parts on your Plugz bike should be regularly
lubricated:
Chain; front axle; rear axle; freewheel, front fork and other rotational parts
Electrical parts should not be lubricated as they are factory lubricated

11
Cleaning:
Your Plugz e-bike should be cleaned with a damp sponge, avoid electrical
parts (battery connection, motor (rear axle), electric cables, handlebar controls,
etc.). Dry with a cloth.
Do not use a steady direct stream of water form a hose to clean your bike. Use
a cloth to avoid short circuiting any electrical components. Your electric bike
has a durable finish and does not need waxing. Clean with a mild detergent
and buff to restore its original shine, if needed.
TROUBLESHOOTING
Problems Possible causes Solutions
Turn the power switch to
“ON” position, the indicator
light doesn’t light come on,
the motor doesn’ work ,
there is no electric power
on the bike
1.Battery is completely
discharged
2.The electric cable connecting
the battery is loose
3. The fuse has burnt
1. Charge the battery
2. Fix the cable firmly
3. Change the fuse
The traveling range is
getting shorter
1. Insufficient battery capacity
2. The battery is getting old and
doesn’t hold the charge
3. Braking frequently, riding
uphill or running against the
wind continuously
1. Charge the battery fully
2. Change the battery
3. Use more pedaling
The charge indicator
light
doesn’t come on when
charging
1.The connecting cable is loose
2. The fuse burnt out
3. The charger is damaged
1.Insert the socket firmly
2. Change the fuse
3.Change the charger
Other troubles
Any problems in electrical
components
Ask the local dealer or
service centre for help
Table of contents