INSTALLATION INSTRUCTIONS
BUDDY HEATED TOWEL RAILS
Installation Guide - Final Fit Off (continued)
5. Once the rail ts correctly to the wall prepare both ends of the wires to be joined (rail side and wall side) Twist the
wires together then thread into the provided water proof Drycon connectors – keep twisting in the same direction
until you are happy the connection is good and there is no metal part of the wire outside the connector – It is
normal to see some of the water proof grease squeeze out. See gure 2
Installation Guide
After the wall linings are complete your wires should
still be exposed and be in the original position. These
wires represent the centre of either your right or left
foot of each rail.
Note : With our unique metal wall bracket system you
have the option of bringing the wire or screw through
either of the 3 holes provided (see diagram) giving
you a nal adjustment on the wall i.e. move them all
up slightly or down or spread the area between the
rails. This may also help you should a tile get chipped
you can adjust feet to cover.
1) Mark out your rail feet Central locations
(these can be above or below your wire position)
and drill through wall linings until you hit the xing
timber.
2) Once the holes are drilled it is time to t the
mounting brackets to the wall – Feel free to use a
small amount of silicone to prevent any chance of the
xings coming loose in years to come. To t the
wall xings use the stainless square headed screws
provided. Simply place rail xing bracket against
the wall and screw into the timber nog until securely
xed.
3) Repeat this again until all brackets are on
wall. Once all the wall xing brackets are tted with
the wires extending through it is time to t the rail/s
to the wall.
4) To t the Rail/s to the wall, back off the xing
grub screws on both sides of the rail – dry t the rail
rst to make sure feet are set right.
FINAL FIT OFF
FIGURE 2
2019 7
6. Once you are happy with the connection push the wires and joiners up into the recess in the body of the rail,
then present the rail to the wall brackets. Once the rail is hard against the wall it is time to tighten the xing grub
screws until the Rail is rmly mounted to the wall and does not wobble at all.
Repeat steps 4,5 and 6 until all rails are installed.
5) Once the rail ts correctly to the wall prepare
both ends of the wires to be joined (rail side and
wall side) Twist the wires together then thread into
the provided water proof Drycon connectors – keep
twisting in the same direction until you are happy the
connection is good and there is no metal part of the
wire outside the connector – It is normal to see some
of the water proof grease squeeze out. See gure 2
6) Once you are happy with the connection
push the wires and joiners up into the recess in the
body of the rail, then present the rail to the wall
brackets. Once the rail is hard against the wall it is
time to tighten the xing grub screws until the Rail is
rmly mounted to the wall and does not wobble at all.
Repeat steps 4,5 and 6 until all rails are installed.
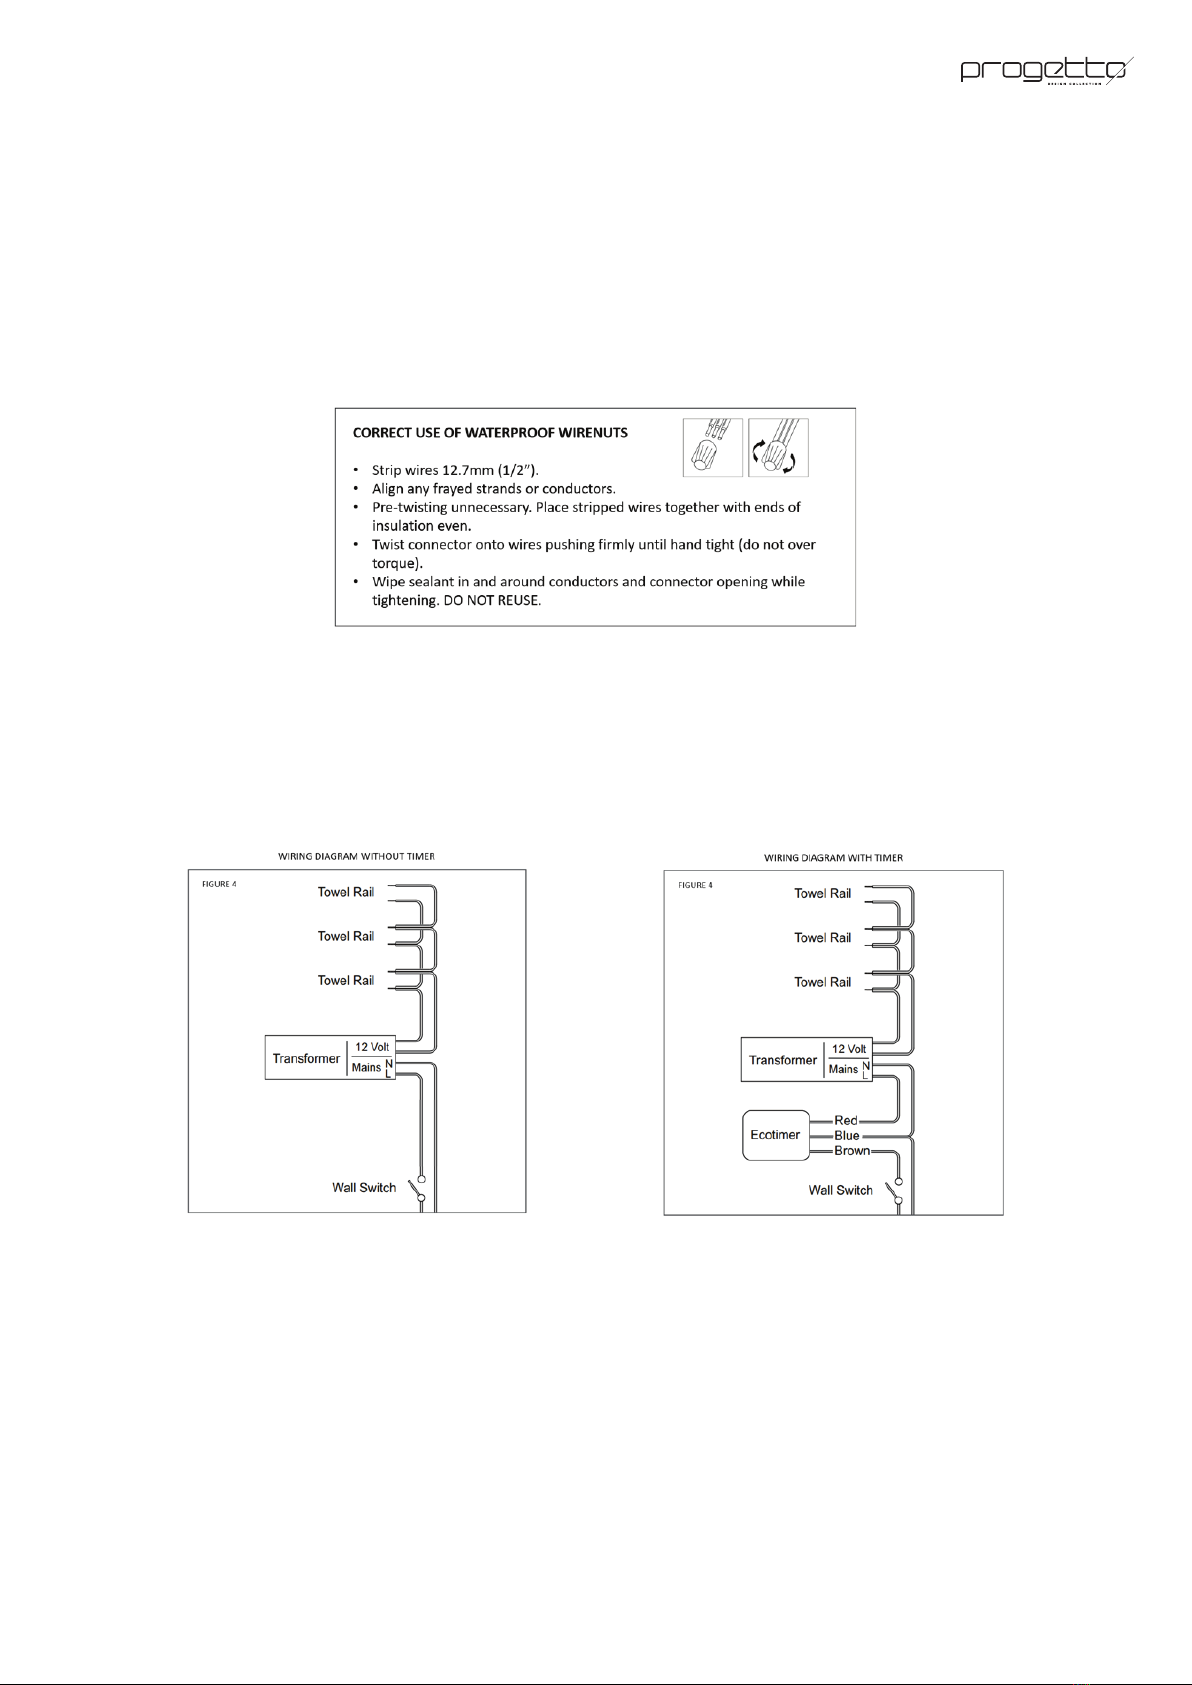
Once all the rails are installed, complete the wiring on the transformer and switch side
The Towel rail must have a switch in the bathroom that can be identied as the towel rail switch. This can be
either located near the set of rails, or a separate mechanism on the light switch plate for the bathroom. e.g.
3 gang switch plate – lights – extractor – Towel rail.
Once wiring is complete turn on power and check all rails are heating – You will feel heat within just a few
minutes.
Your installation is now complete .Please kindly leave the care and maintenance instructions with the owner.
Thank you for installing our Quality Code single rails we hope your client enjoys warm dry towels for many
years to come.
Note: The installer and home owner have the option of tting a timer (sold separately or as a part of the prewire Kit SRTLPWKIT)
or without a timer. See gure 4 .For Prolonged element life and energy conservation we recommend that Code single bar rails
should be connected to a timer set to 25% usage or less.
www.elitebathroomware.com 8
7. Once all the rails are installed, complete the wiring on the transformer and switch side.
The Towel rail must have a switch in the bathroom that can be identied as the towel rail switch. This can be either
located near the set of rails, or a separate mechanism on the light switch plate for the bathroom. e.g. 3 gang switch
plate – lights – extractor – Towel rail.
Once wiring is complete turn on power and check all rails are heating – You will feel heat within just a few minutes.
Your installation is now complete. Please kindly leave the care and maintenance instructions with the owner.