PLUNGE COLD PLUNGE XL User manual

SCAN FOR INSTALL VIDEO
COMMERCIAL
COLD PLUNGE XL
OWNERS MANUAL

WELCOME TO THE PLUNGE FAMILY
Cold Plunge has become an essential routine that has changed our lives
dramatically. We are so excited to share it with you and grateful that
you've chosen Plunge.
First things first, please read all of the safety precautions listed below
before you do anything. Next, watch our installation and maintenance
videos by using the QR code on the front page. If you have questions,
first please make sure you've watched all the support videos and read
the instructions carefully. If you still have questions, don't hesitate to
reach out to [email protected].
Once you're plunging, we'd love to hear from you! Please share your
stories and posts with us on Instagram @the.coldplunge. We'll also
follow up soon over email with a link to leave a review. Potential
customers would love to hear how you're enjoying your Plunge. If you
can leave us a review, we'd really appreciate it! We cant wait to hear
how the Plunge is you and your life!
Wishing you health and
happiness,
Michael and Ryan

INCLUDED WITH YOUR PLUNGE
PHONE / TABELT MOUNT
Affix this to your Plunge to hold your phone or tblet.
HOSE FILTER
Put this on the end of your hose to filter out impurities.
Run wter through it before using it to fill the Plunge.
FILTER WRENCH
Use this to chnge your filter.
COVER KEYS
Use these to lock your cover to keep kiddos out.
SKIMMER NET
Scoop ny floting debris out of your Plunge.
GUIDED PLUNGE VIDEO CONTENT
Access our guided plunge content t
thecoldplunge.com/pges/videos or scn the QR code.
We re very excited for you to plunge, but we sk tht you leve the
chiller in n upright position and unplugged for three hours before
you turn it on. The refrigernt my hve been shken up in trnsit nd
needs time to settle. We pprecite your ptience nd look forwrd to
hering bout your Plunge experience! Give us cll if you hve ny ques-
tions t (916) 7586920.
CHILLER INSTRUCTIONS
READ FIRST BEFORE
SETTING UP THE PLUNGE!

READ FIRST BEFORE
SETTING UP THE PLUNGE!
If the air purge doesn’t work and your Plunge stops filtering for more than
12 hours, you must empty the Plunge, the filter canister, and the
chiller.
This is very important for 3 reasons:
Stagnant water is not sanitary for the system. Solidified bio-
matter can form inside the pipes and requires a deep clean with hot
water to fix. This can also appear if no sanitation is done. Please
follow the maintenance protocol included in the manual.
If the chiller is on, but no water flowing, ice will form and can break
the chiller. Please turn the chiller off immediately if water is
not flowing.
If the temperature in your area drops below freezing and water isn’t
flowing, your plumbing system will crack and break. Please monitor
your Plunge daily when the outside temperature is below
freezing to ensure constant flow. If your Plunge doesn't
have a heater and temp is below 0°F for 12 hours, you must
drain the Plunge, filter and chiller.
32°
If your Plunge is plugged in and water is not flowing
properly, please watch this video on how to purge
air from your system.
Important Warranty Information
Please note that damage caused by freezing conditions or improper
water chemistry are not covered under our warranty.
WATER SHOULD FLOW 24/7
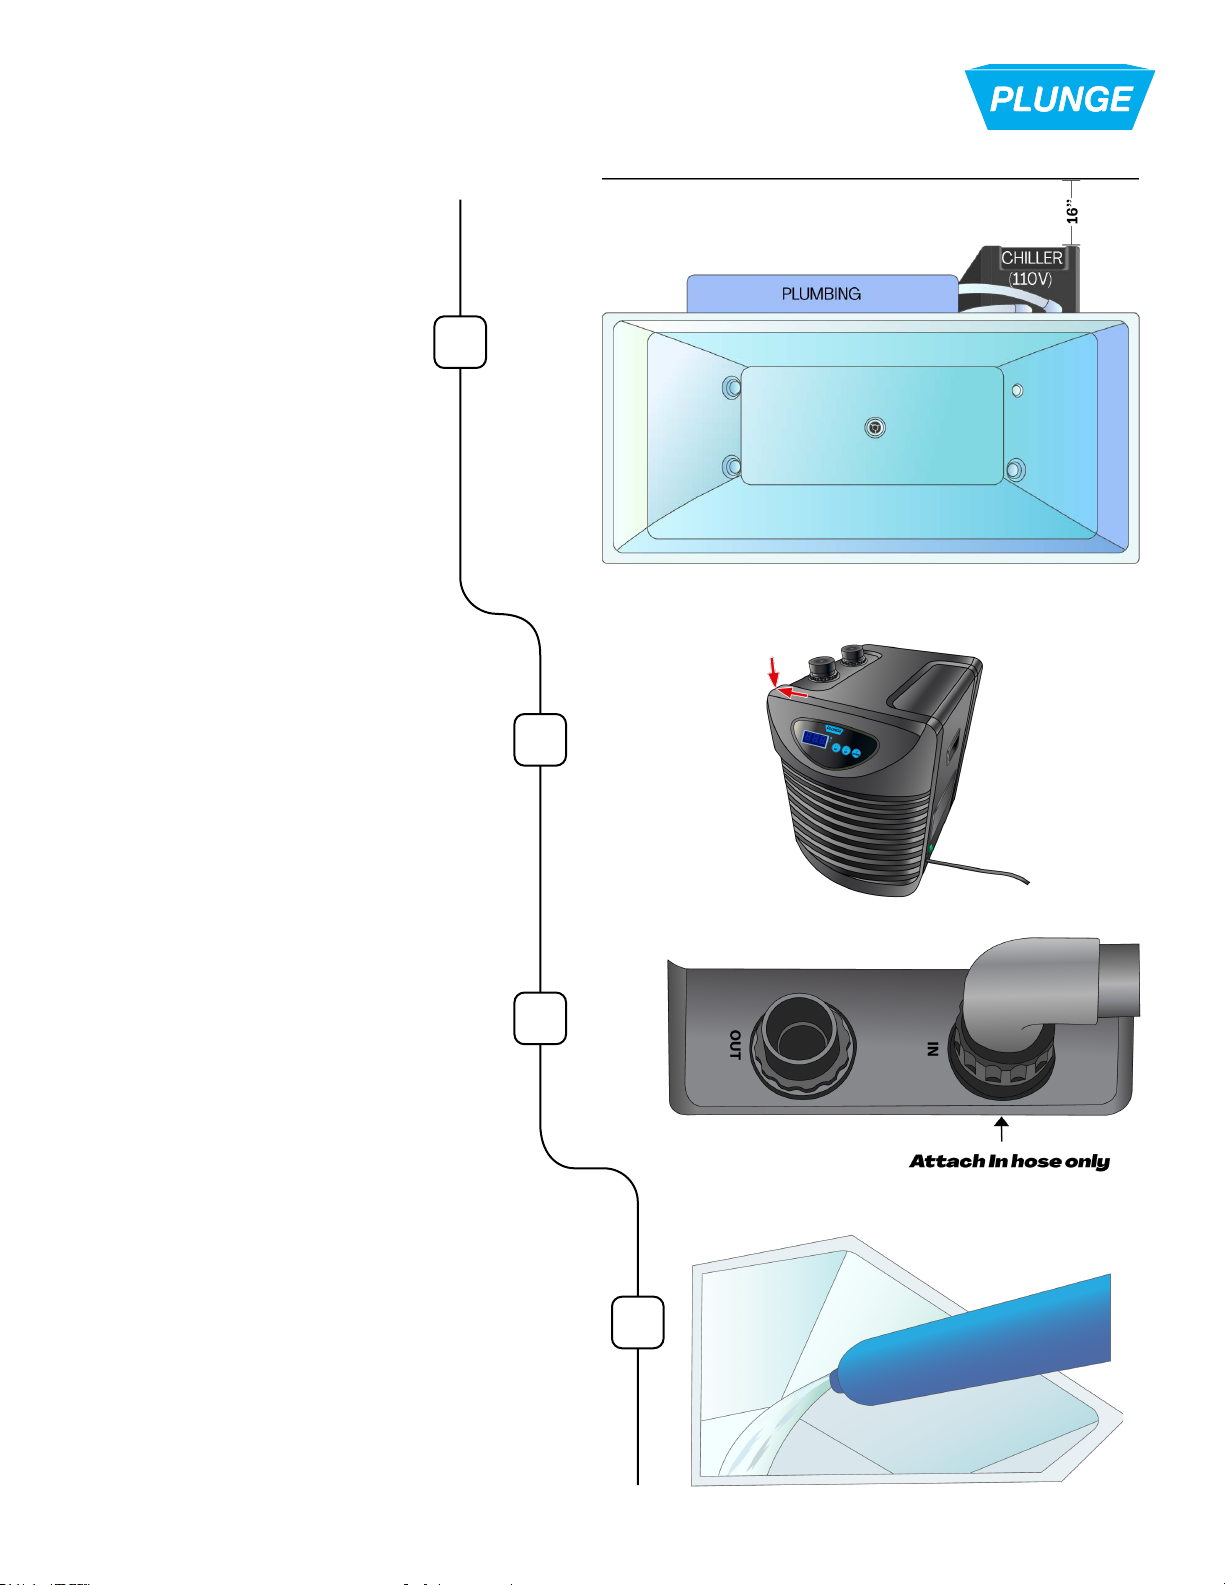
QUICK START GUIDE
Place the Plunge on a
flat surface with 16”
behind it for equipment
access. The Pro model
requires a 20amp 110V
outlet. Make sure it can
support 1,200 lbs and
keep it 5 feet from any
appliances.
Place the chiller behind the
tub. Match the arrow
on the chiller to the one on
the tub.
Screw on the “In” connection
to the chiller
Attach the included carbon hose filter
to a hose. Run water through it into a
drain until the water turns clear.
Then, fill the Plunge with water. We
recommend 3” from the top if outside
and 4.5” from the top if inside.
1
2
3
4

QUICK START GUIDE
Screw on the “Out” hose
on the chiller.
Plug the chiller into the empty
outlet in the electrical box.
Plug the cord coming from the
electrical box into a 15Amp
GFCI outlet (110-120v).
The Plunge will turn on and is
designed to run 24/7.
To set your desired temp, hold
the 'set' button for 3 seconds
until the current temperature is
flashing, then press the up or
down arrow.
It will keep the water within 2° F
of your set temp.
6
5
7
8

QUICK START GUIDE
Turn the light on/off via
the silver button on the
left side of the tub.
See the included maintenance
protocols to keep your water
clean and your Plunge working
well long-term.
Install the phone/tablet mount by
attaching the two suction cups
to the Plunge and rotating each
one clockwise until fully secure.
Watch our “Fundamentals to Cold
Plunging” and our “Guided Plunge”
video series to create a consistant
cold plunge ritual at
thecoldplunge.com/videos.
10
9
11
12

To keep your Plunge water safe and clean in a commercial
environment, see below for the protocol we recommend. This is a
non-chlorine protocol that we’ve seen work well if followed
correctly, but you are more than welcome to use chlorine if it
doesn't work for your setting. If your water gets murky, always
drain and refill. If your plunge ever stops filtering or is off, be sure
to empty the plunge, the filter, and the chiller. Sitting water will not
be sanitary for the system. Also, if water is not flowing, please shut
off the chiller, as the chiller will eventually break without flow.
Note: Please be aware that besides offering these guidelines, Plunge
customer support is not available to troubleshoot water quality.
COMMERCIAL WATER
MAINTENANCE
PROTOCOL
FIRST STEPS
1. Fill your Plunge with fresh water using the carbon hose filter.
2. Add 4 Tablespoons of Sirona Alkalinity Up
3. Add 4 teaspoons of Sirona Sanitizer
4. Add 8 Tablespoons of 35% Hydrogen Peroxide

- Drain and refill your plunge
1. Connect a hose.
2. Open the valve on the bottom right on the backside
of the unit
3. Refill to 4-5 inches from the top.
- Add 4 teaspoons of Sirona Sanitizer
- Add 4 tablespoons of Sirona Alkalinity Up
- Change your filter.
1. Pull up the white diverter valve to the side.
2. Use the filter wrench to loosen the filter canister.
3. Replace the filter.
4. Make sure the O-ring is still in place.
5. Tighten filter back on.
6. Pull the white diverter valve back to the down position.
COMMERCIAL WATER
MAINTENANCE
PROTOCOL
Hydrogen Peroxide Add 35% H2O2
PPM Level
0-20 8 Tbsp
21-40 7Tbsp
41-60 6Tbsp
61-80 5Tbsp
80-100 3Tbsp
101+ 0 Tbsp
DAILY
WEEKLY
- Clean drain cover and wipe the surface of the plunge with a sponge.
- Check Hydrogen Peroxide levels using a test kit.
- Add 35% hydrogen peroxide as needed based on chart morning and night.
PLAY VIDEO

COMMERCIAL WATER
MAINTENANCE
PROTOCOL
EVERY 4 MONTHS OR AS NEEDED
- Clean out Pump
1. Drain the Plunge
2. Unscrew both nuts so the Pump can come completely
off
3. Unplug the pump cord from the electrical box.
4. Twist the end piece and remove to exposes the
impeller.
5. Clean out the impeller. It can be fully removed and
cleaned out.
6. Make sure O ring is put back in place if it was removed.
7. Reinstall all pieces back together and plug the pump
back in.
BIANNUALLY
- Deep Clean Plumbing
1. If you have hot water, fill the plunge with hot
water.
2. Put in a teaspoon of plumbing jet cleaner e.g.
Aqua
3. Let the system run for at least 30 minutes.
4. Drain and refill.
PLAY VIDEO
PLAY VIDEO
Table of contents


