PNI 380 User manual

PNI 380
Chematoare pentru vanatoare
Hunting Caller
User manual / Ръководство за потребителя / Benutzerhandbuch / Manual de usuario / Manuel utilisateur
Használati utasítás / Manuale d’uso / Instrukcja obsługi / Manual de utilizare
EN User manual ............................................. 2
BG Ръководство за потребителя ................ 4
DE Benutzerhandbuch ................................... 6
ES Manual de usuario .................................... 8
FR Manuel utilisateur ..................................... 10
HU Használati utasítás ................................... 12
IT Manuale utente ........................................ 14
PL Instrukcja obsługi ..................................... 16
RO Manual de utilizare ................................... 18

EN
2
WARNINGS
Use the product in accordance with the instructions and procedures in this manual. Improper use may result
in malfunction, and loss of warranty.
This product can be used for the study of wildlife, the removal of certain species of pests or even during the
hunting season, thanks to the very loud horn speaker, the remote controls and the small dimensions, being
able to play the desired sound at very high level.
PRODUCT DESCRIPTION
USING DEVICE
1. Turn on the unit using the highlight button in Fig. C.
2. The LCD screen opens and you can view the information on the screen. (Fig. A)
(The controls from left to right are: Play / Pause), return key to the previous menu, next menu key (Next),
volume up key, volume down key.
The numeric keys from left to right are: 1,2,3,4,5,6,7,8, 9, repeat key, 0 key, M key).
3. Press the M key in the numeric key area after the unit has switched on to enter the menu. You have 4
submenus (Playback, Language, Time, Storage) available. Select the desired submenu using the keys
Previous or Next and press the M key to conrm.
a) Playback: Press the M key in the 4 modes: normal / all / same / random; Press “Play” key to play the
desired music le.
b) Language: The default language is English, press the M key to enter the language menu and briey
press the Previous or Next key to choose the desired language and then press the M key to conrm. You
have 18 languages (Ex: English, Simplied Chinese, Traditional Chinese, French, Danish).
c) Timer: Press the M key to enter the menu.
- Timer settings: Press the Previous or Next key to select the timer option, and then press the M key to
enter the timer mode. Press the Previous or Next key to move the cursor to the desired timer, and then press

EN
3
the volume up or volume down key to increase or decrease the timer.
- Timer setting: Press the Previous or Next key to move the cursor to the desired timer, and then press the
volume key + or volume - to increase or decrease the timer value, press the M key to conrm after you have
made the desired settings.
- Data storage: The unit has a TF (Micro SD purchase card separately) card reader, as shown in Figure D.
Press the M key to enter the main menu or use the Previous or Next keys to select the storage option and
then press the M key to select the TF memory and press the M key to conrm.
d) Customized options: Press keys 0-9 on the keyboard, which will also appear on the LCD screen, for
example, press the 9 key representing the 9th song, and then press the M key to play: Ex: 0001 0002 rst
and second songs.
e) External speaker (Fig. D), The 2 jack sockets allow the connection of 2 external speakers.
f) The power supply can be made with a dedicated 12V battery or AAA battery holder. If you cannot charge
the battery, you can use AAA batteries (Fig. B)
d) Press the Repeat key on the remote control keypad to pair a new remote control.
g) External power supply can be made with 12V c.c.
COPYING FILES
In order to use the caller you must insert a transash card (microSD to be purchased separately) in the
dedicated slot.
Then connect the caller using the USB cable ifrom package to a PC / Laptop.
Turn On caller from the dedicated switch, and open the external storage unit (the caller) on the PC /
Laptop.
Copy the desired les to the external storage unit (callers).
Disconnect the caller from the PC / Laptop and test / play the copied les.
LCD display 128 x 64
PC/Laptop connection USB 2.0 (read: 1000KB, write 800KB)
Card capacity (TF/MicroSD) max. 16 Gb
Power Li-ion battery 1000 mAh
External 12 V c.c.
Audio & specications
multimedia les
Output power 2 x 10 W
MP3, BPS: 5Kbps – 320 Kbps
WMA, WMV, ASF,
BPS
5 Kbps – 384 Kbps
Frequency
response
20 Hz – 20 KHz
S/N Radio 120 dB
Media format MP3/WMA
Autonomy over 8 hours
Temperature -26˚C - +60˚C
Default language Engleza
Operating system Windows XP, 7, 9, 10, Mac OS 10, Linux 2.4.2

BG
4
ПРЕДУПРЕЖДЕНИЯ
Използвайте продукта в съответствие с инструкциите и процедурите в това ръководство.
Неправилното използване може да доведе до неизправност, неизправност и загуба на гаранция.
Този продукт може да се използва за изучаване на дивата природа, премахване на определени видове
вредители или дори по време на ловния сезон, благодарение на много силния високоговорител на
клаксона, дистанционните управления и малките размери, като може да възпроизвежда желания звук
много силно и силно.
ОПИСАНИЕ НА ПРОДУКТА
ВЪВЕЖДАНЕ В ЕКСПЛОАТАЦИЯ
1. Включете устройството с помощта на бутона за осветяване на фиг. В.
2. LCD екрана се отваря и можете да видите информацията на екрана. (Фиг. A)
(Контролите отляво надясно са: Възпроизвеждане / Пауза), клавиш за връщане към предишното
меню, следващ клавиш от менюто (Следващ), клавиш за увеличаване на силата на звука, клавиш за
намаляване на силата на звука.
Цифровите клавиши отляво надясно са: 1,2,3,4,5,6,7,8, 9, ключ за повторение, ключ 0, ключ M).
3. Натиснете клавиша M в областта на цифровия клавиш, след като устройството се включи, за
да влезете в менюто. Имате на разположение 4 подменюта (Playback, Language, Time, Storage).
Изберете желаното подменю с помощта на клавишите Предишна или следваща и натиснете клавиша
M за потвърждение.
a) играя (Playback): Натиснете клавиша M в четирите режима: нормален / всички / същия / случаен;
Натиснете клавиш „Възпроизвеждане“, за да възпроизведете желания музикален файл.
b) език (Language): Езикът по подразбиране е английски, натиснете клавиша M, за да влезете в
менюто на езика, и за кратко натиснете клавиша Previous или Next, за да изберете желания език, след
което натиснете клавиша M, за да потвърдите. Имате 18 езика (напр .: английски, опростен китайски,
традиционен китайски, френски, датски).
c) синхронизиране (Timer): Натиснете клавиша M, за да влезете в менюто.

BG
5
- Настройки на таймера: Aнатиснете клавиша Предишен или Следващ, за да изберете опцията за
таймер, след което натиснете клавиша M, за да влезете в режим на таймера. Натиснете клавиша
Предишен или Следващ, за да преместите курсора към желания таймер, след което натиснете
клавиша за увеличаване или намаляване на силата на звука, за да увеличите или намалите таймера.
- Настройки за изчакване: Натиснете предишния или следващия клавиш, за да преместите курсора
към желания таймер, след което натиснете клавиша за сила на звука + или силата на звука - за да
увеличите или намалите стойността на таймера, натиснете клавиша M, за да потвърдите, след като
направите желаните настройки.
Съхранение на данни:Устройството има TF (Micro SD отделно закупен) четец на карти, както е
показано на фигура D. Натиснете клавиша M, за да влезете в главното меню, или използвайте
клавишите предишен или следващ, за да изберете опцията за съхранение, след което натиснете M
клавиш, за да изберете TF памет и натиснете M клавиш за потвърждение.
d) Опции за персонализиране: Натиснете клавишите 0-9 на клавиатурата, които също ще се появят
на LCD екрана, например натиснете клавиша 9, представляващ 9-та песен, и след това натиснете
клавиша M, за да играете: Ex: 0001 0002 представлява първата и втората песен.
e) Външен високоговорител (Фиг. D), 2-те гнездови жакове позволяват свързването на 2 външни
високоговорителя.
f) Захранването може да се извърши със специална 12V батерия или AAA държач за батерии. Ако не
можете да зареждате батерията, можете да използвате батерии AAA (фиг. B)
g) Натиснете бутона Repeat на клавиатурата на дистанционното управление, за да свържете ново
дистанционно управление.
h) Външно захранване може да се извърши с 12V c.c.
КОПИРАНЕ НА ФАЙЛОВЕ
За да използвате повикването, трябва да поставите трансфлаш карта (microSD, за да бъде закупена
отделно) в специалния слот.
След това свържете обаждащия се с помощта на USB кабел в пакета към компютър / лаптоп.
Стартирайте обаждащия се от специалния бутон и отворете външния модул за съхранение
(обаждащия се) на PC / Laptop.
Копирайте желаните файлове във външното устройство за съхранение (обаждащите се).
Изключете обаждащия се от PC / Laptop и тествайте / възпроизвеждайте копираните файлове.
LCD екран 128 x 64
PC / лаптоп връзка USB 2.0 (citire: 1000KB, scriere 800KB)
Капацитет на картата TF (
MicroSD)
max. 16 Gb
хранене батерия Li-ion 1000 mAh
външен 12 V c.c.
Аудио и функции
Мултимедийни файлове
Изходна мощност
на външен
високоговорител
2 x 10 W
MP3, BPS: 5Kbps – 320 Kbps
WMA, WMV, ASF,
BPS
5 Kbps – 384 Kbps
Честотна
характеристика
20 Hz – 20 KHz
S/N Radio 120 dB
Музикален формат MP3/WMA
температура -26˚C - +60˚C
Меню за език по подразбиране English
Sistem de operare compatibil Windows XP, 7, 9, 10, Mac OS 10, Linux 2.4.2

DE
6
ATENTIONARI SPECIALE
Verwenden Sie das Produkt gemäß den Anweisungen und Verfahren in diesem Handbuch. Eine
unsachgemäße Verwendung kann zu Fehlfunktionen, Fehlfunktionen und zum Verlust der Garantie führen.
Dieses Produkt kann für die Untersuchung von Wildtieren, die Entfernung bestimmter Schädlingsarten
oder sogar während der Jagdsaison verwendet werden. Dank des sehr lauten Hornlautsprechers, der
Fernbedienungen und der geringen Abmessungen kann der gewünschte Klang sehr stark und kräftig
wiedergegeben werden.
PRODUKTBESCHREIBUNG
INBETRIEBNAHME
1. Schalten Sie das Gerät mit der Hervorhebungstaste in Abb. C ein.
2. Der LCD-Bildschirm wird geöffnet und Sie können die Informationen auf dem Bildschirm anzeigen. (Abb.
A)
(Die Bedienelemente von links nach rechts lauten: Wiedergabe / Pause), Zurückkehren zum vorherigen
Menü, Drücken der nächsten Menütaste (Weiter), Erhöhen der Lautstärke, Verringern der Lautstärke.
Die Zifferntasten von links nach rechts lauten: 1,2,3,4,5,6,7,8, 9, Wiederholungstaste, Taste 0, Taste M).
3. Drücken Sie die Taste M im Zifferntastenbereich, nachdem das Gerät eingeschaltet wurde, um das Menü
aufzurufen. Sie haben 4 Untermenüs (Wiedergabe, Sprache, Zeit, Speicher) zur Verfügung. Wählen Sie mit
den Tasten das gewünschte Untermenü aus
Zurück oder Weiter und drücken Sie die M-Taste zur Bestätigung.
a) Spielen (Playback): Drücken Sie die M-Taste in den 4 Modi: normal / alle / gleich / zufällig; Drücken Sie
die “Play” -Taste, um die gewünschte Musikdatei abzuspielen.
b) Sprache (Language):Die Standardsprache ist Englisch. Drücken Sie die Taste M, um das Sprachmenü
aufzurufen, und drücken Sie kurz die Taste Zurück oder Weiter, um die gewünschte Sprache auszuwählen.
Drücken Sie anschließend die Taste M, um die Auswahl zu bestätigen. Sie haben 18 Sprachen (zB Englisch,
vereinfachtes Chinesisch, traditionelles Chinesisch, Französisch, Dänisch).c) Temporizare (Timer): Apăsţi

DE
7
tasta M pentru a intra în meniu.
- Timer-Einstellungen: Drücken Sie die Taste Zurück oder Weiter, um die Timer-Option auszuwählen, und
drücken Sie dann die Taste M, um den Timer-Modus aufzurufen. Drücken Sie die Zurück- oder Weiter-Taste,
um den Cursor auf den gewünschten Timer zu bewegen, und drücken Sie dann die Lauter- oder Leiser-
Taste, um den Timer zu erhöhen oder zu verringern.
- Timer-Einstellung: Drücken Sie die Taste Zurück oder Weiter, um den Cursor auf den gewünschten Timer
zu bewegen, und drücken Sie dann die Lautstärketaste + oder die Lautstärketaste -, um den Timerwert zu
erhöhen oder zu verringern. Drücken Sie die Taste M, um zu bestätigen, nachdem Sie die gewünschten
Einstellungen vorgenommen haben.
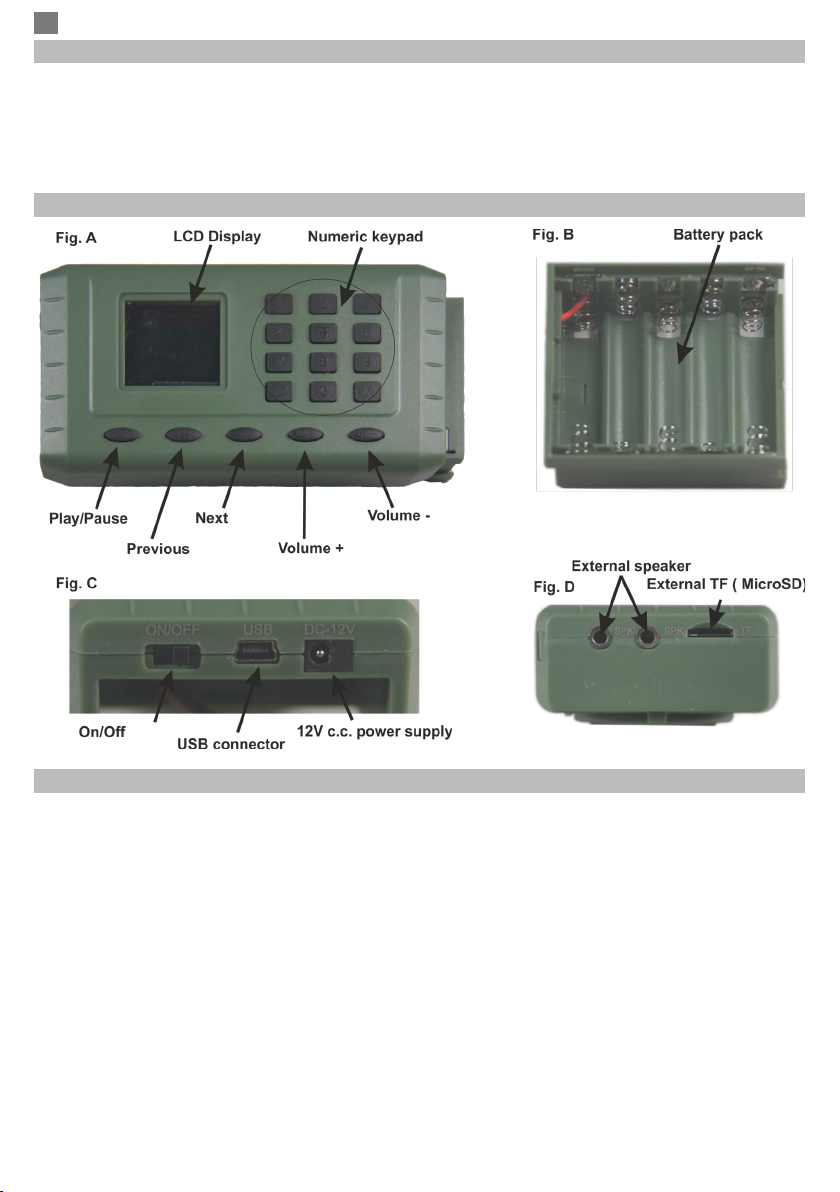
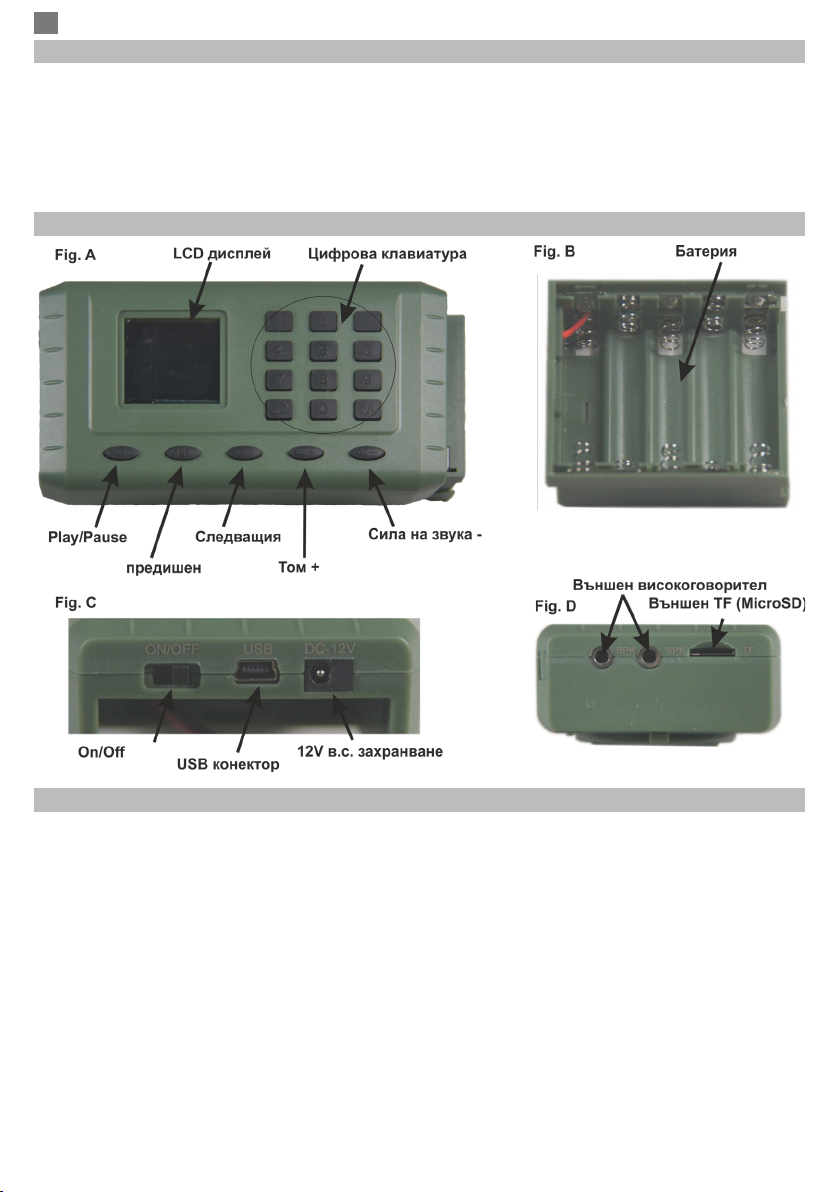
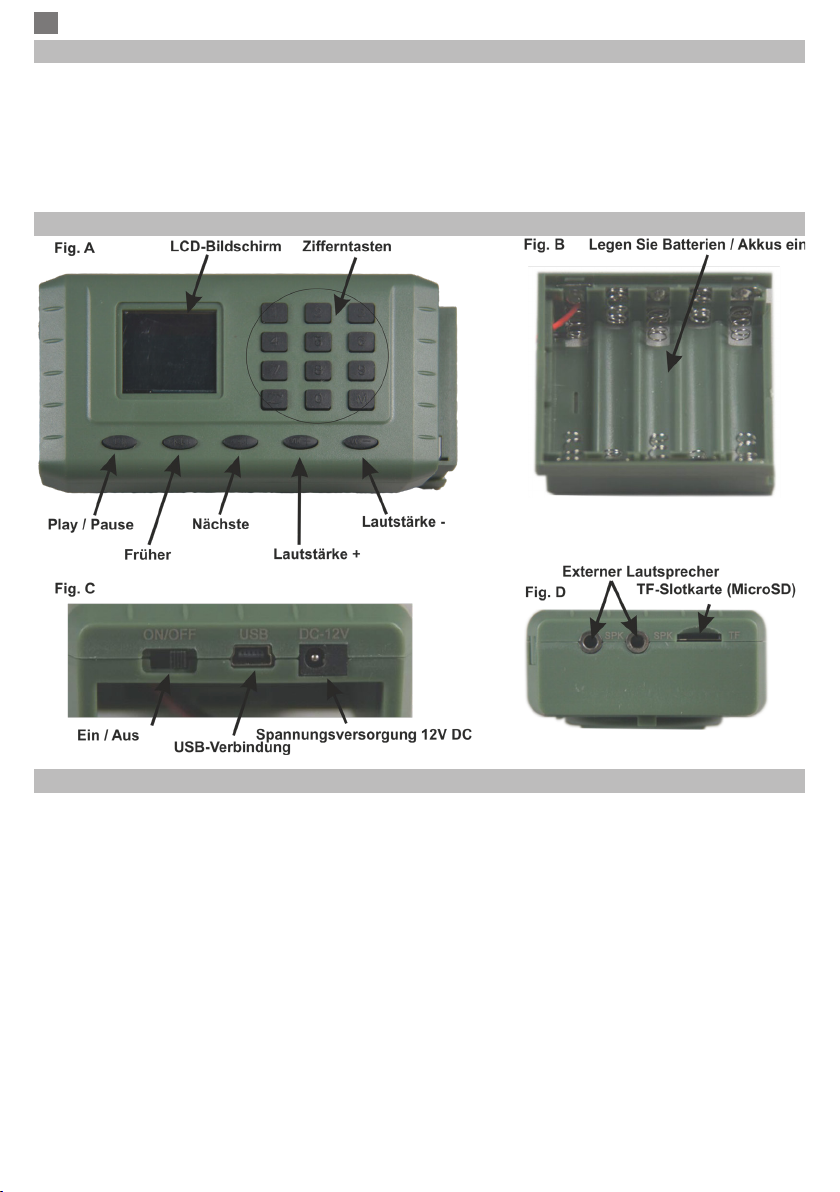
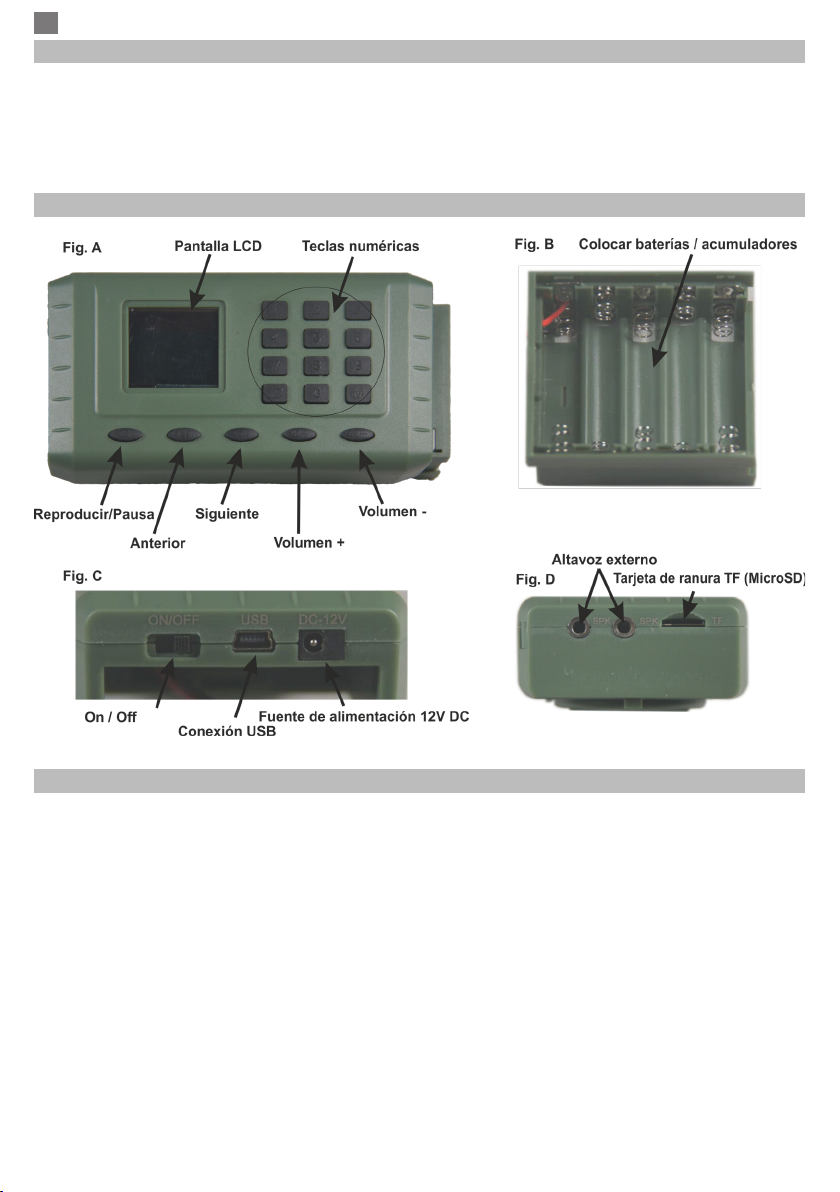
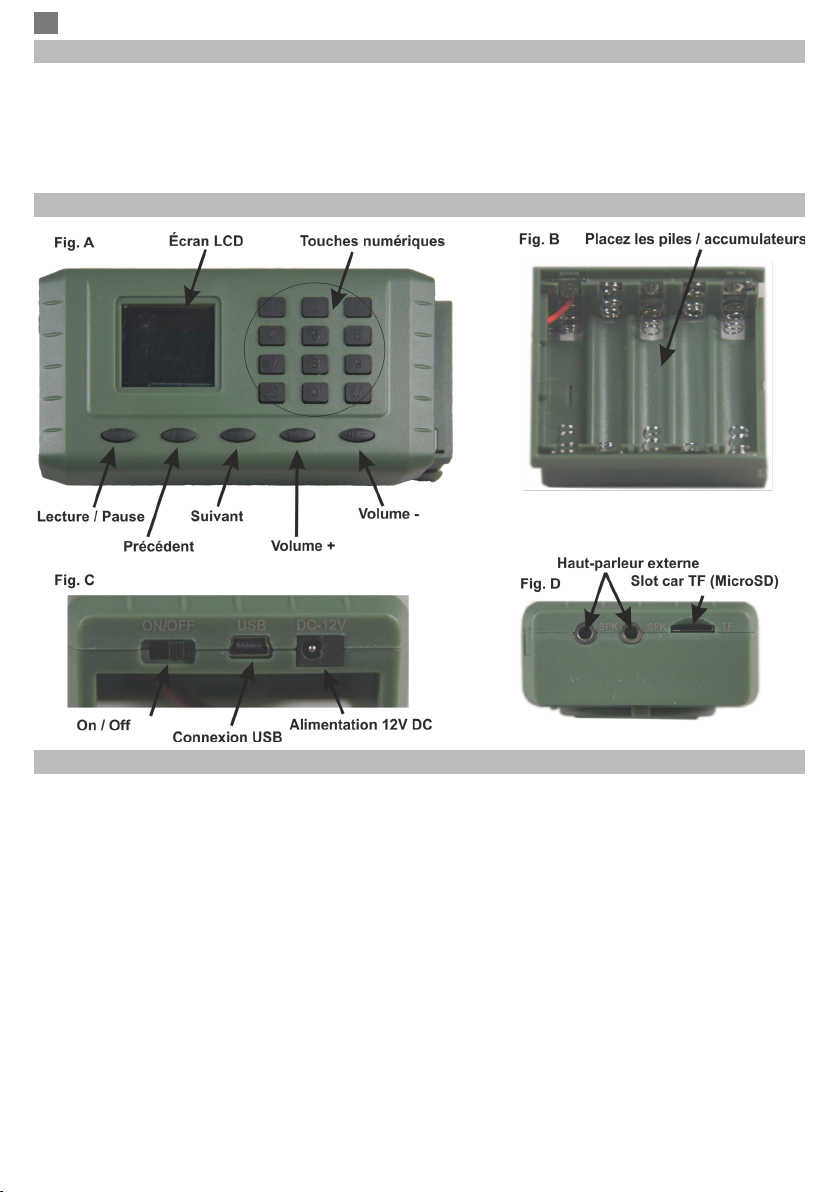
Datenspeicherung: Das Gerät verfügt über einen TF-Kartenleser (Micro SD Purchase Card separat), wie in
Abbildung D dargestellt. Drücken Sie die Taste M, um das Hauptmenü aufzurufen, oder verwenden Sie die
Tasten Zurück oder Weiter, um die Speicheroption und auszuwählen Drücken Sie dann die M-Taste, um den
TF-Speicher auszuwählen, und drücken Sie zur Bestätigung die M-Taste.
d) Anpassungsoptionen: Drücken Sie die Tasten 0-9 auf der Tastatur, die auch auf dem LCD-Bildschirm
angezeigt werden. Drücken Sie beispielsweise die Taste 9, die das 9. Lied darstellt, und drücken Sie dann
die Taste M, um Folgendes abzuspielen: Beispiel: 0001 0002 repräsentiert das erste und zweite Lied.
e) Externer Lautsprecher (Abb. D). An den 2 Buchsen können 2 externe Lautsprecher angeschlossen
werden.
f) Die Stromversorgung kann mit einer speziellen 12-V-Batterie oder einem AAA-Batteriehalter erfolgen.
Wenn Sie den Akku nicht auaden können, können Sie AAA-Batterien verwenden (Abb. B).
g) Drücken Sie die Wiederholungstaste auf der Fernbedienungstastatur, um eine neue Fernbedienung zu
koppeln.
h) Externe Stromversorgung kann mit 12 V Gleichstrom erfolgen.
DATEIEN KOPIEREN
Um den Anruf nutzen zu können, müssen Sie eine Transash-Karte (microSD muss separat erworben
werden) in den dafür vorgesehenen Steckplatz einlegen.
Schließen Sie dann den Anrufer mit dem mitgelieferten USB-Kabel an einen PC / Laptop an.
Starten Sie den Anrufer über die entsprechende Taste und öffnen Sie die externe Speichereinheit (den
Anrufer) auf dem PC / Laptop.
Kopieren Sie die gewünschten Dateien auf die externe Speichereinheit (Anrufer).
Trennen Sie den Anrufer vom PC / Laptop und testen / spielen Sie die kopierten Dateien ab.
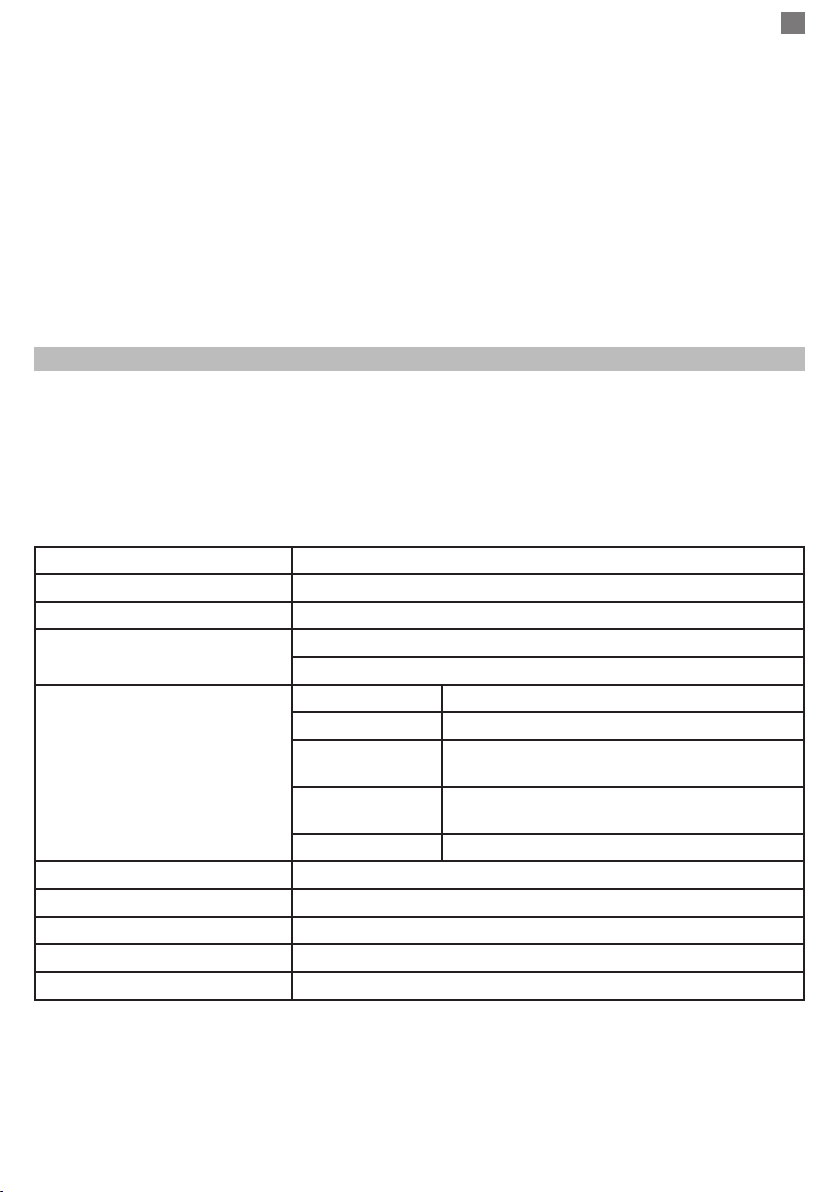
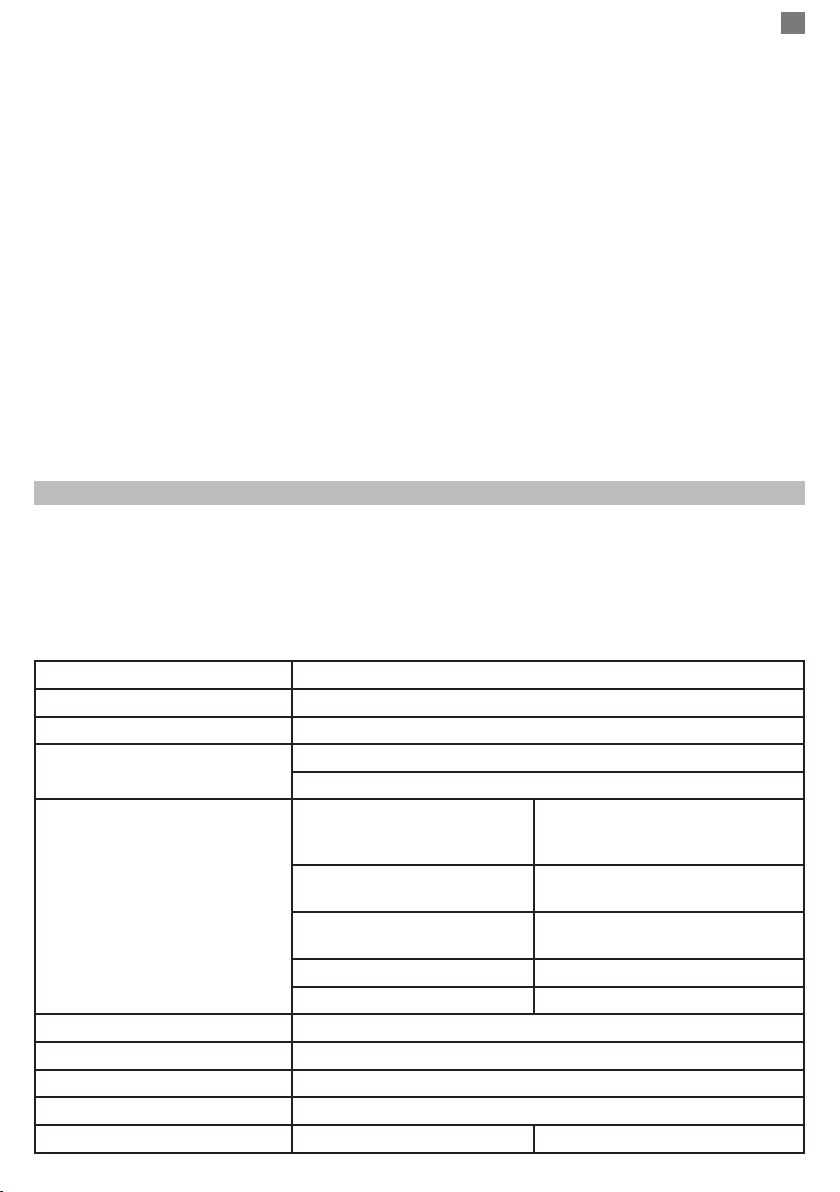
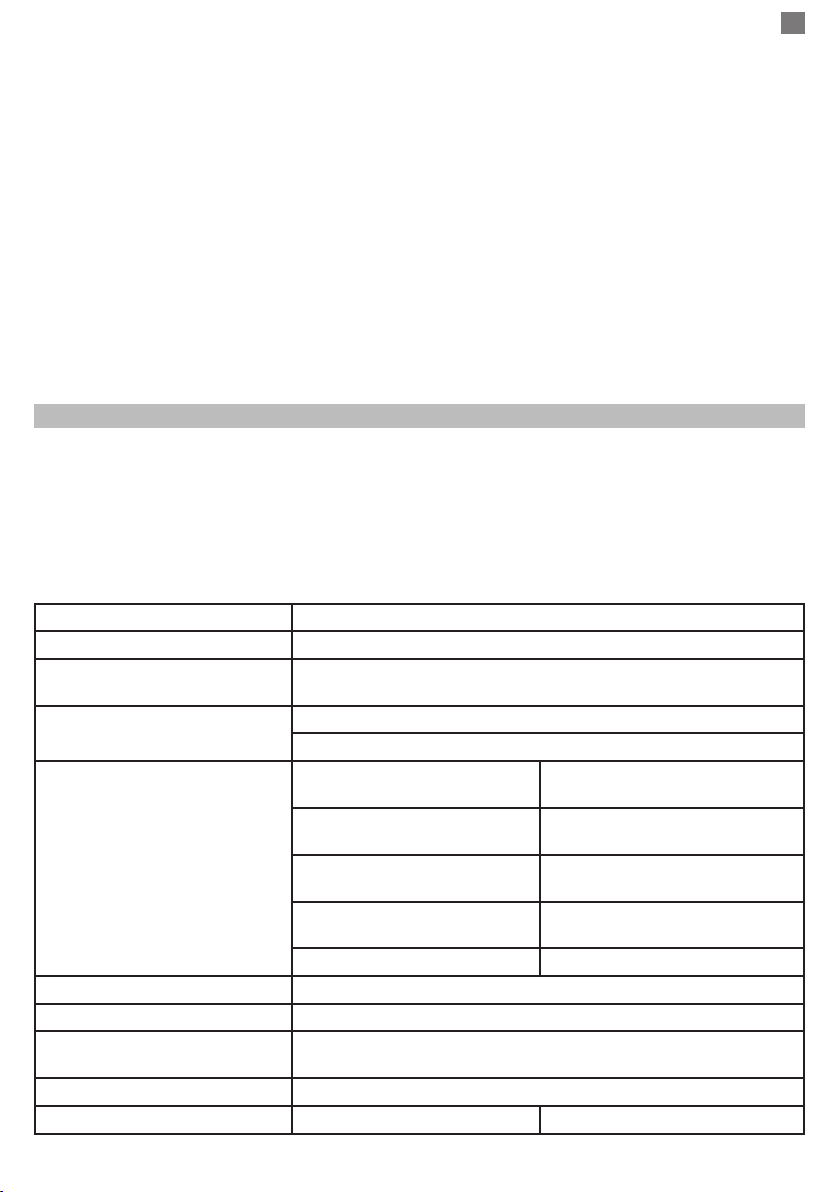
LCD-Bildschirm 128 x 64
PC / Laptop-Verbindung USB 2.0 (lesen: 1000 KB, schreiben 800 KB)
TF-Kartenkapazität (MicroSD) max. 16 GB
Ernährung 1000 mAh Li-Ion Akku
Externe 12 V DC
Audio und Funktionen
Ausgangsleistung des
externen Lautsprechers 2 x
10 W
2 x 10 W
Multimedia-Daten 5 Kbit / s -
320 Kbit / s
5Kbps – 320 Kbps
WMA, WMV, ASF, BPS 5 Kbit /
s - 384 Kbit / s
5 Kbps – 384 Kbps
Frequenzgang 20 Hz - 20 KHz 20 Hz – 20 KHz
S / N Radio 120 dB 120 dB
Musikformat MP3 / WMA
Temperatur -26 ° C - + 60 ° C
Standardsprachmenü Englisch
Kompatibles Betriebssystem Windows XP, 7, 9, 10, Mac OS 10, Linux 2.4.2

ES
8
ADVERTENCIAS ESPECIALES
Use el producto de acuerdo con las instrucciones y procedimientos de este manual. El uso incorrecto puede
provocar un mal funcionamiento, un mal funcionamiento y la pérdida de la garantía.
Este producto se puede utilizar para el estudio de la vida silvestre, la eliminación de ciertas especies de
plagas o incluso durante la temporada de caza, gracias al altavoz de bocina muy fuerte, los controles
remotos y las pequeñas dimensiones, pudiendo reproducir el sonido deseado con mucha fuerza y fuerza.
DESCRIPCIÓN DEL PRODUCTO
PUESTA EN MARCHA
1. Encienda la unidad usando el botón resaltado en la Fig. C.
2. Se abre la pantalla LCD y puede ver la información en la pantalla. (Fig. A)
(Los controles de izquierda a derecha son: Reproducir / Pausa), tecla Volver al menú anterior, tecla Menú
siguiente, tecla Volumen siguiente, tecla Bajar volumen.
Las teclas numéricas de izquierda a derecha son: 1,2,3,4,5,6,7,8, 9, tecla de repetición, tecla 0, tecla M).
3. Presione la tecla M en el área de teclas numéricas después de que la unidad se haya encendido para
ingresar al menú. Tiene 4 submenús (Reproducción, Idioma, Hora, Almacenamiento) disponibles.
Seleccione el submenú deseado usando las teclas Anterior o Siguiente y presione la tecla M para conrmar.
a) Jugar (Playback): Presione la tecla M en los 4 modos: normal / todo / igual / aleatorio; Presione la tecla
“Reproducir” para reproducir el archivo de música deseado.
b) Idioma (Language): El idioma predeterminado es el inglés, presione la tecla M para ingresar al menú de
idiomas y presione brevemente la tecla Anterior o Siguiente para elegir el idioma deseado, y luego presione
la tecla M para conrmar. Tiene 18 idiomas (ej .: inglés, chino simplicado, chino tradicional, francés, danés).
c) Sincronización(Timer): Presione la tecla M para ingresar al menú.
- Conguración del temporizador: presione la tecla Anterior o Siguiente para seleccionar la opción de
temporizador y luego presione la tecla M para ingresar al modo de temporizador. Presione la tecla Anterior

RO
9
ES
9
o Siguiente para mover el cursor al temporizador deseado, y luego presione la tecla para subir o bajar el
volumen para aumentar o disminuir el temporizador.
- Conguración del temporizador: presione la tecla Anterior o Siguiente para mover el cursor al
temporizador deseado, y luego presione la tecla de volumen + o volumen - para aumentar o disminuir el
valor del temporizador, presione la tecla M para conrmar después de haber realizado la conguración
deseada.
Almacenamiento de datos: la unidad tiene un lector de tarjetas TF (tarjeta de compra Micro SD por
separado), como se muestra en la Figura D. Presione la tecla M para ingresar al menú principal o use las
teclas Anterior o Siguiente para seleccionar la opción de almacenamiento y luego presione la tecla M para
seleccionar la memoria TF y presione la tecla M para conrmar.
d) Opciones de personalización: presione las teclas 0-9 en el teclado, que también aparecerán en la
pantalla LCD, por ejemplo, presione la tecla 9 que representa la novena canción y luego presione la tecla M
para reproducir: Ej: 0001 0002 Primera y segunda canción.
e) Altavoz externo (Fig. D), las 2 tomas jack permiten la conexión de 2 altavoces externos.
f) La fuente de alimentación se puede hacer con una batería dedicada de 12V o un soporte de batería AAA.
Si no puede cargar la batería, puede usar baterías AAA (Fig. B)
d) Presione la tecla Repetir en el teclado del control remoto para vincular un nuevo control remoto.
g) La fuente de alimentación externa se puede hacer con 12V c.c.
COPIAR ARCHIVOS
Para utilizar la llamada, debe insertar una tarjeta transash (la tarjeta microSD se debe comprar por
separado) en la ranura dedicada.
Luego conecte la llamada usando el cable USB en el paquete a una PC / Laptop.
Inicie la llamada desde el botón dedicado y abra la unidad de almacenamiento externo (la persona que
llama) en la PC / computadora portátil.
Copie los archivos deseados a la unidad de almacenamiento externo (personas que llaman).
Desconecte la persona que llama de la PC / computadora portátil y pruebe / reproduzca los archivos
copiados.
Pantalla LCD 128 x 64
Conexión PC / Laptop USB 2.0 (lectura: 1000 KB, escribir 800 KB)
Capacidad de la tarjeta TF
(MicroSD)
máx. 16 GB
Alimentación Batería de iones de litio de 1000 mAh
Externo 12 V DC
Audio y características
Potencia de salida de altavoz
externo 2 x 10 W 2 x 10 W
Archivos multimedia de 5
Kbps - 320 Kbps
5Kbps – 320 Kbps
WMA, WMV, ASF, BPS 5 Kbps
- 384 Kbps
5 Kbps – 384 Kbps
Respuesta de frecuencia 20
Hz - 20 KHz
20 Hz – 20 KHz
Radio S / N 120 dB 120 dB
Formato de música MP3 / WMA
Temperatura -26˚C - + 60˚C
Menú de idioma
predeterminado
Inglés
Sistema operativo compatible Windows XP, 7, 9, 10, Mac OS 10, Linux 2.4.2

FR
10
AVERTISSEMENTS SPÉCIAUX
Utilisez le produit conformément aux instructions et aux procédures décrites dans ce manuel. Une utilisation
incorrecte peut entraîner un dysfonctionnement, une perte de garantie.
Ce produit peut être utilisé pour l’étude de la faune, la suppression de certaines espèces de ravageurs ou
même pendant la saison de chasse, grâce au haut-parleur à cor très fort, aux télécommandes et aux petites
dimensions, pouvant jouer le son désiré très fort.
DESCRIPTION DU PRODUIT
MISE EN SERVICE
1. Pdécorer l’unité à l’aide du bouton en surbrillance de la gure C.
2. L’écran LCD s’ouvre et vous pouvez voir les informations à l’écran. (Fig. A)
(Les commandes de gauche à droite sont: Lecture / Pause), Touche de retour au menu précédent, touche de
menu Suivant, touche de volume suivant, touche de diminution du volume.
Les touches numériques de gauche à droite sont les suivantes: 1,2,3,4,5,6,7,8, 9, touche de répétition, 0,
touche M).
3. Appuyez sur la touche M dans la zone des touches numériques une fois l’appareil allumé pour accéder au
menu. Vous avez 4 sous-menus (Lecture, Langue, Heure, Stockage) disponibles. Sélectionnez le sous-
menu souhaité à l’aide des touches Précédent ou Suivant et appuyez sur la touche M pour conrmer.
a) Lecture: appuyez sur la touche M dans les 4 modes: normal / tout / identique / aléatoire; Appuyez sur la
touche “Play” pour lire le chier de musique souhaité.
b) Langue (Language): La langue par défaut est l’anglais, appuyez sur la touche M pour accéder au menu
des langues, appuyez brièvement sur la touche Précédent ou Suivant pour choisir la langue souhaitée,
puis appuyez sur la touche M pour conrmer. Vous avez 18 langues (Ex: anglais, chinois simplié, chinois
traditionnel, français, danois).
c) Minuterie: Appuyez sur la touche M pour accéder au menu.
- Paramètres du minuteur: appuyez sur la touche Précédent ou Suivant pour sélectionner l’option de

FR
11
minuterie, puis appuyez sur la touche M pour passer en mode Minuterie. Appuyez sur la touche Précédent
ou Suivant pour déplacer le curseur sur le minuteur souhaité, puis appuyez sur la touche d’augmentation ou
de diminution du volume pour augmenter ou diminuer le minuteur.
- Réglage de la minuterie: appuyez sur la touche Précédent ou Suivant pour déplacer le curseur sur
la minuterie souhaitée, puis appuyez sur la touche de volume + ou sur le volume - pour augmenter ou
diminuer la valeur de la minuterie, appuyez sur la touche M pour conrmer après avoir effectué les réglages
souhaités.
Stockage des données: L’appareil est doté d’un lecteur de carte TF (carte d’achat Micro SD séparément),
comme illustré à la gure D. Appuyez sur la touche M pour accéder au menu principal ou utilisez les touches
Précédent ou Suivant pour sélectionner l’option de stockage et appuyez sur la touche M. puis appuyez sur la
touche M pour sélectionner la mémoire TF et appuyez sur la touche M pour conrmer.
d) Options de personnalisation: Appuyez sur les touches 0 à 9 du clavier, qui s’afcheront également sur
l’écran LCD. Par exemple, appuyez sur la touche 9 qui représente la neuvième chanson, puis appuyez sur la
touche M pour jouer: Ex: 0001 0002 représente première et deuxième chansons.
e) Haut-parleur externe (Fig. D), Les 2 prises jack permettent la connexion de 2 haut-parleurs externes.
f) L’alimentation peut être réalisée avec une batterie 12V dédiée ou un support de batterie AAA. Si vous ne
pouvez pas charger la batterie, vous pouvez utiliser des piles AAA (Fig. B)
d) Appuyez sur la touche Répéter du clavier de la télécommande pour apparier une nouvelle télécommande.
g) L’alimentation externe peut être faite avec 12V DC.
COPIER DES FICHIERS
Pour pouvoir utiliser l’appel, vous devez insérer une carte transash (la carte microSD doit être achetée
séparément) dans le logement dédié.
Ensuite, connectez l’appelant à l’aide d’un câble USB fourni à un PC / ordinateur portable.
Démarrez l’appelant à partir du bouton dédié et ouvrez l’unité de stockage externe (l’appelant) sur le PC /
l’ordinateur portable.
Copiez les chiers souhaités sur l’unité de stockage externe (appelants).
Déconnectez l’appelant du PC / ordinateur portable et testez / lisez les chiers copiés.
Écran LCD 128 x 64
Connexion PC / ordinateur portable USB 2.0 (lire: 1000 Ko, écrire 800 Ko)
Capacité de la carte TF (MicroSD) max. 16 Go
alimentation Batterie Li-ion 1000 mAh
12 V CC externe
Audio et caractéristiques
Puissance de sortie des
haut-parleurs externes 2
x 10 W
2 x 10 W
Médias 5Kbps - 320 Kbps 5Kbps – 320 Kbps
WMA, WMV, ASF, BPS 5
Kbps - 384 Kbps
5 Kbps – 384 Kbps
Réponse en fréquence 20
Hz - 20 KHz
20 Hz – 20 KHz
S / N Radio 120 dB 120 dB
Format de musique MP3 / WMA
température -26˚C - + 60˚C
Menu de langue par défaut Anglais
Système d'exploitation compatible Windows XP, 7, 9, 10, Mac OS 10, Linux 2.4.2

HU
12
KÜLÖNLEGES FIGYELMEZTETÉSEK
A terméket a kézikönyvben szereplő utasításoknak és eljárásoknak megfelelően használja. A nem megfelelő
használat hibás működést, meghibásodást és a jótállás elvesztését eredményezheti.
Ez a termék felhasználható vadon élő állatok tanulmányozására, egyes kártevő fajok eltávolítására vagy
akár a vadászidényben is, a nagyon hangos kürt hangszórónak, a távirányítónak és a kis méreteknek
köszönhetően, mivel nagyon erősen és erősen képes lejátszani a kívánt hangot.
TERMÉKLEÍRÁS
ÜZEMBE
1. Kapcsolja be az egységet a C. ábra kiemelő gombjával.
2. Megnyílik az LCD képernyő, és megnézheti az információkat a képernyőn. (A ábra) (Balról jobbra a
következő kezelőszervek: Lejátszás / Szünet), visszatérés az előző menübe, a következő menü gomb
(Következő), a hangerő növelése gomb, a hangerő csökkentése gomb.
Balról jobbra a numerikus gombok: 1,2,3,4,5,6,7,8, 9, ismétlődő gomb, 0 gomb, M gomb.
3. A készülék bekapcsolása után nyomja meg az M gombot a számgombok területén a menübe való
belépéshez. 4 almenü van (lejátszás, nyelv, idő, tárolás). A gombokkal válassza ki a kívánt almenüt
Előző vagy Következő, és nyomja meg az M gombot a megerősítéshez.
a) játszik (Playback): Nyomja meg az M gombot 4 üzemmódban: normál / minden / azonos / véletlen; A
kívánt zenefájl lejátszásához nyomja meg a “Play” gombot.
b) Nyelv (Language): Az alapértelmezett nyelv az angol, nyomja meg az M gombot a nyelv menübe való
belépéshez, és röviden nyomja meg az Előző vagy a Következő gombot a kívánt nyelv kiválasztásához,
majd nyomja meg az M gombot a megerősítéshez. 18 nyelve van (pl .: angol, egyszerűsített kínai,
hagyományos kínai, francia, dán).
c) időzítés (Timer): Nyomja meg az M gombot a menübe való belépéshez.
- Időzítő beállításai: Nyomja meg az Előző vagy a Következő gombot az időzítő opció kiválasztásához,

HU
13
majd nyomja meg az M gombot az időzítő módba lépéshez. Az előző vagy a következő gombbal mozgassa
a kurzort a kívánt időzítőre, majd nyomja meg a hangerőnövelő vagy lefelé gombot az időzítő növeléséhez
vagy csökkentéséhez.
- Időzítő beállítása: Az előző vagy a következő gombbal mozgassa a kurzort a kívánt időzítőre, majd
nyomja meg a hangerő + vagy a hangerőszabályzó gombot - az időzítő értékének növeléséhez vagy
csökkentéséhez nyomja meg az M gombot, hogy megerősítse a kívánt beállítások elvégzése után.
Adattárolás: Az egység TF (Micro SD vásárlási kártya) kártyaolvasóval rendelkezik, amint az a D. ábrán
látható. Nyomja meg az M gombot a főmenübe való belépéshez, vagy az Előző vagy a Következő
gombokkal válassza ki a tárolási lehetőséget, és majd nyomja meg az M gombot a TF memória
kiválasztásához, majd nyomja meg az M gombot a megerősítéshez.
d) Testreszabási lehetőségek: Nyomja meg a billentyűzet 0-9 gombjait, amelyek szintén megjelennek
az LCD képernyőn, például nyomja meg a 9. számot jelző 9 gombot, majd nyomja meg az M gombot a
lejátszáshoz: Ex: 0001 A 0002 az első és a második dalt képviseli.
e) Külső hangszóró (D. ábra), A 2 aljzat lehetővé teszi 2 külső hangszóró csatlakoztatását.
f) Az áramellátás dedikált 12 V-os elemmel vagy AAA elemtartóval történhet. Ha nem tudja feltölteni az
akkumulátort, használhat AAA elemeket (B. ábra)
d) Az új távirányító párosításához nyomja meg a távirányító kezelõjének Repeat gombját.
g) Külső tápegység 12 V-os áramforrással biztosítható.
FÁJLOK MÁSOLÁSA
A hívás igénybevételéhez be kell helyeznie a transzash kártyát (a microSD-t külön kell megvásárolni) a
dedikált nyílásba.
Ezután csatlakoztassa a hívót a csomagban található USB kábellel a számítógéphez / laptophoz.
Indítsa el a hívót a dedikált gombbal, és nyissa meg a külső tárolóegységet (a hívót) a PC-n / laptopon.
Másolja a kívánt fájlokat a külső tárolóegységre (hívók).
Válasszuk le a hívót a számítógépről / laptopról, és teszteljük / lejátsszuk a másolt fájlokat.
LCD képernyő 128 x 64
PC / laptop kapcsolat USB 2.0 (olvasás: 1000KB, írj 800KB)
TF kártya kapacitás (MicroSD) max. 16 GB
etetés 1000 mAh Li-ion akkumulátor
Külső 12 V DC
Hang és szolgáltatások
Külső hangszóró
kimeneti teljesítménye 2
x 10 W
2 x 10 W
Multimédia letöltés
5Kbps - 320 Kbps
5Kbps – 320 Kbps
WMA, WMV, ASF, BPS 5
Kbps - 384 Kbps
5 Kbps – 384 Kbps
Frekvencia válasz 20 Hz
- 20 KHz
20 Hz – 20 KHz
S / N rádió 120 dB 120 dB
Zene formátum MP3 / WMA
hőmérséklet -26 ° C - + 60 ° C
Alapértelmezett nyelv menü angol
Kompatibilis operációs
rendszer
Windows XP, 7, 9, 10, Mac OS 10, Linux 2.4.2

IT
14
AVVERTENZE SPECIALI
Utilizzare il prodotto secondo le istruzioni e le procedure contenute in questo manuale. L’uso improprio può
provocare malfunzionamenti e perdita di garanzia.
Questo prodotto può essere utilizzato per lo studio della fauna selvatica, la rimozione di alcune specie di
parassiti o anche durante la stagione di caccia, grazie all’altoparlante a tromba molto rumoroso, al telecomando
e alle dimensioni ridotte, in grado di riprodurre il suono desiderato in modo molto forte.
DESCRIZIONE DEL PRODOTTO
MESSA IN FUNZIONE
1. Accendere l’unità utilizzando il pulsante On/Off mostrato nella Figura C.
2. Si apre lo schermo LCD ed è possibile visualizzare le informazioni sullo schermo. (Figura A) I controlli da
sinistra a destra sono: Riproduci / Pausa (Play/Pause), tasto di ritorno al menu precedente (Previous), tasto di
menu successivo (Next), tasto di aumento del volume, tasto di riduzione del volume.
I tasti numerici da sinistra a destra sono: 1,2,3,4,5,6,7,8, 9, tasto di ripetizione, tasto 0, tasto M.
3. Dopo l’accensione dell’unità, premere il tasto M nell’area dei tasti numerici per accedere il menu. Sono
disponibili 4 sottomenu (Riproduzione, Lingua, Tempo, Memoria). Selezionare il sottomenu desiderato
usando i tasti Previous o Next e premere il tasto M per confermare.
a) Riproduzione (Playback): Premere il tasto M nelle 4 modalità: normale / tutto / stesso / casuale; Premere
il tasto “Play” per riprodurre il le desiderato.
b) Lingua (Language): La lingua predenita è l’inglese, premere il tasto M per accedere al menu della lingua
e premere brevemente il tasto Previous o Next per scegliere la lingua desiderata, quindi premere il tasto M per
confermare. Ci sono 18 lingue (es: inglese, cinese semplicato, cinese tradizionale, francese, danese etc.).
c) Sincronizzazione (Timer): Premere il tasto M per accedere al menu.
- Impostazione timer: premere il tasto Previous o Next per selezionare l’opzione timer, quindi premere il
tasto M per accedere alla modalità timer. Premere il tasto Previous o Next per spostare il cursore sul timer

IT
15
desiderato, quindi premere il tasto volume su o volume giù per aumentare o diminuire il timer.
- Impostazione timer: premere il tasto Previous o Next per spostare il cursore sul timer desiderato, quindi
premere il tasto volume + o volume - per aumentare o ridurre il valore del timer, premere il tasto M per
confermare dopo aver effettuato le impostazioni desiderate.
Memorizzazione dei dati: l’unità dispone di un lettore di schede TF (la scheda non è inclusa nella confezione),
come mostrato nella Figura D. Premere il tasto M per accedere al menu principale o utilizzare i tasti Previous
o Next (Precedente o Successivo) per selezionare l’opzione di archiviazione e quindi premere il tasto M per
selezionare la memoria TF e premere il tasto M per confermare.
d) Opzioni di personalizzazione: Premere i tasti da 0 a 9 sulla tastiera. Per esempio, il tasto 9 per la
riproduzione della IX-a canzone, quindi premere il tasto M per riprodurre. Per esempio: 0001 e 0002
rappresentano il primo e il secondo le.
e) Altoparlante esterno (Figura D): Le 2 prese jack consentono il collegamento di 2 altoparlanti esterni.
f) L’alimentazione può essere effettuata con una batteria da 12 V dedicata o portabatterie AAA. Grazie alla
disponibilità in carica della batteria, è possibile utilizzare batterie AAA (Figura B)
d) Premere il tasto Repeat (Ripeti) sul telecomando per abbinare un nuovo telecomando.
g) L’alimentazione esterna può essere effettuata con 12V c.c.
COPIARE I FILE
Per utilizzare questo dispositivo è necessario inserire nello slot dedicato una scheda transash (microSD, da
acquistare separatamente) .
Quindi collegare il dispositivo utilizzando il cavo USB incluso nella confezione a un PC / laptop.
Avviare il dispositivo dal pulsante dedicato e aprire sul PC / laptop l’unità di archiviazione esterna (il dispositivo
di richiamo) .
Copiare i le desiderati sull’unità di memoria esterna (il dispositivo di richiamo).
Scollegare il dispositivo di richiamo dal PC / laptop e testare / riprodurre i le copiati.
Schermo LCD 128 x 64
Connessione PC / Laptop USB 2.0 (leggi: 1000 KB, scrivi 800 KB)
Capacità scheda TF (MicroSD) max. 16 GB
Alimentazione Batteria agli ioni di litio da 1000 mAh
12 V CC esterna
Audio e funzionalità
Potenza di uscita
dell'altoparlante esterno
2 x 10 W.
2 x 10 W
File multimediali da 5 Kbps
- 320 Kbps
5Kbps – 320 Kbps
WMA, WMV, ASF, BPS 5
Kbps - 384 Kbps
5 Kbps – 384 Kbps
Risposta in frequenza 20
Hz - 20 KHz
20 Hz – 20 KHz
Radio S / N 120 dB 120 dB
Formato musicale MP3 / WMA
Temperatura -26˚C - + 60˚C
Lingua predenita del menu Inglese
Sistema operativo compatibile Windows XP, 7, 9, 10, Mac OS 10, Linux 2.4.2

PL
16
SPECJALNE OSTRZEŻENIA
Używaj produktu zgodnie z instrukcjami i procedurami zawartymi w tym podręczniku. Niewłaściwe
użytkowanie może spowodować nieprawidłowe działanie, nieprawidłowe działanie i utratę gwarancji.
Ten produkt może być używany do badania dzikiej przyrody, usuwania niektórych gatunków szkodników,
a nawet podczas sezonu łowieckiego, dzięki bardzo głośnemu głośnikowi tubowemu, pilotom zdalnego
sterowania i niewielkim wymiarom, który jest w stanie odtwarzać pożądany dźwięk bardzo mocno i mocno.
OPIS PRODUKTU
URUCHOMIENIE
1. Włącz urządzenie za pomocą przycisku podświetlenia na rys. C.
2. Otwiera się ekran LCD i można wyświetlić informacje na ekranie. (Ryc. A) Elementy sterujące od lewej
do prawej to: Odtwórz / Pauza (Play/Pause), Klawisz powrotu do poprzedniego menu, Klawisz następnego
menu, Klawisz następnego głośności, Klawisz zmniejszania głośności. Klawisze numeryczne od lewej do
prawej to: 1,2,3,4,5,6,7,8, 9, klawisz powtarzania, klawisz 0, klawisz M).
3. Użyj klawisza M w użyciu klawiszy numerycznych po włączeniu urządzenia, aby wejść do menu.
Dostępne są 4 podmenu (Pobierz, Język, Czas, Pamięć). Wybierz Żądane podmenu za pomocą instrukcji
Poprzedni lub następny i naciśnij klawisz M., aby potwierdzić.
a) Odtwarzaj mp3(Playback): Naciśnij klawisz M w 4 trybach: normalny / wszystkie / takie same / losowe;
Naciśnij przycisk „Odtwórz”, aby odtworzyć żądany plik muzyczny.
b) Język(Language): Domyślnym językiem jest angielski, naciśnij klawisz M, aby przejść do menu języka
i krótko naciśnij klawisz Poprzedni lub Następny, aby wybrać żądany język, a następnie naciśnij klawisz M,
aby potwierdzić. Masz 18 języków (np .: angielski, chiński uproszczony, chiński tradycyjny, francuski, duński).
c) Chronometraż (Timer): Naciśnij klawisz M, aby wejść do menu.
- Ustawienia timera: Naciśnij przycisk Poprzedni lub Następny, aby wybrać opcję timera, a następnie
naciśnij klawisz M, aby przejść do trybu timera. Naciśnij przycisk Poprzedni lub Następny, aby przesunąć

PL
17
kursor do żądanego timera, a następnie naciśnij klawisz zwiększania lub zmniejszania głośności, aby
zwiększyć lub zmniejszyć timer.
- Ustawienie timera: Naciśnij klawisz Poprzedni lub Następny, aby przesunąć kursor do żądanego timera, a
następnie naciśnij klawisz głośności + lub głośność - aby zwiększyć lub zmniejszyć wartość timera, naciśnij
klawisz M, aby potwierdzić po dokonaniu żądanych ustawień.
Przechowywanie danych: Urządzenie jest wyposażone w czytnik kart TF (karta zakupu Micro SD oddzielnie),
jak pokazano na rysunku D. Naciśnij klawisz M, aby przejść do menu głównego lub użyj klawiszy Poprzedni
lub Następny, aby wybrać opcję przechowywania i następnie naciśnij klawisz M, aby wybrać pamięć TF i
naciśnij klawisz M, aby potwierdzić.
d) Opcje dostosowywania: Naciśnij klawisze 0–9 na klawiaturze, które pojawią się również na ekranie LCD,
na przykład naciśnij klawisz 9 reprezentujący dziewiąty utwór, a następnie naciśnij klawisz M, aby odtworzyć:
Np .: 0001 0002 reprezentuje pierwszą i drugą piosenkę.
e) Głośnik zewnętrzny (rys. D), 2 gniazda jack umożliwiają podłączenie 2 głośników zewnętrznych.
f) Zasilacz może być wykonany z dedykowanej baterii 12V lub uchwytu baterii AAA. Jeśli nie możesz
naładować baterii, możesz użyć baterii AAA (rys. B)
d) Naciśnij przycisk Repeat na klawiaturze pilota, aby sparować nowego pilota.
g) Zewnętrzny zasilacz może być wykonany przy napięciu 12V c.c.
KOPIOWANIE PLIKÓW
Aby skorzystać z połączenia, należy włożyć kartę Transash (microSD do nabycia osobno) w
dedykowanym gnieździe.
Następnie podłącz dzwoniącego za pomocą kabla USB w pakiecie do komputera / laptopa.
Uruchom dzwoniącego za pomocą specjalnego przycisku i otwórz zewnętrzną jednostkę pamięci
(dzwoniącą) na komputerze / laptopie.
Skopiuj żądane pliki do zewnętrznej jednostki pamięci (rozmówcy).
Odłącz dzwoniącego od komputera / laptopa i przetestuj / odtwórz skopiowane pliki.
Ekran LCD 128 x 64
Połączenie z komputerem /
laptopem
USB 2.0 (odczyt: 1000 KB, zapis 800 KB)
Pojemność karty TF (MicroSD) max. 16 GB
karmienie Akumulator litowo-jonowy 1000 mAh
Zewnętrzne 12 V DC
Audio i funkcje
Moc wyjściowa głośnika
zewnętrznego 2 x 10 W. 2 x 10 W
Multimedia multimedialne 5
Kb / s - 320 Kb / s
5Kbps – 320 Kbps
WMA, WMV, ASF, BPS 5 Kbps
- 384 Kbps
5 Kbps – 384 Kbps
Pasmo przenoszenia 20 Hz -
20 KHz
20 Hz – 20 KHz
Radio S / N 120 dB 120 dB
Format muzyczny MP3 / WMA
temperatura -26˚C - + 60˚C
Domyślne menu językowe angielski
Kompatybilny system
operacyjny
Windows XP, 7, 9, 10, Mac OS 10, Linux 2.4.2

RO
18
ATENTIONARI SPECIALE
Utilizati produsul respectand indicatiile si procedurile din acest manual. Utilizarea necorespunzatoare poate
duce la nefunctionalitate, defectare si pierderea garantiei.
Acest produs poate utilizat pentru studiul faunei, alungarea anumitor specii de daunatoare sau chiar si pe
parcursul sezonului de vanatoare, datorita difuzorului tip goarna foarte puternic, telecomenzii si dimensiunilor
reduse, reusind sa redea extrem de del si puternic sunetele dorite.
DESCRIERE PRODUS
PUNEREA IN FUNCTIUNE
1. Porniţi unitatea folosind butonul de ponire evidentiat in Fig.C.
2. Ecranul LCD se deschide şi veţi putea vizualiza informaţiile pe ecran. (Fig. A)
(Comenzile de la stânga la dreapta sunt: Redare/Pauză (Play/Pause), tastă de întoarcere la meniul anterior
(Previous), tastă meniu următor (Next), tastă creştere volum, tastă descreştere volum.
Tastele numerice de la stânga la dreapta sunt: 1,2,3,4,5,6,7,8, 9, tasta repetare, tasta 0, tasta M).
3. Apăsaţi tasta M din zona tastelor numerice după ce unitatea a pornit pentru a intra în meniu. Aveţi
disponibile 4 submeniuri (Playback, Language, Time, Storage). Alegeţi submeniul dorit utilizand tastele
Previous sau Next şi apasati tasta M pentru conrmare.
a) Redare (Playback): Apăsaţi tasta M din cele 4 moduri: normal/all/same/random; apăsaţi tasta „Play”
pentru a reda şierul de muzică dorit.
b) Limbă (Language): Limba implicită este engleza, apăsaţi tasta M pentru a intra în meniul de limbă şi
apăsati scurt tasta Previous sau Next pentru a alege limba dorită şi apoi apăsaţi tasta M pentru conrmare.
Aveţi disponibile 18 limbi (Ex: engleză, chineză simplicată, chineză tradiţională, franceză, daneză).
c) Temporizare (Timer): Apăsţi tasta M pentru a intra în meniu.
- Setari temporizare: Apăsaţi tasta Previous sau Next pentru a selecta opţiunea de temporizare şi mai
apoi apăsaţi tasta M pentru a intra în modul de temporizare. Apăsaţi tasta Previous sau Next pentru a muta

RO
19
cursorul pe temporizarea dorită şi mai apoi apăsaţi tasta creştere volum sau descreştere volum pentru a
creşte sau descreşte temporizarea.
- Setari durata temporizare: Apăsaţi tasta Previous sau Next pentru a muta cursorul la temporizarea dorită,
şi mai apoi apăsati tasta volum + sau volum – pentru a creşte sau descreşte valoarea temporizării, apăsaţi
tasta M pentru a conrma după ce aţi efectuat setările dorite.
Stocare date: Unitatea are un cititor de card de tip TF Micro SD ( cardul micro SD se achizitioneaza
separat), cum apare şi în gura D. Apăsaţi tasta M pentru a intra în meniul principal sau folosiţi tastele
Previous sau Next pentru a selecta opţiunea de stocare şi mai apoi apăsaţi tasta M pentru a alege memoria
TF şi apăsaţi tasta M pentru a conrma.
d) Opţiuni de personalizare: Apăsaţi tastele de la 0-9 de pe tastatură, ce vor apărea şi pe ecranul LCD,
spre exemplu apăsaţi tasta 9 ce reprezintă a IX-a melodie şi mai apoi apăsaţi tasta M pentru redare: Ex:
0001 0002 reprezintă prima şi a doua melodie.
e) Difuzor extern (Fig. D), Cele 2 mufe jack permit conectarea a 2 difuzoare externe .
f ) Alimentarea se poate face cu acumulator dedicat 12V sau suportul de baterii AAA. Dacă nu aveti
posibilitatea sa incarcati acumulatorul, puteti folosi baterii AAA (Fig. B)
d) Apăsaţi tasta Repeat de pe tastatura telecomenzii pentru a imperechea o telecomanda noua.
g) Alimentare externa se poate face cu 12V c.c.
COPIEREA FISIERELOR
Pentru a putea utiliza chematoarea trebuie sa introduceti un card transash ( microSD ce se achizitioneaza
separat ) in slotul dedicat.
Conectati apoi chematoarea cu ajutorul cablului USB din pachet la un PC / Laptop.
Porniti chematoarea de la butonul dedicat si deschideti pe PC / Laptop unitatea de stocare externa (
chematoarea ).
Copiati sierele dorite pe unitatea de stocare externa ( chematoare ).
Deconectati chematoarea de la PC / Laptop si testati / redati sierele copiate .
Ecran LCD 128 x 64
Conexiune PC/Laptop USB 2.0 (citire: 1000KB, scriere 800KB)
Capacitate Card TF ( MicroSD) max. 16 Gb
Alimentare Acumulator Li-ion 1000 mAh
Externa 12 V c.c.
Audio si Caracteristici
Fisiere multimedia
Putere iesire
difuzor extern 2 x 10 W
MP3, BPS: 5Kbps – 320 Kbps
WMA, WMV, ASF,
BPS
5 Kbps – 384 Kbps
Raspuns in
frecventa
20 Hz – 20 KHz
S/N Radio 120 dB
Format muzică MP3/WMA
Autonomie peste 8 ore
Temperatura -26˚C - +60˚C
Limba Implicita meniu Engleza
Sistem de operare compatibil Windows XP, 7, 9, 10, Mac OS 10, Linux 2.4.2

EN:
EU Simplied Declaration of Conformity
SC ONLINESHOP SRL declares that Hunting caller PNI 380 complies with the Directive EMC 2014/30/EU.
The full text of the EU declaration of conformity is available at the following Internet address:
https://www.mypni.eu/products/2157/download/certications
BG:
Опростена декларация за съответствие на ЕС
SC ONLINESHOP SRL декларира, че Ловен обаждащ се PNI 380 спазва директивата EMC 2014/30/
EU. Пълният текст на ЕС декларацията за съответствие е достъпен на следния интернет адрес:
https://www.mypni.eu/products/2157/download/certications
DE:
Vereinfachte EU- Konformitätserklärung
SC ONLINESHOP SRL erklärt, dass das Anrufer jagen PNI 380 der Richtlinie EMC 2014/30/EU entspricht.
Sie nden den ganzen Text der EU-Konformitätserklärung an der folgenden Internetadresse:
https://www.mypni.eu/products/2157/download/certications
ES:
Declaración UE de conformidad simplicada
SC ONLINESHOP SRL declara que el Llamador de caza PNI 380 cumple con la Directiva EMC 2014/30/
EU. El texto completo de la declaración de conformidad de la UE está disponible en la siguiente dirección de
Internet:
https://www.mypni.eu/products/2157/download/certications
FR
Déclaration de conformité simpliée de l’UE
SC ONLINESHOP SRL déclare que Appelant de chasse PNI 380 est conforme à la directive EMC 2014/30/
EU. Le texte complet de la déclaration de conformité UE est disponible à l’adresse Internet suivante:
https://www.mypni.eu/products/2157/download/certications
HU:
Egyszerűsített EU Megfelelési Közlemény
SC ONLINESHOP SRL kijelenti azt, hogy a Vadász hívó PNI 380 megfelel az EMC 2014/30/EU irányelvnek.
Az EU-megfelelőségi nyilatkozat teljes szövege a következő internetes címen érhető el:
https://www.mypni.eu/products/2157/download/certications
IT:
Dichiarazione UE di conformità semplicata
SC ONLINESHOP SRL dichiara che il Chiamante di caccia PNI 380 è conforme alla direttiva EMC
2014/30/UE. Il testo completo della dichiarazione di conformità europea è disponibile al seguente indirizzo
Internet:
https://www.mypni.eu/products/2157/download/certications
PL:
Uproszczona deklaracja zgodności UE
SC ONLINESHOP SRL oświadcza, że Polowanie na rozmówcę PNI 380 jest zgodny z dyrektywą EMC
2014/30/EU. Pełny tekst deklaracji zgodności UE dostępny jest pod następującym adresem internetowym:
https://www.mypni.eu/products/2157/download/certications
RO:
Declaratie UE de conformitate simplicata
SC ONLINESHOP SRL declara ca Chematoare vanatoare PNI 380 este in conformitate cu Directiva
EMC 2014/30/EU. Textul integral al declarației UE de conformitate este disponibil la urmatoarea adresa de
internet:
https://www.mypni.eu/products/2157/download/certications
Other manuals for 380
1
Table of contents
Languages:
Other PNI Transceiver manuals