manuals.online logo
Brands
  1. Home
  2. •
  3. Brands
  4. •
  5. POD Point
  6. •
  7. Automobile Batteries Charger
  8. •
  9. POD Point Solo 3 Instruction manual

POD Point Solo 3 Instruction manual

Charging
Solo 3 or Twin
Wi-Fi Connection Guide
Solo 3 or Twin S3/T-UK-CG-6
Connection Guide
Contents
Solo 3 or Twin S3/T-UK-CG-6
Connection Guide Page 1
02 Connect your Solo 3 or Twin to Wi-Fi
05 Changing your Wi-Fi network
07 Disconnecting your Solo 3 or Twin from Wi-Fi
09 Using a temporary mobile hotspot
192.168.1.1 OR 192.168.101.1
Connect your Solo 3 or Twin to Wi-Fi
Turn the charger o and on at the switch on the fuse box/consumer unit.
Scan for podpoint Wi-Fi network on a mobile device and press connect.
Please note: This network will only be available for 10 minutes after turning the charger o and on.
For Android device users: Press YES on the pop-up message, if applicable.
1
Open your web browser, type in one of the following IP addresses - please try the sequence
below and use all full stops.
If the first IP address does not work, please try the second one.
2
Status light
Once the charger is turned on, the status light on the front
(or sides) will illuminate white.
Note: Please have your Wi-Fi password ready and complete these steps whilst near to your charger..
If the first IP address works and you see the following screen, please turn to page 3.
Otherwise, please turn to page 4.
3
Solo 3 or Twin S3/T-UK-CG-6
Connection Guide Page 2
Continued on next page
2
1
Connect your Solo 3 or Twin to Wi-Fi
Pick your Wi-Fi network from the list and type in the
password.
Press Connect.
Note: Please pair the charger to 2.4 GHz Wi-Fi
networks only.
The new settings will take 15-30 minutes to activate. You can activate them immediately if
you switch your charger o and on again. The status light on the charger should go blue
with a short pink flash every few seconds.
If the status light remains white, you may need to restart the charger again and verify the
network credentials. If it still isn’t working, contact support at pod-point.com/contact.
4A
Solo 3 or Twin S3/T-UK-CG-6
Connection Guide Page 3
5A
Continued on next page
Tip: If you used the first IP address to set up your connection, follow instructions on
page 7 to update your Wi-Fi network.
Connect your Solo 3 or Twin to Wi-Fi
Pick your Wi-Fi network from the list and type in the
password.
Press Connect.
Note: Only 2.4 GHz Wi-Fi networks will be displayed.
The status light on the charger should go blue with a short pink flash every few seconds
within one minute of connecting to your Wi-Fi network.
If the status light remains white, you may need to restart the charger again and verify the
network credentials. If it still isn’t working, contact support at pod-point.com/contact.
Solo 3 or Twin S3/T-UK-CG-6
Connection Guide Page 4
4B
5B
Tip: If you used the second IP address to set up your connection, follow instructions on
page 5 to update your Wi-Fi network.
Connect
Changing your Wi-Fi network
1Turn the charger o and on again at the
switch on the fuse box/consumer unit.
192.168.101.1
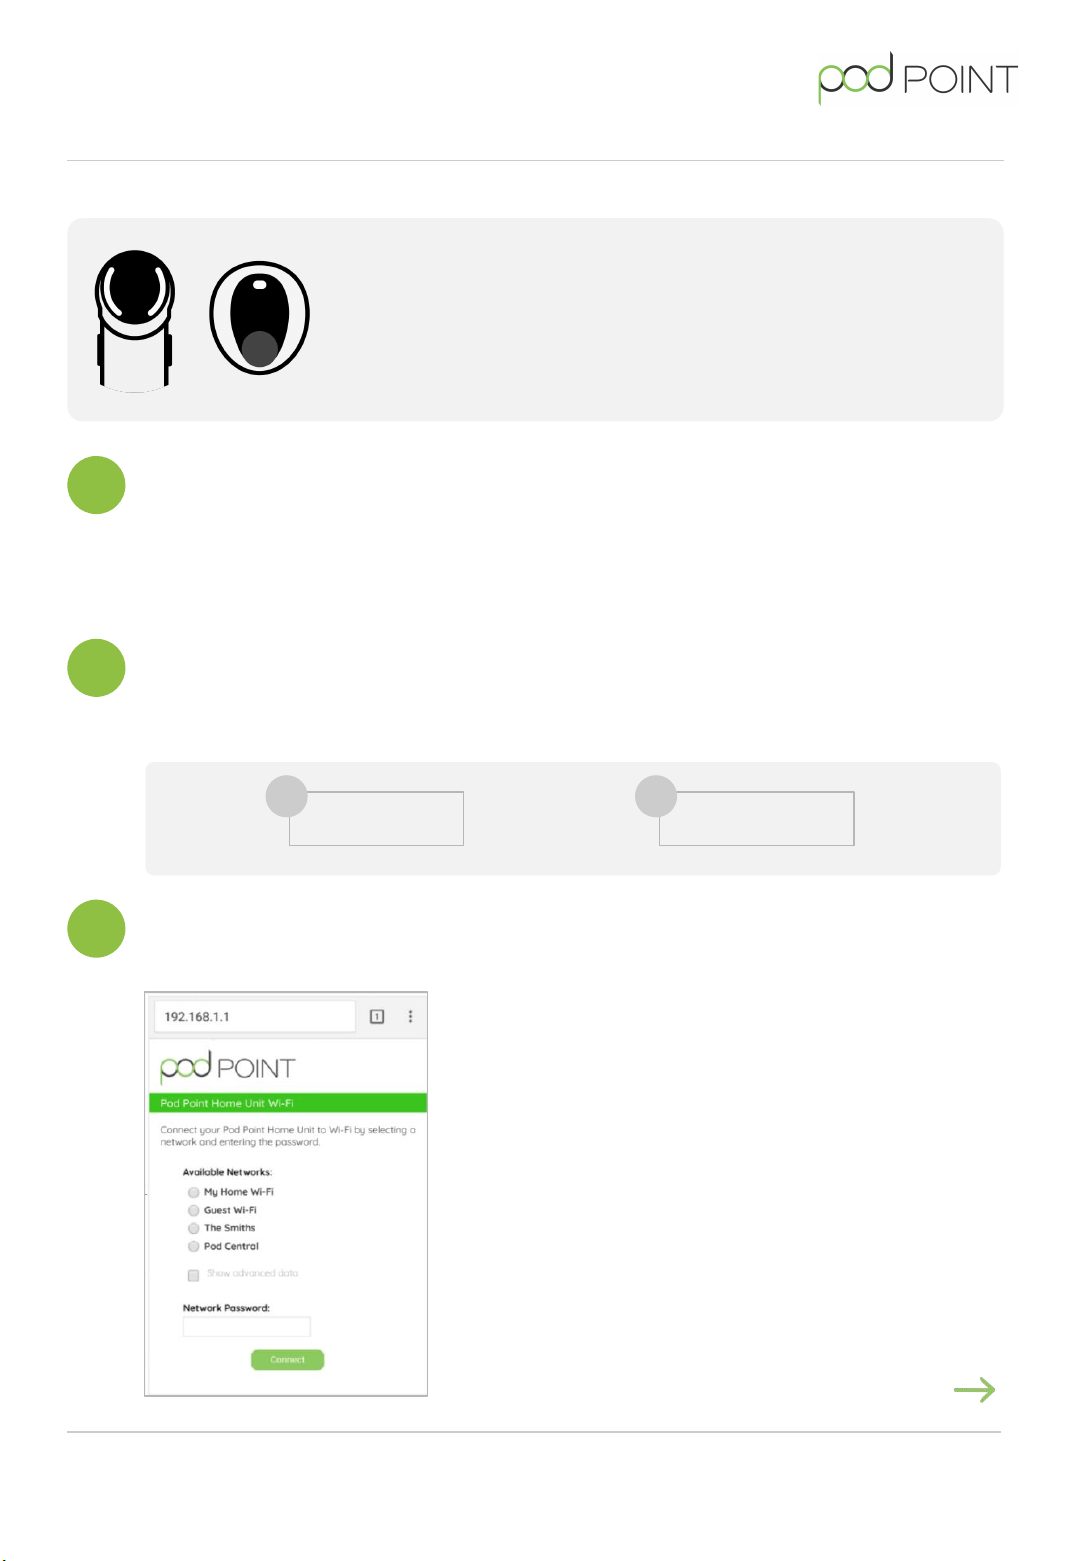
2With any smart device or laptop
that can connect to Wi-Fi, look for
the podpoint Wi-Fi network while
standing next to the charger and
press to connect.
3Open you web browser, type in the
following IP address - if you can’t
access this IP address, please
disconnect your Solo 3 or Twin from
Wi-Fi (page 7) before connecting to
a new Wi-Fi network.
When to change your Wi-Fi network
Note: You might need to update your Wi-Fi network settings when changing your
Wi-Fi password, router, internet service provider or if your charger has undergone a
technical service.
Some Solo 3 models require you to disconnect the charger before reconnecting to
Wi-Fi. If the instruction below don't work, please go to page 7.
Continued on next page
Solo 3 or Twin S3/T-UK-CG-6
Connection Guide Page 5
Connect
Changing your Wi-Fi network
Pick your Wi-Fi network from the list and type in
the password.
Press Connect.
Please note: The charger only works with 2.4 GHz
Wi-Fi networks.
5The status light on the charger should go blue with a short pink flash every few seconds
within one minute of connecting to your Wi-Fi network.
If the status light remains white, you may need to restart the charger again and verify the
settings. If the connection is still unsuccessful, retry the process with a dierent device. If this
still isn’t working, contact support at pod-point.com/contact.
Solo 3 or Twin S3/T-UK-CG-6
Connection Guide Page 6
4
Disconnecting your Solo 3 or Twin from Wi-Fi
Turn your router o using the o/on switch on the router.
If there is no switch on the router, unplug the router and plug it back in.
1
Turn the charger o and on again at the switch on the fuse box/consumer unit.
192.168.1.1/profiles_config.html OR 192.168.101.1/profiles_config.html
2
With any smart device or laptop that can connect
to Wi-Fi, look for the podpoint Wi-Fi network while
standing next to the charger and press to connect.
3
4Open you web browser, type in one of the following IP addresses - please try the sequence
below and use all full stops. If the first IP address does not work, please try the next one.
When to disconnect your charger from Wi-Fi
Note: You might need to disconnect your Wi-Fi network when changing your Wi-Fi password,
router, internet service provider or if your charger has undergone a technical service.
Some Solo 3s can’t be disconnected from Wi-Fi. If you’d like to change the Wi-Fi connection,
please follow the instructions on page 5 first.
Continued on next page
Solo 3 or Twin S3/T-UK-CG-6
Connection Guide Page 7
2
1
Disconnecting your Solo 3 or Twin from Wi-Fi
Scroll down to Profiles section and select
all profiles except PP3GWifi.
Click on Remove Selected Profiles and save.
5
Turn the charger o and on again at the switch on the fuse box/consumer unit.
Turn your router back on.
Your Wi-Fi network is now disconnected from your Solo 3 or Twin.
6
Solo 3 or Twin S3/T-UK-CG-6
Connection Guide Page 8
Using a temporary mobile hotspot
iOS hotspot setup
Open the main settings menu on
your phone.
Press Personal Hotspot.
Note: Some phone networks don’t allow
hotspotting on pay-as-you-go taris.
Toggle the switch next to Personal
Hotspot to the ON position.
On that same screen, you also have the
option to edit the password for your
hotspot.
Setup a hotspot on your iOS smart device
Note: Your smart device must be in close proximity to the Solo 3 or Twin to maintain connection. Using a
hotspot is only a temporary solution for remote troubleshooting and cannot be used for Wi-Fi enabled
features like Charge Scheduling.
Android hotspot setup
Solo 3 or Twin S3/T-UK-CG-6
Connection Guide Page 9
1A
Using a temporary mobile hotspot
Android OS hotspot setup
Open the main settings menu on your
phone.
Press More in the Wireless and
Network section or press Network &
Internet option, depending on your
phone.
Then press the Hotspot & Tethering
option.
Toggle the switch next to
Wi-Fi hotspot or Portable
hotspot to ON .
Press Setup Wi-Fi hotspot or Portable
hotspot settings to manage name and
password settings for your hotspot.
Setup a hotspot on your Android OS smart device
Solo 3 or Twin S3/T-UK-CG-6
Connection Guide Page 10
Continued on next page
1B
Android OS
(may look dierent based on version)
Using a temporary mobile hotspot
Turn the Solo 3 or Twin o and on at the switch on the fuse box/consumer unit.
Go to Wi-Fi connection menu on your smart device and connect to the podpoint Wi-Fi
network while standing next to the charger.
For Android users, you need to press CONNECT on the pop-up message.
Note: Once connected, your hotspot will usually turn OFF .
2
Solo 3 or Twin S3/T-UK-CG-6
Connection Guide Page 11
iOS
Using a temporary mobile hotspot
192.168.101.1
4Open you web browser, type in the following IP address.
If you can see the screen on the right, please follow step
5A below.
If you can't see the screen on the right, please follow
one of the two options below to connect to a temporary
mobile hotspot.
1. If you have an additional smart device with a
network connection (other than the one you
have already used in this setup process) you can
use this to pair the charger with the hotspot - to
do this, please turn to page 13.
2. If you do not have a second smart device to
complete the pairing process (other than the
device emitting the hotspot) please turn to
page 14.
Pick your hotspot from the list and type the password.
or
Click on “Select another network” and type the SSID name.
Press Connect.
The status light on the charger should go blue with a short pink flash every few seconds
within one minute of connecting to your Wi-Fi network.
Solo 3 or Twin S3/T-UK-CG-6
Connection Guide Page 12
5A
6A
192.168.1.1 Or 192.168.101.1
Using a temporary mobile hotspot
Open you web browser on your second device (the one
that is not emitting the hotpot) and type in one of the
following IP addresses - please try the sequence below
and use all full stops. If the first IP address does not
work, please try the next one.
If you have a second smart device follow these steps:
5B
Pick your hotspot from the list and type the password.
Press Connect. Depending on which IP address works (and which screen you see) the settings
will be activated dierently.
6B
Connect
The new settings will take 15-30
minutes to activate.
You can activate them immediately if
you switch your charger o and on
again at the switch on the fuse
box/consumer unit.
7B
The status light on the charger should
go blue with a short pink flash every
few seconds within one minute of
connecting to your Wi-Fi network.
Continued on next page, step 8
Solo 3 or Twin S3/T-UK-CG-6
Connection Guide Page 13
12
Connect
Using a temporary mobile hotspot
Open you web browser, type in one of the following IP addresses - please try the sequence
below and use all full stops. If the first IP address does not work, please try the next one.
If you do not have a second smart device follow these steps:
5B
Type the name of your hotspot in the SSID
field and select WAP2 for security type.
Type the password for your hotspot in the
Security key field and set priority to 1 and
press Add . The page should refresh.
6B
Scroll down and check that your hotspot has
been added to the profile list.
7B
192.168.1.1/profiles_config.html OR 192.168.101.1/profiles_config.html
Finally, turn on the hotspot again by following the steps on page 9/10 and reset your
charger’s Wi-Fi by turning the charger o and on again at the switch on the fuse
box/consumer unit.
The LED status light on the Solo 3 or Twin should turn blue
flashing pink if the connection to the hotspot is successful.
Note: Once connected, the charger will show up in your “connected devices list” (Android only). iOS devices do not yet support this
feature; instead, a banner will show up at the top of your screen stating that the smart device has been connected.
8
Solo 3 or Twin S3/T-UK-CG-6
Connection Guide Page 14
1 2
Need help?
Get in touch with our support team at: pod-point.com/contact
Join our EV community
Say hello to thousands of other EV drivers by sharing a picture of your chargepoint and
tag us on any of the channels below.
Need advice? The EV community is a knowledgeable and helpful bunch - just give them a
shout, we were all new to charging once!
Search Pod Point on social media:
Solo 3 or Twin S3/T-UK-CG-6
Connection Guide Page 16
17

Other manuals for Solo 3

1

This manual suits for next models

1

Other POD Point Automobile Batteries Charger manuals

POD Point Solo 3 User manual

POD Point

POD Point Solo 3 User manual

POD Point Twin Charge User manual

POD Point

POD Point Twin Charge User manual

POD Point Mode 3 User manual

POD Point

POD Point Mode 3 User manual

Popular Automobile Batteries Charger manuals by other brands

Circontrol Genion One installation manual

Circontrol

Circontrol Genion One installation manual

Fimer ELECTRA DC Station 60 installation manual

Fimer

Fimer ELECTRA DC Station 60 installation manual

Projecta PC400 instructions

Projecta

Projecta PC400 instructions

FRO­NIUS Acctiva Professional 42 user manual

FRO­NIUS

FRO­NIUS Acctiva Professional 42 user manual

Stihl AL 101 instruction manual

Stihl

Stihl AL 101 instruction manual

HYPERVOLT Home 3.0 quick start guide

HYPERVOLT

HYPERVOLT Home 3.0 quick start guide

Fimer FLEXA installation manual

Fimer

Fimer FLEXA installation manual

Power Wizard FarmPro 40 owner's manual

Power Wizard

Power Wizard FarmPro 40 owner's manual

ABL eMH1 WALLBOX operating manual

ABL

ABL eMH1 WALLBOX operating manual

Charge Amps Aura installation manual

Charge Amps

Charge Amps Aura installation manual

Chamberlain CA1000 user guide

Chamberlain

Chamberlain CA1000 user guide

MayPole MP725 Instructions and specifications

MayPole

MayPole MP725 Instructions and specifications

Leviton EVB16 user guide

Leviton

Leviton EVB16 user guide

Schumacher INSTANT POWER XP400-CA owner's manual

Schumacher

Schumacher INSTANT POWER XP400-CA owner's manual

Motomaster ELIMINATOR WORKSHOP 011-1981-2 instruction manual

Motomaster

Motomaster ELIMINATOR WORKSHOP 011-1981-2 instruction manual

PulseTech X2 xtreme charge Feature and use guide

PulseTech

PulseTech X2 xtreme charge Feature and use guide

manuals.online logo
manuals.online logoBrands
  • About & Mission
  • Contact us
  • Privacy Policy
  • Terms and Conditions

Copyright 2025 Manuals.Online. All Rights Reserved.