Technivolt 100 User manual

DE
EN
Operating
instructions
Charging station for charging
electric vehicles
TECHNIVOLT 100 Plug socket model
TECHNIVOLT 101 Cable model
TECHNIVOLT

28
Table of contents
1 Introduction ..............................................................................................................................29
2 Intended use .............................................................................................................................29
3 Safety instructions in this manual.....................................................................................29
4 Safety instructions on the device ......................................................................................30
5 General safety information..................................................................................................30
5.1 Safety instructions for the earthing system........................................................................... 31
5.2 Safety instructions for mains cable, mains plug and charging cable....................... 32
5.3 Safety instructions for wall mounting ...................................................................................... 32
6 Information about the charging station .......................................................................... 33
6.1 Operating elements and connections .......................................................................................33
6.2 Plug socket or cable model............................................................................................................ 34
6.2.1 TECHNIVOLT 100 (Plug socket model) ......................................................................... 34
6.2.2 TECHNIVOLT 101 (Cable model)....................................................................................... 34
6.3 Behaviour of the status information display..........................................................................35
7 TECHNIVOLT 100 charging process ................................................................................... 36
7.1 Autostart charging mode................................................................................................................ 36
7.1.1 Vehicle connection and charging ................................................................................... 36
7.1.2 Stopping the charging process........................................................................................ 36
7.2 Authorised charging mode (RFID mode...................................................................................37
7.2.1 User RFID card registration.................................................................................................37
7.2.2 Vehicle connection and authorised charging............................................................37
7.2.3 Stopping the charging process.........................................................................................37
8 TECHNIVOLT 101 charging process ....................................................................................40
8.1 Autostart charging mode................................................................................................................40
8.1.1 Vehicle connection and charging......................................................................................40
8.1.2 Stopping the charging process.........................................................................................40
8.2 Authorised charging mode (RFID mode).................................................................................41
8.2.1 User RFID card registration..................................................................................................41
8.2.2 Vehicle connection and authorised charging........................................................... 42
8.2.3 Stopping the charging process ........................................................................................ 43
9 Loss of the Master RFID card ...............................................................................................44
10 Locked cable function (only TECHNIVOLT 100) .............................................................46
11 Faults and fault conditions...................................................................................................48
11.1 General fault conditions.................................................................................................................48
11.2 Other fault conditions .....................................................................................................................48
11.3 Behaviour of the DC 6 mA direct current leakage sensor ............................................ 49
12 Shutdown and re-starting the charging station ...........................................................49
13 Maintenance and cleaning ...................................................................................................49
14 Disposal ...................................................................................................................................50
15 CE mark and Declaration of Conformity ..........................................................................50
16 Contact address.......................................................................................................................50
17 Service instructions ................................................................................................................50
18 Copyright ...................................................................................................................................50

29
DE
EN
1 Introduction
These instructions describe operation of the charging station TECHNIVOLT 100 and
TECHNIVOLT 101 and is addressed to persons who wish to operate a TECHNIVOLT charging
station.
The following text explains how the charging station is connected to the electric vehicle to
charge it.
These operating instructions are an integral part of the product and must be kept safely for
its entire service life.
Please read these instructions in full before installation or commissioning.
2 Intended use
The charging station is designed exclusively for charging electric vehicles using charging mode 3
(Mode 3) in accordance with the standard IEC 61851-1. Connecting other devices is not permied.
Intended use of this device always includes compliance with the operating instructions.
3 Safety instructions in this manual
The following symbols and warning signs are used in this manual and must be observed.
Warns about electric danger
DANGER
Indicates a danger that can lead to death or severe injury if it is not avoided.
WARNING
Indicates a dangerous situation that can lead to death or severe injury if it is
not avoided.
CAUTION
Indicates dangers that can lead to damage to the device itself or to other
electrical consumers.
NOTE
Indicates important information and special features.
30
4 Safety signs on the device
Safety signs are mounted on the charging station and must be complied with.
Read the installation instructions before you open the charging station or start
installation of the charging station.
A dangerous electrical voltage may be present inside the charging station aer
opening the housing.
5 General safety information
For your own protection, please read through the safety instructions carefully prior to installation.
• These operating instructions must be kept in safe keeping for consultation at a later date.
DANGER
Danger to life from electrical power.
All assembly and installation work should be carried out by an expert electrician.
A skilled person is someone who, on account of their technical training and
experience, has adequate knowledge in the field of the installation to be
tested, and who is acquainted with the applicable governmental safety at
work regulations, accident prevention regulations, guidelines and the generally-
accepted rules of technology (e.g. DIN standards, VDE stipulations), to an
extent that he can assess the safe working status of the installation. Skilled
persons can be persons such as works engineers, master crasmen, technical
sta and fiers.
The person carrying out the installation must be fit for the work involved in
accordance with DGUV Regulation 103-011 “Working on live electrical systems
and operating material”.
WARNING
Never permit persons (including children) with limited physical, sensoral or
mental capacities, or with a lack of experience and / or knowledge to use the
electrical equipment unsupervised!
Non-observance of these warnings can lead to death and severe injury.
NOTE
The alternating current mains connection and the charging plan for the
charging station for electric vehicles must be checked and approved by the
authorities in accordance with the applicable regional or national regulations
and standards for electric vehicles. The charging plan must be created
accordingly for installations with several charging stations for electric vehicles.
The manufacturer is not liable, either directly or for any other reason, for damage
and risks arising from faults caused by the mains connection or load planning.

31
DE
EN
• Check the voltage stated on the type plate and use the charging station only with a suitable
power supply voltage.
• Do not continue to use the device if you are unsure whether it is functioning correctly, or
may be damaged - switch it o and set the main power circuit breaker and residual current
device to OFF. Contact your local dealer.
• The ambient temperature must be between –35 °C and +55 °C, without direct sunlight, and
there the relative humidity must be between 5 % and 95 %. The charging station must only
be used within these operating conditions.
• The device must be located in a position that avoids excessive heating up of the charging
station. High operating temperatures, caused by direct sunlight or sources of heat, can
reduce the charging current or can temporarily interrupt the charging process.
• The charging station is designed for both outdoor and indoor use.
• In order to reduce the danger of fire and the danger of electrocution or product damage,
do not expose the device to rain, snow, thunderstorms or other severe weather events. In
addition, the charging station must not be exposed to spillages or sprayed fluids.
• Do not touch the connection terminals, the electric vehicle plug and all other live parts on
the charging station with sharp metal objects.
• Avoid contact with sources of heat and locate the device at a safe distance from flammable,
potentially explosive, reactive, and combustible materials, chemicals and vapours.
• Explosion risk. This device has parts within it that may cause electric sparks and discharges
and which should never come into contact with flammable vapours. It must not be installed
in recesses or cellar rooms.
• The device is intended only for the charging of electric vehicles whose charging can be
carried out without ventilation.
• In order to prevent the danger of an explosion or electrocution, make sure that the stipulated
line protection switch and the ground fault circuit interrupter are correctly connected to
the electric mains in the building.
• The boom of the charging plug socket (TECHNIVOLT 100) should be located at a height of
1 m to 1.5 m above floor level.
• One must not use adapters or conversion adapters. Cable extension leads must not be used.
• The charging station must not be installed in areas where there is a danger of high water.
5.1 Safety instructions for the earthing system
• The charging station must be connected to a centrally earthed system. The earth line that
goes into the charging station must be connected to the grounding lug of the device. This
must be carried out with power circuit conductors while connected to the earthing rail of the
device or on the charging station. Connection to the charging station is the responsibility
of the installer and the purchaser. In order to reduce the danger of electrocution, connect
the device using only properly earthed plug sockets.
WARNING! Make sure that the charging station is constantly and properly earthed during
installation and use.

32
5.2 Safety instructions for the mains cable, mains plug and charging cable
• Make sure that the charging cable at the side is compatible with the charging station.
• A damaged charging cable can cause fires or electrocution. Do not use this product if the
flexible charging cable or the vehicle cable is frayed, has damaged insulation, or displays
other indications of damage.
• Make sure that the charging cable is positioned in such a way that nobody can step on it
or trip over it, and that it is neither damaged nor over-stretched.
• Never forcefully pull on the charging cable and do not damage it with sharp objects.
• Never touch the mains cable or the plugs with wet hands since this may cause a short-
circuit or electrocution.
• In order to avoid the danger of fire or electrocution, the device must not be used with
extension cables. If the mains cable or the vehicle charging cable are damaged, they must
be replaced by the manufacturer, his customer service engineers or a similarly qualified
person, in order to avoid hazards.
5.3 Safety instructions for wall mounting
• Do not install the charging station on the ceiling or an inclined wall.
• The charging station must only be operated when mounted vertically.
• The charging station must not be installed in enclosed cabinets.
• Use only the screws and accessories provided for wall mounting.
• The device is designed for use indoors and outdoors. If the device is to be installed outdoors,
all the connection devices for outdoor operation must be designed and properly installed
so as to ensure that the prescribed IP protection rating is retained.

33
DE
EN
6 Information about the charging station
6.1 Operating elements and connections
TECHNIVOLT 100
With an integrated charging plug socket
TECHNIVOLT 101
With a firmly connected charging cable
❶❶
❷❷
❸❸
❹❹
❻❻❼❼
❶❶
❷❷
❸❸❺❺
❹❹
❻❻❼❼❽❽
❶LED status indicator ❶LED status indicator
❷RFID reader ❷RFID reader
❸Charging plug socket type 2 ❸Charging plug type 2
❹Type plate ❹Type plate
❺-❺Blind socket for the charging plug
❻Input AC infeed, M32 ❻Input AC infeed, M32
❼Input communication cable, M20 ❼Input communication cable, M20
❽Charging cable
34
6.2 Plug socket or cable model
6.2.1 TECHNIVOLT 100 (plug socket model)
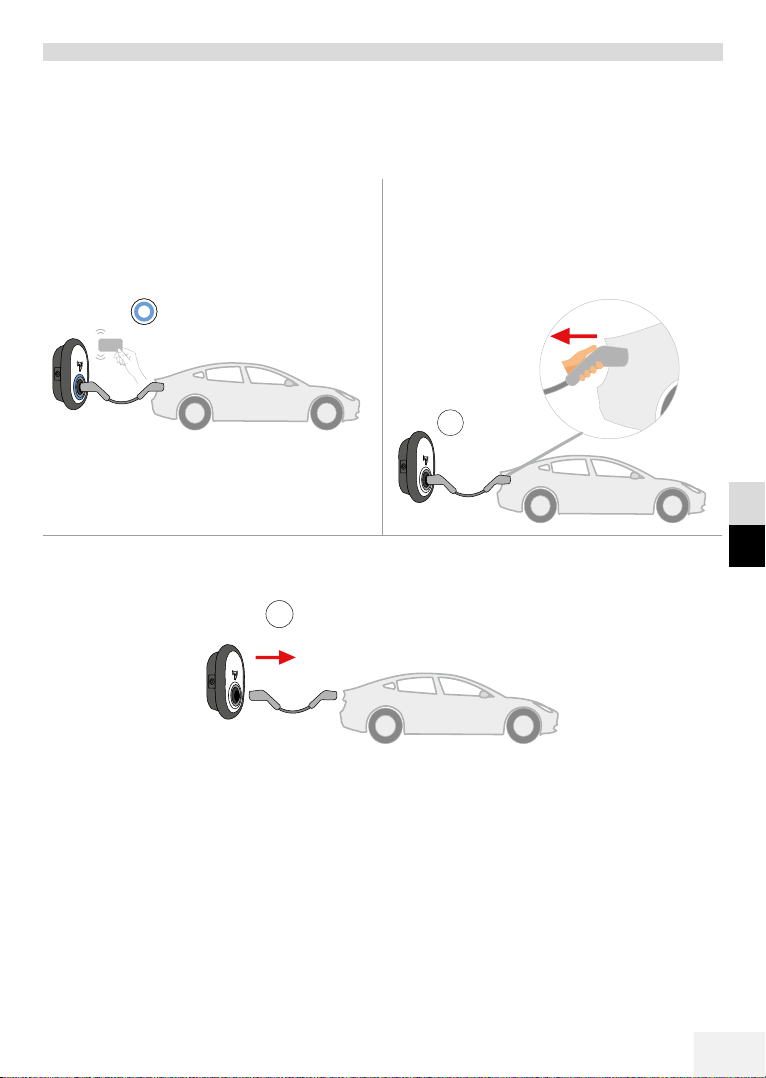
Open the front cover on the plug socket and insert the charging cable into the plug socket.
Illustration 1: TECHNIVOLT 100
6.2.2 TECHNIVOLT 101 (cable model)
Press the buon on the top of the blind socket to release the charging plug from the charging
unit, and unplug the charging plug. Then insert the charging plug into the vehicle to start the
charging process.
Illustration 2: TECHNIVOLT 101
Note: The colour of the charging plug may be dierent.
❶ ❷
❷❶
35
DE
EN
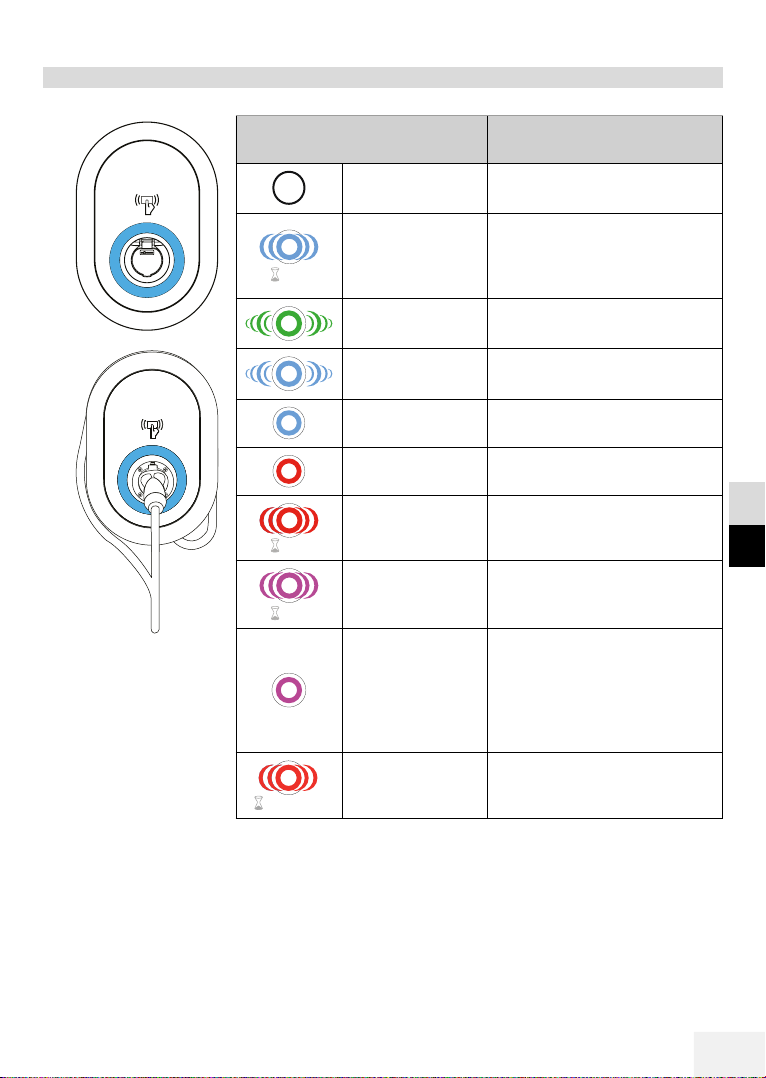
6.3 Behaviour of the status information display
Status of the LED Status of the charging
station
No LED display Charging device is ready for
charging.
Flashes blue
once every 4
seconds
Electric vehicle is connected.
The charging station waits
for authorisation of the RFID
card.
Green light Charging has started.
Blue light Charging process running.
Constant blue Charging stopped or ended.
Constant red Error condition.
Flashes red once
every 4 seconds
Ventilation required!
Vehicle cannot be charged.
Flashes violet
once every 4
seconds
Charging with limited
current because of an over-
temperature.
Constant violet
Charging is not possible
because the temperature too
high or the current limiter
of the power optimiser has
been reached or the charging
device is deactivated.
Flashes RED once
per second for
20 seconds
RFID config.
4 sec
4 sec
4 sec
1 sec / 20 sec
36
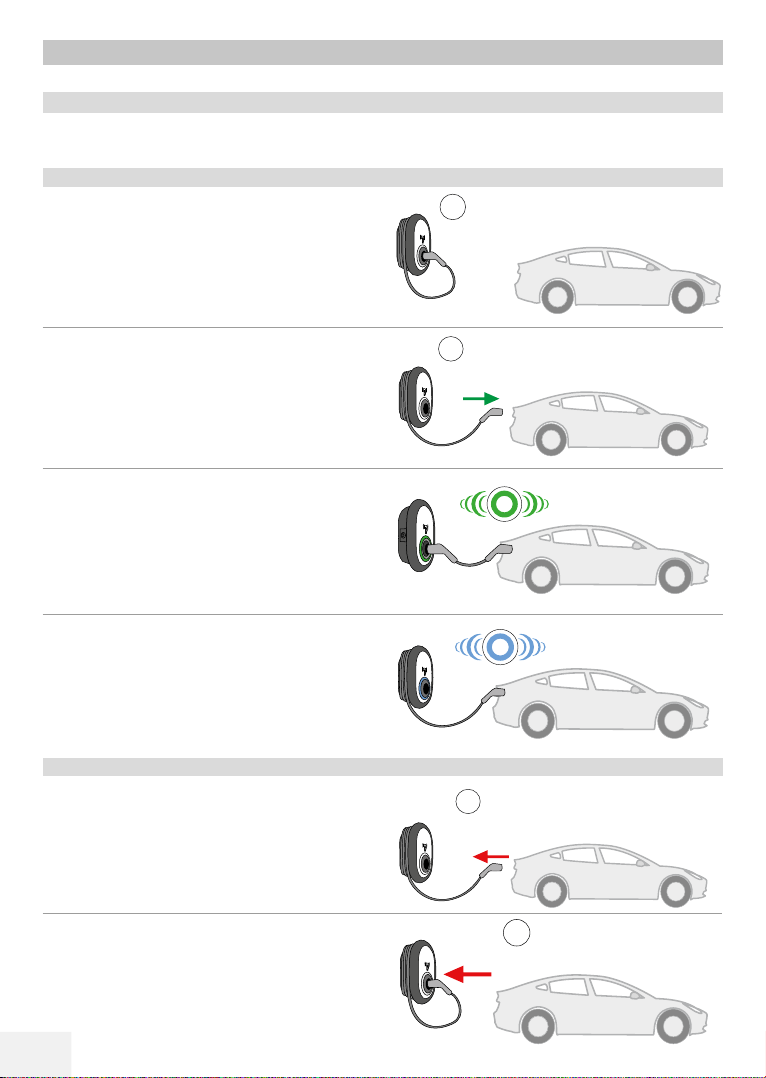
7 TECHNIVOLT 100 charging process
The product works in Autostart charging mode as standard.
7.1 Autostart charging mode
The Autostart charging mode functions without an RFID card. Charging takes place without
authorisation.
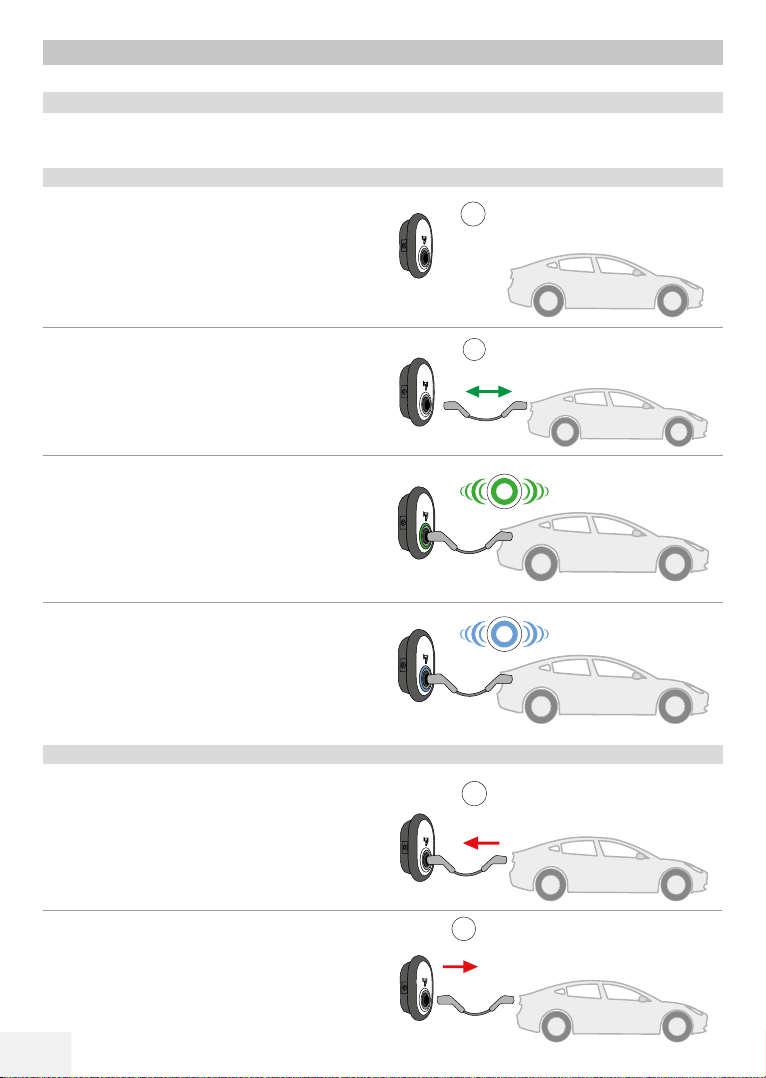
7.1.1 Vehicle connection and charging
1. Make sure that your vehicle and the station
are ready for charging.
2. Connect the charging station and the
vehicle with the charging cable. To do this,
insert the charging plug into the vehicle
plug socket and the charging station.
3. The LED status indicator lights up green
when the charging station and the vehicle
are connected.
4. The charging process starts automatically
and the LED status indicator lights up blue.
7.1.2 Stopping the charging process
1. First disconnect the charging cable from the
vehicle in order to interrupt the charging
process. Do not aempt to pull the plug out
of the station before you have disconnected
it from the vehicle. Otherwise the locking
mechanism could be damaged.
2. Disconnect the charging cable from the
station.
No LED display
No LED display
No LED display
No LED display
37
DE
EN
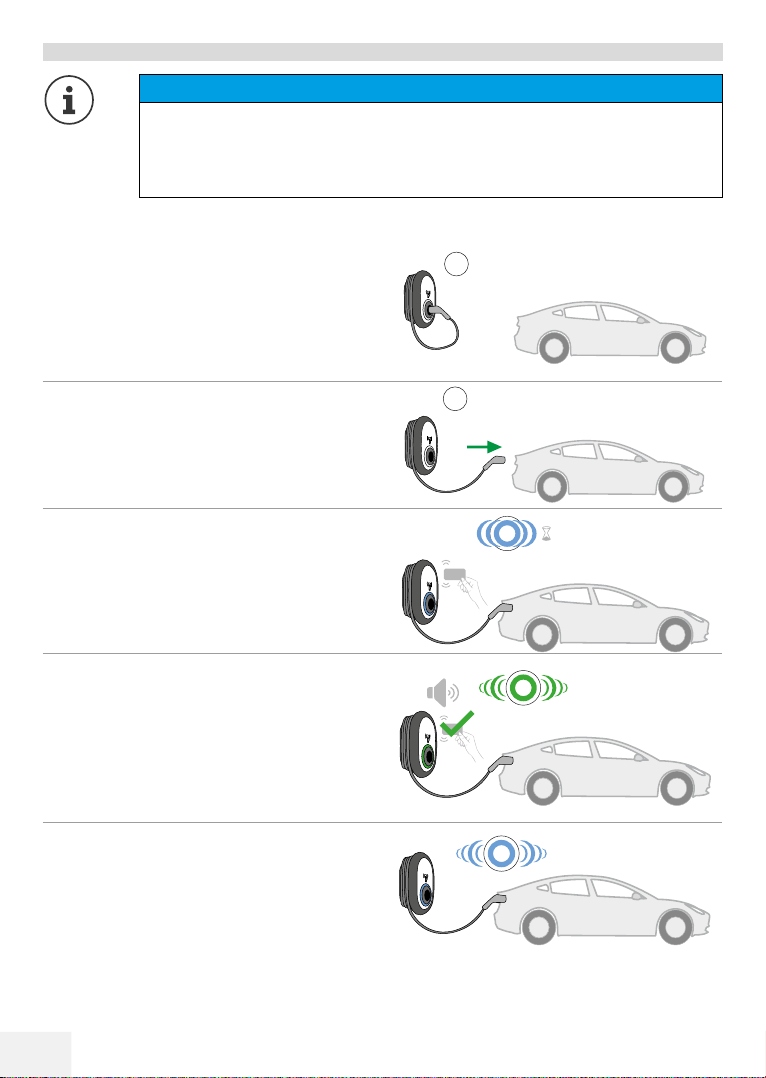
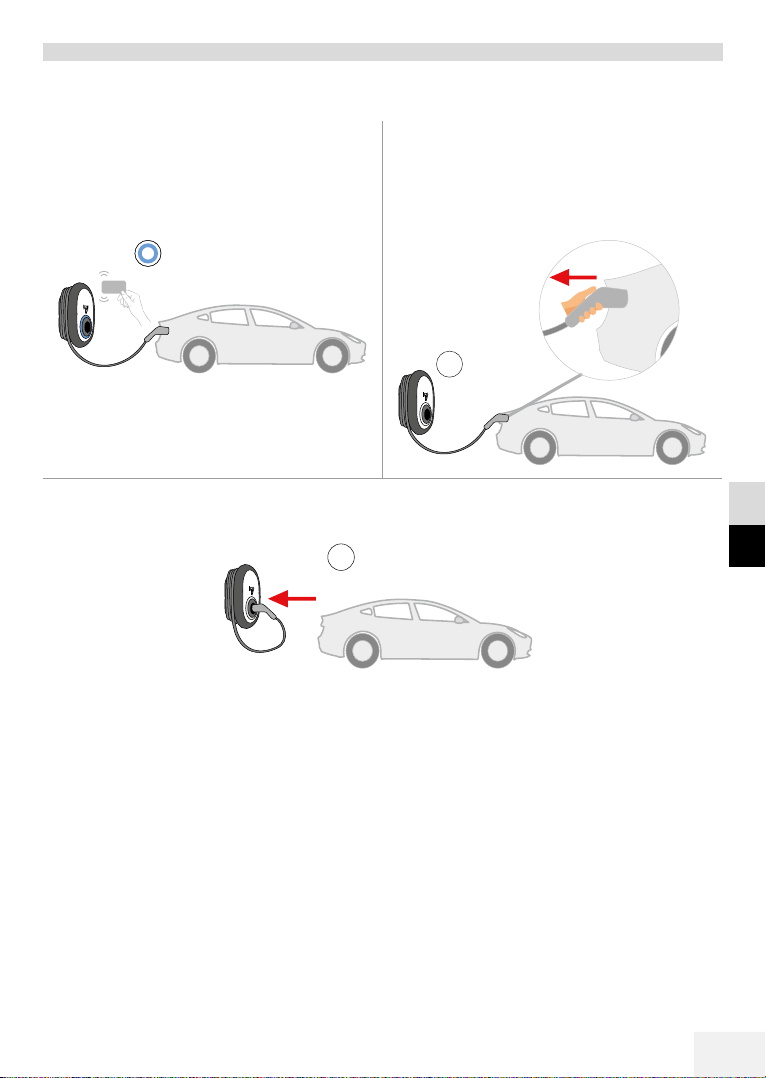
7.2 Authorised charging mode (RFID mode)
In the authorised charging mode, you release the charging station to start the charging process
with a USER RFID card. To do this, a user RFID card must be registered on the charging station,
see „7.2.1 User RFID card registration“.
The USER RFID cards are marked with the text "USER".
The scope of delivery of the charging station includes 2 USER RFID cards.
Before using for the first time, register the USER RFID card on the charging station. The process
of registration is described in the following chapter.
7.2.1 USER RFID card registration
If you wish to use your charging station in authorised charging mode, you need to perform
the following steps.
NOTE
The charging station must not be connected to the electric vehicle during
registration!
Registering the user RFID card
1. Hold the MASTER RFID card against the
RFID reader.
“BEEP” “BEEP”
2. Aer the “BEEP”, hold a USER RFID card
against the RFID reader for a period of 10
seconds. Only one USER RFID card at a time
can be registered.
Repeat steps 1 and 2 if you wish to register additional USER RFID cards.
In this way you can register the USER RFID cards on the charging station, one aer the other.
A maximum of 20 user cards can be registered on one charging station.
Removing the USER RFID card
Removal of a user card is similar to the registration of a USER RFID card.
If you wish to remove an authorised USER RFID card from the station, you first need to hold the
MASTER RFID card against the RFID reader and then hold the USER RFID card to be removed
against the RFID reader for a period of 10 seconds.
BENUTZER
Privates Laden
BENUTZER
Privates Laden
MB

38
7.2.2 Vehicle connection and authorised charging
1. Make sure that your vehicle and the station
are ready for charging.
2. Insert the charging plug into the vehicle plug
socket and the charging station.
3. Hold the USER RFID card against the RFID
reader.
4. The authorised USER RFID card is recognised
and charging is approved.
5. The charging process starts automatically
and the LED status indicator lights up blue.
NOTE
You will need a registered USER RFID card to use the authorised charging mode.
The charging process will be rejected by the charging station if you use an
unregistered USER RFID card.
No LED display
4 sec
No LED display
39
DE
EN
7.2.3 Stopping the charging process
1. You can use the following alternative methods of stopping the charging process. Do not
aempt to remove the charging cable from the charging station before ending the charging
process. Otherwise the locking mechanism could be damaged.
Method 1
You can end the charging process by holding
the USER RFID card that you used to start
the charging process against the RFID reader.
Method 2
You can end the charging process by first
disconnecting the charging cable from the
vehicle.
2. Disconnect the charging cable from the station.
No LED
display
No LED display
40
8 TECHNIVOLT 101 charging process
The product works in Autostart charging mode as standard.
8.1 Autostart charging mode
The Autostart charging mode functions without an RFID card. Charging takes place without
authorisation.
8.1.1 Vehicle connection and charging
1. Make sure that your vehicle and the
station are ready for charging.
2. Connect the charging station to the
vehicle. To do this, insert the charging
plug into the vehicle plug socket.
3. The LED status indicator lights up green
when the charging station and the vehicle
are connected.
4. The charging process starts automatically
and the LED status indicator lights up
blue.
8.1.2 Stopping the charging process
1. First disconnect the charging cable from
the vehicle in order to interrupt the
charging process.
2. To do this, insert the charging plug into the
blind socket on the charging station.
No LED display
No LED display
No LED display
No LED display

41
DE
EN
8.2 Authorised charging mode (RFID mode)
In the authorised charging mode, you release the charging station to start the charging process
with a USER RFID card. To do this, a user RFID card must be registered on the charging station,
see „8.2.1 User RFID card registration“.
The USER RFID cards are marked with the text "USER".
The scope of delivery of the charging station includes 2 USER RFID cards.
Before using for the first time, register the USER RFID card on the charging station. The process
of registration is described in the following chapter.
8.2.1 USER RFID card registration
If you wish to use your charging station in authorised charging mode, you need to perform
the following steps.
NOTE
The charging station must not be connected to the electric vehicle during
registration!
Registering the user RFID card
1. Hold the MASTER RFID card against the
RFID reader.
“BEEP” “BEEP”
2. Aer the “BEEP”, hold a USER RFID card
against the RFID reader for a time period of
10 seconds. Only one USER RFID card at a
time can be registered.
Repeat Steps 1 and 2 if you wish to register additional USER RFID cards.
In this way you can register the USER RFID card on the charging station, one aer the other. A
maximum of 20 user cards can be registered on one charging station.
Removing the USER RFID card
The removal of a user card is similar to the registration of a USER RFID card.
If you wish to remove an authorised USER RFID card from the station, you first need to hold the
MASTER RFID card against the RFID reader and then hold the USER RFID card to be removed
against the RFID reader for a period of 10 seconds.
BENUTZER
Privates Laden
BENUTZER
Privates Laden
MB
42
8.2.2 Vehicle connection and authorised charging
1. Make sure that your vehicle and the station
are ready for charging.
2. Insert the charging plug into the vehicle
plug socket.
3. Hold the USER RFID card against the RFID
reader.
4. The authorised user RFID card is recognised
and charging is approved.
5. The charging process starts automatically
and the LED status indicator lights up blue.
No LED display
No LED display
4 sec
NOTE
You will need a registered USER RFID card to use the authorised charging mode.
The charging process will be rejected by the charging station if you use an
unregistered USER RFID card.
43
DE
EN
8.2.3 Stopping the charging process
1. You can use the following alternative methods of stopping the charging process.
Method 1
You can end the charging process by holding
the USER RFID card that you used to start
the charging process against the RFID reader.
Method 2
You can end the charging process by
disconnecting the charging cable from the
vehicle.
2. Insert the charging plug into the blind socket on the station.
No LED
display
No LED display

44
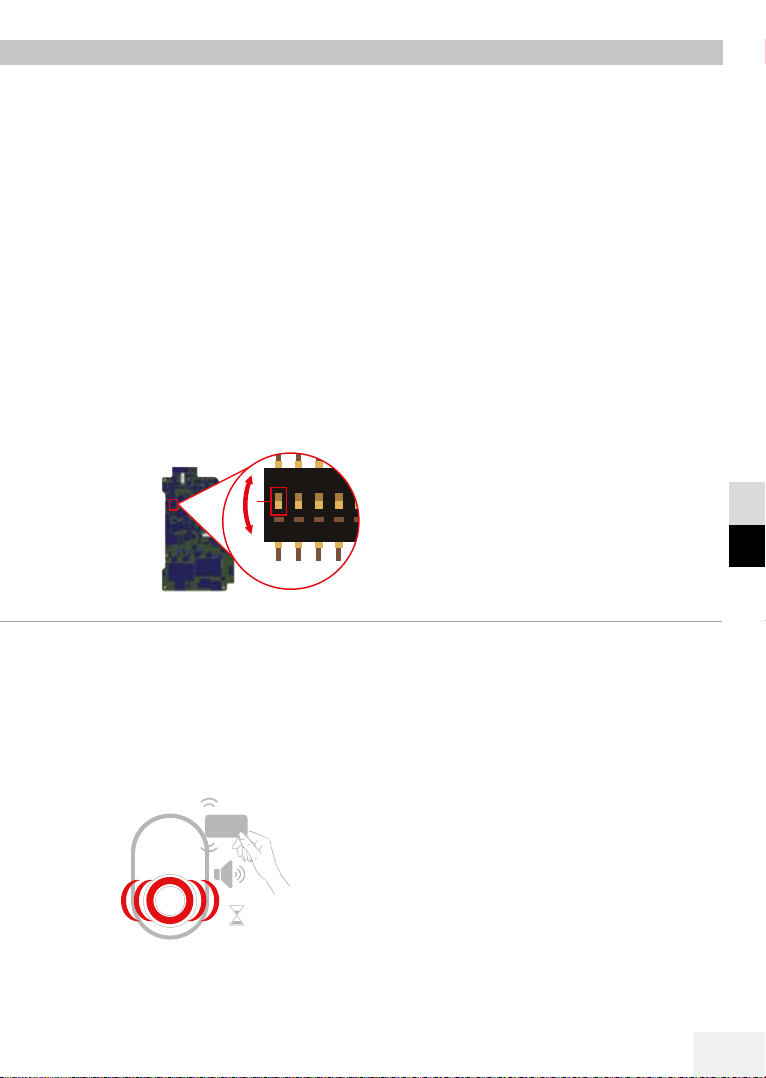
9 Loss of the MASTER RFID card
If you have lost the registered Master RFID card, you can register a new Master
RFID card on the charging station.
You need to open up the charging station for registration.
1. Switch the charging station o at the line
protection switch.
2. Open the charging station as
described in the installation instructions.
3. Switch DIP switch no. 1 over to the other position using a pointed plastic tool. The position
of the DIP switches is shown in the following illustration.
4. Open the charging station as
described in the installation instructions.
5. Switch the charging station on.
The previously stored Master and user RFID
cards are deleted.
6. The status information LED must flash red for 20 seconds when a new Master RFID card is
registered. You can register a new Master RFID card in 20 seconds by holding it against the
RFID reader. (If you do not hold a card against it for this period of time, you will not be able
to register user cards and your station will remain in the Autostart charging mode.) Aer
you have registered a new Master RFID card, you can carry out the steps in the “Authorised
Charging Mode” section to add user RFID cards.
“BEEP”
DANGER
Danger to life from electrical power.
There is an immediate danger to life by electrocution if you touch live parts.
The charging station must be opened only by a skilled electrician.
1
ON
2345
SW1
45
DE
EN
9 Loss of the MASTER RFID card
If you have lost the registered Master RFID card, you can register a new Master
RFID card on the charging station.
You need to open up the charging station for registration.
1. Switch the charging station o at the line
protection switch.
2. Open the charging station as
described in the installation instructions.
3. Switch DIP switch no. 1 over to the other position using a pointed plastic tool. The position
of the DIP switches is shown in the following illustration.
4. Open the charging station as
described in the installation instructions.
5. Switch the charging station on.
The previously stored Master and user RFID
cards are deleted.
6. The status information LED must flash red for 20 seconds when a new Master RFID card is
registered. You can register a new Master RFID card in 20 seconds by holding it against the
RFID reader. (If you do not hold a card against it for this period of time, you will not be able
to register user cards and your station will remain in the Autostart charging mode.) Aer
you have registered a new Master RFID card, you can carry out the steps in the “Authorised
Charging Mode” section to add user RFID cards.
“BEEP”
DANGER
Danger to life from electrical power.
There is an immediate danger to life by electrocution if you touch live parts.
The charging station must be opened only by a skilled electrician.
1
ON
2345
SW1

46
10 Locked cable function (only TECHNIVOLT 100)
The charging plug socket on the charging station is equipped with a locking function.
If the charging plug on the charging cable is in the charging plug socket, and the function is
activated,
it is no longer possible to remove the charging plug from the charging plug socket. Anti-theft
protection!
The charging station needs to be opened up to activate the function.
1. Switch the charging station o at the line
protection switch.
2. Open the charging station as
described in the installation instructions.
3. Switch DIP switch no. 3 to ON using a pointed plastic tool to activate the cable locking
function. The position of the DIP switches is shown in the following illustration.
4. Open the charging station as
described in the installation instructions.
5. Open the front cover on the plug socket
and insert the charging cable into the plug
socket.
6. Switch the charging station on.
The charging cable is locked and the charging station behaves like a cable model.
DANGER
Danger to life from electrical power.
There is an immediate danger to life by electrocution if you touch live parts.
The charging station must be opened only by a skilled electrician.
This manual suits for next models
1
Table of contents
Other Technivolt Automobile Batteries Charger manuals

Popular Automobile Batteries Charger manuals by other brands


Kostal
Kostal ENECTOR operating manual

Volt Polska
Volt Polska 12 8A instructions

FRONIUS
FRONIUS Acctiva Professional 42 user manual

Black & Decker
Black & Decker SIMPLE START BBC2CB instruction manual

Circontrol
Circontrol CCL-WB2M-SMART series instruction manual

Circutor
Circutor eHome Series installation guide