Pogo TSR-500 User manual


TSR-500 User Manual
2
3
TSR-500 User Manual
Section 1:
At First Glance..............................4
Section 2:
Unpacking and
Initial Orientation..........................5
Section 3:
Setup..............................................9
Section 4:
Programming Your Devices.......17
Section 5:
Learn Code.................................22
Section 6:
Setting Up MyPick.......................25
Section 7:
Key Mirror.....................................29
Section 8:
Key Label....................................32
Section 9:
Additional Key Device Functions
to Enhance Control....................40
Section 10:
Operation of
MyPick Function......................41
Section 11:
Troubleshooting.......................42
Section 12:
Limited Warranty.....................43
Notice to Users.......................................................................................3
Introduction............................................................................................4
USER MANUAL

TSR-500 User Manual
23
TSR-500 User Manual
Notice to Users
This manual is protected by copyright law and all rights are reserved. No portion
of this manual may be reproduced in any form or translated into other languages
without written permission from the manufacturer and publisher of this manual.
The content of this manual is provided “as is” and the manufacturer is under NO
obligation to notify users of revisions or modications to the product or procedures.
Every effort has been taken to ensure the accuracy of the information herein.
However, the manufacturer is not responsible for any inaccuracies or omissions that
may affect the TSR/500’s operation.
All programs or accessories included with the TSR/500 are under copyright
protection. No part of these programs may be reproduced without written
permission from the manufacturer and publisher.
The PoGo! Products logo, MyPick™, all POWER™, Key Mirror™ are trademarks of
PoGo! Products, Inc. All other product names used in this manual are protected by
each product’s trademark, service mark, or registered brand.
2002 POGO! PRODUCTS INC – ALL RIGHTS RESERVED

TSR-500 User Manual
4
5
TSR-500 User Manual
Introduction
Thank you for purchasing the TSR/500 Universal Touch-Screen Remote, which
eliminates the hassle and confusion of multiple remote controls with one, simple,
advanced solution. The many features of this hand-held unit allow you to fully
customize the remote operation of your home entertainment system according to
your preferences as well as those of ve other users. We at PoGo! Products believe
you’ll nd yourself wondering how you ever lived without the TSR/500. It’s innovation
at your ngertips!
You can obtain more information about PoGo! Products on our website:
www.pogoproducts.com. You can also sign up to receive free information about
our products and receive technical support services.
1. At First Glance
Product Feature Overview
At last you can access all of your multimedia devices with one remote control. The
PoGo! Products’ TSR/500 allows you to quickly take charge of your TV, DVD, VCR,
PVR, Surround Amp, Satellite, and cable boxes, to name a few electronic devices.
With its extensive library of manufacturer brands stored internally, the TSR/500
enables you to nd the right code to control even your most esoteric audio/video
devices.
In addition, the unit’s Learning Mode, you can update code for any new audio/
video gear in the future. With today’s rapid advances in multimedia and technol-
ogy, it is hard to anticipate what new functions and controls might be needed in
the future. The TSR-500 anticipates these future needs with features for editing and
customizing the Soft Keys on the remote touch screen all without using a PC.
With MyPick, TM everyone in your household can have their own personal settings
and macros. Up to six different users pages can be customized, each with 4 pages
with 8functions each with 4 levels. With MyPick, you can easily automate functions
you frequently use. For example, to play a DVD movie in your home theater with
MyPick, you can program the unit to allow you to turn on your TV/Monitor, DVD
player, your Surround Amp, plus adjust volume and play the movie with a couple
of keystrokes. You can set up a page for your child that lets them view only the
channels you want them to see.
If technology intimidates you and you can’t set the clock on your VCR, don’t worry.

TSR-500 User Manual
45
TSR-500 User Manual
Your TSR-500’s help screens and friendly user interface will have you up and running
in no time. Take a few moments to familiarize yourself with the contents of this
manual and begin to enjoy life without the remote control headaches!
2. Unpacking and Initial Orientation
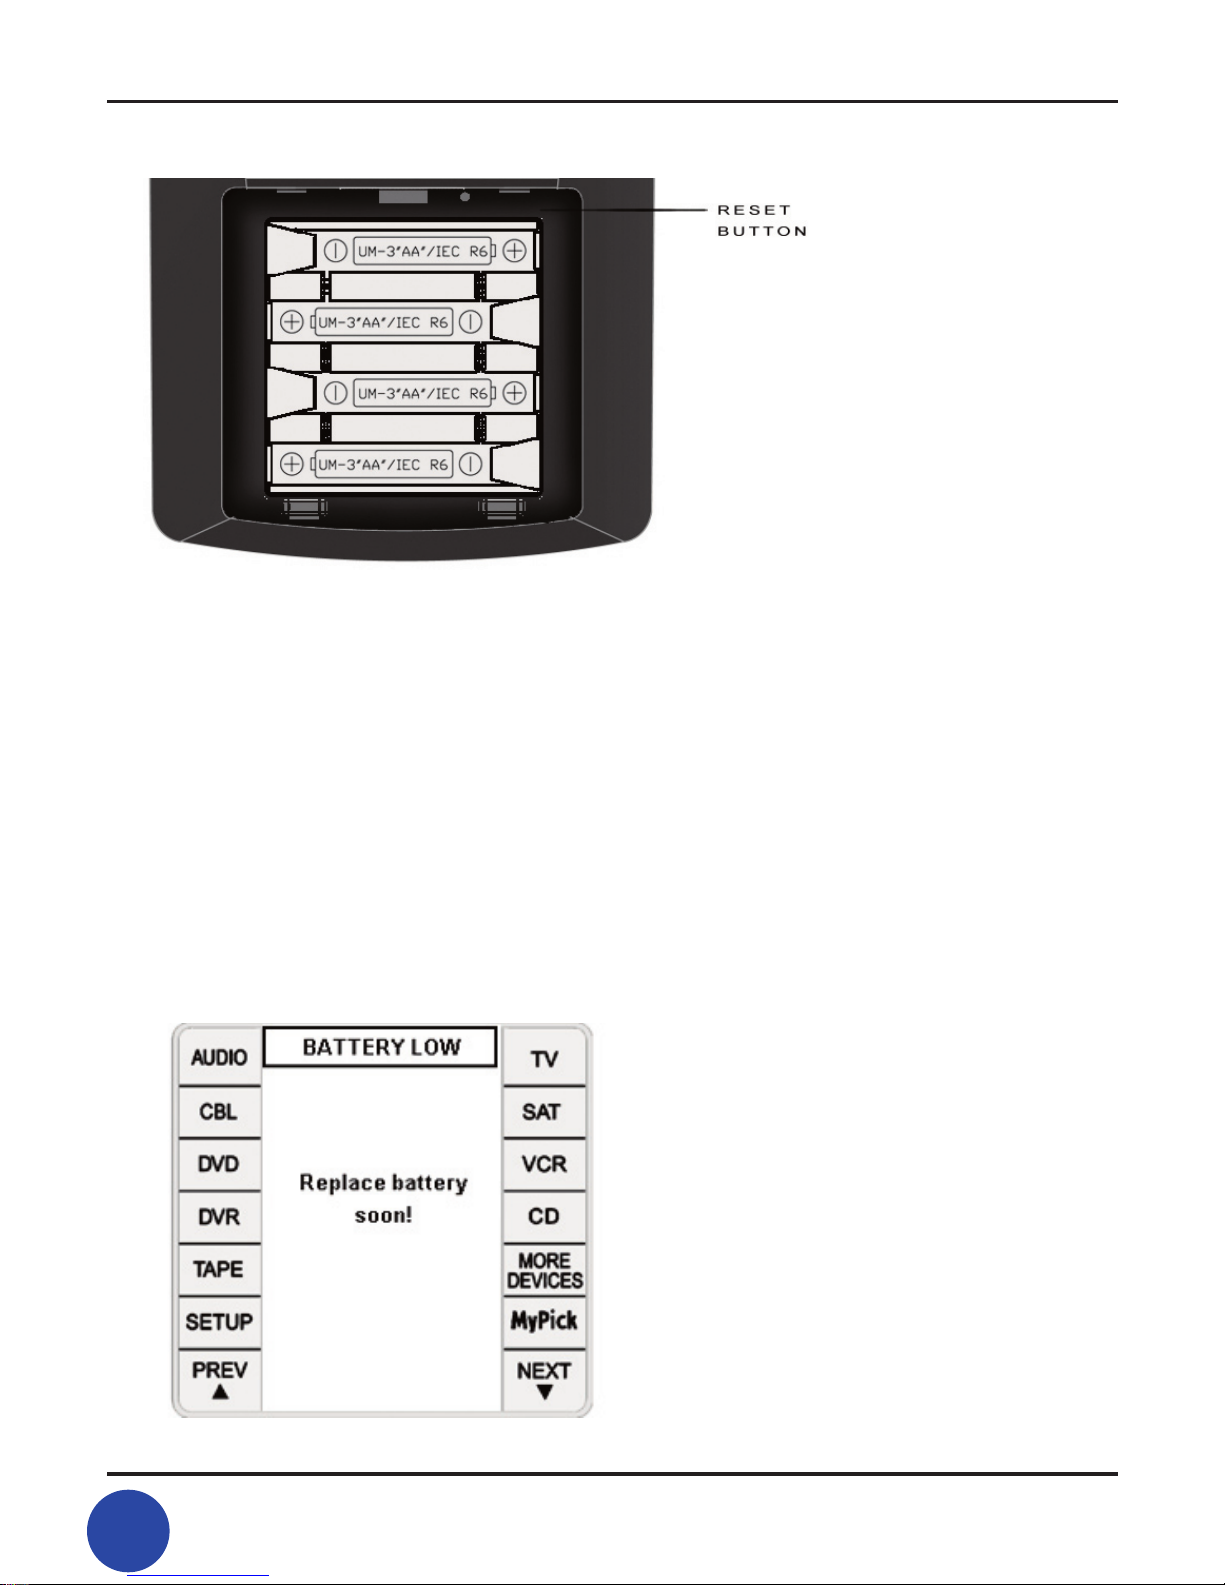
Carefully remove the battery cover on the back of the TSR/500 by pressing down
on the semicircle on the back with your thumb and sliding the cover toward you (or
the bottom of the unit). Install the 4 AAA batteries included with your remote. Please
observe the polarity markings ( insert battery compartment diagram). The at end
of each battery goes against each spring. Replace the battery cover. The unit will
beep and display the software version (Firmware and Database information). This in-
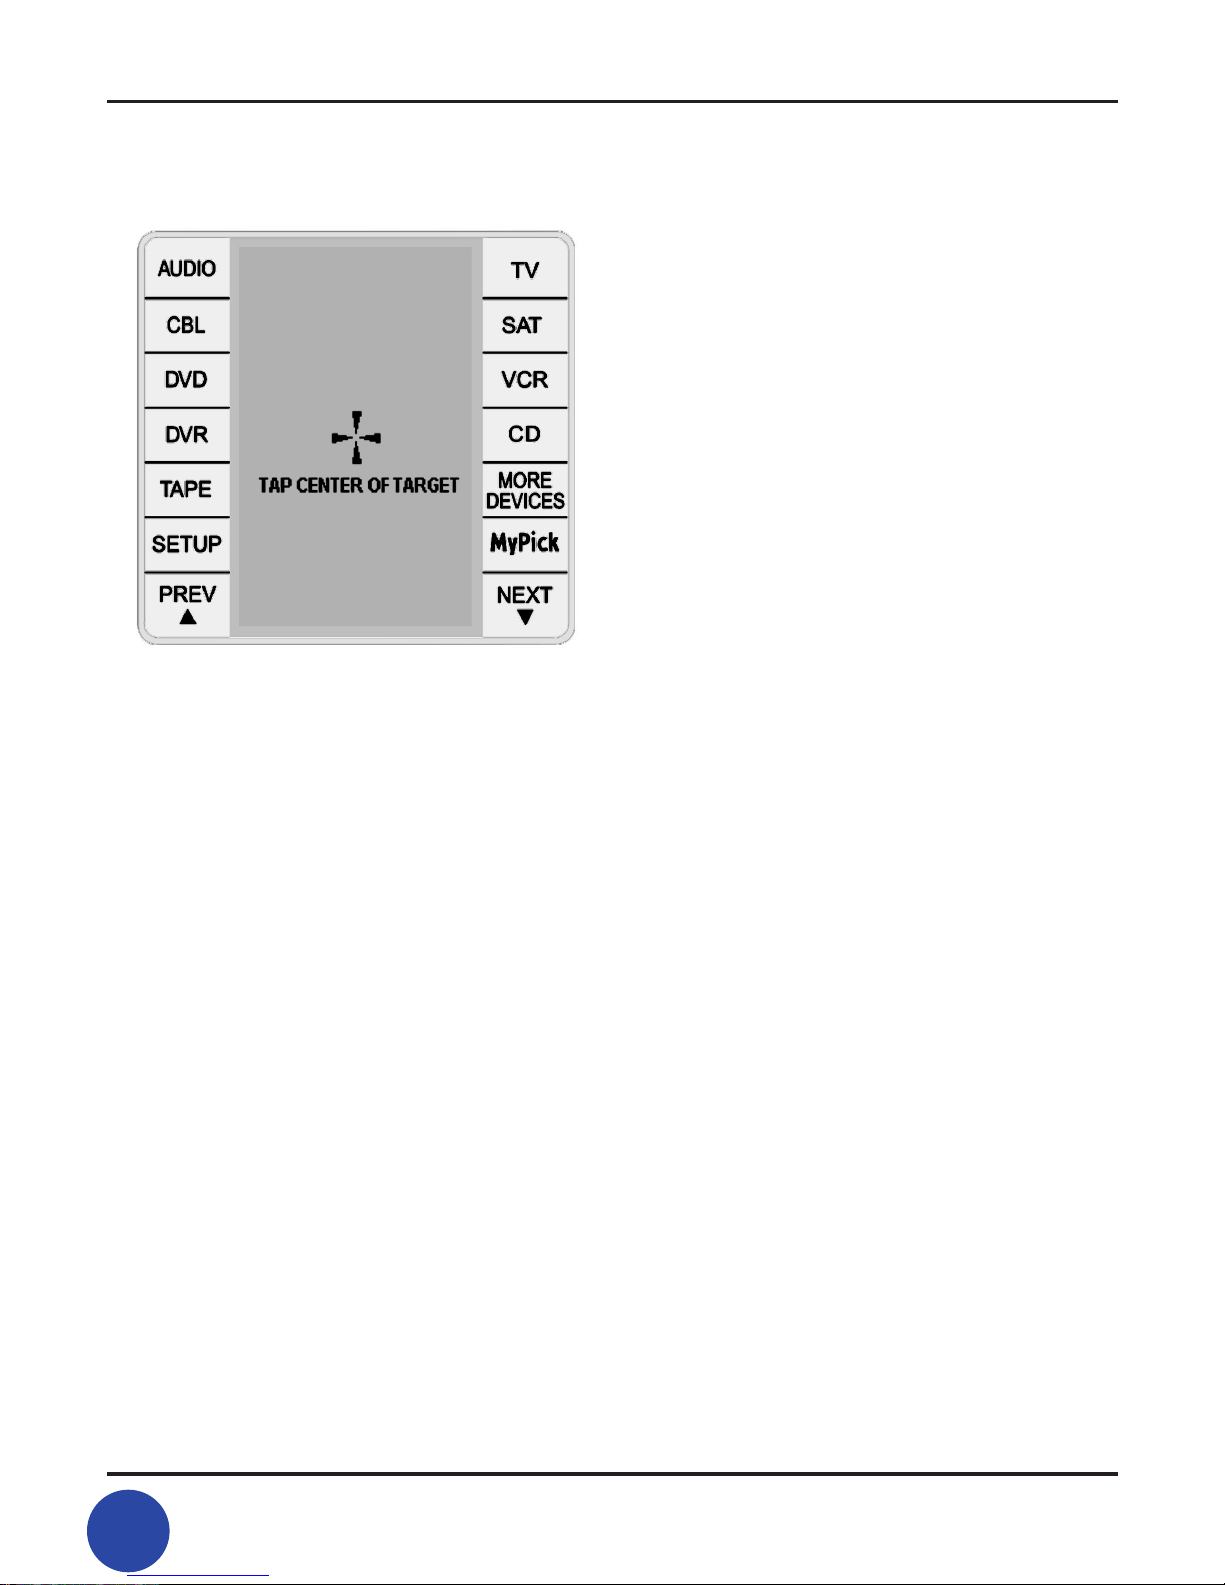
formation disappears quickly, often before you turn the remote over to look at it. It’s
not a problem to miss this information. TAP CENTER OF TARGET appears on the LCD
Screen. Stop here and read further down to get oriented. See Section 3 on Setup to
continue programming the unit.
Please take moment to familiarize yourself with the location and functions of the
controls in your remote. Note that some controls do more than one thing, such as
the LCD contrast +/- on the left side panel of the unit. This control only changes the
LCD contrast in the conguration screen mode. In all other modes, it doubles as a
screen page up and down.
The remote is activated any time you touch the LCD Screen or any of the Hard Keys
such as volume, channel when turned on it displays the previous active device. If
you were using the TV device before the remote turned off, then you will automati-
cally come back to that device when the unit is activated again.
The remote is controlled by two type of keys:
• Hard Keys: POWER, MENU, EXIT, MUTE, all POWER, VOL+, VOL-, CH+, CH- , Next,
Prev /LCD+ /- (Conguration Mode) and B/L .
• Soft Keys: They are the touch-sensitive areas on the LCD that include the device
columns on the left and right portions of the LCD and the active area of the LCD.
The active area of the LCD display displays context functions dependent on the
device selected. In the following example, TV has been selected so you can see a
numeric keypad for direct entry of channel data.
All POWER: When the [all POWER] Soft Key is pressed, the power codes for the all
pre-selected devices will be transmitted in sequence. The [all POWER] Hard Key
alternately turns the selected devices on or off if they are already on.

TSR-500 User Manual
6
7
TSR-500 User Manual
Some functions such as Next and Prev are duplicated on the touch-screen Soft
Keys and Hard Keys. As a result, you can use the remote for convenient one-hand
operation or on a coffee table.
Thus by pressing the Next or Prev Hard Keys on the touch-screen panel or by pressing
the Next or Prev Soft Keys on the lower left or lower right side of the touch screen,
the Next or Prev(ious) screen page will be selected.
See below:
• The page number changes from 1/6 to 2/6.
• Some devices such as TV, DVR and Audio may have 6 pages of functions.
• VCR has 7 pages, DVD and CD have 5 pages, Cable and SAT have 3 pages, Tape
has 2 pages.
Battery Installation
When you use TSR/500 for the rst time, you have to install the batteries.
TSR/500 requires 4 new AAA Alkaline batteries (Included, 4 x 1.5 V ) to function.
1. Remove the battery cover on the back of TSR/500 by pressing and sliding.
2. Place four new batteries in the direction indicated on the inside of the battery
compartment
3. Place the battery cover back on.

TSR-500 User Manual
67
TSR-500 User Manual
Note : If you are replacing old batteries, TSR/500 will retain its setup and program-
ming indenitely, even without batteries.
Note : After replacing the batteries, the Touch Pad Calibration Screen will appear.
To ensure accurate LCD touch entry, you will need to calibrate the touch pad.
Using a stylus or pencil, touch the center of all three targets. This enables the Touch
Pad set-up.
Note : Do not mix old and new batteries. If your TSR/500 is not to be used for a long
period of time, remove the old batteries to prevent leakage and internal damage.
Reset of Battery
Under normal circumstances, you will never have to reset the TSR/500. However, on
rare occasions, if the TSR/500’s touch screen freezes or if you notice unusual behav-
ior, you need to perform a reset to get the TSR/500 running again. All customized
commands and devices are retained.
1. Remove the battery cover on the back of TSR/500 by pressing and sliding.
2. Use an unfolded paperclip to carefully press the Reset button
3. Replace the battery cover back on.
4. After performing the reset, you will need to calibrate the touch pad to ensure
accurate LCD touch entry.

TSR-500 User Manual
8
9
TSR-500 User Manual
Low Battery Alert
TSR/500 provides an On-Screen Message when the remote is low on battery
power.
When the remote is low on battery power, The LCD will provide an on-screen
message for around 2 seconds when you turn on the remote by pressing any
hard button or soft keys. Although there is a message on-screen, the remote
can still be used in the general operation mode. It can be used for several
hours although there may be some some malfunctioning of the programming
modes such as programming code, learn code, label etc.
When the on-screen message “ Battery Low” appears, you need to replace
the new AAA Alkaline batteries.

TSR-500 User Manual
89
TSR-500 User Manual
3. Setup
1) Using a stylus or the tip of a pencil, press in the center of TAP CENTER OF
TARGET in the upper left corner of the LCD display.
2) Repeat the procedure in the lower left corner.
3) Repeat this procedure a third time in the center of the LCD
display. The LCD will go blank, but you now have access to

TSR-500 User Manual
10
11
TSR-500 User Manual
set up the controls.
4) Press the [SETUP] Soft Key on left side of LCD touch panel.
This puts your remote in SETUP mode.
Note: In SETUP Mode, you can program the code,
learn the code, change the label, set up the MyPick,
set up the Key mirror and change the conguration.
5) next, touch the [CONFIGURATION] Soft Key, which gives
you six conguration modes. This mode lets you
change preferences such as LCD off time, key tones on/off,
all POWER setup and Default setting (see diagram below)

TSR-500 User Manual
10 11
TSR-500 User Manual
3.1 Touch Pad Calibration
To ensure accurate LCD touch entry, you will need to calibrate
the touch pad.
1) Press the [TOUCHPAD SETUP] Soft Key
to enter Touch pad setup mode.
2) Using a stylus or pencil, touch the center of all three targets
as shown previously. This enables the Touch Pad set-up.

TSR-500 User Manual
12
13
TSR-500 User Manual
3-2. Changing LCD off time
The LCD remains on for a time period selcted by the user
(5 seconds to 180 seconds). The power on default is 50 seconds
from last key press.
1) To change the 50-second default time to allow more
or less time before the LCD turns off, press the [50 SEC] key.
Note: You must be in SETUP Mode to perform this operation.

TSR-500 User Manual
12 13
TSR-500 User Manual
2) To increase LCD off time, press the + Soft Key.
3) To decrease LCD off time, press the – Soft Key.
Note: You may hold down the keys to move to your
preferred number of seconds quicker.
4) To return to [CONFIGURATION] mode,
press [EXIT] Soft Key
5) The previous [50 SEC] key will now display
the number of seconds you selected

TSR-500 User Manual
14
15
TSR-500 User Manual
3.3 Key Actuation Tones
The default setting of “Key Tone” is [ON].
The touch tone sound is emitted with each key actuation.
(In other words, the unit beeps each time you press a Hard
or Soft Key.)
1) Press the touch-tone [ON] Soft Key to set it to “OFF”
(non-beeping).
2) Press the touch-tone [OFF] Soft Key to turn it [ON] again
(beeping).
3.4 All Power Setup
To access this function, you need to be in Setup Mode and have
selected the[all POWER] Soft Key.
Select all of the devices you wish to be controlled by
[all POWER] Soft Key and then the dot marks will be displayed
next to each device selected . If you select the wrong device,
just press the device Soft Key once more and the device dot mark
will be gone. When the [all POWER] Soft Key is pressed,
the power codes for the all pre-selected devices will be transmitted

TSR-500 User Manual
14 15
TSR-500 User Manual
Note: all POWER will only function if your remote is programmed
See PROGRAM CODE in the next section. Press SETUP to return
to Conguration Mode.
The diagram shows AUDIO, CBL, TV, AND AUX 1,
AUX 3 AND AUX 6 selected for all Power.
3-5. Default Setting
This setting returns the remote to its intial state before user programing.
1) To delete the learned data for a specic device
. Press the [LEARNING-DEVICE] Soft Key.
. Select the Device you wish to erase the learned data
Caution: If you press [CONFIRM], You will lose all learned data for the
selected device.
2) To delete all learned data for all devices:
. Press the [LEARNING-ALL] Soft Key.

TSR-500 User Manual
16
17
TSR-500 User Manual
Caution: If you press [CONFIRM], you will lose all learned data for all devices.
3) To erase all setup data including the pre-program,
MyPick and learning data:
Press the [SYSTEM] Soft Key.
Caution: If you press [CONFIRM] You will lose all programmed
data including the pre-program, MyPick and Learning Data.

TSR-500 User Manual
16 17
TSR-500 User Manual
4. Programming Your Devices
Here is the preferred method for programming your
audio/video components:
1) Turn on your device to be controlled.
(for example: your Stereo or Surround Amp [AUDIO]).
2) Press the [SETUP] Soft Key and then touch the
[PROGRAM CODE] Soft Key.
3) Next select any Device you wish to program
(For example: [AUDIO] Soft Key).

TSR-500 User Manual
18
19
TSR-500 User Manual
4) You will see the screen on the right. Select the rst letter
of your device brand name. [GHI] Soft Key for Harman Kardon)
You will see a list of manufactures brand names. Select
HARMAN KARDON
Note: By pressing [NEXT/PREV] Soft Key
on the touch panel and/or on the side,
you can search the additional brand names.

TSR-500 User Manual
18 19
TSR-500 User Manual
5) Press the [SELECT] Soft Key until your device
turns off and then press [VERIFY] Soft Key.
Your selected device will turn on again.
6. You will see a second page which allows you
to test for compatibility; in this case, it is the [VOL-],
[MUTE] and [VOL+] Soft Keys.
If your device works properly, press [SAVE]
to store the programming code.
If your device doesn’t work properly,
press [BACK] to use the next code
and repeat step 5 to step 6 until all Soft Keys
work properly.
7) When the [SAVE] Soft Key pressed,
the remote will save the settings and
return to normal operation mode
(for example, AUDIO operation mode).
If you nd that you have saved the wrong code,
repeat steps 1 – 7 above. You will start at the next
available code for that device.

TSR-500 User Manual
20
21
TSR-500 User Manual
4-1. To program the 2nd device (AUX1 – AUX 6 )
In order to program the 2nd device,
touch one of the [AUX 1] to [AUX 6] Soft Keys
(for example, AUX 1).
To assign the 2nd device on [AUX 1],
touch one of the primary device’s Soft Key
(for example, TV).
To program the 2nd TV on AUX1,
repeat the above steps 4 to 7 again.
In order to reassign the other device on AUX1
(now AUX 1 is assigned for the 2nd TV ),
touch [AUX 1] Soft Key (now labeled as TV) and
select the other device you wish to assign.
Table of contents
Languages:
Other Pogo Remote Control manuals